Letos YC0004 User manual

CAR ROOF TENT
(MODEL#: YC0004)
USER MANUAL

CONTENTS
1
BRIEF INSTRUCTION
1.Characteristics and application
2.Material & Specification
3.Main parts
HOW TO USE
1.Attached parts and tools
2.Installation diagram
3.Installation steps
4.Operation & Maintenance
5.How to operate the ladder
6.Attention

Car Roof Tent
1)Main material :Frame: Aluminium
Ladder: Aluminium
Tent: waterproof cloth
2)Closed size:212(L)x132(W)x24(H)cm
Open size:212(L)x132(W)x123(H)cm
2 3
1)This car roof tent is a tent installed on the car roof which is very easy
to open and close. You can enjoy your outdoor camping life in bad
environment such as muddy and bumpy ground ,the rainy day and so on.
2)Modular and lightweight design to convenient operation and
installation.
3)The load bearing of the bedframe is not more than 200KG, the
telescopic ladder not more than 150KG, and the tent suitable for different
SUV models.
Thanks for buying our tent, please read below instruction carefully before
installation.
123cm
202cm
212cm
70cm 132cm
BRIEF INSTRUCTION
3.Main parts
1.Characteristics and application
2.Material & Specification
Support bar
Guard rail
Bedframe

5
4
Note: below 3 types of roof rack recommended
套筒扳手
1)The installation diagram for the SUV with original roof rack, and the
distance between the rack and the car top is bigger than 3cm. A: For the car with small rack , fixed on
the rack.
B: For the car with groove on the roof ,
fixed on the groove.
C: Others ,fixed on the door frame.
>3cm
1.A ttached parts and tools
U-shaped fixing plate (4pcs)M8 self-locking nut
(10pcs)
Insert with spring ball
(4pcs)
M8x12 Bolt, hexagon
socket (4pcs)
30x30 Plastic cap
(4pcs)
Hexagon bar wrench
(Allen Key) 6mm (1pc)
Ratchet wrench 13mm(1pc)
M8x30 Bolt, hexagon head
(8pcs)
M8x50 Bolt, hexagon head
(8pcs)
Plain washer
(8pcs)
Spring washer
(8pcs)
Plain washer
(8pcs)
Spring washer
(8pcs)
Spring washer
(4pcs)
2.Installation diag ram
Roof rack
U-shaped fixing
plate
U-shaped fixing
plate
(Bottom view)
(Bottom view)
Bottom connec-
ting tube
Bedframe
Bedframe
Car Roof Rack Bottom connec-
ting tube
HOW TO USE 2)The installation diagram for the SUV other than the above.
Please be noted that you need to get a set of suitable roof rack and install it
on the car roof before install the tent.
Fillet (4pcs)

67
Unfolding method:
4.Operation & Maintenance
1)Take off the cover.
2)According to the direction
and size of the roof rack,
loosen the screws and adjust
the direction and distance of
the two connecting-tubes,
tighten the screws, then carry
the tent onto the car roof.
3)Adjust the tent to appropriate
position on the car roof. (Make
sure the trunk door can be
opened.)
5) The bolts pass through the hole of the U-shaped fixing plate, flat
washer then spring washer in proper order, then tighten the M8
self-locking nut using a ratchet wrench.
Please be noted total 4 pcs U-shaped fixing plates shall be fixed on 4
corners respectively.
M8 Flat gasket
M8 Spring washer
M8 self-locking
nut
1)Please check the car if there
are original rack on its roof and
the distance between the rack
and the car roof is bigger than
3cm,otherwise , you need to
get a set of suitable roof rack
and install it first.
4) Slide the M8 x 50 bolts to
appropriate position from the
end of the connecting tube,
2pcs at each end.
Please be noted , when the
distance between roof rack
and car roof is less than 4cm ,
the short bolts M8x30 will be
used instead of the long bolts
M8x50.
6) Insert the plastic cap (30x30cm)
into the end of the connecting
tubes.
Insert the latch into the hole of the U-shaped connecting piece on both sides after the tent is
unfolded fully.
Adjust the length of the bandage and then hook on the wheel of the car.
Press the top tube of the telescopic ladder into the retainers at the front of the bedframee, Then
fasten the bandage together with the bedframe.
Hold the two bandages in the front of the tent, pull forward to unfold the tent.
Make sure nothing inside before folding, pull out the latches from the holes of the U-shaped
connecting piece ,then remove the bandage hook from wheel , hold the bandages and gently
loosen until the tent is folded fully.
Loosen the bandage, take off the ladder from the retainer .Step on the lowest crosspiece with
one foot, grasp the ladder with one hand, and press the left and right switches of the lowest
crosspiece to collapse the ladder.Place the collapsed ladder into trunk.
Cover the water proof cover after folded , hook it around the bedframe.
Adjust the ladder to a suitable height. When in use the ladder must be at an angle of 75 degrees
between the floor and ladder.
3)
2)
4)
5)
6)
7)
8)
9)
Ratchet
wrench
3.Installation steps
Folding method:

5. How to operate the ladder
10) Show in operation
89
Read all the instruction attached on the ladder before use it .
1)When open the ladder, step on the lowest crosspiece with one foot and lift-upwards to reach the
required height.
2)Always check whether the crosspiece is locked before using the ladder. When in use the ladder
must be at an angle of 75 degrees between the floor and ladder.
3)Step on the lowest crosspiece with one foot, grasp the ladder with one hand, and press the left
and right switches of the lowest crosspiece .
Do not put your hands on the crosspiece when pressing the contraction switches.
4) Hold the ladder firmly and pull downwards. The ladder will contract downwards automatically
pushing each joint into one another.
5) When contracting, do not put your hands on the crosspiece as this maybe injure your hands.
6) The design of the ladder only permit one person to use it and max loading is 150Kg.
Note:To reduce the height, please collapse the ladder first, and then extend it again to the height you want.
Maintenance:
Please dry in time after tent is wet.
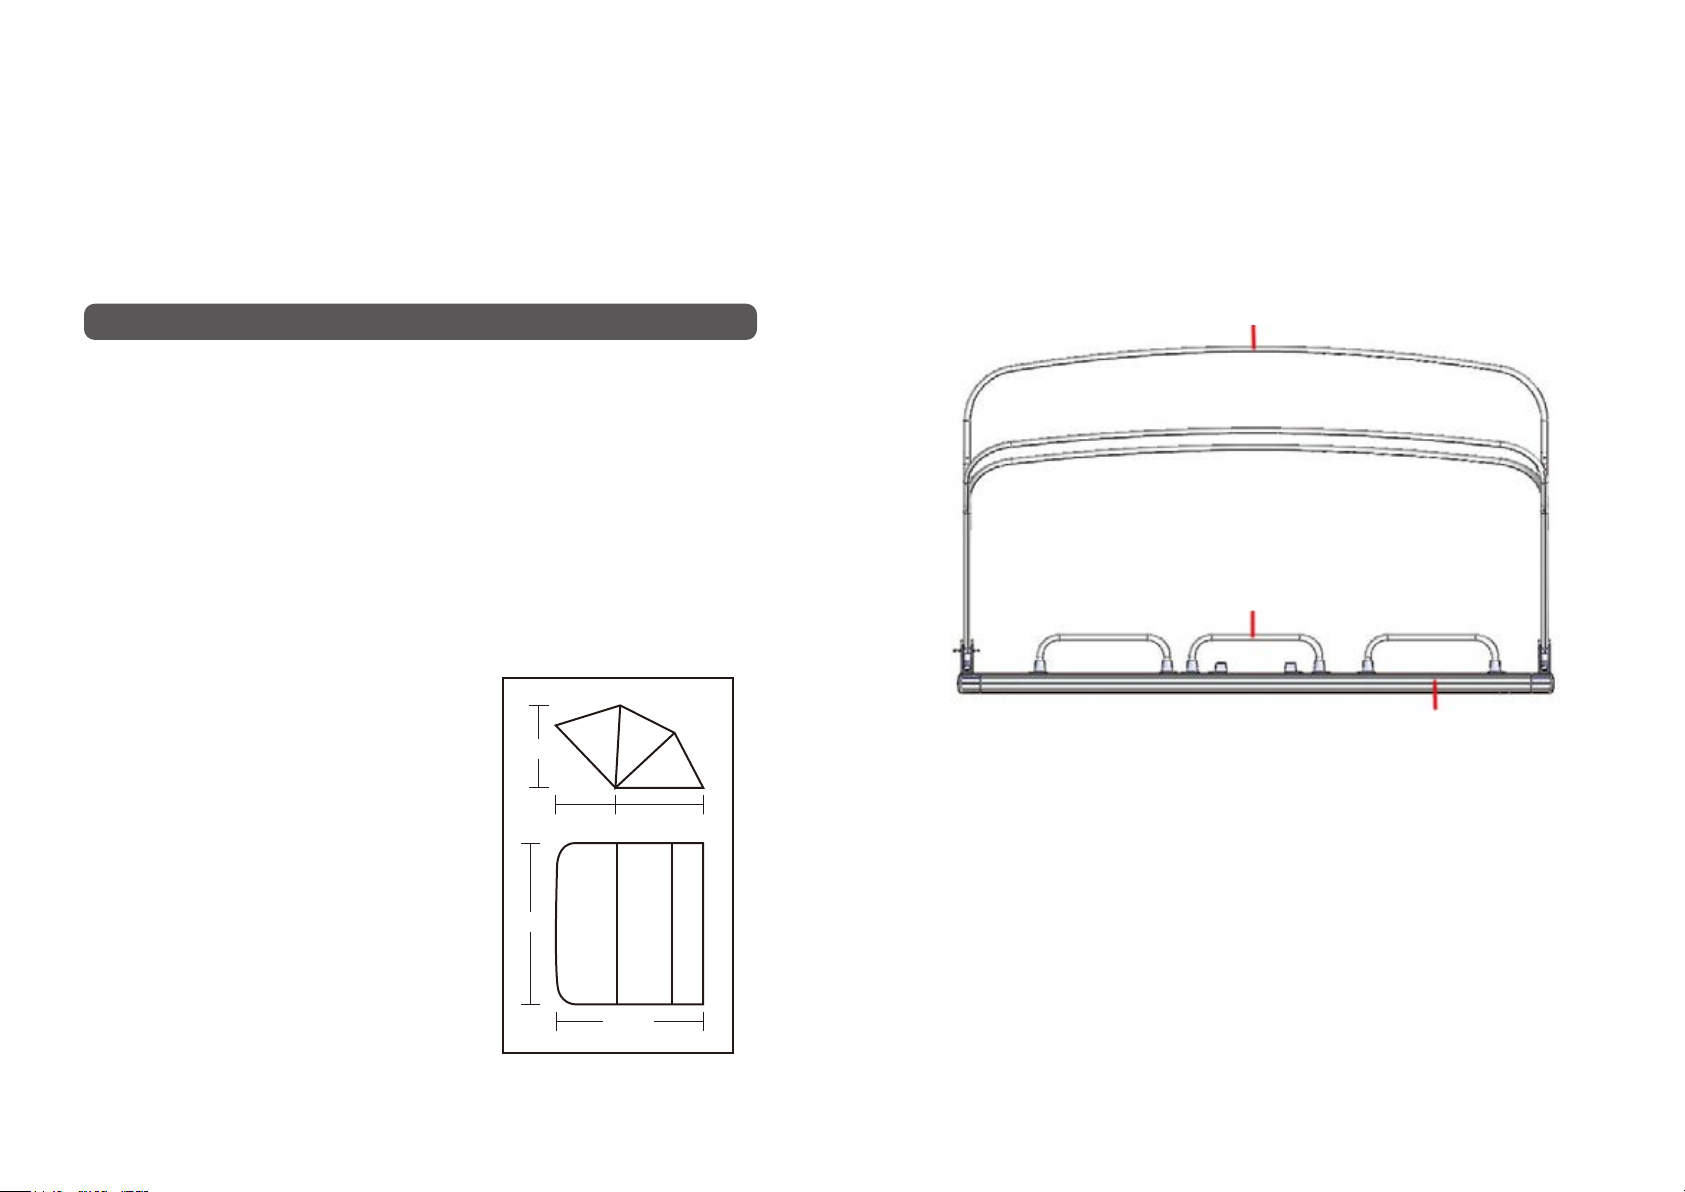
Overall view
Side view Rear view
6.Attention
Keep the tent windows open when folding.
Make sure nothing in the tent before folding, such as sleepy bag, pillow, etc.
Don’t put anything onto the top of the tent when the tent installed on car top whether in use or not.
Using wet cloth to clean the tent.
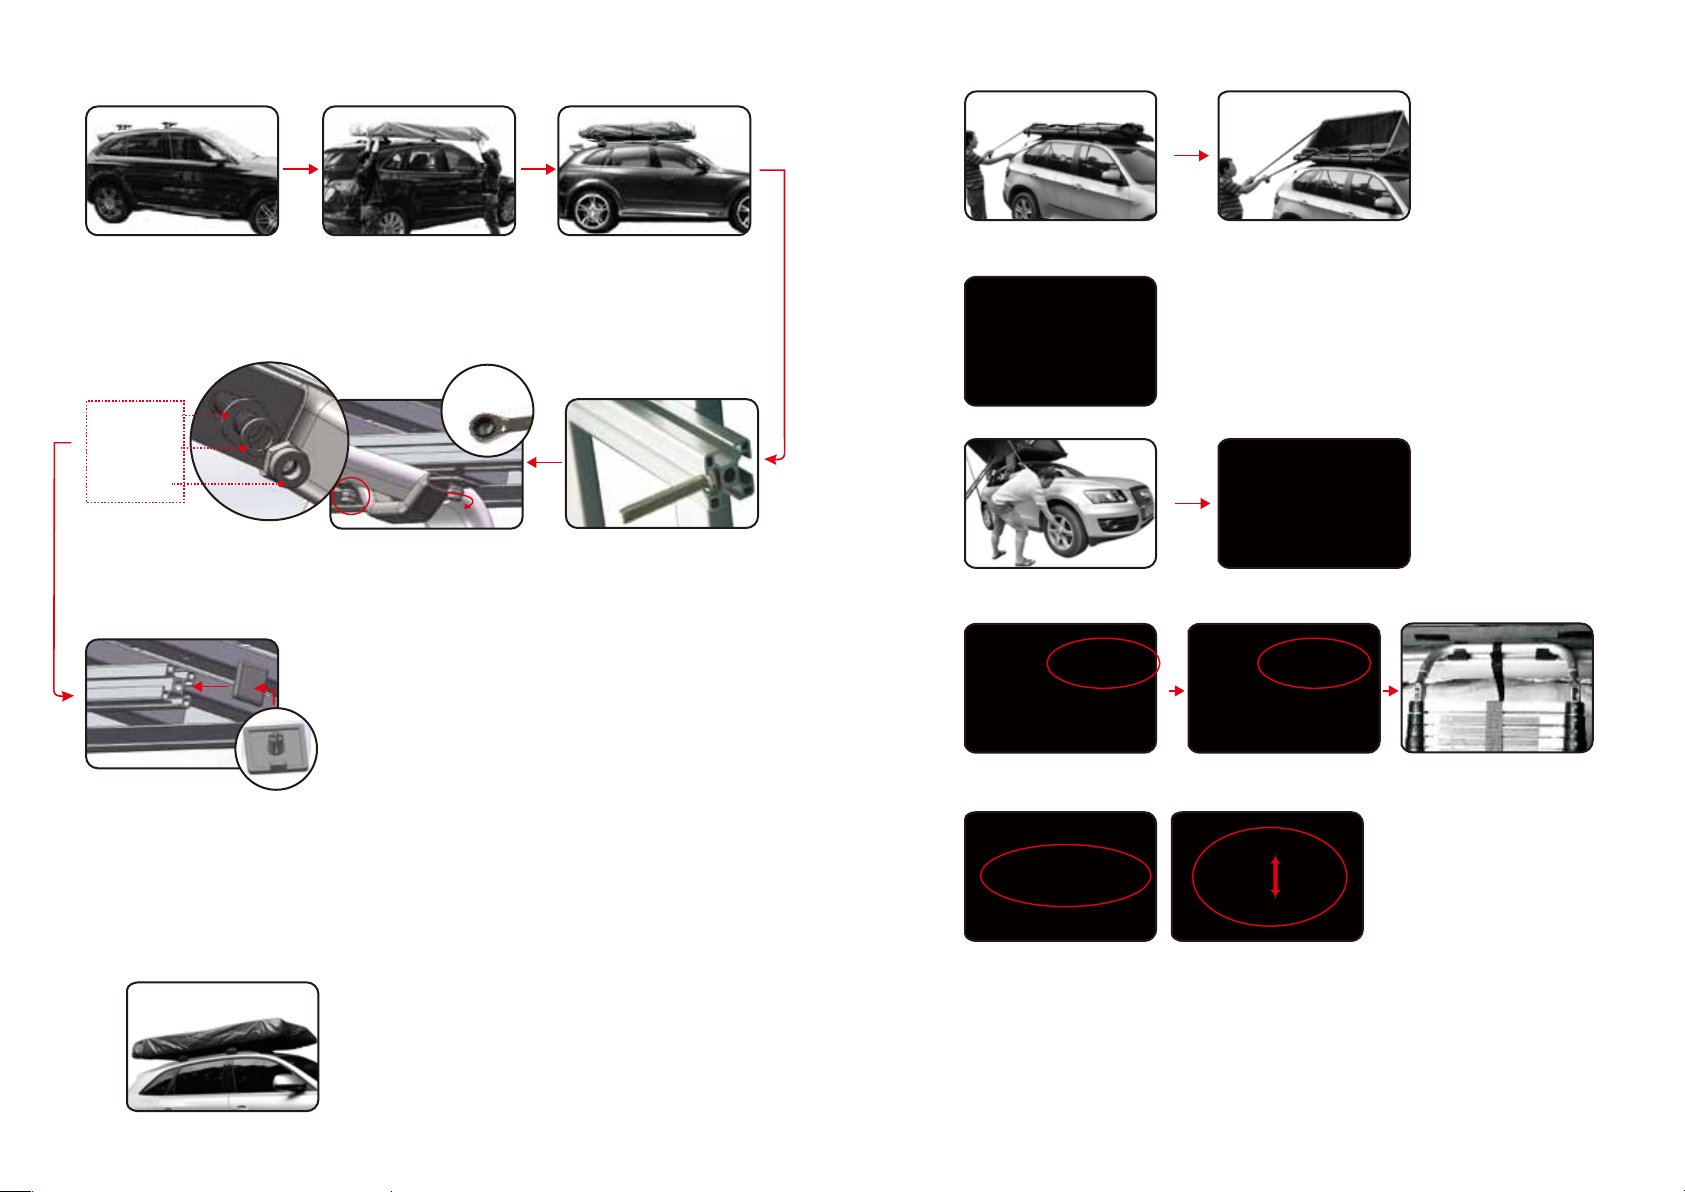
Please double check if the nuts that lock the bedframe together with roof rack are tightened after
installation and before driving.
Don’t do violent exercise inside the tent.
The water proof cover must be covered during driving.
Before using the ladder, make sure that all rounds are firm and the extended parts are locked fast.
Check all parts in good working condition before using. Do not use damaged ,worn-out,
chemically-etched ladder.
Set the ladder on firm ground. Do not let it stand on one leg. Do not set it on unsteady ground which
has gunge, ice or snow on it ,without any anti-skid device.
Before climbing the ladder, please make sure the crosspieces are locked, please don’t reach out your
body far away. Otherwise , you will lose your balance. Face the ladder while climbing up and down,
hold firmly the ladder with hands. Distribute your body weight on the middle of the rounds. Do not climb
on single side. Jumping from ladder is not allowed.
Do not pull out the top crosspiece unless the ladder is fully extended, or it may fall.
Do not press the any contract switch when in use to avoid injury to person.
Make sure the ladder is clean. Keep it from grease, dirt, snow, paint and chemicals.
Do not conduct any temporary maintenance on ladder to damage parts .
The bedframe and the ladder are all electric conductors ,keep away from any live parts.
The ladder must be at an angle of 75 degrees between the floor and ladder when in use.
To provide children with protection, do not leave the ladder stand alone without any attention.
When contracting, grasp the ladder rod by one hand , and press the left and right switches of the
lowest crosspieces. Do collapse the ladder down-top sequentially and slowly. Caution to avoid hand
injuries!
To extend the ladder, you need to pull out rounds bottom-up sequentially and lock each round
carefully.
Before extending the ladder, make sure the ground is flat. To reduce the height, please collapse the
ladder first, and then extend it again to the height you want.
You are not allowed to use the tent and ladder in strong wind weather.
The design of the ladder only permit one person to use it and max loading is 150Kg.
01)
02)
03)
04)
05)
06)
07)
08)
09)
10)
11)
12)
13)
14)
15)
16)
17)
18)
19)
20)
21)
Front view (window zipped) Front view (window unzipped and folded)
Table of contents