Installation and Use of your new Fixture
To setup and use your fixture for the first time, please follow these instructions:
Preparation
Open & Unpack your fixture.
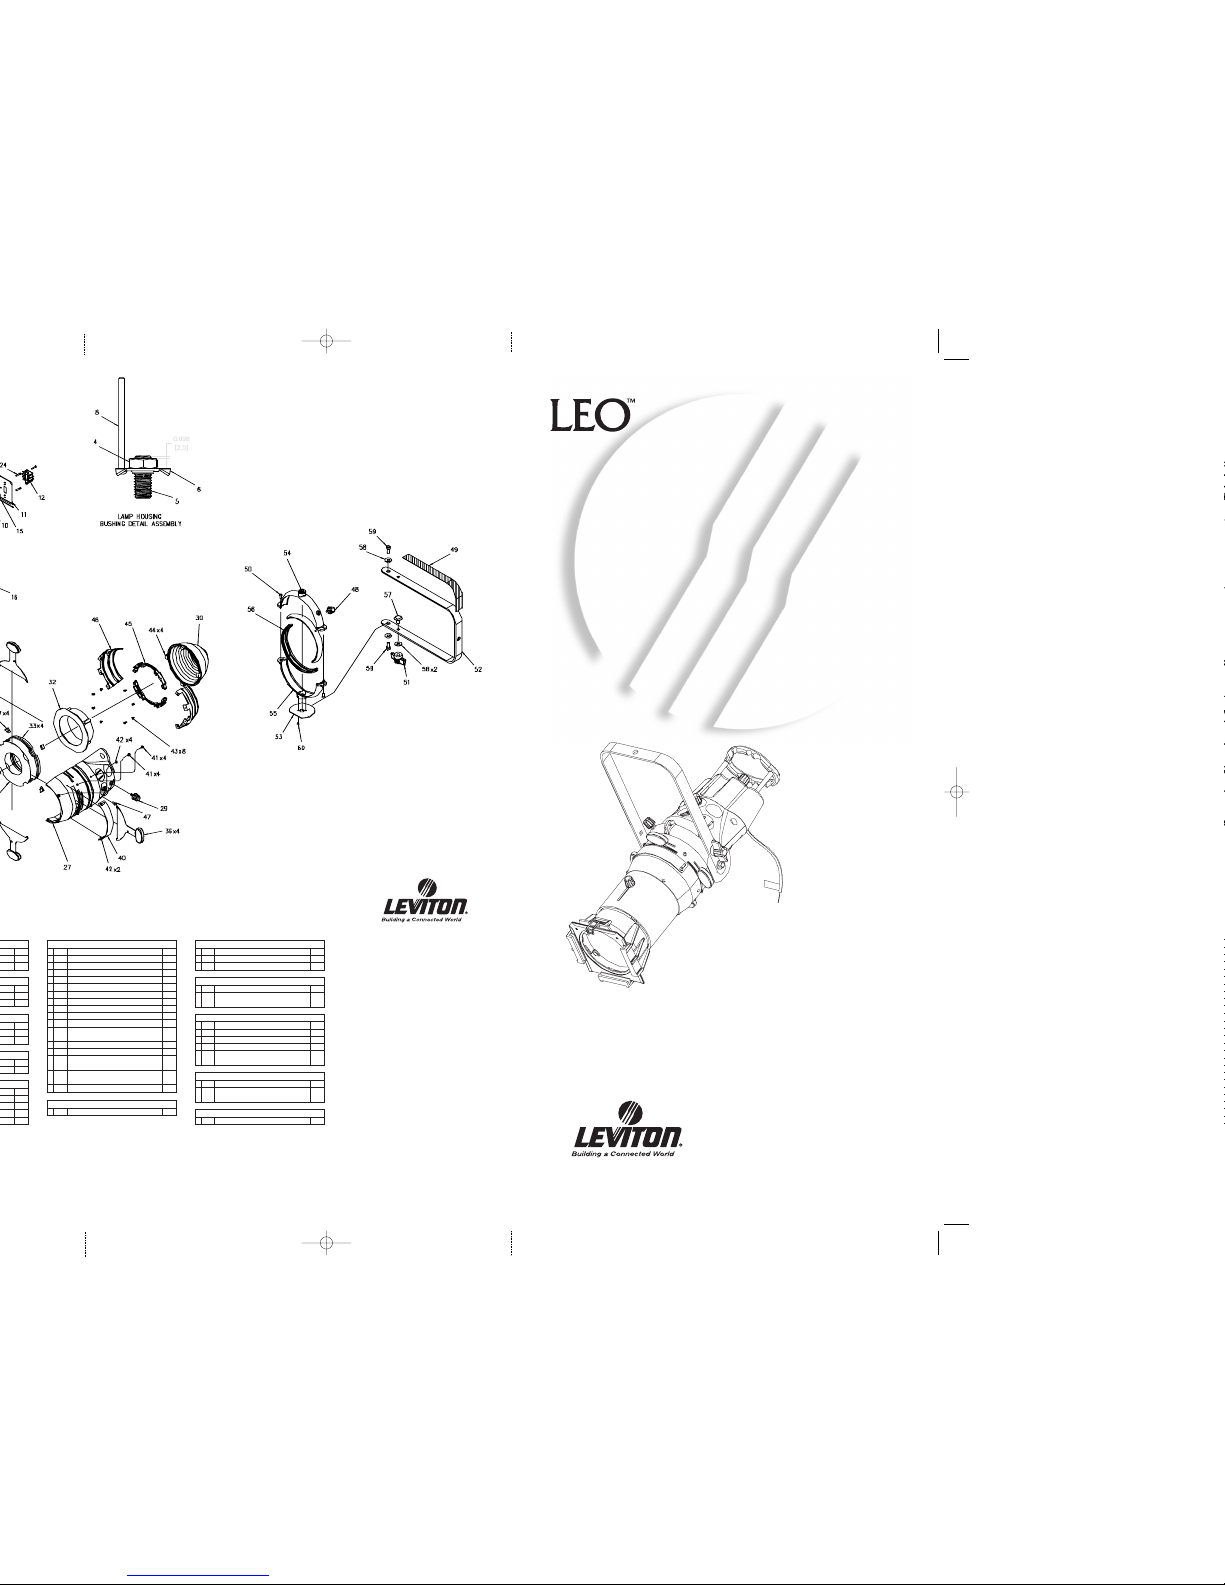
You should have the following items:
i. Fixture body, reflector housing
ii. Lens Tube (installed in reflector housing
iii. C-Clamp
iv. Gel Frame
v. Plug installed on fixture (if ordered as such)
Install C-Clamp.
Install the provided C-clamp into the fixture yoke by
installing the bolt through the hole in the yoke, and
screwing into the c-clamp. Firmly tighten the bolt to
the c-clamp with a wrench.
Lamp Installation/Replacement
To install and/or replace the lamp in your fixture, follow this procedure:
1. Disconnect fixture from power.
2. Loosen, but do not remove the Lamp Housing Removal Handle.
3. Separate the Lamp Housing from the fixture.
4. If replacing the lamp, remove the current lamp.
5. Install one of the new lamps from the chart below.
6. Reinstall Lamp Housing and tighten Lamp Housing Removal Handle.
Lamp Replacement Chart:
(Leviton recommends only replacement with one of the following lamps)
Lamp Facts:
Base: G9.5 Max. Voltage: 240V MOL: 101mm DIA: 18mm
Medium 2-Pin Max Wattage: 750W LCL: 60.5mm
Bench Focus of Fixture (Lamp Centering)
To Bench Focus your fixture:
1. Firmly attach the fixture to a pipe & boom or
other work surface at a comfortable height, at an
appropriate distance from the wall.
2. Point Fixture at a wall, and connect to power.
3. Examine the pattern produced on the wall. Using
the lamp adjustment screws at the rear of the fixture,
adjust the “centering” of the lamp until optimum
performance is achieved.
4. Examine the pattern produced on the wall. Using
the lamp adjustment screws at the rear of the fixture, adjust the on-axis (in/out)
position of the lamp until desired performance for both center-peak and flat field
adjustment is achieved.
5. Disconnect the fixture from power and allow to cool before removing.
Hang Fixture
1. Hang the fixture from the pipe, allow it to hang in it’s natural position, and
sufficiently tighten the C-Clamp.
2. Connect a Safety Cable (Leviton part #a00sc-000) to the fixture and a suitable anchor.
3. Focus the fixture.
Focus Fixture
To focus your fixture, please follow these steps:
1. Bench focus the fixture per previous instructions.
2. Hang the fixture per previous instructions.
3. Do not remove from the fixture but pull out all
(4) shutters completely so that they do not impede
the path of light.
4. Connect the fixture to it’s power source. Ensure
that if a dimmer is the power source that it is
turned on.
5. Aim the fixture at it’s desired target, usually chest height of a person standing at
the location you want to light.
6. Loosen the Lens Position knobs on the top of the lens barrel so that the barrel can
be moved in and out freely. Set the position of the lens barrel so that the desired focus
is achieved. Usually, you want to move the lens barrel until a hard edge is seen, and
then pull the barrel slightly back or forward to soften the edge. When soft focusing a
fixture, generally more of a “peak” lamp focus is desired.
7. Rotate the lens barrel and adjust the shutter so that the desired framing of the
object, zone, scenery, etc. is completed.
8. Insert any color, diffusion, or other media into the media holders.
Beam Shaping
The LEO ellipsoidal spotlight has several features which allow you to shape the
beam to your needs. These features are best learned by experience and practice.
The available features are as follows:
•(4) Shutters, each in it’s own plane •360° Rotatable Lens Barrel •Beam Focus
•Accessory slot for gobo’s, gobo rotators, iris, and other accessories.
Color/Diffusion Media
The LEO ellipsoidal spotlight has (2) media slots in the front of the fixture which
can be used for color, diffusion, snoots, or other media and/or accessories. Please
remember that the spring clip should always be in the closed & locked position
when you are not inserting or removing media.
Lens Position Guide
Leviton’s patented lens system allows
you to achieve 15°, 19°, 26°, 36°, & 50°
field angles using different combina-
tions and positions of the same (4)
lenses. That means depending on the
lenses you have in your possession,
or those purchased as spares, you can
convert fixtures from one field angle
to the other in the field!
Of the four lenses, one is a large 5.2” diameter lens and can only be
located at position P6. Of the other (3), one has a Red mark, the other
a Blue mark, and the third is unmarked. This information can be used
to help you identify your lenses.
To access the lenses, remove the lens barrel from your fixture, then
remove the (4) screws allowing you to separate the two halves of the
lens barrel.
Please reference the position guide and chart to determine which
combination of lenses and their positions in the lens barrel are required
to achieve the differing field angle.
Maintenance
Reflector
The reflector in your fixture is made of a high quality glass and reflective
coating which should require little maintenance. However, from time-to-
time as dust accumulates in your fixture and other causes due to your
environment the reflector may become dirty and require cleaning to
restore proper light output.
To clean your reflector, remove the reflector from the fixture and wipe
clean with cotton, tissue, or a soft cloth moistened with isopropyl
alcohol, then, rinse with water.
Lenses
The lenses in your fixture are precision molded using the highest quality
low-expansion borosilicate glass. Since this spotlight is state-of-the-art,
quality lenses are necessary to withstand the high radiation energy
densities. NEVER use a lens that is chipped, cracked, scratched, or
tinted. Replacement lenses can be ordered as required.
To clean your lenses, remove the lenses from the fixture, and wipe clean
with cotton, tissue, or a soft cloth moistened with isopropyl alcohol,
then, rinse with water.
Accessories
Your Ellipsoidal fixture can accommodate many different accessories
after the gate in accessory area, accessed by sliding back the
“Gobo/Iris/Accessory Slot Cover”.
Accessory
C
ompartment
D
imensions: 4 3/4" wide, 1/2" depth, 3" dia.
G
ate.
Gobo Holder 3.70" Wide, Size “A” Gobo, 3" Diameter Pattern.
Field Required Lenses Lens Kit
Angle Part Numbers
15° (1) 5.2” dia. Lens at P6 LeLsp-Lens219
19° (1) Lens with NO MARK at P5 LeLsp-Lens218
26° (1) Lens with “BLUE” mark at P1 LeLsp-Lens217
(1) Lens with NO MARK at P5 LeLsp-Lens218
36° (1) Lens with “BLUE” mark at P1 LeLsp-Lens217
(1) Lens with NO MARK at P4 LeLsp-Lens218
50° (1) Lens with “RED” mark at P1 LeLsp-Lens216
(1) Lens with “BLUE” mark at P4 LeLsp-Lens217
Wattage Voltage Lamp Lumens Color ANSI Leviton
Life Temp. Designation
Part Number
575W 115V 300hrs 14,500 3200K GLC L0gLc-000
575W 115V 1500hrs 13,000 3050K GLA L0gLa-000
750W 115V 300hrs 19,000 3200K GLD L0gLd-000
750W 115V 1500hrs 17,400 3050K GLE L0gLe-000
600W 230V 250hrs 14,000 3200K GKV L0gkv-000
240V
600W 230V 1500hrs 11,000 3000K GKV/LL L0gkv-LL0
240V
CAUTION: DO NOT TOUCH THE GLASS OF THE NEW LAMP. ANY BODY OILS ON THE LAMP
WILL CAUSE “HOT SPOTS” ON THE LAMP AND CAUSE PREMATURE LAMP FAILURE
CAUTION: LAMP HOUSING AND OTHER FIXTURE COMPONENTS ARE HOT!!! WAIT FOR DEVICE
TO COOL AND WEAR PROTECTIVE CLOTHING PRIOR TO CONTACT WITH THE FIXTURE.
Inspect all of the components. If any of
them are damaged, please contact the
shipper to make claim with them.
If any of the above components are
missing, please contact our Customer
Service Department at 800.736.6682.
Leviton recommends bench focusing your
new fixture initially prior to fixture use and
periodically through the life of the fixture.
Bench focusing is the process by which
the lamp is centered in the reflector
assembly and adjustments are made as
to the light field distribution. Proper
bench focusing is necessary to achieve
optimum performance from your fixture.
“Focusing” a fixture is the process of
aiming and adjusting the fixture so that
it's intended purpose is met. This process
is highly subjective and desired results
will differ based on the individual designer.
As such, generalized steps for focusing
a fixture are given and specifics with
respect to beam quality, framing, etc. are
not discussed.
CAUTION: FOR STAGE OR STUDIO USE ONLY
Safety Cable - Leviton recommends
always using a safety cable when using
any lighting fixture. The safety cable
should loop through the fixture yoke and
be connected to a secure attachment at
the other end. Safety cables can be
purchased for your fixture from your
local theatrical supply or as Leviton part
#a00sc-000.