Levolor Natural Shades Remote Control User manual

Natural Shades
Remote Control Guide
Guía de persianas naturales
con control remoto

2 3
Remote Control Buttons
BACK
Battery
Compartment
Reset
Button
All
Favorite
Groupings
Groupings
Function Arrows,
Lower/Raise
FRONT
Button Key Symbol Function LED Light Color
All all Select all shading
groups at once
Groupings 1 ,2, 3,
4, 5, 6
Shading Groups Blue LED
Indicator Light
Favorite ♥Moves shade to preset
favorite position
Open Shade Up &
Window Uncovered
Close Shade Down &
Window Covered
Stop Stops Shade
Programming
Light
White LED
Indicator Light
Programming
Light
Remote Control Guide Remote Control Guide
Table of Contents
© 2020 LEVOLOR®, Inc.
Thank you for purchasing a LEVOLOR® motorized window
covering. This guide will help you set up and operate your
new remote control and help you understand all functions
and capabilities, allowing you to make the most of your new
window coverings.
Table of Contents
Remote Control Buttons ...................................................3
Explanation of Functions ........................................... 4 – 5
GROUPS ........................................................................4
FAVORITES ...................................................................4
Travel Limit / Stops ......................................................5
Manual Control Button .................................................5
Standard Battery Pack .................................................5
Satellite Battery Pack ...................................................5
Remote Reset Button ...................................................5
LEVOLOR App Overview ....................................................6
Getting Started ..................................................................7
Battery Placement .......................................................7
Tools Needed to Mount Remote Holder......................7
Mounting Instructions ..................................................7
Activating and Operating ..........................................8 – 10
Join a Window Covering to a GROUP ..........................8
Set a FAVORITE Position ..............................................8
Operating Window Coverings ......................................9
Remove a Window Covering from a GROUP .............10
Create a Duplicate or Second Remote ......................10
Additional Programming ..................................................11
Reset Window Covering Programming ......................11
Reset Travel Limits .......................................................11
Reset Remote .............................................................12
Battery Replacement ......................................................12
Troubleshooting ...............................................................13
Radio Frequency Compliance ........................................ 14
Warranty ............................................................................15

4 5
Explanation of Functions Explanation of Functions
ALL
1 2 3
4 5 6
ALL
1 2 3
4 5 6
GROUP Buttons
FAVORITES
Button
Front of
Shade
Manual
Control
Button
Remote Control Guide Remote Control Guide
NOTE: The FAVORITE position for a given window
covering is stored in the window covering itself. The
favorite position is always the same regardless of which
GROUP or GROUPS the window covering is assigned to
or which remote you use. If you set a FAVORITE with one
remote on one shade, and then overwrite it with another
FAVORITE position with a different remote, you will only
have the FAVORITE as set by the last remote. From now
on, any remotes programmed to that shade will trigger
the same FAVORITE position.
See page 8 "Set a FAVORITE position".
TRAVEL LIMIT/STOPS
The points when a window covering stops along its travels.
The window covering comes programmed to your ordered
dimensions from the factory, but if it does not travel as
expected, these limits can be adjusted by resetting the
window covering travel limits.
See page 11 for instructions on "RESETTING TRAVEL LIMITS".
MANUAL CONTROL BUTTON
A manual control button is located
on the motor side of the headrail.
This button can control the window
covering without the remote. This
button is also used to program your remote.
STANDARD BATTERY PACK
The standard power source provided with the LEVOLOR®
motorized operating system. The battery pack is a tube of
batteries that is connected to and is installed behind the
headrail to supply power to the window covering, allowing it
to link and function with the remote.
SATELLITE BATTERY PACK
An optional power source that allows the battery pack to be
mounted on the top of a headrail, next to molding or under the
sill. It is the best choice when the window covering is mounted
in a high window, restricting access to the battery pack.
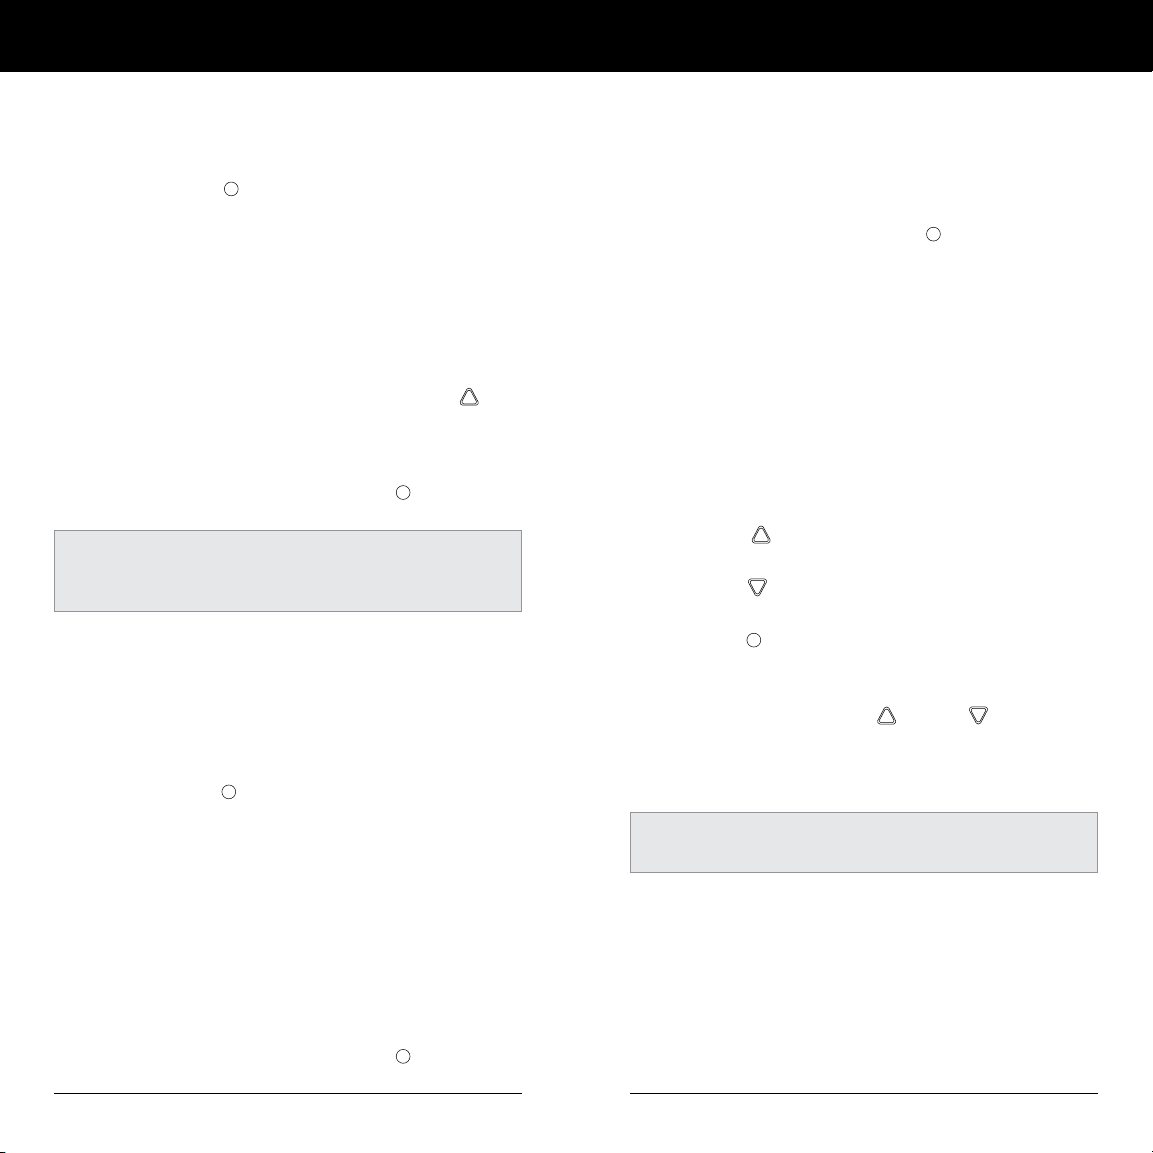
REMOTE RESET BUTTON
A small recessed button located under the battery
compartment cover on the back of the remote. This is
used when creating a duplicate remote and/or resetting
the remote.
Once your remote is programmed, you will be able to
operate and control the position and adjustment of
your new window coverings with a touch of a button.
By setting up GROUPS and FAVORITES you will be able to
perform all functions.
GROUPS
Joining a window covering to a GROUP is what
connects a window covering to an individual
remote and allows the remote to communi-
cate with the window covering, so the window
covering will follow the remote's commands.
A window covering will not operate with the
remote, unless it is assigned to a GROUP.
Each LEVOLOR® remote offers 6 GROUP
assignments, designated by buttons
numbered 1, 2, 3, 4, 5, and 6 on the remote.
A GROUP can consist of a single window covering, or be
comprised of multiple window coverings, assigned to that
particular GROUP button. Window coverings assigned to the
same GROUP, will operate at the same time, when functions
are selected on the remote. There is no limit to the number
of window coverings you can assign to a given GROUP.
If you want a window covering to operate independently of other
window coverings, it must be added to a GROUP of its own.
A window covering can be added to more than one GROUP on
the same remote (or separate remotes).
Once the window coverings have been joined to a GROUP, the
remote will operate your window covering.
See page 8 "JOIN A WINDOW COVERING TO A GROUP".
FAVORITES
Setting FAVORITES stores a preferred position
for each individual window covering, and recalls
stored position when the FAVORITES button
is selected. (FAVORITES button is designated
by the heart ♥ symbol.) Each window covering
can have ONLY ONE FAVORITE position. Upon
arrival, each of your window coverings will be
set to the default FAVORITE position, which is
half way down. You can re-program each shade
to your FAVORITE position.

6 7
LEVOLOR® App Overview
LEVOLOR® APP OVERVIEW
Unlock your shades' full potential; download the LEVOLOR
App for advanced controls and easy 3 Step Set-Up Guide.
Easily organize and control all of your motorized LEVOLOR
products by pairing your remote(s) to the LEVOLOR App.
The app’s advanced controls allow you to adjust your window
coverings, create favorite preset positions, and program your
shades to run automatically on a timed schedule.
Download the app to your mobile device from the Google
Play or Apple App Store. The LEVOLOR App is compatible
with Android (version 5.1 or newer) and Apple iOS (version
11.0 or newer).
The app is powered by Bluetooth connectivity, which allows
your iOS and Android devices to control your window coverings
wirelessly over short distances. Both your mobile device and
remote must be within range of your window covering(s) in
order to control them using the app and to create or edit a
preset schedule or Favorite.
NOTE: Your mobile device ONLY needs to be within range
of the remote and the window covering in order to create or
edit a schedule. The window covering will then automatically
run according to the programmed schedule regardless of
the location of your mobile device as long as the remote is
within range.
Remote Control Guide Remote Control Guide
Getting Started
BATTERY PLACEMENT
1. Remove the back cover, to expose the battery
compartment.
2. Use two new AAA Alkaline batteries (provided).
Slide a battery into each compartment being
sure to align correct positive and negative ends
and press into place.
3. Replace the back cover.
TOOLS NEEDED TO MOUNT REMOTE HOLDER
— Power drill — 3
⁄32" drill bit
— Phillips screwdriver — Pencil
— Drywall anchors, if mounted into drywall (not provided).
MOUNTING INSTRUCTIONS
1. Choose a location to mount the remote holder.
2. Orient the remote holder on the wall. Mark
screw holes.
3. If you are mounting the remote holder onto wood,
use a 3⁄32" drill bit to drill the screw holes.
4. Attach the remote holder to the wall using the
screw provided.
5. Snap screw cover over screw.
6. Gently push the remote into the remote holder
until it is snug.
NOTE: If you are mounting the Remote Holder onto
drywall, use drywall anchors.
Curved edge
should be
on top

8 9
Activating and Operating Activating and Operating
Remote Control Guide Remote Control Guide
JOIN A WINDOW COVERING TO A GROUP
NOTE: The LEVOLOR® remote will not operate a window
covering until the window covering has been added to a GROUP.
1. Press and hold STOP until the WHITE programming
light starts flashing, then release. This puts the remote
in program mode.
2. Press the desired GROUP number (1, 2, 3, 4, 5 or 6) on
the remote. The BLUE GROUP indicator light above
the GROUP button will flash to show it is selected.
3. With one hand press and continue to hold the manual
control button located on the window covering headrail.
4. While continuing to hold down the manual control
button, use your other hand to press and hold
OPEN on the remote until the window covering moves
slightly to indicate it has been joined to the GROUP.
5. Release both buttons.
6. To exit program mode press and hold STOP until
the lights stop flashing.
SET A FAVORITE POSITION
Each window covering has one FAVORITE position. Default
setting is half way down. Setting a new FAVORITE position
overwrites any previous setting.
1. Using the manual control button located on the
window covering headrail open or close the window
covering to the preferred FAVORITES position.
2. Press and hold STOP until the WHITE programming
light starts flashing, then release. This puts the remote
in program mode.
3. With one hand press and continue to hold the
manual control button located on the window
covering headrail.
4. While continuing to hold down the manual control
button, use your other hand to press and hold ♥
FAVORITE on the remote until the window covering
moves slightly to indicate it has set this window
covering position as your FAVORITE.
5. Release both buttons.
6. To exit program mode press and hold STOP until
the lights stop flashing.
OPERATING WINDOW COVERINGS
Once the window coverings have been joined to a GROUP
or multiple GROUPS, the remote is ready to operate the
window covering(s). Multiple window coverings can be
operated at the same time.
1. To wake up the remote press STOP. The BLUE
indicator light from the last GROUP(S) selected
will be highlighted and active.
2. Press ALL or GROUP 1, 2, 3, 4, 5 or 6 button(s) to
select specific window covering(s) to operate. The
selected GROUP(S) BLUE indicator light above
the number will light to show they are selected.
3. Multiple GROUP buttons may be selected at the
same time.
4. To deselect a GROUP, press the GROUP button again.
The BLUE indicator light above the GROUP button
will go out.
5. Press OPEN to open the selected window
covering(s).
6. Press CLOSE to close the selected window
covering(s).
7. Press STOP to stop window covering anywhere
along its travel path.
8. While the window covering is in motion, press the
opposite of its motion ( OPEN or CLOSE) to
reverse direction.
9. Press ♥ FAVORITE and window covering(s) will
move to your preset FAVORITE position.
NOTE: It is recommended that only similar window coverings
be included in a GROUP because of differences in product
features and operation.
NOTE: The tilt up and tilt down arrows do not apply to this
product category.

10 11
Activating and Operating Additional Programming
Remote Control Guide Remote Control Guide
RESET WINDOW COVERING PROGRAMMING
This reset erases all programming stored in the window
covering, including GROUP assignments, preventing any
remote from operating the window covering. Reset window
covering program is used during installation to correct
GROUP assignments.
NOTE: This reset does not affect travel limits.
1. Press and hold the manual control button, located
on the window covering headrail. Continue to hold
the manual control button until the window covering
moves slightly up and down TWO times. This indicates
the window covering programming has been reset.
2. Release the manual control button.
3. Refer to “Join a window covering to a GROUP” on
page 8, to program the window covering to a group.
RESET TRAVEL LIMITS
1. Press and hold the manual control button, located
on the window covering headrail, until the window
covering moves slightly up and down ONE time.
This indicates that the limits have been reset.
2. Release the manual control button.
3. The window covering will now move on its own
to set both the top and bottom motor limits.
Once this process is done, the window covering
will move briefly in both directions.
If steps 1-3 do not resolve the issue, please follow the additional
steps below.
TO RESET THE BOTTOM LIMIT
1. Press the open button on the remote to run the
shade to the current top limit.
2. With one hand, press and hold the manual control
button on the window covering headrail. Use
your other hand to press the close button on
the remote.
3. Shade jogs and motor LED turns red to indicate
shade is in limit adjust mode. This mode will time
out and revert to old limits after ~30s of no action.
REMOVE A WINDOW COVERING FROM A GROUP
1. Press and hold STOP until the WHITE programming
light starts flashing, then release. This puts the remote
in program mode.
2. Press the desired GROUP number (1, 2, 3, 4, 5 or 6)
on the remote. The BLUE GROUP indicator light above
the GROUP number will flash to show it is selected.
3. With one hand press and continue to hold the
manual control button located on the window
covering headrail.
4. While continuing to hold down the manual control
button, press and hold CLOSE on the remote
until the window covering moves slightly to indicate
it has been removed from the GROUP.
5. Release both buttons.
6. To exit program mode press and hold STOP until
the lights stop flashing.
CREATING A DUPLICATE REMOTE
1. Remove the back cover from the new remote..
2. Using a paper clip, press and hold the recessed reset
button until the BLUE GROUP indicator lights double
flash followed by a triple flash, making a total of five
flashes. Note there will be a delay between the double
flash and the triple flash. Replace the back cover.
3. Press and hold STOP on the original remote until
the WHITE programming light starts flashing, then
release. This puts the remote in program mode.
4. With one hand press and hold ALL on the new remote.
5. While continuing to hold down the ALL button press
and release STOP on the original remote.
6. All of the BLUE GROUP indicator lights on the duplicate
remote will flash twice to indicate all of the information
from the original remote has been copied.
7. To exit program mode press and hold STOP until the
llights stop flashing.
NOTE: This duplicate remote will now operate the same set
of window coverings and GROUPS as the original remote

12 13
Battery Replacement Troubleshooting
Remote Control Guide Remote Control Guide
Troubleshooting
Problem Window covering does not operate with the
remote control.
Solution Make sure the Indicator light on the remote
control comes on when you try to operate
the window shading. If the Indicator light
does not come on, replace the batteries in
your remote control.
NOTE: The window covering can still operate
using the manual control button on the
headrail. If the window covering doesn’t
operate with the manual control button,
make sure it has power. If the window
covering does not have power replace the
batteries on the standard battery pack or
the satellite battery pack.
Problem The window covering does not open or
close fully or has an intermediate stop
that is no longer wanted.
Solution Make sure the operation of the window
covering is not obstructed. Reset the
shading as described in “RESET WINDOW
COVERING PROGRAMMING” on page 11.
4. Use the open and close buttons to move shade to
desired limit position.
5. Hold stop button for ~6 seconds to put remote in
programming mode.
6. Hold manual control button and press close button
on remote while still in programming mode to set
new limit.
7. Red LED turns off and shade jogs to confirm limit set.
To set the top travel limit, repeat steps 1-7 using the open
button instead of close.
RESET REMOTE
Removes any connections previously programmed between
the remote and any window coverings.
• Using a paper clip, BRIEFLY press the remote
reset button.
Previously paired window covering(s) will no longer operate
with this remote.
BATTERY REPLACEMENT
Replacing the batteries in the remote will not cause the loss
of any window covering programming, including GROUPS and
FAVORITE. The remote uses two Alkaline AAA batteries.
To replace the batteries in the remote:
1. Slide open back of battery compartment.
2. Gently lift and remove the old batteries. To remove
batteries use a small screwdriver or fingernail to lift
battery and remove from slot.
3. Insert new batteries, be sure to align correct positive
and negative ends and press into place.
4. Align and replace the back cover onto the backside
of the remote.
NOTE: When the window covering starts moving slowly,
the batteries in the window covering battery pack may
need to be replaced. More than likely the batteries in the
remote are just fine.

14 15
Compliance / Warranty Compliance / Warranty
Remote Control Guide Remote Control Guide
U.S. RADIO FREQUENCY FCC
COMPLIANCE STATEMENT
U.S. Radio Frequency FCC Compliance
This device complies with Part 15 of the FCC Rules. Operation
is subject to the following two conditions:
(1) This device may not cause harmful interference, and
(2) This device must accept any interference received,
including interference that may cause undesired
operation.
This equipment has been tested and found to comply with
the limits for a Class B digital device, pursuant to Part 15
of the FCC Rules. These limits are designed to provide
reasonable protection against harmful interference in a
residential installation. This equipment generates uses and
can radiate radio frequency energy and, if not installed and
used in accordance with the instructions, may cause harmful
interference to radio communications. However, there is
no guarantee that interference will not occur in a particular
installation. If this equipment does cause harmful interference
to radio or television reception, which can be determined by
turning the equipment off and on, the user is encouraged to
try to correct the interference by one or more of the
following measures:
• Reorient or relocate the receiving antenna.
• Increase the separation between the equipment
and receiver.
• Connect the equipment into an outlet on a circuit
different from that to which the receiver is connected.
• Consult the dealer or an experienced radio/TV
technician for help.
Any changes or modifications not expressly approved by
the party responsible for compliance could void the user’s
authority to operate the equipment.
WARRANTY
For warranty information visit LEVOLOR.com or contact
customer service at 1-800-538-6567

Guía de persianas naturales
con control remoto

18 19
BOTONES DEL CONTROL REMOTO
Compartimiento
para baterías
Botón de
reinicio
Todas
Favoritos
Grupos
Grupos
Flechas de función,
bajar/subir
PARTE
FRONTAL
PARTE
POSTERIOR
Botón Símbolo Función Color de la
luz LED
Todas todas
Selecciona todos los
grupos de persianas de
una sola vez
Grupos 1 ,2, 3, 4,
5, 6
Grupos de persianas Luz indicadora
LED de color azul
Favoritos ♥
Mueve la persiana a
la posición favorita
preconfigurada
Abrir Persiana hacia arriba y
ventana descubierta
Cerrar Persiana abajo y
cubierta de ventana
Detener Detiene la persiana
Luz de
programación
Luz indicadora
LED de color
blanco
Luz de
programación
Guía del control remoto Guía del control remoto
ÍNDICE
Gracias por comprar la decoración de ventanas motorizada
de LEVOLOR®. Esta guía lo ayudará a configurar y operar el
nuevo control remoto y a comprender todas las funciones y
capacidades, lo que le permitirá aprovechar al máximo las
nuevas decoraciones de ventanas.
ÍNDICE
Botones del control remoto ...........................................19
Explicación de las funciones ...................................20–21
GRUPOS ..................................................................... 20
FAVORITOS ................................................................ 20
Límite o tope de desplazamiento .............................. 21
Botón de control manual ...........................................21
Paquete de baterías estándar ................................... 21
Paquete de baterías Satellite .....................................21
Botón de reinicio del control remoto .........................21
Descripción general de la aplicación LEVOLOR ......... 22
Introducción ..................................................................... 23
Colocación de las baterías ........................................ 23
Herramientas necesarias para montar
el soporte del control remoto ................................. 23
Instrucciones para el montaje .................................. 23
Activación y funcionamiento ..................................24–26
Cómo asignar una decoración de
ventana a un GRUPO .............................................. 24
Cómo configurar una posición en FAVORITOS ....... 24
Cómo operar las decoraciones de ventanas ........... 25
Cómo eliminar una decoración de
ventana de un GRUPO ............................................ 26
Cómo crear un segundo control
remoto o duplicado ................................................. 26
Programación adicional ..................................................27
Cómo reiniciar la programación de
la decoración de ventana ........................................27
Cómo reiniciar los límites de desplazamiento ..........27
Cómo reiniciar el control remoto...............................27
Reemplazo de las baterías ............................................. 28
Solución de problemas .................................................. 29
Cumplimiento de radiofrecuencia ................................ 30
Garantía .............................................................................31

20 21
EXPLICACIÓN DE LAS FUNCIONES EXPLICACIÓN DE LAS FUNCIONES
ALL
1 2 3
4 5 6
ALL
1 2 3
4 5 6
Botones de
GRUPO
Botón
FAVORITOS
Parte frontal
de la persiana
Botón de
control
manual
Guía del control remoto Guía del control remoto
NOTA: La posición favorita para una decoración de ventana
en particular se almacena en esta. La posición favorita es
siempre la misma, independientemente del GRUPO o los
GRUPOS a los que está asignada la decoración de ventana
o del control remoto que se utiliza. Si configura una posición
favorita para una persiana con un control remoto y, luego, la
sobrescribe con otra posición favorita con un control remoto
diferente, solo contará con la posición que configuró con el
último de estos. Desde ese momento en adelante, cualquier
control remoto programado para esa persiana activará la
misma posición en FAVORITOS.
Consulte la sección "Cómo configurar una posición en
FAVORITOS" en la página 24.
LÍMITE O TOPE DE DESPLAZAMIENTO
Los puntos donde una cubierta para ventana se detiene en su
recorrido. La cubierta para ventana viene programada de fábrica
en las dimensiones solicitadas, pero si no se desplaza como
se esperaba, estos límites se pueden ajustar al restablecer los
límites de recorrido de la cubierta para ventana.
Consulte la página 27 para ver las instrucciones sobre cómo
"RESTABLECER LOS LÍMITES DE RECORRIDO".
BOTÓN DE CONTROL MANUAL
El botón de control manual está
ubicado en el lado del motor del
cortinero. Este botón se utiliza
para programar la aplicación
LEVOLOR® y el control remoto.
PAQUETE DE BATERÍAS ESTÁNDAR
Fuente de alimentación estándar que viene junto con el sistema
operativo motorizado de LEVOLOR®. El paquete de baterías es un
tubo de baterías que está conectado e instalado detrás del cortine-
ro para suministrar electricidad a la decoración de ventana, lo que
le permite a esta conectarse y funcionar con el control remoto.
PAQUETE DE BATERÍAS SATELLITE
Fuente de alimentación opcional que permite montar el paquete
de baterías en la parte superior del cortinero, al lado de la moldura
o debajo del alféizar. Es la mejor opción para los casos en los que la
decoración de ventana está colocada en una ventana alta y que el
acceso al paquete de baterías está restringido.
BOTÓN DE REINICIO DEL CONTROL REMOTO
Es un botón pequeño empotrado que está ubicado debajo de la
cubierta del compartimiento para baterías en la parte posterior
del control remoto. Este botón se utiliza para crear un duplicado
del control remoto o para reiniciarlo.
Una vez que el control remoto esté programado, podrá operar
y controlar la posición y los ajustes de la decoración de
ventana nueva con solo tocar un botón.
Al configurar los GRUPOS y los FAVORITOS, podrá realizar todas
las funciones.
GROUPS
Al asignar una decoración de ventana a un
GRUPO, esta se conecta a un control remoto
individual; por lo tanto, ese control remoto se
comunica con la decoración de ventana, la cual
seguirá los comandos del control remoto.
La decoración de ventana no funcionará
con el control remoto, a menos que se le
asigne un GRUPO.
Cada control remoto LEVOLOR® ofrece 6
asignaciones de GRUPOS, que están designados
por los botones numerados 1, 2, 3, 4, 5 y 6 en el
control remoto.
Un GRUPO puede estar formado por una sola decoración de
ventana o por varias asignadas a un botón de GRUPO en particular.
Las decoraciones de ventanas que están asignadas a un mismo
GRUPO funcionarán al mismo tiempo, cuando se seleccionen las
funciones en el control remoto. No hay un límite en cuanto a la
cantidad de decoraciones de ventanas que se pueden asignar a un
GRUPO determinado.
Si desea que una decoración de ventana funcione de manera
independiente, debe asignarla a un GRUPO individual.
Una decoración de ventana se puede asignar a más de un GRUPO
en el mismo control remoto (o en controles remotos por separado).
El control remoto operará las decoraciones de ventanas una vez
que estén asignadas a un GRUPO.
Consulte la sección "CÓMO ASIGNAR UNA DECORACIÓN DE
VENTANA A UN GRUPO" en la página 26.
FAVORITOS
Al configurar FAVORITOS, almacena una posición
preferida de cada decoración de ventana individual
y recuerda la posición almacenada cuando se se-
lecciona el botón FAVORITOS (el botón FAVORITOS
está designado por el símbolo de corazón ♥). Cada
decoración de ventana puede tener SOLO UNA
posición en FAVORITOS. Cuando llegue, cada dec
oración de ventana se configurará en la posición de
FAVORITOS predeterminada, que es hasta la mitad.
Puede volver a programar cada persiana a su
posición de FAVORITOS.

22 23
DESCRIPCIÓN GENERAL DE
LA APLICACIÓN LEVOLOR®
DESCRIPCIÓN GENERAL DE LA APLICACIÓN LEVOLOR®
Libere todo el potencial de las persianas. Descargue la
aplicación LEVOLOR para obtener controles avanzados y una
guía de instalación fácil de 3 pasos.
Organice y controle fácilmente todos los productos motorizados
de LEVOLOR al vincular los controles remotos con la aplicación
LEVOLOR. Los controles avanzados de la aplicación permiten
regular las decoraciones de ventanas, crear posiciones favoritas
preconfiguradas y programar las persianas para que funcionen
de manera automática en un horario establecido.
Descargue la aplicación en su dispositivo móvil desde Google
Play o Apple App Store. La aplicación LEVOLOR es compatible
con Android (versión 5.1 o posterior) y Apple iOS (versión 11.0
o posterior).
La aplicación funciona con conectividad Bluetooth, lo que
permite que los dispositivos con iOS y Android controlen las
decoraciones de ventanas de manera inalámbrica en distancias
cortas. Tanto el dispositivo móvil como el control remoto deben
estar dentro del alcance de las decoraciones de ventanas para
poder controlarlas mediante la aplicación y para crear o editar
un horario o una posición favorita preconfigurada.
NOTA: el dispositivo móvil SOLO debe estar dentro del alcance
del control remoto y de la decoración de ventana para poder crear
o editar un horario. Las decoraciones de ventanas funcionarán
automáticamente según el horario programado sin tener en
cuenta la ubicación del dispositivo móvil, siempre y cuando el
control remoto esté dentro del alcance.
Guía del control remoto Guía del control remoto
INTRODUCCIÓN
COLOCACIÓN DE LAS BATERÍAS
1. Retire la cubierta posterior para descubrir el
compartimiento para baterías.
2. Utilice dos baterías alcalinas AAA nuevas (incluidas).
Deslice las baterías dentro de cada compartimiento
asegurándose de que los extremos positivos y negativos
estén correctamente alineados y presiónelas en su lugar.
3. Coloque de nuevo la cubierta posterior.
HERRAMIENTAS NECESARIAS PARA MONTAR
EL SOPORTE DEL CONTROL REMOTO
— Taladro eléctrico — Broca para taladro de 3
⁄32"
— Destornillador Phillips — Lápiz
— Anclas de expansión de panel de yeso (si el montaje se
realiza sobre un panel de yeso) (no incluidas)
INSTRUCCIONES PARA EL MONTAJE
1. Elija una ubicación para montar el soporte del
control remoto.
2. Oriente el soporte del control remoto en la pared.
Marque los orificios para los tornillos.
3. Si desea colocar el soporte en una pared de madera,
utilice una broca para taladro de 3
⁄32" para perforar los
orificios para los tornillos.
4. Fije el soporte a la pared con los tornillos provistos.
5. Fije la cubierta de los tornillos sobre los tornillos.
6. De manera suave, empuje el control remoto dentro
del soporte hasta que quede ajustado.
NOTA: si desea colocar el soporte del control remoto en un
panel de yeso, utilice anclas de expansión.
El borde curvo
debe quedar en la
parte superior.

24 25
ACTIVACIÓN Y FUNCIONAMIENTO ACTIVACIÓN Y FUNCIONAMIENTO
Guía del control remoto Guía del control remoto
CÓMO ASIGNAR UNA DECORACIÓN DE
VENTANA A UN GRUPO
NOTA: el control remoto LEVOLOR® no operará las decoraciones
de ventanas hasta que se asignen a un GRUPO.
1. Mantenga presionado DETENER hasta que la luz de
programación BLANCA comience a parpadear, luego
suelte el botón. Esto pone al control remoto en el modo
de programación.
2. Presione el número de GRUPO que desee (1, 2, 3, 4, 5 o 6)
en el control remoto. La luz indicadora AZUL del GRUPO
que está sobre el botón GRUPO parpadeará para indicar
que está seleccionado.
3. Con una mano, mantenga presionado el botón de control
manual ubicado en el cortinero de la decoración de ventana.
4. Mientras mantiene presionado el botón de control
manual, use la otra mano para presionar ABRIR en
el control remoto hasta que la decoración de ventana se
mueva ligeramente para indicar que se asignó al GRUPO.
5. Suelte ambos botones.
6. Para salir del modo de programación, mantenga
presionado DETENER hasta que las luces dejen
de parpadear.
CÓMO CONFIGURAR UNA POSICIÓN EN FAVORITOS
Cada decoración de ventana tiene una posición en FAVORITOS.
La configuración predeterminada es hasta la mitad. La config-
uración de una posición de FAVORITOS nueva sobrescribe toda
configuración anterior.
1. Utilice el botón de control manual ubicado en el cortinero
de la decoración de ventana para abrirla o cerrarla según
la posición de FAVORITOS preferida.
2. Mantenga presionado DETENER hasta que la luz de
programación BLANCA comience a parpadear, luego
suelte el botón. Esto pone al control remoto en el modo
de programación.
3. Con una mano, mantenga presionado el botón de control
manual ubicado en el cortinero de la decoración de ventana.
4. Mientras mantiene presionado el botón de control
manual, use la otra mano para presionar el botón ♥
FAVORITOS en el control remoto hasta que la decoración
de ventana se mueva ligeramente para indicar que esa
posición se configuró en FAVORITOS.
5. Suelte ambos botones.
6. Para salir del modo de programación, mantenga
presionado DETENER hasta que las luces dejen
de parpadear.
CÓMO OPERAR LAS DECORACIONES DE VENTANAS
Una vez que las decoraciones de ventanas se asignaron a un
GRUPO o a varios GRUPOS, el control remoto está listo para
operarlas. Se pueden operar varias decoraciones de ventanas
al mismo tiempo.
1. Para activar el control remoto, presione DETENER.
Las luces indicadoras de color AZUL de los últimos
GRUPOS seleccionados se resaltarán y activarán.
2. Presione los botones TODAS o GRUPO 1, 2, 3, 4, 5 o 6 para
seleccionar las decoraciones de ventanas específicas que
quiera operar. Las luces indicadoras de color AZUL de los
GRUPOS seleccionados que están sobre el número se
encenderán para indicar que están seleccionados.
3. Se pueden seleccionar varios botones de GRUPO al
mismo tiempo.
4. Para deshacer la selección de un GRUPO, vuelva a
presionar el botón del GRUPO. La luz indicadora AZUL
que está sobre el botón del GRUPO se apagará.
5. Presione ABRIR para abrir las decoraciones de
ventanas seleccionadas.
6. Presione CERRAR para cerrar las decoraciones de
ventanas seleccionadas.
7. Presione DETENER para detener la decoración de
ventanas en cualquier lugar durante su recorrido.
8. Mientras la decoración de ventana está en movimiento,
presione el botón contrario al movimiento
( ABRIR o CERRAR) para cambiar la dirección.
9. Presione el botón ♥ FAVORITOS para que las deco-
raciones de ventanas se muevan hacia la posición de
FAVORITOS preconfigurada.
NOTA: se recomienda que solo se agreguen al mismo GRUPO
las decoraciones de ventanas que sean similares debido a las
diferencias en las características y en los modos de operación
de los productos.
NOTA: Las flechas de inclinación hacia arriba e inclinación
hacia abajo no se aplican a esta categoría de productos.

26 27
ACTIVACIÓN Y FUNCIONAMIENTO PROGRAMACIÓN ADICIONAL
Guía del control remoto Guía del control remoto
NOTA: este duplicado control remoto operará el mismo
conjunto de decoraciones de ventanas y GRUPOS que el
control remoto original;
CÓMO REINICIAR LA PROGRAMACIÓN DE
LA DECORACIÓN DE VENTANA
Mediante este reinicio, se borra toda la programación
almacenada en la decoración de ventana, inclusive las
asignaciones a los GRUPOS, y se impide que cualquier control
remoto opere la decoración de ventana. Este programa se utiliza
durante la instalación para corregir las asignaciones a
los GRUPOS.
NOTA: esto no afecta los límites de desplazamiento.
1. Mantenga presionado el botón de control manual ubicado
en el cortinero de la decoración de ventana. Continúe
presionando el botón de control manual hasta que la
decoración de ventana se mueva ligeramente hacia
arriba y hacia abajo DOS veces. Esto indica que se
reinició la programación.
2. Suelte el botón de control manual.
3. Consulte la sección "Cómo asignar una decoración
de ventana a un GRUPO" en la página 8 para asignar
la decoración de ventana a un grupo.
CÓMO REINICIAR LOS LÍMITES DE DESPLAZAMIENTO
1. Mantenga presionado el botón de control manual ubicado
en el cortinero de la decoración de ventana hasta que esta
se mueva ligeramente hacia arriba y hacia abajo UNA vez.
Esto indica que se reiniciaron los límites.
2. Suelte el botón de control manual.
3. En esta instancia, la decoración de ventana se moverá por
sí sola para configurar los límites inferior y superior del
motor. Una vez que finalice este proceso, la decoración de
ventana se moverá brevemente en ambas direcciones.
Si los pasos 1 al 3 no resuelven el problema, siga los pasos
adicionales a continuación.
PARA RESTABLECER EL LÍMITE INFERIOR
1. Presione el botón de apertura en el control remoto
para llevar la persiana hasta el límite superior actual.
CÓMO ELIMINAR UNA DECORACIÓN
DE VENTANA DE UN GRUPO
1. Mantenga presionado DETENER hasta que la luz de
programación BLANCA comience a parpadear, luego
suelte el botón. Esto pone al control remoto en el modo
de programación.
2. Presione el número de GRUPO que desee (1, 2, 3, 4, 5 o 6)
en el control remoto. La luz indicadora AZUL del GRUPO
que está sobre el número del GRUPO parpadeará para
indicar que está seleccionado.
3. Con una mano, mantenga presionado el botón de
control manual ubicado en el cortinero de la decoración
de ventana.
4. Mientras mantiene presionado el botón de control
manual, mantenga presionado CERRAR en el control
remoto hasta que la decoración de ventana se mueva
ligeramente para indicar que se eliminó del GRUPO.
5. Suelte ambos botones.
6. Para salir del modo de programación, mantenga presionado
DETENER hasta que las luces dejen de parpadear.
CÓMO CREAR CONTROL REMOTO O DUPLICADO
1. Retire la cubierta posterior del control remoto nuevo.
2. Con un sujetapapeles, mantenga presionado el botón
empotrado de reinicio hasta que las luces indicadoras de
color AZUL de los GRUPOS destellen dos veces, seguido
por tres veces y hasta llegar a un total de cinco destellos.
Tenga en cuenta que habrá un retraso entre el destello
doble y el destello triple. Coloque de nuevo la cubierta
posterior.
3. Mantenga presionado DETENER en el control remoto
original hasta que la luz de programación BLANCA
comience a parpadear, luego suelte el botón. Esto pone
al control remoto en el modo de programación.
4. Con una mano, mantenga presionado el botón TODAS
en el control remoto nuevo.
5. Mientras mantiene presionado el botón TODAS, presione
y suelte DETENER en el control remoto original.
6. Todas las luces indicadoras de color AZUL de los GRUPOS
en el control remoto duplicado parpadearán dos veces
para indicar que se copió toda la información del control
remoto original.
7. Para salir del modo de programación, mantenga presionado
DETENER hasta que las luces dejen de parpadear.

28 29
COLOCACIÓN DE LAS BATERÍAS SOLUCIÓN DE PROBLEMAS
Guía del control remoto Guía del control remoto
2. Con una mano, mantenga presionado el botón del
control manual ubicado en el cortinero de la cubierta
para ventana. Use su otra mano para presionar el
botón de cierre en el control remoto.
3. La persiana se activa y el LED del motor se enciende
en color rojo para indicar que la persiana está en
modo de ajuste de límite. El tiempo de este modo se
acabará y volverá a los límites anteriores después de
~30 segundos sin acción.
4. Use los botones de apertura y cierre para mover la
persiana hasta la posición límite deseada.
5. Mantenga presionado el botón de detención durante
~6 segundos para poner el control remoto en modo
de programación.
6. Mantenga presionado el botón de control manual y
presione el botón de cierre en el control remoto
mientras todavía está en modo de programación
para establecer un nuevo límite.
7. El LED rojo se apaga y la persiana se activa para
confirmar el límite establecido.
Para establecer el límite de recorrido superior, repita
los pasos 1 al 7 con el botón de apertura en lugar
del de cierre.
CÓMO REINICIAR EL CONTROL REMOTO
Esta función elimina cualquier conexión programada anteriormente
entre el control remoto y cualquier decoración de ventana.
• Con un sujetapapeles, presione BREVEMENTE el botón de
reinicio del control remoto.
Las decoraciones de ventanas vinculadas anteriormente ya no
funcionarán con este control remoto.
REEMPLAZO DE LAS BATERÍAS
El reemplazo de las baterías del control remoto no causará
la perdida de ninguna programación de las decoraciones de
ventanas, incluyendo los GRUPOS y FAVORITOS. El control
remoto usa dos baterías alcalinas AAA.
Para reemplazar las baterías del control remoto, realice
lo siguiente:
1. Deslice y abra la parte posterior del compartimiento
para baterías.
SOLUCIÓN DE PROBLEMAS
Problema La decoración de ventana no funciona con
el control remoto.
Solución Asegúrese de que la luz indicadora del
control remoto se encienda cuando intenta
hacer funcionar la decoración de ventana.
Si la luz indicadora no se enciende, reemplace
las baterías del control remoto.
NOTA: es posible que la decoración de
ventana aún funcione con el botón de control
manual ubicado en el cortinero. Si la deco-
ración de ventana no funciona con el botón
de control manual, asegúrese de que tenga
alimentación. Si la decoración de ventana
no tiene energía, reemplace las baterías del
paquete de baterías estándar o del paquete
de baterías Satellite.
Problema La decoración de ventana no se abre ni
cierra por completo o se detiene en un
tope intermedio que ya no se desea.
Solución Asegúrese de que el funcionamiento de la
decoración de ventana no esté obstruido.
Reinicie la persiana como se describe en
la sección "CÓMO REINICIAR LA
PROGRAMACIÓN DE LA DECORACIÓN
DE VENTANA" en la página 27.
NOTA: es posible que deba cambiar las baterías del paquete
de baterías de la decoración de ventana cuando comience a
moverse lentamente. Es muy probable que las baterías del
control remoto estén bien.
2. Con cuidado, levante y retire las baterías viejas. Utilice
un destornillador pequeño o la uña para levantarlas y
retirarlas de la ranura.
3. Coloque las baterías nuevas, asegurándose de que los
extremos positivos y negativos estén correctamente
alineados, y presiónelas en su lugar.
4. Alinee y vuelva a colocar la cubierta en la parte posterior
del control remoto.

30 31
CUMPLIMIENTO O GARANTÍA CUMPLIMIENTO O GARANTÍA
Guía del control remoto Guía del control remoto
DECLARACIÓN DE CUMPLIMIENTO CON LA
FCC EN CUANTO A LA RADIOFRECUENCIA
EN LOS ESTADOS UNIDOS
Cumplimiento de la FCC en cuanto a la radiofrecuencia en
los Estados Unidos
Este dispositivo cumple con la sección 15 de las reglas de la
Comisión Federal de Comunicaciones (FCC, por sus siglas
en inglés). El funcionamiento está sujeto a las siguientes
dos condiciones:
(1) Este dispositivo no puede causar interferencia perjudicial.
(2) Este dispositivo debe aceptar cualquier interferencia
recibida, incluida la interferencia que pudiese causar
la operación no deseada.
Este equipo ha sido probado y se ha verificado que cumple los
límites para un dispositivo digital clase B, conforme a la sección
15 de las reglas de la FCC. Estos límites están diseñados para
proporcionar protección razonable contra interferencias
perjudiciales en una instalación residencial. Este equipo genera,
utiliza y puede irradiar energía de radiofrecuencia y, si no se
instala y se usa de acuerdo con las instrucciones, puede causar
interferencia perjudicial para las comunicaciones de radio. Sin
embargo, no se garantiza que no se producirán interferencias en
una instalación en particular. Si este equipo causa interferencia
perjudicial a la recepción de radio o televisión, lo que se puede
determinar al encender y apagar el equipo, se recomienda al
usuario que intente corregir la interferencia con una o más de
las siguientes medidas:
• Reorientar o reubicar la antena de recepción.
• Aumentar la separación entre el equipo y el receptor.
• Conectar el equipo a un tomacorriente de un circuito
distinto al que usa el receptor.
• Solicitar ayuda al distribuidor o a un técnico con
experiencia en radio/TV.
Cualquier cambio o modificación que no esté expresamente
aprobado por la parte responsable del cumplimiento podría
anular la autorización del usuario para utilizar este equipo.
GARANTÍA
Para obtener información sobre la garantía, visite LEVOLOR.com o
póngase en contacto con Servicio al Cliente al 1-800-538-6567.

© 2020 LEVOLOR®, Inc.
5775 Glenridge Drive
Building A
Atlanta, GA 3032819-0050-051
Other manuals for Natural Shades Remote Control
2
Table of contents
Languages:
Other Levolor Remote Control manuals