Lewmar LFX Assembly Instructions & Safe Anchoring Guide iss.1 | 2
Warranty
Limited Warranty and Key Terms of Supply by Lewmar
Anchoring with the LFX
Your LFX is a high-performance, reliable anchor with the convenience of
low mass and collapsibility for storage. When correct anchoring practice is
followed, the anchor will quickly set and provide exceptional holding power.
It is important that not only the anchor, but the rode, shackle and strong
points are suitable for your usage scenario. This reference guide contains all
information you need to get started with confidence.
1. Rode
Your rode should consist of a short length of steel chain and 3-stand nylon
line.
The heavy steel chain attached to the anchor helps keep the anchor shank
horizontal for optimal setting and holding power. We recommend a mini-
mum length of 6.5 (2m) of chain. This length is good to approximately 26
(8m) of water depth. Beyond this, we recommend an additional 6.5 (2m)
per 26 (8m) depth. For example, 13 (4m) chain should be used for 52
(16m) of water depth.
Three-strand Nylon rope is recommended for its good shock-absorbing
characteristics. During rough conditions, the rope will reduce the likelihood
of the anchor becoming dislodged or damage to the boat. For this reason, a
chain-only rode is not advise
2. Holding Power and Anchor Sizing
Ensure that your LFX is sufficiently sized for your usage scenarios. Use the
table below to determine the correct anchor size for a given boat length and
wind speed. If in doubt, move up a size.
3. Scope
Scope is the ratio of anchor rode length to depth of water. A good scope
results in the anchor shank being in position that is more horizontal and
parallel to the seabed. The weight of the anchor rode causes it to sag into
an arc, which acts as a shock absorber.
4. Setting
Set your LFX gently by backing down the boat slowly; ideally using tidal
currents only. Once the anchor has achieved its initial set, it is advisable to
use the engine to provide additional setting pull. Increase the engine speed
slowly to drive the anchor further into the seabed.
Attempting to set an anchor at high speed can cause the anchor to drag
across the surface rather than snagging and setting.
The chart below shows the approximate thrust produced by your boat’s
engine. You can use this chart as reference when using setting the anchor
with engine assistance. To ensure that the anchor is firmly set, you can use
your engine thrust to simulate wind loading on the boat.
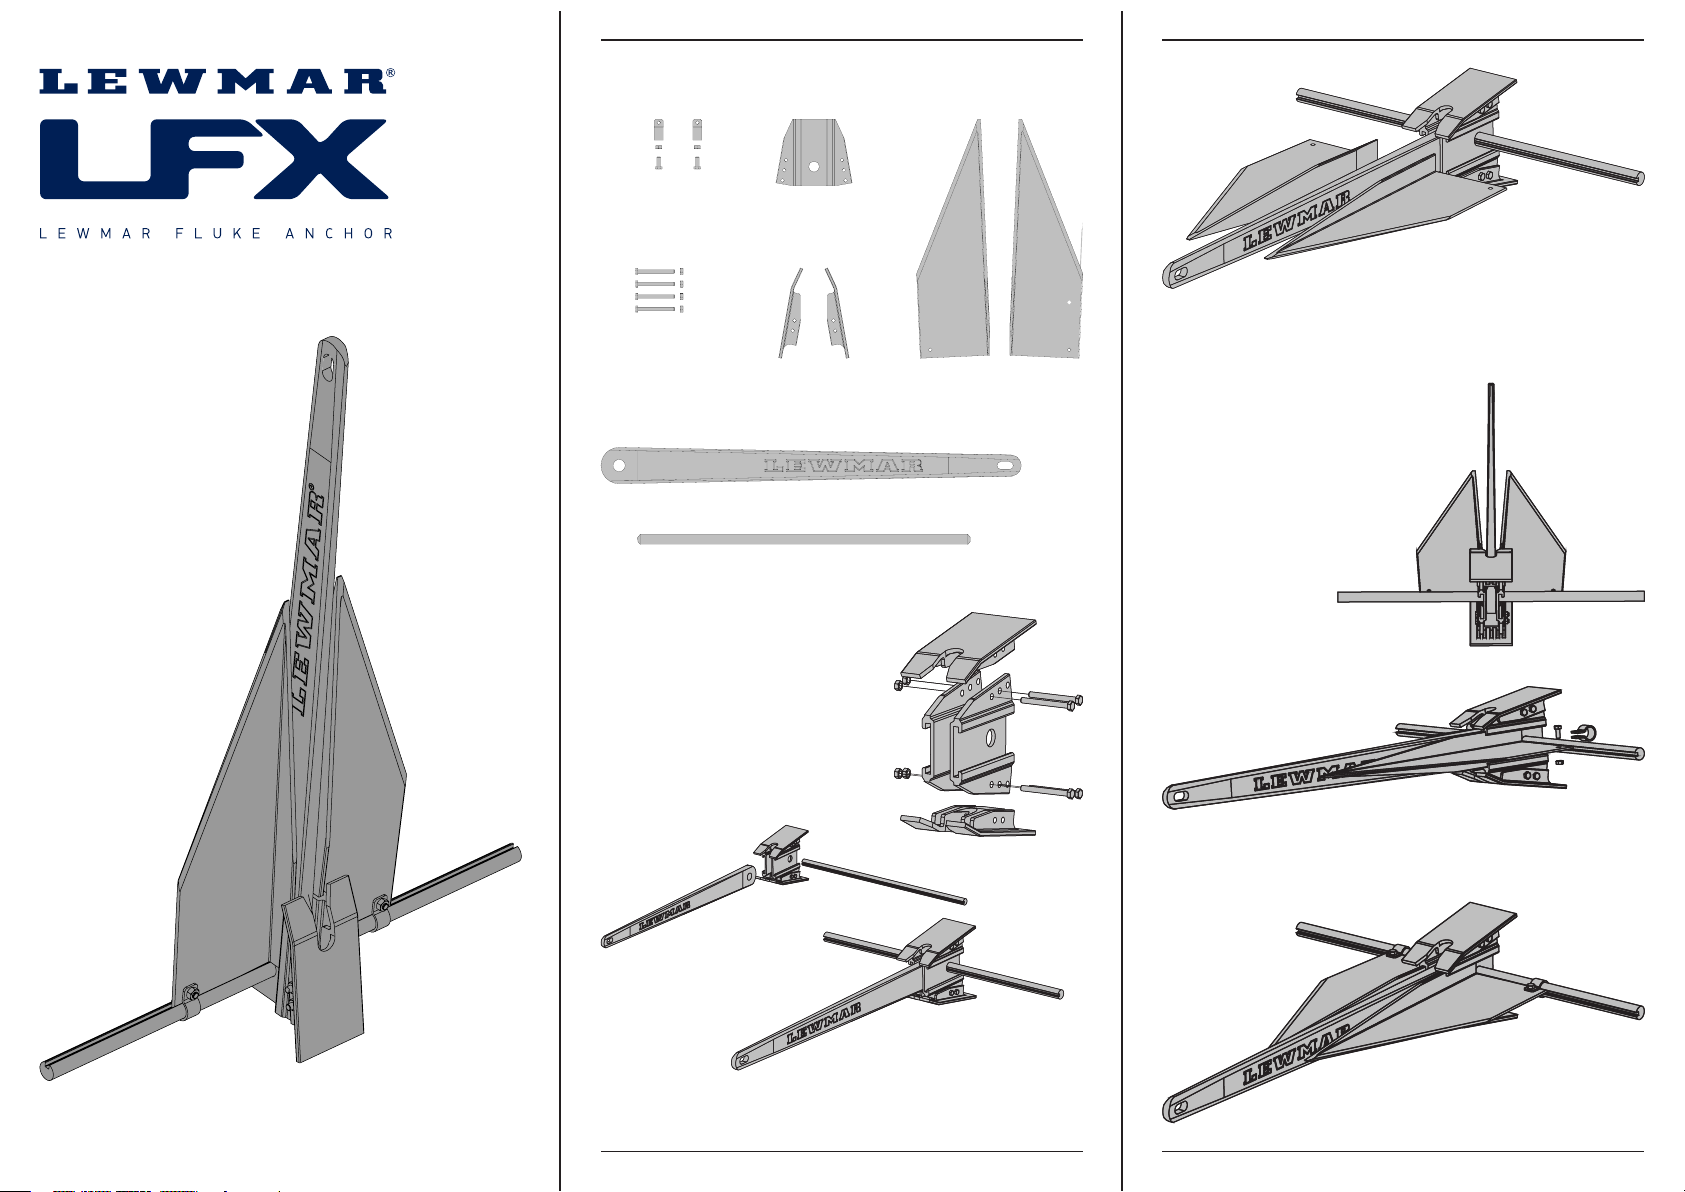
6. Fluke angle
The LFX design allows the user easy adjustment of the fluke angle to suit
different bottom conditions. This is accomplished by adjusting the mud palm
position.
The standard fluke angle for the LFX is 30º. This suits general sandy and
common medium consistency bottoms. The mud palms should be in the ‘a’
position (closer to the shank); this limits the flukes to a 30º angle. When
attempting to set the anchor in so mud or silts, the mud palms should be
moved to the forward position (furthest from the shank) to increase the
7. Retrieval
Move the boat towards the anchor position whilst pulling in the rode. When
the boat is directly above the anchor, it can be broken out with ease. In
many cases, smaller anchors can be broken out and retrieved by hand. For
stubborn anchors, tie the line off around a cleat or strong point then power
the boat backwards slowly with the engine. This will dislodge the anchor
from the bottom and allow retrieval.
The higher the scope, the higher the resulting horizontal pull on the anchor
and thus the depth the anchor buries itself. This increases holding power.
Where an insufficient scope is used, the anchor shank will be in a position
that is closer to vertical. This will reduce holding power and may result in
the anchor dislodging.
All scope measurements are based on the waterline. Remember that your
depth sounder is likely to be mounted in the keel; be sure to include dra
and deck height in scope calculations.
We recommend a minimum scope of 5:1. For example, in 10 (3m) of depth
from the waterline, 50 (15m) of rode is used. Greater scopes of up to 10:1
will only increase potential holding power. In stormy conditions, try to use
a scope close to 10:1. In crowded locations where a high scope is not
possible, set at 5:1 then shorten as required to 3:1 minimum.
10:1
100%
7:1
85%
5:1
70%
3:1
40%
2:1
10%
COMMON BOTTOMS
30˚ANGLE FOR SOFT MUD BOTTOMS
USE 45˚ANGLE ON LFX
TO IMPROVE HOLDING POWER
RECOMMENDED
(15M) = 5:1 SCOPE
10FT
(3M)
SCOPE:
IDEAL = x10 DEPTH OF WATER
MINIMUM = x3 DEPTH OF WATER
FRONT 2 FIXING FOR 30°
REAR 2 FIXINGS FOR 45°
maximum angle to 45º. So substrates can be troublesome, however the
45º LFX flukes reduce the likelihood of the anchor dislodging by shearing
out.
If there is difficulty setting the LFX, we recommend reducing the scope to
2:1 initially before letting out more line once the anchor has begun to set.
Ensure that the scope is increased to at least 5:1 once the LFX is set.
Lewmar warrants that in normal private pleasure boat usage and with proper maintenance
its products will conform with their specification for a period of three years from the date of
purchase by the end user, subject to the conditions, limitations and exceptions. Any product,
which proves to be defective in normal usage during that three-year period, will be repaired
or, at Lewmar’s option, replaced by Lewmar.
For full warranty and key terms of supply please visit www.lewmar.com
B
L
20
FT
6
M
25
FT
8
M
30
FT
9
M
35
FT
11
M
40
FT
12
M
50
FT
15
M
WIND SPEED
15
kts 90 41 125 57 175 79 225 102 300 1360 400 181
30
kts 360 163 490 222 700 318 900 408 1200 544 1600 726
42
kts 720 327 980 445 1400 635 1800 816 2400 1089 3200 1452
60
kts 1440 653 1960 889 2800 1270 3600 1633 4800 2177 6400 2903
lbs kg lbs kg lbs kg lbs kg lbs kg lbs kg
S HP 25 50 75 100 150 200 300
TRUE DISPLACEMENT HULLS
SHAFT HP x 20
lb
kg
500
225
1000
450
1500
675
2000
900
3000
1350
4000
1800
6000
2700
SEMI DISPLACEMENT HULLS
SHAFT HP x 15
lb
kg
375
169
750
338
1125
506
1500
675
2250
1013
3000
1350
4500
2025
FAST, PLANING HULLS
SHAFT HP x 10
lb
kg
250
113
500
225
750
338
1000
450
1500
675
2000
900
3000
1350
10:1
100%
7:1
85%
5:1
70%
3:1
40%
2:1
10%
COMMON BOTTOMS
30˚ANGLE FOR SOFT MUD BOTTOMS
USE 45˚ANGLE ON LFX
TO IMPROVE HOLDING POWER
RECOMMENDED
(15M) = 5:1 SCOPE
10FT
(3M)
SCOPE:
IDEAL = x10 DEPTH OF WATER
MINIMUM = x3 DEPTH OF WATER
FRONT 2 FIXING FOR 30°
REAR 2 FIXINGS FOR 45°
10:1
100%
7:1
85%
5:1
70%
3:1
40%
2:1
10%
COMMON BOTTOMS
30˚ANGLE FOR SOFT MUD BOTTOMS
USE 45˚ANGLE ON LFX
TO IMPROVE HOLDING POWER
RECOMMENDED
(15M) = 5:1 SCOPE
10FT
(3M)
SCOPE:
IDEAL = x10 DEPTH OF WATER
MINIMUM = x3 DEPTH OF WATER
FRONT 2 FIXING FOR 30°
REAR 2 FIXINGS FOR 45°
10:1
100%
7:1
85%
5:1
70%
3:1
40%
2:1
10%
COMMON BOTTOMS
30˚ANGLE FOR SOFT MUD BOTTOMS
USE 45˚ANGLE ON LFX
TO IMPROVE HOLDING POWER
RECOMMENDED
(15M) = 5:1 SCOPE
10FT
(3M)
SCOPE:
IDEAL = x10 DEPTH OF WATER
MINIMUM = x3 DEPTH OF WATER
FRONT 2 FIXING FOR 30°
REAR 2 FIXINGS FOR 45°
UK & International Distribution
Lewmar
Southmoor Lane
Havant
Hampshire
PO9 1JJ
England
Tel: +44 (0)23 9247 1841
Email: info@lewmar.com
USA
Lewmar
351 New Whitfield Street
Guilford, CT
06437
USA
Tel: +1 203 458 6200