Lexor ELITE User manual


THE KEY TO SALON SUCCESS
PEDICURE SPA USER MANUAL
Table of Contents
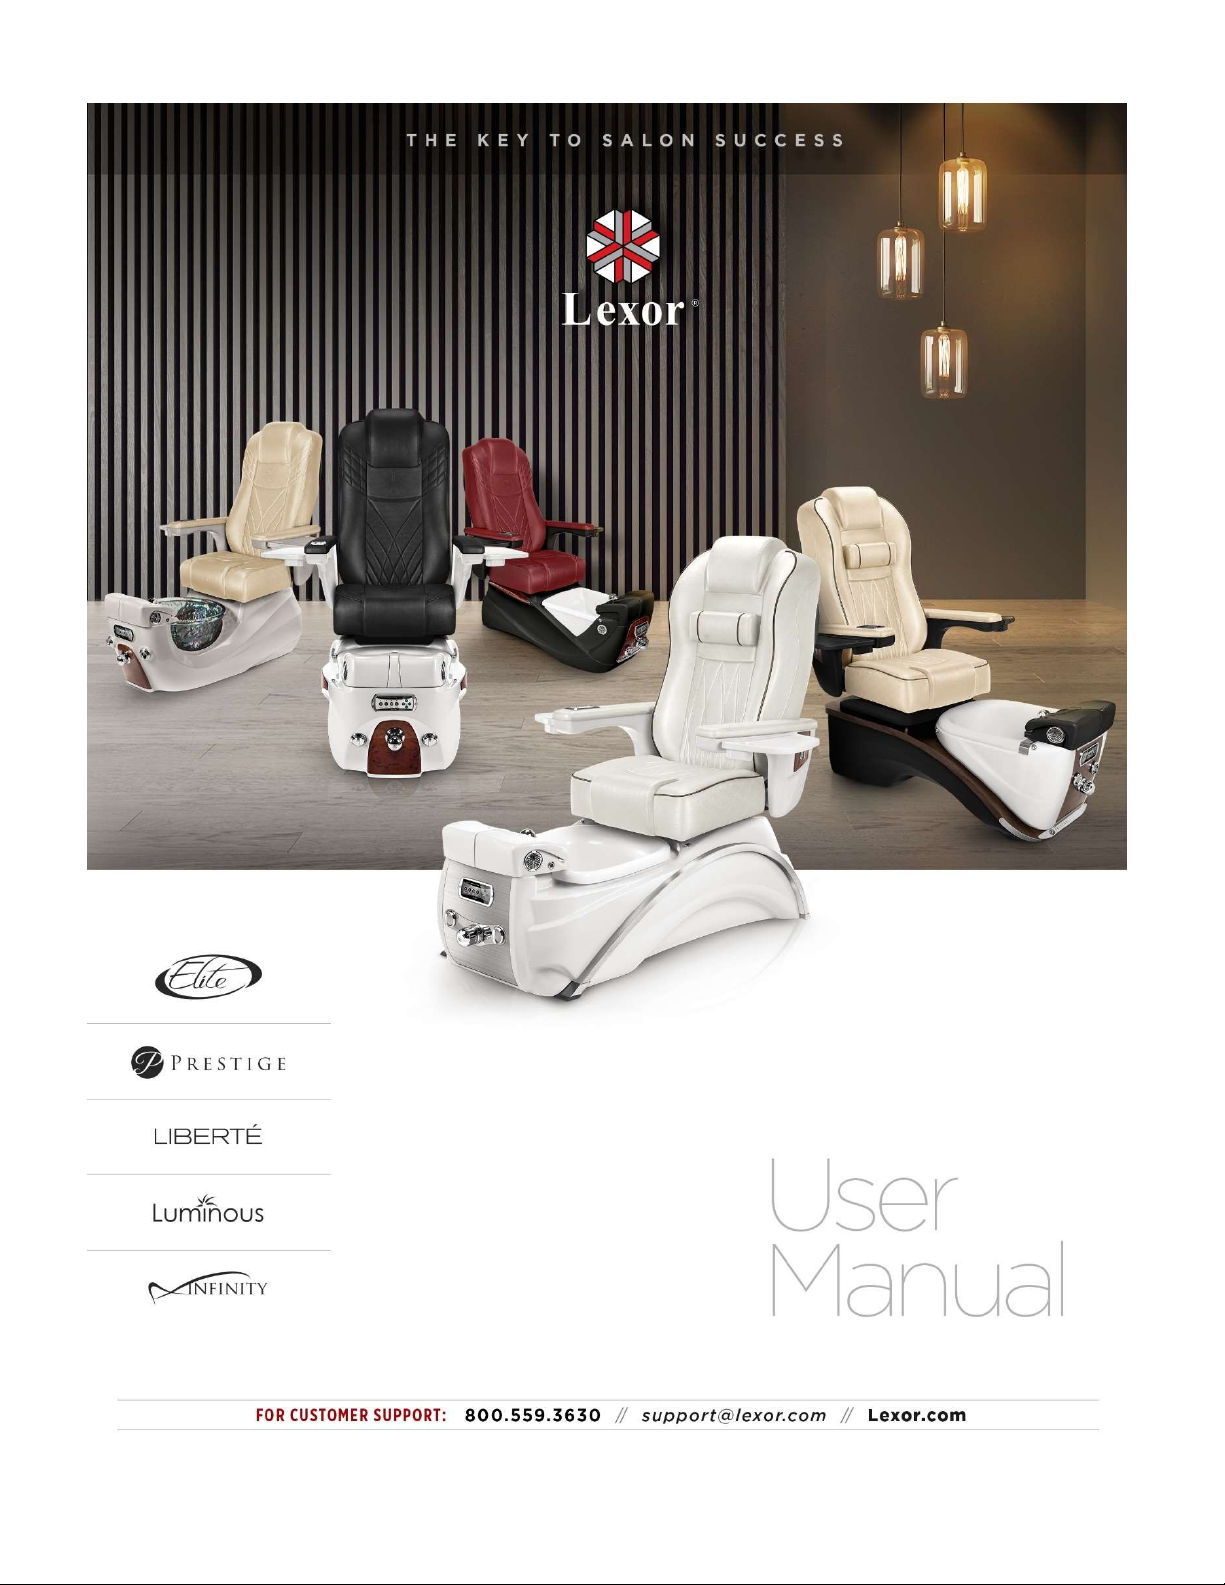
IDENTIFYING PARTS FOR ELITE ® MODEL 2
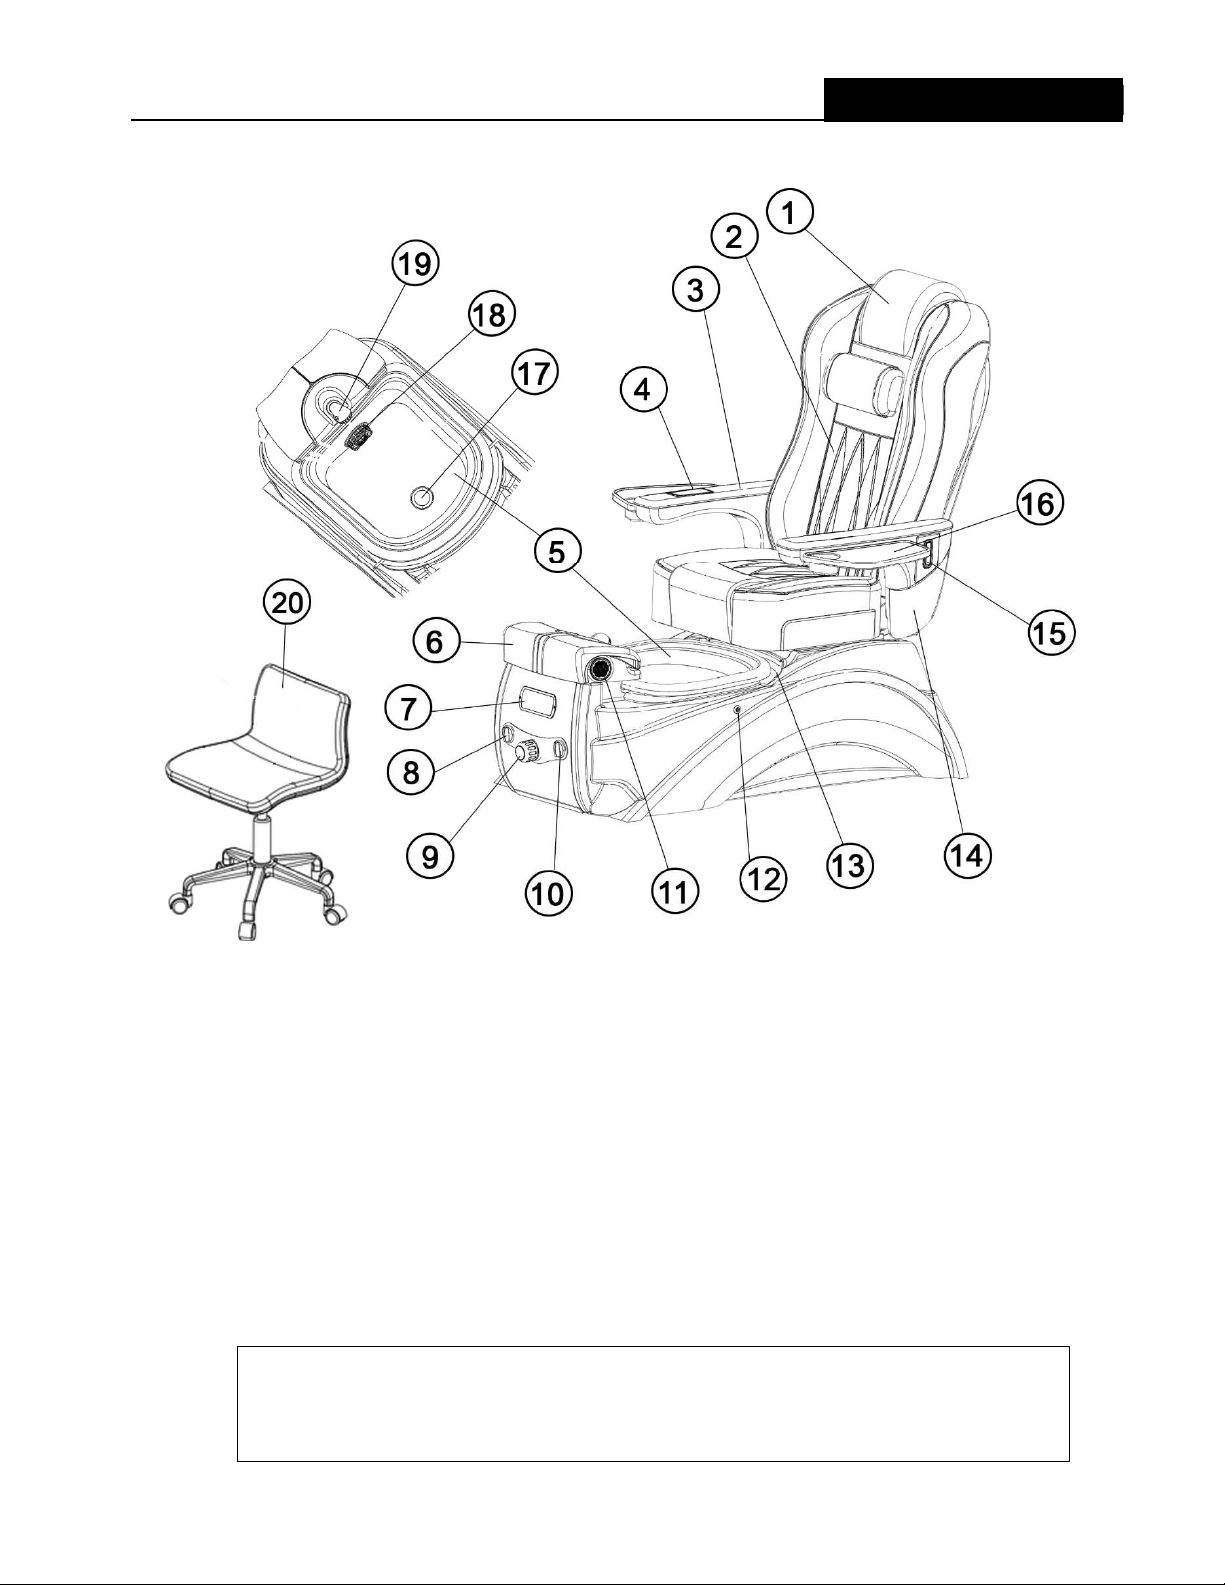
IDENTIFYING PARTS FOR PRESTIGE ® MODEL 3
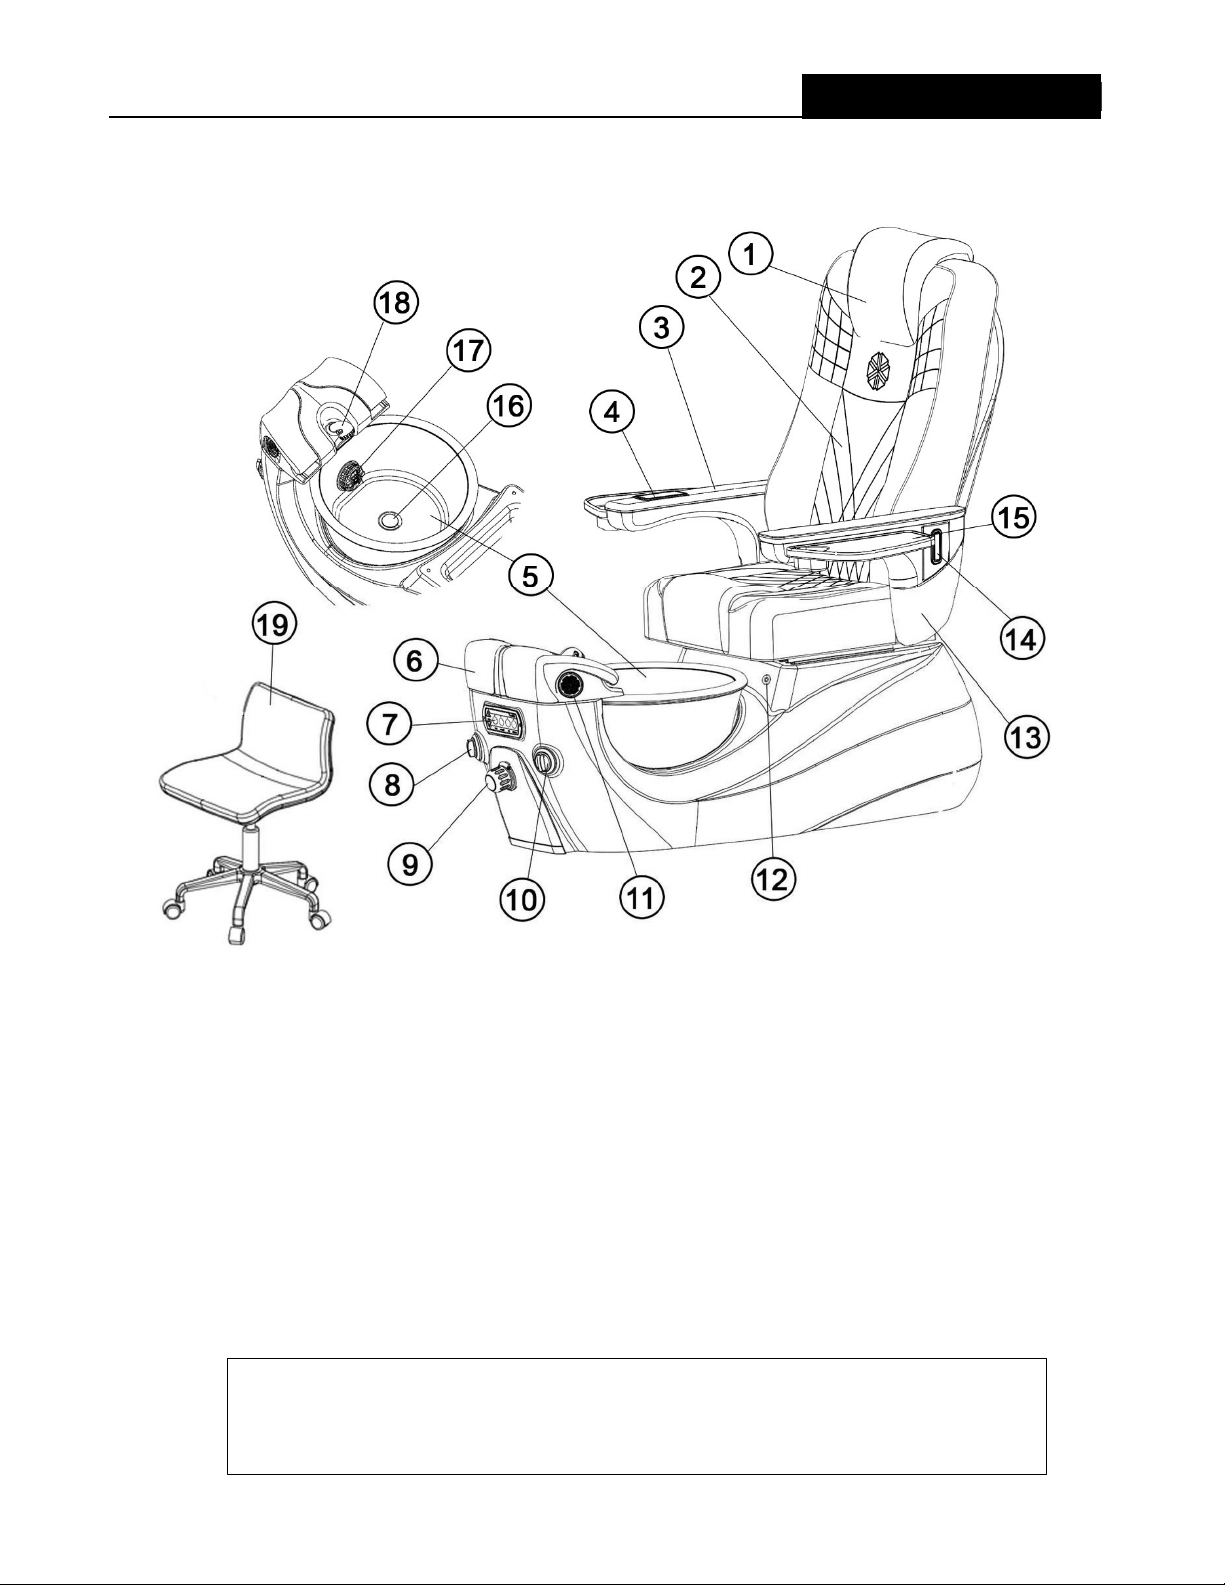
IDENTIFYING PARTS FOR LIBERTE ® MODEL 4
IDENTIFYING PARTS FOR LUMINOUS ® MODEL 5
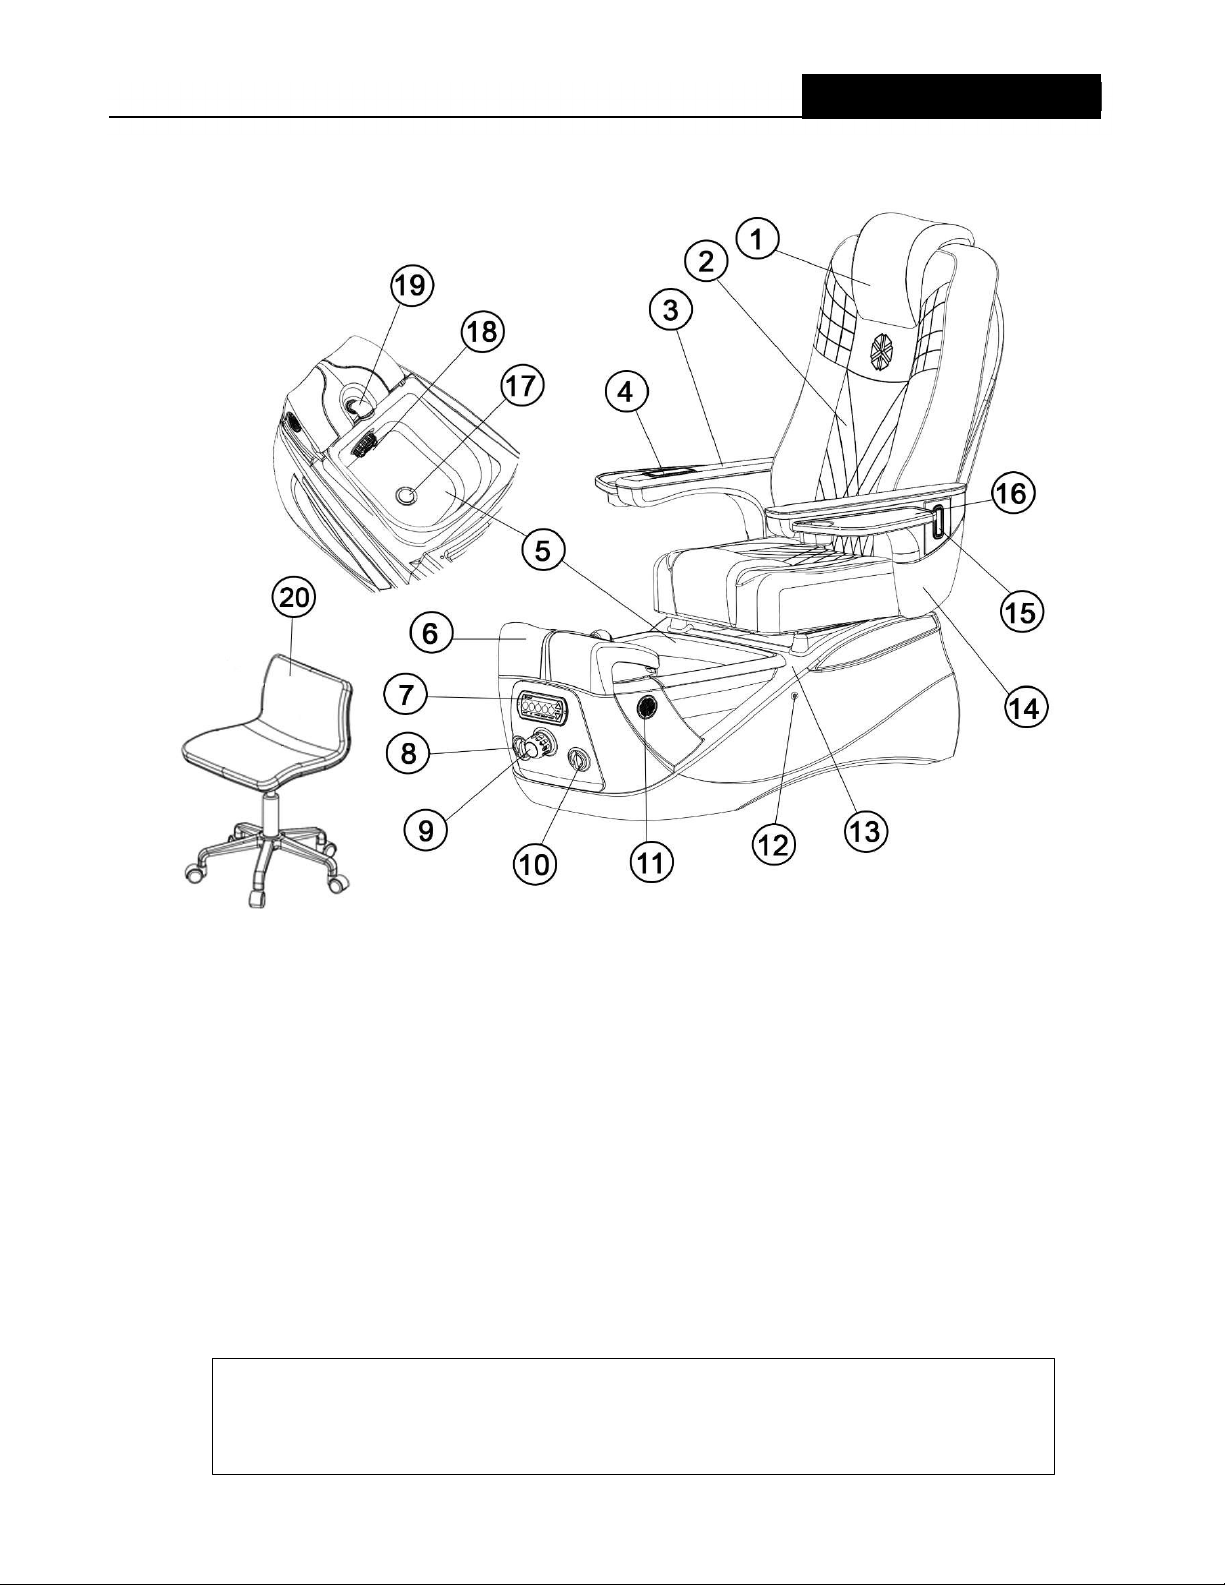
IDENTIFYING PARTS FOR INFINITY ® MODEL 6
WALL CLEARANCE & SPA TO SPA RECOMMENDED CLEARANCE 7
INSTALLATION OF PEDICURE SPA SEAT 7
INSTALLATION OF PLUMBING SYSTEM 10
INSTALLATION OF VENTILATION SYSTEM (OPTIONAL) 13
ELECTRICAL AND PEDICURE SPA COMPONENT SPECIFICATIONS 14
PRE-OPERATIONAL SETUP 15
OPERATE AUTO-FILL / JET SWITCH 20
OPERATE DIGITAL CONTROL PANEL
22
RESET WATER SENSOR AND WATER LEVEL
23
MASSAGE SYSTEM & REMOTE CONTROLLER
FAUCET ASSEMBLY INSTRUCTION
RECEIVING AND INSPECTION: If missing parts or damages are found, please notif the carrier at once and
insist on a notation of the damage on the bill of lading. DO NOT DISCARD THE SHIPPING BOX. If ou give
the carrier a clear receipt for goods that have been damaged in transit, ou do so at our own risk and expense.
REMOVING THE FOOTREST
1
WARNING: 1.This product is for indoor use onl & is not recommended for use on carpet or wood floor.
2.This product must be connected to a circuit outlet protected b a class A GFCI.
3. DO NOT USE if ou have poor circulation, or if an area of our feet or legs has an open sore.
4. Maximum temperature of the water should never exceed 100 degrees F.
5. DO NOT STEP or STAND IN THE FOOT BASIN.
6. DO NOT operate an electrical devices near the pedicure spa.
PLEASE SAVE THESE INSTRUCTIONS FOR FUTURE REFERENCE
7. Maximum load in the spa chair is 250lbs (114kg).
PROPER INSTALLATION ACCORDING TO THIS MANUAL IS REQUIRED. FAILURE TO DO SO MAY RESULT IN
SERIOUS INJURY AND/OR WARRANTY WILL BE NULL. YOU MUST HAVE A LICENSED PLUMBER TO CONNECT THE
SPA AND WATER SYSTEM IN PLACE SAFELY.
STATES’ NOTICE
In the commonwealth of most states, all pedicure spas installed for commercial usage are required to have a
backflow preventer at the salon’s cost. This device shall be installed between the water inlet hose and the spout
INSTALLATION OF PEDICURE SPA CUSHION 8
REMOVING THE DRAIN KNOB & THE AUTO-FILL/JET KNOB 17
18
19
21

2
z
Identifying Parts
IDENTIFYIN PARTS
P dicur Spa with Massag Syst m
11.Ventilation Inlet
12. Air-Jet Connector
13. Liner Hook
14. Up/Down Armrest
15. Handbag (Purse) Hook
16. Manicure Tra
17. Air ring therma Jet
18. ECOJETTM Magnetic Drive
19. Hand Spra Spout
20. Low Profile Pedicure Stool
1. Headrest
2. Back Cushion with Massage
3. Armrest Cushion
4. Massage Remote Control
5. Aurora Bowl
6. Footrest with Calf Support
7. Digital control S stem
8. Drain Knob
9. Hot/Cold Water Mixer Valve
10. Auto-fill/Jet Knob
IDENTIFYING PARTS FOR ELITE ® MODEL
Spa Chair Dimensions & Weight:
Spa (Seat up-right): L=58” (147 cm), W=31” (79 cm) W/Tra 48” (121 cm), H=55” (140 cm)
Spa (full reclined): L=78” (198 cm)
Net Weight: 195 lbs | Shipping Weight: 260 lbs. | Max. Handling Load: 250 lbs.

3
Identifying Parts
IDENTIFYIN PARTS
P dicur Spa with Massag Syst m
11.Ventilation Inlet
12. Air-Jet Connector
13. Liner Hook
14. Up/Down Armrest
15. Handbag (Purse) Hook
16. Manicure Tra
17. Air ring therma Jet
18. ECOJETTM Magnetic Drive
19. Hand Spra Spout
20. Low Profile Pedicure Stool
1. Headrest
2. Back Cushion with Massage
3. Armrest Cushion
4. Massage Remote Control
5. Aurora Bowl
6. Footrest with Calf Support
7. Digital control S stem
8. Drain Knob
9. Hot/Cold Water Mixer Valve
10. Auto-fill/Jet Knob
IDENTIFYING PARTS FOR PRESTIGE ® MODEL
Spa Chair Dimensions & Weight:
Spa (Seat up-right): L=58” (147 cm), W=31” (79 cm) W/Tra 48” (121 cm), H=56” (142 cm)
Spa (full reclined): L=74” (187 cm)
Net Weight: 220 lbs | Shipping Weight: 260 lbs. | Max. Handling Load: 250 lbs.

Identifying Parts
IDENTIFYIN PARTS
IDENTIFYING PARTS FOR LIBERTE ® MODEL
P dicur Spa with Massag Syst m
11.Ventilation Inlet
12. Air-Jet Connector
13. Up/Down Armrest
14. Handbag (Purse) Hook
15. Manicure Tra
16. Air ring therma Jet
17. ECOJETTM Magnetic Drive
18. Hand Spra Spout
19. Low Profile Pedicure Stool
1. Headrest
2. Back Cushion with Massage
3. Armrest Cushion
4. Massage Remote Control
5. Aurora Bowl
6. Footrest with Calf Support
7. Digital control S stem
8. Drain Knob
9. Hot/Cold Water Mixer Valve
10. Auto-fill/Jet Knob
4
Spa Chair Dimensions & Weight:
Spa (Seat up-right): L=66” (134 cm), W=31” (79 cm) W/Tra 48” (121 cm), H=56” (142 cm)
Spa (full reclined): L=68” (172 cm)
Net Weight: 220 lbs | Shipping Weight: 230 lbs. | Max. Handling Load: 220 lbs.

5
Identifying Parts
IDENTIFYIN PARTS
P dicur Spa with Massag Syst m
11.Ventilation Inlet
12. Air-Jet Connector
13. Liner Hook
14. Up/Down Armrest
15. Handbag (Purse) Hook
16. Manicure Tra
17. Air ring therma Jet
18. ECOJETTM Magnetic Drive
19. Hand Spra Spout
20. Low Profile Pedicure Stool
1. Headrest
2. Back Cushion with Massage
3. Armrest Cushion
4. Massage Remote Control
5. Aurora Bowl
6. Footrest with Calf Support
7. Digital control S stem
8. Drain Knob
9. Hot/Cold Water Mixer Valve
10. Auto-fill/Jet Knob
IDENTIFYING PARTS FOR LUMINOUS ® MODEL
Spa Chair Dimensions & Weight:
Spa (Seat up-right): L=66” (134 cm), W=31” (79 cm) W/Tra 48” (121 cm), H=56” (142 cm)
Spa (full reclined): L=68” (172 cm)
Net Weight: 220 lbs | Shipping Weight: 230 lbs. | Max. Handling Load: 220 lbs.

6
Identifying Parts
IDENTIFYIN PARTS
IDENTIFYING PARTS FOR INFINITY ® MODEL
P dicur Spa with Massag Syst m
11. Ventilation Inlet
12. Air-Jet Connector
13. Liner Hook
14. Up/Down Armrest
15. Handbag (Purse) Hook
16. Manicure Tra
17. Air ring therma Jet
18. ECOJETTM Magnetic Drive
19. Hand Spra Spout
20. Low Profile Pedicure Stool
1. Headrest
2. Back Cushion with Massage
3. Armrest Cushion
4. Massage Remote Control
5. Aurora Bowl
6. Footrest with Calf Support
7. Digital control S stem
8. Drain Knob
9. Hot/Cold Water Mixer Valve
10. Auto-fill/Jet Knob
Spa Chair Dimensions & Weight:
Spa (Seat up-right): L=66” (134 cm), W=31” (79 cm) W/Tra 48” (121 cm), H=54” (137 cm)
Spa (full reclined): L=68” (172 cm)
Net Weight: 220 lbs | Shipping Weight: 230 lbs. | Max. Handling Load: 220 lbs.

7
WALL CLEARANCE & SPA TO SPA RECOMMENDED CLEARANCE
INSTALLATION OF PEDICURE SPA SEAT
1. FOLD & UNFOLD BACK-REST MASSAGE
INSTALLATION
VERY IMPORTANT: Both the back of the chair and seat are adjustable. When the seat is at a maximum
incline, one must allow 18"(44cm) from the back wall to the foot spa. This minimum distance assures an
unobstructed recline. Failure to follow this required dimension might damage our spa components and
plumbing connections, which will void our warrant .
Raise the backrest until a “click” is
heard. Make sure the lever is locked
before operating.
To fold down the backrest: Lift up lever handle
and push the backrest downward.

8
INSTALLATION
trench
Fig. 1 Fig. 2
Fig. 3 Fig. 4
Snap fit joint of seat cushion
Crossbar seat frame
St p 1: Attach the back cushion b placing
2 hooks left and right back frame on the
shaft massage frame.
St p 2: Pivot the back cushion up, then insert
snap fit joint of back cushion on the crossbar
top massage frame, press the back cushion
firml on the massage frame to secure.
St p 4: Pivot the seat cushion down, then
insert snap fit joint of seat cushion on the
crossbar seat frame, press the seat cushion
firml on the seat frame to secure.
St p 3: Attach the seat cushion b placing
Hook of back cushion
Shaft massage frame
Hook of seat cushion
Rear crossbar seat frame
Snap fit joint of back cushion
Crossbar top massage frame
2 hooks left and right seat cushion on the
rear crossbar seat frame.
INSTALLATION OF PEDICURE SPA CUSHION

9
ARMRESTS ASSEMBLY
INSTALLATION
trench
1) To install the armrest, position the armrest horizontally as shown above.
Align the rods and the notches as shown in detail A and B. Fully snap-in the
armrest until hearing a “click” sound.
2) To remove the armrest, pull up the locking ring as shown in figure and detail C,
then pull out the armrest.

INSTALLATION OF PLUMBING SYSTEM
NOTE: The drainage and water suppl s stem installation require a licensed plumber. Detailed
instructions can be found in the manual book. Instructions and local plumbing codes need to be
carefull complied to pass the cit inspections.
1. GRAVITY DRAIN
10
GRAVITY DRAIN
1-¼” flex hose with removable connector is provided for
eas installation (optional)
Backflow preventer (not included)
(Optional device based on local
plumming code)
½” ID cold water
½” ID hot water
Vent
Drainage pipe connect to waste s stem
through P-trap and vent.
Connect to sanitarConnect to sanitar
Underground P-trap
1-½” drainage pipe
The gravit drainage installation should compl with SECTION 701.0, 2018 UPC.
P-trap, vent, and connectors should compl with SECTION 1001.1 and 1001.2 UPC.
An alternative code needs to be complied with b the states not adopting UPC.
●Drainage s stem: SECTION 701.2 and 702.2 IPC (or local plumbing code).
●P-trap, vent, and connectors: SECTION 1002.1 and 1002.2 IPC (or local plumbing code).
The installer/plumber is responsible for obtaining and compl ing with the local plumbing code for
inspection. If an assistance is required from the vendor’s side, please contact our customer
service.
PLUMBING SYSTEM

2. POWER DRAIN
The power drainage installation should compl with SECTION 807.1, 2018 UPC.
P-trap, vent, and connectors should compl with SECTION 1001.1 and 1001.2 UPC.
An alternative code needs to be complied with b the states not adopting UPC.
●Drainage s stem: SECTION 701.2 and 702.2 IPC (or local plumbing code).
●P-trap, vent, and connectors: SECTION 1002.1 and 1002.2 IPC (or local plumbing code).
The installer/plumber is responsible for obtaining and compl ing with the local
plumbing code for inspection. If an assistance is required from the vendor’s
side, please contact our customer service.
11
½” ID cold water ½” ID hot water
¾” PVC drain
¾” drain pipe
¾” coupling
Check valve
PLUMBING SYSTEM

12
PLUMBIN SYSTEM
3. DRAIN SYSTEM RECOMMENDATION
4. HOT/COLD WATER SUPPLY SYSTEM
NOTE: The drainage and water suppl s stem installation require a licensed plumber. Instructions
and local plumbing codes need to be carefull complied to pass the cit inspections.
N w constructions: drain a good amount of water in
a bucket to remove all debris from the new hot/cold
water pipes before connecting to new SPA chairs
(figure 1).
Replacement Spas: Make sure to use new hot/cold
water hoses to replace old ones before installing a
new Spa chair. The old debris, rubber, or plastic chips
could clog the water inlet s stem.
** Failure to do so will void the warrant .
Height needs to be adjusted
Based on our salon setup
1-½” drain pipe
¾” to 1-½” T-connector
Wall
Connect to main drain
Check valve
6o slop to the end drainage
Detail A

13
(The Spa comes with a preinstalled ventilation s stem.Please contact our state department for the
requirements and regulations).
HỆ THỐNG THÔNG KHÍ
Connect the 2 vent pipes as needed.
INSTALLATION OF VENTILATION SYSTEM (OPTIONAL)
VENTILATION SYSTEM
1-1/2” Vent pipe kit supplied.
1-1/2” Vent pipe
(pre-installed in Spa base).

14
ELECTRICAL AND PEDICURE SPA COMPONENT SPECIFICATIONS
All electrical connections MUST be made b a licensed electrician following Local & National
Electrical and Building Codes.
SPECIFICATIONS LIST
Spa Dimensions & Weights
See page 2-6 for each model’s specifications
Adjustable Stool Pedicure Stool:
Manicure Stool:
12” – 13”.
16.25” – 20”
Spa Water Capacit ~ 4 US Gallon
Jet Motor 120 VAC. 85W 60Hz
Massage, Motors, Seat
Sliding & Reclining
24VDC, 120W Max
Discharge Pump Motor – 120V at 85W 60 Hz Maximum vertical lift: 3ft.
Flow rate 400 GPH @ floor level
Air Pump for Air-Jet 120V 70W 60Hz
Power source 115 VAC, 60HZ, 15A. The power needed per spa chair = 7 Amp
Electrical Switches
One (1) electro-mechanical knob for the Whirlpool rated at 5A
contacts.
One (1) electro-mechanical knob for the Drain. Rated at 5A contact.
Safet Pedicure Spa is UL Listed.
SPECIFICATIONS

PRE-OPERATIONAL SETUP
1. STEAMER SET UP
Drain Stopp r
Clamps
The air ring stand should fac
down. Press down the air ring to lock
it into the drain shoe.
Drain Sho
Air ring stand should fac up
press down air ring to lock it into the
drain stopper knob.
Note: The drain stopper will punch
through the plastic liner for draining
the water later.
NOTE:
R mov air ring b for drain wat r.
Air tub will g t hot wh n syst m is running - syst m will shut off if air tub pops out.
Air Ring Air Tub
Installing Air Tub to Air Ring
1. Not Using th Drain Stopp r
2. Using th Drain Stopp r
15
OPERATION & CARE
S l ct 1 of th 2 applications b low as n d d:
Plug in the other end of the pipe to the
Air-connector

PRE-OPERATIONAL SETUP
2. ECO- ET SET UP
Th syst m should b s t as th pictur abov b for ach s rvic s ction.
(Location of the Air Connector slightl varies on different models. Refer to the page 2-6 to locate).
16
Eco-Jet
Silicon
Pipe
Air-Ring
Drain
Stopper
Liner
OPERATION & CARE

REMOVING THE DRAIN KNOB & THE AUTO-FILL/JET KNOB
1. REMOVING THE DRAIN KNOB.
17
REMOVAL INSTRUCTIONS
St p 1. Pull out part 1.
St p 2. Loosen(do not remove) 3 black screws (not : th r ar 3 black scr ws
int rsp rs d with 3 whit scr ws).Then, remove part 2 from the front panel.
St p 3. Remove the 3 screws at the back of part 2 to remove the cover.
St p 4. Unplug the signal wire and remove the cable.
2. REMOVING THE AUTO-FILL/JET KNOB.
1
2
1
2
St p 1. Pull out part 1.
St p 2. Loosen(do not remove) 3 black screws (not : th r ar 3 black scr ws
int rsp rs d with 3 whit scr ws).Then, remove part 2 from the front panel.
St p 3. Unplug the signal wire.

Fauc t Ass mbly Instruction
FAUCET ASSEMBLY INSTRUCTION
Plastic
nut
Fauc t handl
Cartridg
arm
Cartridg
St p 1: To open cap cover , use a pointed
object ( pen tip, toothpick head…)put at
trench of cap cover and rotate counter
clockwise ( Fig.1).
St p 2: Remove mounting
screw and remove push button
( Fig.2).
St p 3: Insert socket tool into faucet
bod to remove plastic nut and faucet
handle ( rotate counter clockwise)
( Fig.3).
St p 4: Remove 3 screws
and remove cartridge
( Fig.4)
St p 5: When replacing the new cartridge. Pa full
attention on the 2 locking pins and the 2 guide holes
( fig .5) the must be full inserted and kept in place
during the process to avoid leaking.
St p 6: Plug the cartridge into the valve bod as instructed in step 5.
- Reverse step 4 b install the cartridge ring and 3 screws.
- Slowl turn the cartridge arm all the wa to the left “ H”
(see Fig.6.1 ) or match the arrow inside the valve bod
(see fig.6.2) .
- Line up the trench mark on the faucet handle with the “H”
on the valve bod and reverse step 3 to secure them .
- Reverse step 2 to install the push button .
- Reverse step 1 to install the push button chrome cover.
Fig .1
Fig .2
Fig .3
Fig .4
Fig .5
Fig .6.1
Fig .6.2
18
H

REMOVING THE FOOTREST.
STEP 1.
1. Pull out & remove the spout and do not
let the hose drop into the bottom base.
2. Raise the calf suport.
3. Remove the screw on font of footrest.
STEP 2.
1
2
3
1
2
Lift up the footrest & push footrest
backward.
19
REMOVAL INSTRUCTIONS
Other manuals for ELITE
1
This manual suits for next models
4
Table of contents
Languages:
Other Lexor Pedicure Spa manuals