LG F90 User manual

Connect 4G
MFL68500901 (1.0)
ENGLISH
User Guide

&RS\ULJKW/*(OHFWURQLFV,QF$OOULJKWVUHVHUYHG
/*DQGWKH/*ORJRDUHUHJLVWHUHGWUDGHPDUNVRI/*&RUS
DQGLWVUHODWHGHQWLWLHV$OORWKHUWUDGHPDUNVDUHWKHSURSHUW\
RIWKHLUUHVSHFWLYHRZQHUV

3
Important Customer Information
Before you begin
Before reading this user guide and getting started, please review the
separate Product Safety and Warranty Information guide for important
product safety and warranty information about your device.

4
Important Customer Information..............................................3
Table of Contents .......................................................................4
The Basics...................................................................................7
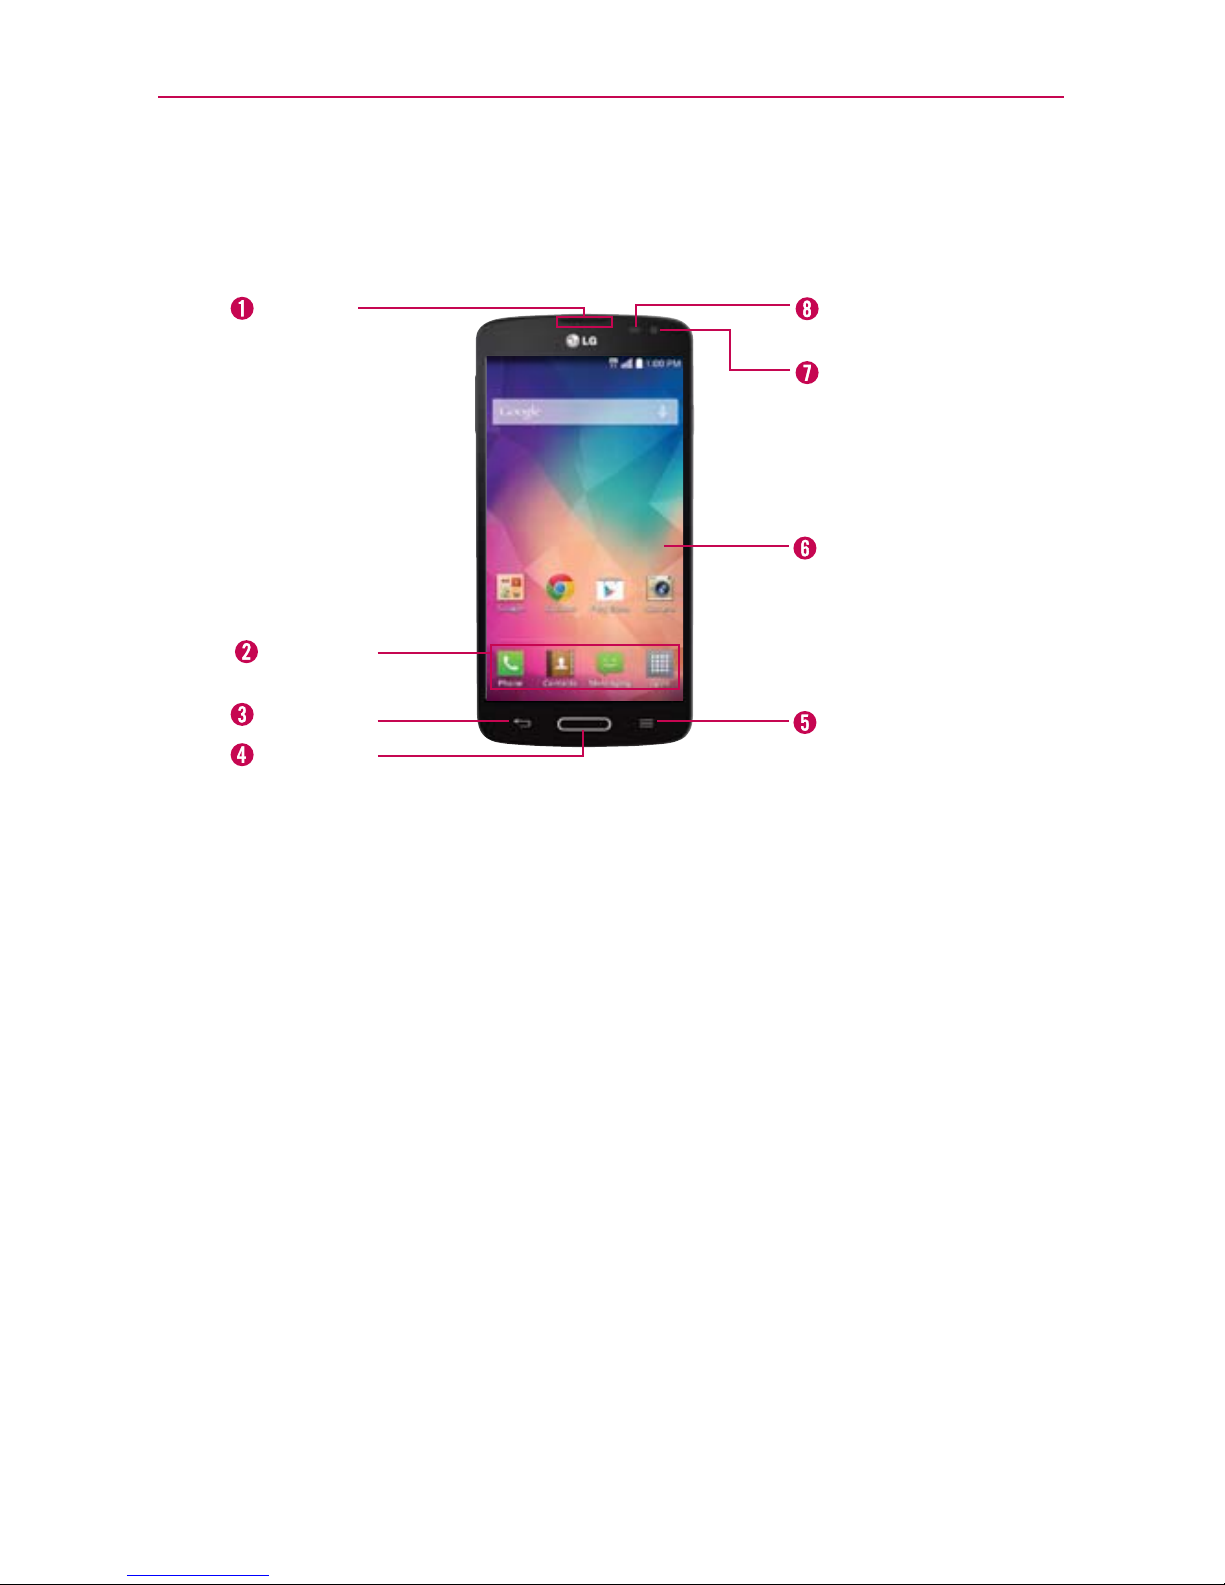
Phone Overview.....................................................................................................7
Setting Up Your Phone .......................................................................................10
Removing the Battery and SIM Card ................................................................13
Inserting and Removing a Memory Card..........................................................14
Charging the Phone............................................................................................15
Optimizing Battery Life ......................................................................................16
Turning the Phone On and Off..........................................................................18
Phone’s Status Icons .........................................................................................22
Getting to Know the Home Screen ..................................................................24
Touchscreen........................................................................................................29
Apps: How to View, Open, and Switch .............................................................36
Working with Menus ..........................................................................................42
Managing Notifications .....................................................................................43
Searching Your Phone and the Web................................................................. 47
Locking the Screen ............................................................................................49
Guest Mode ........................................................................................................53
Customizing the Home Screen.........................................................................54
Connecting to Networks and Devices ................................... 57
Connecting to Mobile Networks ....................................................................... 57
Connecting to Wi-Fi Networks .........................................................................58
USB Connection.................................................................................................60
SmartShare..........................................................................................................61
Calls .......................................................................................... 62
Placing and Ending Calls ..................................................................................62
Answering or Rejecting Calls ............................................................................65
Working With the Call Logs Tab .......................................................................66
Calling Your Contacts.........................................................................................68
Options During a Call ........................................................................................70
Managing Multiple Calls.....................................................................................71
Listening to Your Voicemail ............................................................................... 72
Table of Contents

5
Table of Contents
Web............................................................................................74
Chrome................................................................................................................ 74
Communication ....................................................................... 84
Contacts..............................................................................................................84
Messaging...........................................................................................................90
Email.................................................................................................................... 96
Gmail .................................................................................................................. 101
Hangouts............................................................................................................107
Entertainment ......................................................................... 110
Camera............................................................................................................... 110
Video Camera.................................................................................................... 116
Gallery ............................................................................................................... 120
Video Player...................................................................................................... 124
Play Store.......................................................................................................... 125
Music ..................................................................................................................127
YouTube™.......................................................................................................... 133
Tools.........................................................................................134
QuickMemo ...................................................................................................... 134
QSlide................................................................................................................ 136
Calendar............................................................................................................ 138
Calculator.......................................................................................................... 142
Alarm/Clock...................................................................................................... 144
Maps.................................................................................................................. 148
Weather............................................................................................................. 149
Voice Recorder ................................................................................................. 150
ThinkFree Viewer .............................................................................................. 152
File Manager..................................................................................................... 153
Tasks.................................................................................................................. 154

6Table of Contents
Settings ...................................................................................156
Safety........................................................................................181
Consumer Information About Radio Frequency Emissions......................... 183
Consumer Information on SAR ......................................................................187
FCC Hearing-Aid Compatibility (HAC) Regulations
for Wireless Devices......................................................................................... 189
Caution:
Avoid potential hearing loss............................................................................. 191
TIA Safety Information.................................................................................... 192
Safety Information ........................................................................................... 196
FDA Consumer Update ................................................................................... 201
Specifications ..........................................................................211
LIMITED WARRANTY STATEMENT ....................................212
Index ........................................................................................216

7
The Basics
Phone Overview
Front View
Proximity
Sensor
QuickTap
Bar
Back Key
Home Key
Menu Key
Home Screen
Earpiece
Front Camera
Lens
NOTES •All screen shots in this guide are simulated. Actual displays may vary.
•Instructions to perform tasks in this guide are based on the default settings and may
change depending on the mode and software version on your phone.
1. Earpiece Lets you hear callers and automated prompts.
2. QuickTap Bar Provides icons for quick, one-touch access to the apps
you use most often.
NOTE You can change the icons in the QuickTap Bar to suit your needs. To reposition, add, or
remove an icon, see page 25.
3. Back Key Tap to return to the previous screen. It also closes pop-up
items such as menus, dialog boxes, and the on-screen keyboard. Touch
and hold it to display your most recently used apps.
4. Home Key Press to return to the Home screen (or your default Home
screen panel from any of the Home screen extension panels). You can
also press it to wake your phone from screen timeout. Press and hold it
to access Google Now.
NOTE The
Home Key
LED illuminates when you have pending notification(s).

8The Basics
5. Menu Key Tap to open an Options menu with options that affect the
current screen or app. This only applies when available, depending on
the screen or app.
6. Home Screen Displays all of the items needed to operate your phone
including icons for app access, widgets, and the Status Bar (with status
icons) allowing simple touch access to all of its functions and features.
WARNING! Placing a heavy object on the phone or sitting on it can damage the LCD and
touchscreen functions.
7. Front Camera Lens Use to take pictures and record videos of yourself.
You can also use this for video chatting. Keep it clean for optimal
performance.
8. Proximity Sensor Senses proximity toward other objects. When making
and receiving calls, it automatically turns the backlight off and locks the
touchscreen by sensing when the phone is near your ear. This extends
battery life and prevents you from unintentionally activating the
touchscreen during calls.
NOTE Do not block the sensor or near the sensor to avoid problems with the touchscreen.
Rear View
Rear Camera
Lens
LED Flash
Back Cover
Speaker
NFC Touchpoint
9. Rear Camera Lens Use to take photos and record videos. Keep it clean
for optimal performance.

9
The Basics
10. NFC Touchpoint Use to exchange data with other NFC compatible
devices. Tap this location to an NFC tag or another NFC compatible
device.
11. Speaker Use to listen to the audio from the selected function (e.g.,
music, videos, sound clips, speakerphone, etc.).
12. Back Cover Encloses the battery compartment which protects the
battery and internal antenna.
13. LED Flash Brightens up the captured image or recorded video when
you turn on the flash.
Side Views
Power/Lock Key
Volume Keys
14. Volume Keys Press to adjust the ringer, the media volumes, or the
in-call volume during a call.
TIP With the screen backlight off (asleep), you can press and hold either of the
Volume
Keys
to activate the
Camera
app.
15. Power/Lock Key Press to turn off the screen backlight and lock the
screen, or turn the screen backlight back on. Press and hold to turn the
phone on/off, restart it, activate/deactivate Airplane mode, and change
the sound settings.

10 The Basics
Top and Bottom Views
USB/
Charging
Port
3.5mm
Headset Jack
Microphone
16. 3.5mm Headset Jack Allows you to plug in an optional headset for
convenient, hands-free conversations. You can also plug in headphones
to listen to music.
17. USB/Charging Port Allows you to connect the phone and the USB
Cable for use with the Charger Adapter, or other compatible
accessories.
18. Microphone Transmits your voice to the other caller. It's also used for
voice-activated functions.
Setting Up Your Phone
Step 1. Remove the Back Cover
Place your fingernail in the USB/Charging Port at the bottom of the phone
and pull the back cover off the phone.

11
The Basics
Step 2. Insert the SIM Card
Slide the SIM Card into the lower slot, located under the back cover.
Step 3. Insert the Battery
Insert the battery in its compartment, making sure to align the gold
contacts. Press down gently to secure the battery.

12 The Basics
Step 4. Replace the Back Cover
Place the cover over the back of the phone, then press down along the
edges to secure the cover.
Step 5. Charge the Phone
Before turning on your phone, fully charge the battery. Be sure to use the
USB cable and Charger adapter that came with your phone. Correctly orient
the USB cable plug before inserting it in the USB/Charging Port to avoid
damage to your phone. See
Charging the phone
on pages 15 & 16 for
more information.
NOTE It’s important to fully charge the battery before initial use of the phone.

13
The Basics
Removing the Battery and SIM Card
Removing the battery
1.
Turn the phone off and insert your fingernail in the USB/Charging Port at the
bottom of the phone, then gently pull the back cover off to remove it.
2. Use the fingertip cutout at the bottom of the battery compartment to lift the
battery out.

14 The Basics
Removing the SIM card
1. Turn the phone off, then remove the back cover and the battery (as
demonstrated in the previous instructions).
2. Locate the lower slot and gently slide the SIM Card out to remove it.
CAUTION If the microSD card is installed in your phone, please remove it from the upper slot
before trying to remove the SIM card.
Inserting and Removing a Memory Card
Inserting a microSD card
1. Remove the back cover (as demonstrated in the
previous instructions) and locate the dual slot
just above the upper-right corner of the battery
compartment. (microSD is inscribed near the
slot opening).
2. Position the microSD card (sold separately) with
the label side facing up and the gold contacts
toward the slot, then carefully slide it into the
upper slot until it's secured in place.
NOTE The microSD card can be easily damaged by improper operation. Please be careful when
inserting, removing, or handling it.

15
The Basics
To remove the microSD card
1. Unmount the microSD card.
From the Home screen, tap the
Menu Key
>
System settings
>
General
tab >
Storage
>
Unmount SD card
.
2. Remove the back cover and locate the microSD
card slot (as demonstrated in the previous
instructions).
3. Carefully pull the microSD card out to remove it.
To unmount the microSD card
It’s important to unmount the microSD card prior to removing it from the
phone to avoid damage to it or the data saved on the card.
1. From the Home screen, tap the
Menu Key
.
2. Tap
System settings
>
General
tab >
Storage
.
3. Tap
Unmount SD card
.
Charging the Phone
Your phone comes with a USB cable and a Charger adapter which connect
together to charge your phone. Correctly orient the USB cable plug before
inserting it in the USB/Charging Port to avoid damaging your phone.
NOTE Please only use an approved charging accessory to charge your LG phone. Improper
handling of the USB/Charging Port, as well as the use of an incompatible charger, may
cause damage to your phone and void the warranty.
1. Correctly orient the USB cable with the Charger adapter, and connect
them (as shown below).
USB Cable
Charger
Adapter

16 The Basics
2. The USB/Charging Port is located at the bottom of the phone. Correctly
orient the plug with the port before plugging it in. As shown below, the
USB logo on the cable will face upward.
3. Plug the adapter into an electrical outlet to begin charging.
Charging with the USB Cable
USB Cable
NOTE Make sure to correctly orient the
plug with the port before plugging it in.
When the phone is facing upward, the USB
logo on the cable will also face upward.
You can use your computer to charge your phone. To be able to charge with
the USB cable, you need to have the necessary USB drivers installed on
your PC first. Connect one end of the USB cable to the USB/Charging Port
on your phone (as shown above) and connect the other end to a USB port
on your PC. It’s best to use the rear USB port when connecting to a desktop
PC. The USB hub should be powered by an external power source.
NOTE You may experience a slower charging rate when charging from your computer.
Optimizing Battery Life
You can extend your battery’s life between charges by turning off features
that run in the background. You can also monitor how apps and system
resources consume battery power.
Tips to extend the life of your battery
Reduce the screen brightness and set a shorter screen timeout.
Turn off radio communications (such as Wi-Fi, Bluetooth, GPS, etc.) that
you’re not actively using. (Note that the GPS receiver is only turned on
when you’re using an app that makes use of it).
Turn off automatic syncing for Gmail, Calendar, Contacts, and other apps
if you don’t need it.

17
The Basics
Use the Battery saver feature (accessed in the Settings menu) to control
data activity, Wi-Fi connection, Bluetooth connection, and power used for
the phone such as screen brightness and notification light.
NOTE Allowing other devices to use your device's hotspot connection will drain your battery
more quickly.
To check the battery charge level
From the Home screen, tap the
Menu Key
>
System settings
>
General
tab >
Battery
.
The battery level (as a percentage of fully charged) and the battery status
(Charging or Discharging) is displayed at the top of the screen.
Checkmark the
Battery percentage on status bar
checkbox to display
the percentage of remaining battery charge on the Status Bar next to the
battery icon.
Tap
Battery saver
to view and/or modify your Battery saver settings.
To monitor and control what uses the battery
The Battery use screen allows you to see which apps are consuming the
most battery power. Information on this screen allows you to identify
downloaded apps you may want to turn off when not being used, so you
can get the most out of your battery power.
From the Home screen, tap the
Menu Key
>
System settings
>
General
tab >
About phone > Battery > Battery use.The top of this
screen displays a usage graph and below it, battery usage times. It lists
all of the apps or services using battery power from the greatest amount
of energy used to the least amount.
Tap an app or service in the Battery use screen to see the details about
its power consumption, including either how long since last connected
to a power source or how long you were last running on battery power.
Different apps or services offer different kinds of information, and they
may even include options to modify the settings so you can reduce
power consumption by that app.

18 The Basics
Battery saver mode
Battery saver mode changes certain settings to conserve battery power
until you can recharge your phone. If you turn Battery saver mode On, it will
automatically activate when the battery charge level drops to the level you
set. If Battery saver mode is off, you’ll be prompted to turn on Battery
saver mode when the battery reaches low levels.
1. From the Home screen, tap the
Menu Key
>
System settings
>
General
tab >
Battery
>
Battery saver
>
Turn Battery saver on
.
2. Select the option you want. Choose from
Immediately
, when the charge
drops to
10%
,
20%
,
30%
, and
50%
.
3. Checkmark each battery saving item you want to include. You can set
Auto-sync, Wi-Fi, Bluetooth, Vibrate on touch, Brightness, Screen
timeout, Front touch key light, and Home button LED.
4. Tap the switch at the top of the screen to turn it
on
.
NOTE You can also activate Battery saver mode using the Status Bar. Open the Notifications
panel, then tap the Battery saver icon in the Quick settings to toggle it on or off.
Turning the Phone On and Off
Turning the phone on
Press and hold the
Power/Lock Key
for a couple of seconds until
the screen turns on.
Turning the phone off
1. Press and hold the
Power/Lock Key
until the Phone options
menu appears.
2. Tap
Power off
in the Phone options menu.
3. Tap
OK
to confirm that you want to turn off the phone.

19
The Basics
Turning the screen on using the KnockON feature
The KnockON feature allows you to double-tap the screen to easily turn the
screen on or off.
Quickly double-tap the center of the screen to turn the screen on.
Quickly double-tap the Status Bar, an empty area on the Home screen,
or the Lock screen to turn the screen off.
NOTE The KnockON feature can be turned off in the Gestures menu. From the Home screen,
tap
Menu Key
>
System settings
>
General
tab >
Gestures
> remove the
checkmark from the
Screen on/off
checkbox .
To unlock the phone
If you don’t use the phone for a while, the screen and backlight will turn off
to conserve battery power. To unlock the phone:
1. Turn the screen on.
Press the
Power/Lock Key
. The default Lock screen will
appear.
OR
Press the
Home Key
to display the default Lock screen.
2. From the center of the screen, swipe in any
direction to unlock it.
To use a shortcut, swipe the shortcut icon at the
bottom of the screen in any direction. The screen
will unlock and launch the app.
NOTE The default Lock screen simply locks the screen to prevent
unintentional actions. For more security to guard against
unauthorized use, you can set an unlock requirement (such
as a pattern, PIN, password, knock code, or face recognition)
that will need to be entered to unlock it.

20 The Basics
To turn the phone sounds off
If you’re in a place where your phone sounds may disturb others, you can
quickly silence your phone from the Home screen.
From the Home screen, press and hold the
Power/Lock Key
then
tap the
Silent mode
icon .
NOTE Only one mode can be selected at a time. The currently activated mode (Silent ,
Vibration , or Sounds ) is underlined in blue. Tap any of the sounds mode icons to
switch to that mode.
OR
Open the Notifications panel and tap the Sound icon until is displayed.
NOTE You can also use the
Volume Down Key
to silence the phone, but not from the
Lock screen or screen timeout (which will launch the
Camera
app instead). Press it until
vibration is set, then press it again to turn all sounds off.
Your Google Account
You must sign into a Google Account to use Gmail, Hangouts, Google
Calendar, and other Google apps; to download apps from the Play Store; to
back up your settings to Google servers; and to take advantage of other
Google services on your phone.
IMPORTANT
•If you don’t sign into a Google Account during setup, you're prompted to sign in or to create a
Google Account the first time you start an app that requires one, such as Gmail or Play Store.
•When you sign in, you’re prompted to enter your username and password using the on-screen
keyboard.
•After you sign in, your contacts, Gmail messages, Calendar events, and other information from
these apps and services on the web are synchronized with your phone.
•If you have an enterprise account through your company or other organization, your IT
department may have special instructions on how to sign into that account.
Other manuals for F90
1
Table of contents
Other LG Cell Phone manuals