LG 55XF2B User manual

www.lg.com
OWNER’S MANUAL
Please read this manual carefully before operating the your set and retain it
for future reference.
55XF2B
LG Digital
Signage
(MONITOR SIGNAGE)

2
ENGLISH
TABLE OF CONTENTS
3 IMPORTANT PRECAUTIONS
3 Electrical Power Related Precautions
4 Precautions in installing the Product
4 Precautions in Moving the Product
5 Precautions in Using/Cleaning the
Product
5 On Disposal (Only, Hg lamp used LCD
Monitor)
6 LICENSES
7 ASSEMBLY AND PREPARATION
8 Parts and Buttons
8 Portrait Layout
9 REMOTE CONTROL
11 MAKING CONNECTIONS
11 Connecting to a PC
11 External Device Connection
12 Daisy Chain Monitors
13 - Using the Multi Display Mode
Function
14 Using the Input List
14 ENTERTAINMENT
14 Using My Media
14 - Connecting USB Storage Devices
16 - Files Supported by My Media
19 - Viewing Videos
20 - Viewing Photos
20 - Listening to Music
20 - Settings
21 SuperSign Contents
21 Information
21 File Manager
22 PICTURE ID Settings
23 USER SETTINGS
23 Main Menu Settings
23 - Quick Settings
24 - Picture Settings
28 - Sound Settings
29 - Network Settings
31 - General Settings
33 TROUBLESHOOTING
36 PRODUCT SPECIFICATIONS
38 IR CODES
40 TO CONTROL MULTIPLE
PRODUCTS
40 Connecting the Cable
40 RS-232C Configurations
40 Communication Parameter
41 Command Reference List
43 Transmission/Reception Protocol
WARNING: This product contains chemicals known to the State of California to cause cancer and birth
defects or other reproductive harm. Wash hands after handling.

3
ENGLISH
Important Precautions
Please read these safety precautions carefully before using the
product.
WARNING
Failure to follow those warnings may result in death, serious
injury or damage to the product or other property.
Electrical Power Related Precautions
•Use only the power cord supplied with the unit or another
manufacturer's authorized cord.
►Failure to do so may result in fire or electrical shock or damage to
the product.
•Use only a properly grounded plug and receptacle.
►If you do not you may be electrocuted or injured. Or the product
might be damaged.
•Do not use a damaged or loose plug.
►This may cause electrical shock or fire.
•Operate the display only from a power source (i.e. voltage)
indicated in the product specification.
►Otherwise the product can be damaged, fire can occur or you may be
electrocuted. If you are not sure what type of power supply you have,
consult a certified electrician.
•In the presence of thunder and lightning, never touch the power
cord and signal cable because it can be very dangerous.
►It can cause electric shock.
•Do not connect several extension cords, electrical appliances
or electrical heaters to a single outlet. Use a power strip with a
grounding terminal designed for exclusive use with the computer.
►A fire can break out due to overheating.
•Do not touch the power plug with wet hands. Additionally, if
the cord pin is wet or covered with dust, dry the power plug
completely or wipe dust off before plugging in the cord.
►You may be electrocuted due to excess moisture.
•If you don’t intend to use the product for a long time, unplug the
power cable from the product.
►Covering dust can cause a fire, or insulation deterioration can cause
electric leakage, electric shock or fire.
•Insert the power plug firmly so it cannot come loose.
►A loose connection can cause fire.
•Hold the plug when pulling out the power cable. Do not pull the
plug out by the wire. Do not bend the power cord with excessive
force or put heavy objects on the power cord.
►The power line can be damaged, which may cause electric shock
or fire.
WARNING
•Do not insert metal or other conductive materials into the product
openings. Additionally, do not touch the power cable right after
plugging into the wall input terminal.
►You may be electrocuted.
•The appliance coupler is used as the disconnect device.
•Please make sure the device is installed near the wall outlet to
which it is connected and that the outlet is easily accessible.
•Do not unplug the power cord while the product is in use.
►Electrical shock can damage the product.
•As long as this unit is connected to the AC wall outlet, it is not
disconnected from the AC power source even if the unit is turned
off.

4
ENGLISH
Precautions in installing the Product
•Keep away from heat sources like heaters or open flames.
►Electrical shock, fire, malfunction or deformation may occur.
•Keep the packing anti-moisture material or vinyl packing out of
the reach of children.
►Anti-moisture material is harmful if swallowed. If swallowed by
mistake, force the patient to vomit and visit the nearest hospital.
Additionally, vinyl packing can cause suffocation. Keep it out of the
reach of children.
•Do not put heavy objects on the product on sit upon it.
►If the product collapses or is dropped, you may be injured. Children
must pay particular attention.
•Do not leave the power or signal cable where someone can trip
over it.
►The passerby can falter, which can cause electrical shock, fire, product
breakdown, or injury.
•Install the product in a neat and dry place. Do not use near water.
►Dust or moisture can cause electrical shock, fire, or product damage.
•Do not add accessories that have not been designed for this
display.
•If you smell smoke or other odors or hear a strange sound from the
product unplug the power cord and contact LG Customer Service.
►If you continue to use without taking proper measures, electrical
shock or fire can occur.
•If you dropped the product or the case is broken, turn off the
product and unplug the power cord.
►If you continue to use without taking proper measures, electrical
shock or fire can occur. Contact LG Customer Service.
•Do not drop an object on or apply impact to the product. Do not
throw any toys or objects at the product.
►It can cause injury to humans, problems to the product and damage
the display.
•Keep out of reach of children and do not place toys near the
product.
•Make sure the product ventilation hole is not blocked. Install the
product more than 10cm from the wall.
►If you install the product too close to the wall, it may be deformed or
fire can break out due to internal heat build-up.
•Do not cover the product with cloth or other material (e.g., plastic)
while plugged in.
►The product can be deformed or fire can break out due to internal
overheating.
•Place the product on a flat and stable surface that is large enough
to support the product.
►If the product is dropped, you may be injured or the product may
be broken.
•Install the product where no electromagnetic interference occurs.
•Keep the product away from direct sunlight.
►The product can be damaged.
Precautions in Moving the Product
•Make sure to turn off the product.
►You may be electrocuted or the product can be damaged.
•Make sure to remove all cables before moving the product.
►You may be electrocuted or the product can be damaged.
•When lifting or moving the product, do not hold it upside down
while holding only the stand.
►This may cause the product to fall resulting in damage or injury.
•Do not shock the product when moving it.
►You may be electrocuted or the product can be damaged.
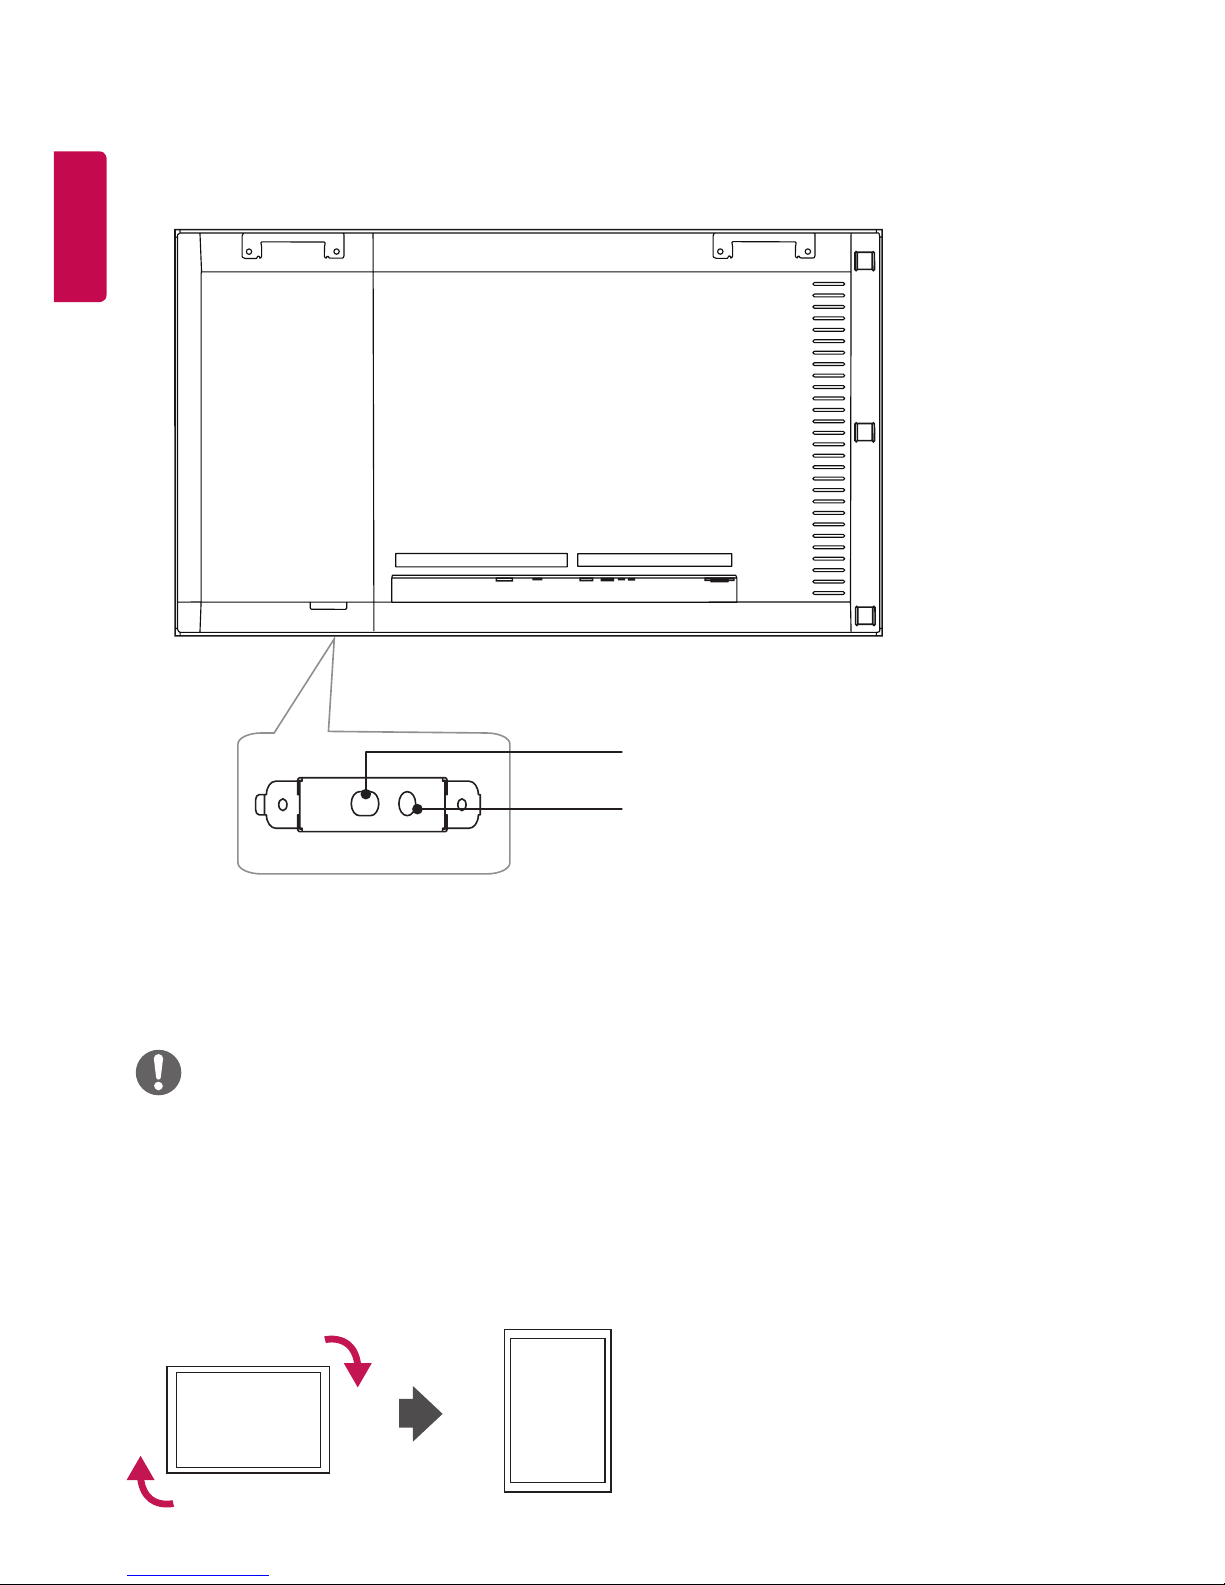
•Make sure the panel faces forward and hold it with both hands
to move.
►If you drop the product, the damaged product can cause electric
shock or fire.
•Do not place the product face down.
►This may damage theTFT-LCD screen.
WARNING
WARNING
•Do not place the product on the floor.
►Small children and others may trip over it.
•Do not install this product on a wall if it could be exposed to oil
or oil mist.
►This may damage the product and cause it to fall.
•For displays with glossy bezels the user should consider the
placement of the display as the bezel may cause disturbing
reflections from surrounding light and bright surfaces.

5
ENGLISH
WARNING
Precautions in Using/Cleaning the
Product
•Do not attempt to disassemble, repair or modify the product
yourself.
►Fire or electric shock can occur.
►Contact LG Customer Service for repair.
•When cleaning the product, unplug the power cord and scrub
gently with a soft cloth to prevent scratching. Do not clean with a
wet cloth or spray water or other liquids directly onto the product.
An electric shock may occur. (Do not use chemicals such as
benzene, paint thinners, or alcohol.)
•Keep the product away from water.
►Fire or electric shock accident can occur.
•Avoid high temperatures and humidity.
•Do not put or store flammable substances near the product.
►There is a danger of explosion or fire.
•Keep the product clean at all times.
•Take a comfortable and natural position when working with the
product.
•Take a regular break when working with the product for a long
time.
•Do not press on the panel with a hand or sharp object such as nail,
pencil or pen, or make a scratch on it.
•Keep proper distance from the product and rest from time-to-time.
►Your vision may be impaired if you look at the product too closely
or for too long.
•Set the appropriate resolution by referring to the User’s Guide.
•Keep small accessories out of the reach of children.
•Displaying a still image for long time on the monitor may leave
persistent image or stain on the monitor screen. To avoid this
problem, use a screen saver and power off when this product is not
used. Persistent image or screen burn caused by long time usage
are not covered by the warranty on this product.
•Do not use products using high voltage around the Monitor. (e.g.,
a bug zapper.)
►Monitor may have malfunction as its electrical shock.
•Spray water onto a soft cloth 2 to 4 times, and use it to clean the
front frame; wipe in one direction only.Too much moisture may
cause staining.
On Disposal (Only, Hg lamp used LCD
Monitor)
•The fluorescent lamp used in this product contains a small amount
of mercury.
•Do not dispose of this product with general household waste.
•Disposal of this product must be carried out in accordance to the
regulations of your local authority.

6
ENGLISH
LICENSES
Supported licenses may differ by model. For more information of the licenses, visit www.lg.com.
The terms HDMI and HDMI High-Definition Multimedia Interface, and the HDMI
logo are trademarks or registered trademarks of HDMI Licensing LLC in the United
States and other countries.
This DivX Certified device has passed rigorous testing to ensure it plays DivX
video. To play purchased DivX movies, first register your device at vod.divx.com.
Find your registration code in the DivX VOD section of your device setup menu.
DivX Certified to play DivX video up to HD 1080p, including premium content.
DivX , DivX Certified and associated logos are trademarks of DivX, LLC and are
used under license.
Covered by one or more of the following U.S. patents: 7,295,673; 7,460,668;
7,515,710; 7,519,274.
Manufactured under license from Dolby Laboratories. Dolby and the double-D
symbol are trademarks of Dolby Laboratories.
•The warranty will not cover any damage caused by using the product in an excessively dusty environment.
NOTE
For DTS patents, see http://patents.dts.com. Manufactured under license from DTS
Licensing Limited. DTS, the Symbol, & DTS and the Symbol together are registered
trademarks, and DTS 2.0 Channel is a trademark of DTS, Inc. © DTS, Inc. All Rights
Reserved.

7
ENGLISH
LICENSES
Supported licenses may differ by model. For more information of the licenses, visit www.lg.com.
ASSEMBLY AND PREPARATION
•Always use genuine components to ensure safety and product performance.
•The product warranty will not cover damage or injury caused by the use of unauthorized components.
CAUTION
•The accessories provided with your product may vary depending on the model or region.
•Product specifications or contents in this manual may be changed without prior notice due to upgrade of
product functions.
•SuperSign Software and Manual
- Downloading from the LG Electronics website.
- Visit the LG Electronics website (www.lgecommercial.com/supersign) and download the latest software for
your model.
NOTE

8
ENGLISH
Parts and Buttons
Illuminance sensor/
IR Receiver
Power Indicator
•Illuminance sensor Adjusts the screen brightness by measuring the amount of light.
•IR Receiver This is where the unit receives signals from the remote control.
•Power Indicator This Indicator lights up red when the display operates normally (on mode). If the display is
in sleep mode (in Power Saving mode), this indicator changes color to amber.
Portrait Layout
When installing in a portrait layout, rotate the monitor clockwise 90 degrees (when facing the screen).
•You can set the status of the power indicator in Installation -> Signage Setup.
NOTE

9
ENGLISH
REMOTE CONTROL
The descriptions in this manual are based on the buttons on the remote control. Please read this manual
carefully to use the monitor correctly.
To install batteries, open the battery cover, place batteries (1.5 V AAA) matching and terminals to the
labels inside the compartment, and close the battery cover.
To remove the batteries, perform the installation actions in reverse. The illustrations may differ from the actual
accessories.
•Do not mix old and new batteries, as this may
damage the remote control.
•Be sure to point the remote control toward the
remote control sensor on the monitor.
(POWER) Turns the monitor on or off.
Turns the monitor on.
Turns the monitor off.
Reduces power consumption by adjusting peak
screen brightness.
Selects the input mode.
This model does not support this.
Toggles between numerical and alphabetical.
(Depending upon the model, this feature may not be supported.)
Number and Alphabet buttons
Enters numerical or alphabetical characters depending upon the setting.
(Depending upon the model, this feature may not be supported.)
Deletes the entered numerical or alphabetical character.
(Depending upon the model, this feature may not be supported.)
Volume Up/Down Button Adjusts the volume.
Selects the Aspect Ratio mode.
Automatically adjusts picture position and minimizes image
instability (available for RGB input only). (Depending upon the
model, this feature may not be supported.)
Mutes all sounds.
Adjusts the brightness of the display. PAGE Function is not
supported in the this model. (Depending upon the model,
this feature may not be supported.)
CAUTION

10
ENGLISH
Selects the Picture Mode.
Activates the Launcher.
This model does not support this.
Accesses the main menus or saves your input and exit menus.
SuperSign menu key (Depending upon the model, this feature
may not be supported.)
Navigation Buttons Scrolls through menus or options.
Selects menus or options and confirms your input.
Allows you to move back one step in the user interaction function.
Quit all OSD tasks and applications.
Allows you to control various multimedia devices to enjoy
multimedia simply by using the remote control through the
SimpLink menu. (Depending upon the model, this feature
may not be supported.)
TILE This model does not support this.
When the Picture ID number matches the Set ID
number, you can control whichever monitor you
want in multi-display format.
USB Menu Control Buttons Controls media playback.

11
ENGLISH
MAKING CONNECTIONS
You can connect various external devices to your monitor. Change the input mode and select the external
device you want to connect.
For more information about external device connections, see the user manual provided with each device.
Connecting to a PC
Some of the cables are not provided.
This monitor supports the Plug & Play* feature.
* Plug & Play: a feature that enables a PC to recognize devices attached by the user without device
configuration or user intervention when powering up.
External Device Connection
Connect a HD receiver, DVD, or VCR player to the monitor and select an appropriate input mode.
Some of the cables are not provided. For the best picture and sound quality, connecting external devices to
your monitor using HDMI cables is recommended.
•Connect the signal input cable and tighten it by turning the screws clockwise.
•Do not press the screen with your finger for a prolonged period as this may result in temporary distortion on
the screen.
•Avoid displaying static images on the screen for a long period of time to prevent image burn. Use a
screensaver if possible.
•A wireless communication device near your monitor can affect the image.
CAUTION
•For the best image quality, using the monitor with HDMI connection is recommended.
•To comply with the standard specifications of the product, use a shielded interface cable with a ferrite core,
such as a DVI-D cable.
•If you turn the monitor on when the set is cold, the screen may flicker. This is normal.
•Sometimes red, green, or blue spots may appear on the screen. This is normal.
•Use a High Speed HDMI /TM cable.
•Use a certified cable with the HDMI logo attached. If you do not use a certified HDMI cable, the screen may
not display or a connection error may occur.
•Recommended HDMI Cable Types
- High-Speed HDMI /TM Cable
- High-Speed HDMI /TM Cable with Ethernet
•If you cannot hear any sound in HDMI mode please check your PC settings. Some PCs require you to
manually change the default audio output to HDMI.
•If you want to use HDMI-PC mode, you must set your PC/DTV to PC mode.
•You may experience compatibility issues if you use HDMI-PC mode.
•Make sure the power cable is disconnected.
•If you connect a gaming device to the monitor, use the cable provided with the gaming device.
•It is recommended to use the speakers that are provided as optional accessories.
•High Speed HDMI /TM cables transmit a HD signal up to 1080p and higher.
NOTE

12
ENGLISH
•If you set the tile mode using DVI-D or HDMI, you will not be able to watch HDCP-encrypted content.
•If the signal cable between the product and your PC is too long, make sure to use the Booster or optical
cable.
NOTE
Monitor 1 Monitor 2 Monitor 3 Monitor 4
Daisy Chain Monitors
To use different products connected to each other, connect one end of the signal input cable (DP Cable) to the
DP Out connector of Monitor 1 and connect the other end to the DP In connector of the other product.
* DP Cable - Use a DP cable that is certified to DP1.1a (SST), DP1.2 (MST) or higher.

13
ENGLISH
Using the Multi Display Mode Function
The Multi Display Mode function displays a video signal received from DP In either in single mode (SST: Single
Stream Transport) or multi-mode (MST: Multi Stream Transport) through DP Out.
•This function can be configured in the Installation Menu (For more information, refer to the Installation
Menu manual.)
•If it is On, the image of each display is displayed in multi-mode.
•If it is Off, the image of each display is displayed in single mode.
•The multi-mode is available in a PC supporting DISPLAYPORT 1.2.
•Multi-mode can connect as many as four monitors. (at the recommended resolution)
•When this function is used, your monitor may not work properly depending on the video card. Reboot the
PC after setting the function to Off for stable screen output when not in use.
•In case of using DVI-D/HDMI Input to DP daisy chain, please set Multi Display mode function to off.
•This feature is designed to be compatible with the MP700 Media player.

14
ENGLISH
Using the Input List
yHDMI1 -> HDMI2 -> DISPLAYPORT -> DVI-D
•Do not turn off the monitor or remove a USB storage device when the My Media screen is activated. This
could result in loss of files or damage to the USB storage device.
•Back up files you have saved on a USB storage device frequently, as loss or damage to the files may be not
covered by the warranty.
ENTERTAINMENT
Using My Media
Connecting USB Storage Devices
Connect a USB storage device such as a USB flash memory or an external hard drive to the display and use
multimedia features.
CAUTION

15
ENGLISH
Tips for using USB storage devices
•Only a USB storage device can be recognized.
•A USB device does not work effectively when it is connected via a USB hub.
•A USB storage device using an automatic recognition program may not be recognized.
•A USB storage device using its own driver may not be recognized.
•The recognition speed of a USB storage device may depend on each device.
•Please do not turn off the display or unplug the USB storage device when the connected device is working. If
the USB storage device is suddenly disconnected, the stored files or the device itself may be damaged.
•Please do not connect a USB storage device which was modified to work on a PC. The device may cause the
monitor to malfunction or the content to fail to be played. Use only a USB storage device which contains
normal music, image or video files.
•A USB storage device formatted as a utility program not supported by Windows may not be recognized.
•A USB storage device (over 0.5 A) which requires an external power supply must be connected to a power
supply separately. If it is not, the device may not be recognized.
•Please connect the USB storage device using the cable provided by the device manufacturer.
•Some USB storage devices may not be supported or operate smoothly.
•File alignment method of USB storage devices is similar to that of Window XP and filenames can recognize
up to 100 English characters.
•Back up important files regularly as data stored on a USB storage device may be damaged. We will not be
responsible for any data loss.
•If the USB HDD does not have an external power source, the USB device may not be detected. To ensure the
device is detected, connect the external power source.
- Use a power adapter for an external power source. We do not provide a USB cable for an external power
source.
•If your USB storage device has multiple partitions, or if you use a USB multi-card reader, you can use up to
four partitions or USB storage devices.
•If a USB storage device is connected to a USB multi-card reader, its volume data may not be detected.
•If the USB storage device does not work properly, disconnect and reconnect it.
•Detection speed differs from device to device.
•If the USB storage device is connected in Standby Mode, the specific hard disk will automatically be loaded
when the display is turned on.
•The recommended capacity is 1 TB or less for a USB external hard drive and 32 GB or less for USB memory
stick.
•Any device with more than the recommended capacity may not work properly.
•If a USB external hard drive with an Energy Saving function does not work, try turning the hard drive off and
on again.
•USB storage devices below USB 2.0 are also supported but may not function correctly in the videos.
•A maximum of 999 sub-folders or files can be recognized under one folder.

16
ENGLISH
Files Supported by My Media
Supported External Subtitle Format
•*.smi, *.srt, *.sub (MicroDVD, SubViewer 1.0/2.0), *.ass, *.ssa, *.txt (TMPlayer), *.psb (PowerDivX), *.dcs (DLP
Cinema
To use Select Play,
Photos/ Videos/ Music
•Play Selection plays back selected content.
To set Device Selection,
Photos/ Videos/ Music
•Device Selection import contents from the selected device.

17
ENGLISH
Supported Internal Subtitle Format
•FULL HD Video
1920 X 1080: XSUB (Supports internal subtitles generated from DivX6)
Supported Video Codec
Extension Codec
.asf
.wmv
Videos VC-1 Advanced Profile (excluding WMVA), VC-1 Simple and Main Profiles
Audio WMA Standard (excluding WMA v1/WMA Speech), WMA 9 Professional
.divx
.avi
Videos DivX3.11, DivX4, DivX5, DivX6, XViD (except 3 warp-point GMC), H.264/AVC, Motion
Jpeg, MPEG-4
Audio MPEG-1 Layer I, II, MPEG-1 Layer III (MP3), Dolby Digital, Dolby Digital Plus, LPCM,
ADPCM, DTS
.mp4
.m4v
.mov
Videos H.264/AVC, MPEG-4
Audio AAC, MPEG-1 Layer III (MP3)
.3gp
.3g2
Videos H.264/AVC, MPEG-4
Audio AAC, AMR-NB, AMR-WB
.mkv Videos MPEG-2, MPEG-4, H.264/AVC, VP8
Audio Dolby Digital, PCM, DTS, MPEG-1 Layer I, II, MPEG-1 Layer III (MP3), Vorbis, AAC
.ts
.trp
.tp
.mts
Videos H.264/AVC, MPEG-2
Audio MPEG-1 Layer I, II, MPEG-1 Layer III (MP3), Dolby Digital, Dolby Digital Plus, AAC,
PCM
.mpg
.mpeg
.dat
Videos MPEG-1, MPEG-2
Audio MPEG-1 Layer I, II, MPEG-1 Layer III (MP3)
.vob Videos MPEG-1, MPEG-2
Audio Dolby Digital, MPEG-1 Layer I, II, DVD-LPCM

18
ENGLISH
Supported Audio File
File Format Item Information
.MP3 Bit rate 32 Kbps to 320 Kbps
Sample freq. 16 KHz to 48 KHz
Support MPEG1, MPEG2, Layer2, Layer3
.wav Support PCM
.ogg Support Vorbis
.wma Support WMA
Supported Photo File
File Format Format Item
2D (jpeg, jpg,
jpe)
JPEG yMinimum : 64 x 64
yMaximum: Normal Type: 15360 (W) x 8640 (H) / Progressive Type: 1920 (W) x 1440
(H)
2D (png) PNG yMinimum : 64 x 64
yMaximum: 1920 (W) x 1080 (H)
2D (bmp) BMP yMinimum : 64 x 64
yMaximum: 1920 (W) x 1080 (H)

19
ENGLISH
Viewing Videos
Play video files on display. All of the saved video files are shown in your display.
To play video files on display
Videos
Tips for Playing Video Files
•Some user-created subtitles may not work properly.
•Some special characters in subtitles are not rendered.
•HTML tags are not supported in subtitles.
•Subtitles in languages other than the supported languages are not available.
•The screen may suffer temporary interruptions (image stoppage, faster playback, etc.) when the audio
language is changed.
•A damaged video file may not play correctly, or some player functions may not be usable.
•Video files produced with some encoders may not be played correctly.
•If the video and audio structure of a recorded file is not interleaved, either video or audio is outputted.
•Depending on the frame, HD videos with a maximum of 1920 x 1080 @ 25/30 P or 1280 x 720 @ 50/60P are
supported.
•Depending on the frame, videos with resolutions higher than 1920 x 1080 @ 25/30 P or 1280 x 720 @ 50/60 P
may not play correctly.
•Video files other than the specified types and formats may not play correctly.
•Maximum bit rate of playable video file is 20 Mbps. (Motion JPEG: 10 Mbps only)
•We cannot guarantee smooth playback of files encoded level 4.1 or higher in H.264 / AVC.
•Video files more than 30 GB in file size are not supported.
•A DivX video file and its subtitle file must be located in the same folder.
•A video file name and its subtitle file name must be identical for it to be displayed.
•Playing a video via a USB connection that does not support high-speed connection may not function
correctly.
•Files encoded with GMC (Global Motion Compensation) may not be played.
•Option values changed in Videos do not affect the Photos and Music. and in turn are not affected by option
values changed in Photos or Music.
•Option values changed in Photos and Music do affect each other.
•When restarting a video file after stopping it, you can play from the point at which it was stopped.
•Only 10,000 sync blocks can be supported within the subtitle file.
•When playing a video, you can adjust the picture size by pressing the ARC button.
•Korean subtitle is supported only when the OSD menu is in Korean.
•The code page options may be disabled depending on the language of the subtitle files.
•Select the appropriate code page for the subtitle files.
NOTE

20
ENGLISH
Viewing Photos
The displays on the screen may differ from the
model.
Viewing image files
Photos
Listening to Music
Viewing music files
Music
•Files with unsupported extensions are not
displayed.
•If a file is invalid, a broken image and the
message Unrecognizable file are displayed.
•Damaged music files are displayed as 00:00 and
will not be played.
•A music file downloaded from a paid service
with copyright protection will not play, and
incorrect information may be displayed during
playback.
•You can use , , , , buttons on
the remote control also in this mode.
•You can use the button to select the next
track and the button to select the previous
track.
•If you press the button within 5 seconds
after playing the song, you will return to the
previous song; if you press the same button
after 5 seconds, you will return to the start of
the song.
NOTE
Settings
You must register your product to play a DRM-
protected DivX video.
In order to register/deregister purchased or
rented DivX VOD contents
Settings DivX VOD
In order to play purchased or rented DivX VOD
contents, you should register your device with the
10-digit DivX registration code from your device at
www.divx.com/vod.
•Registration view the registration code of your
display.
•Deregistration cancel the registration.
•While you are checking the registration code,
some buttons may not work.
•If you use the DivX registration code of another
device, you cannot play rented or purchased
DivX files. Use only the DivX registration code
assigned to your product.
•Video or audio files that are not converted using
the standard DivX codec may be corrupted or
not play.
•The DivX VOD code allows you to activate up to
6 devices under one account.
•After deregistration, you must register your
device again to see DivX VOD contents.
NOTE
This manual suits for next models
1
Table of contents
Other LG Digital Signage manuals
Popular Digital Signage manuals by other brands

All Traffic Solutions
All Traffic Solutions SpeedAlert 18 quick start guide

Panasonic
Panasonic Digital Signage Specifications

hanshow
hanshow HS-AT3701 product manual

Symbol
Symbol MicroKiosk MK1000 manual

Sharp
Sharp PN-U553 Specifications

All Traffic Solutions
All Traffic Solutions SpeedAlert 18 quick start guide