LG Studio LSES302ST User manual

OWNER’S MANUAL
ELECTRIC RANGE
LSES302ST
Please read this guide thoroughly before operating
and keep it handy for reference at all times.
P/No.: MFL62114703 www.lg.com
ENGLISH ESPAÑOL

2
INTRODUCTION
IMPORTANT SAFETY INFORMATION ....3-9
SURFACE CONTROLS COOKING
Locations of Surface Elements and Controls ............ 10
Setting Surface Controls............................................. 11
Hot Surface Indicator.................................................. 11
Using the Element ................................................. 11-12
Recommended Surface Cooking Setting ................... 12
Tips to Protect the Glass/Ceramic Cooktop Surface .. 13
Glass/Ceramic Cooktop Surface ................................ 13
Cooking Areas ............................................................ 14
Using the Proper Cookware ....................................... 14
Home Canning Tips.................................................... 14
LOWER OVEN CONTROLS
Using the Lower Oven ............................................... 15
PARTS AND FEATURES
Parts and features ...................................................... 16
Control panel features ............................................... 17
OPERATING INSTRUCTIONS
Clock........................................................................... 18
Minimum & Maximum Default Settings....................... 18
Timer On/Off............................................................... 19
Special Features of your Oven Control .................20-21
Before using Oven Racks........................................... 22
Telescopic Rack.......................................................... 23
Cooking Mode .......................................................24-34
- Bake....................................................................... 24
- Baking layer cakes................................................. 25
- Broil........................................................................ 26
- Recommended Broiling guide................................ 27
- Dual Convection Bake ......................................28-29
- Convection Roast................................................... 30
- Timed cook............................................................. 31
- Delayed Timed Cook.............................................. 32
- Warm/Proof............................................................ 33
- Healthier Roast ...................................................... 34
- Meat Probe .......................................................35-36
- The Favorite........................................................... 36
To Turn On or Off the oven light ................................. 36
Oven Lockout feature ................................................. 37
Self Clean..............................................................38-40
MAINTENANCE
Care & Cleaning ....................................................41-42
Cleaning the Glass/Ceramic Cooktop ...................42-43
Removing & Replacing the Lift-off Oven door ............ 44
Door Care Instructions................................................ 44
Removing & Replacing the Lower oven Drawer......... 45
TROUBLESHOOTING
Before Calling for Service ...................................46-49
WARRANTY
Warranty for Customers in the U.S.A .......................50
THANK YOU!
Congratulations on your
purchase and welcome to the
LG family. Your new LG Electric
range combines precision
cooking features with simple
operation and stylish design.
Follow the operating and care
instructions in this manual and
your range will provide you with
many years of reliable service.
Staple your receipt here.
Product Registration Information
Model:
Serial Number:
Date of Purchase:

3
ENGLISH
IMPORTANT SAFETY INFORMATION
SAFETY PRECAUTIONS
To reduce the risk of tipping of the range, the range
must be secured by properly installing anti-tip
bracket.
• To check that the anti-tip bracket is properly
installed:
Grasp the top rear edge of the range back guard
and carefully attempt to tilt it forward. Verify that
the anti-tip devices are engaged.
• Lower oven: Remove drawer and visually inspect
that the rear leveling leg is fully inserted into the
anti-tip bracket.
• Refer to the installation manual for proper anti-tip
bracket installation.
• Be certain your appliance is properly installed and
grounded by a qualified technician.
• Do not repair or replace any part of the appliance
unless specifically recommended in the manual.
• All other servicing should be referred to a
qualified technician.
• Always disconnect power to appliance before
servicing by unplugging, removing the fuse or
switching off the circuit breaker.
READ ALL INSTRUCTIONS BEFORE USE
Read and follow all instructions before using your oven to prevent the risk of fire, electric shock, personal injury,
or damage when using the range. This guide does not cover all possible conditions that may occur. Always
contact your service agent or manufacturer about problems that you do not understand.
WARNING
This symbol will alert you to hazards or unsafe practices which
could cause serious bodily harm or death.
CAUTION
This symbol will alert you to hazards or unsafe practices which could
cause bodily injury or property damage.
This is the safety alert symbol. This symbol alerts you to potential hazards that can
kill or hurt you and others. All safety messages will follow the safety alert symbol
and either the word WARNING or CAUTION. These words mean:
WARNING
• DO NOT step or sit on the door.
Install the Anti-Tip Bracket packed
with range.
- The range could be tipped and injury
might result from spilled hot liquid,
food, or the range itself.
- If the range is pulled away from the
wall for cleaning, service, or any
other reason, ensure that the anti-tip
bracket is properly re-engaged when
the range is pushed back against the
wall.

4
IMPORTANT SAFETY INFORMATION
READ ALL INSTRUCTIONS BEFORE USE
SAFETY PRECAUTIONS
(cont')
• DO NOT TOUCH HEATING ELEMENTS OR
INTERIOR SURFACES OF OVEN.
Heating elements may be hot even though they
are dark in color. Interior surfaces of an oven
become hot enough to cause burns. During and
after use, do not touch or let clothing or other
flammable materials contact heating elements or
interior surfaces of oven until they have had
sufficient time to cool. Other surfaces of the
appliance may become hot enough to cause
burns. Among these surfaces are oven vent
openings and surfaces near these openings, oven
doors, and windows of oven doors.
• Use Care When Opening Door.
Let hot air or steam escape before you remove or
replace food in the oven.
• Do Not Heat Unopened Food Containers.
Build-up of pressure may cause container to burst
and result in injury.
• Be certain all packing materials are removed
from the appliance before operating.
Keep plastics, clothes, and paper away from parts
of the appliance that may become hot.
• DO NOT force the door open.
This can damage the automatic door locking
system. Use care when opening the oven door
after the self cleaning cycle. Stand to the side of
the oven when opening the door to allow hot air
or steam to escape. The oven may still be VERY
HOT.
• DO NOT use a steel-wool pad.
It will SCRATCH the surface.
• DO NOT use harsh etching, abrasive cleaners
or sharp metal scrapers to clean the oven
door glass since they can scratch the surface.
Scratches may cause the glass to shatter.
• Be careful when removing and lifting the door.
• DO NOT lift the door by the handle.
The door is very heavy.
• DO NOT step or sit on the door.
Install the anti-tip bracket packed with range.
- The range could be tipped and injury might
result from spilled hot liquid, food, or the range
itself.
- If the range is pulled away from the wall for
cleaning, service, or any other reason, ensure
that the anti-tip bracket is properly re-engage
when the range is pushed back against the wall.
WARNING
• NEVER use your appliance for warming or
heating the room.
• DO NOT use water on grease fires.
Should an oven fire occur, leave the oven
door closed and turn the oven off. If the fire
continues, throw baking soda on the fire or
use a fire extinguisher.
• Use dry pot holders only.
Moist or damp pot holders on hot surfaces
may result in burns from steam. Do not let
the pot holder touch hot heating elements.
Do not use a towel or other bulky cloth.
• Storage in or on appliance.
Flammable materials should not be stored
in an oven or near surface elements.
• Wear proper apparel.
Loose-fitting or hanging garments should
never be worn while using the appliance.

5
ENGLISH
IMPORTANT SAFETY INFORMATION
READ ALL INSTRUCTIONS BEFORE USE
ELECTRICAL SAFETY
• Protective Liners. Do not use aluminum foil or
any other material to line the oven bottoms.
Improper installation of these liners may result in
a risk of electric shock or fire.
• Do Not allow aluminum foil or meat probe to
contact heating elements.
• Before replacing your oven light bulb, switch
off the electrical power to the oven at the main
fuse or circuit breaker panel.
Failure to do so can result in severe personal
injury, death, or electrical shock.
• DO NOT line the oven walls, racks, bottom, or
any other part of the oven with aluminum foil
or any other material.
Doing so will disrupt heat distribution, produce
poor baking results and cause permanent
damage to the oven interior (aluminum foil will
melt to the interior surface of the oven.)
PAN PLACEMENT
Doing so will cause permanent damage to the oven
bottom finish.
• Never place plastics, paper, canned foods or
combustible material in the oven.
• When cooking food in the Lower oven always
use a baking sheet or pan with 4 raised sides.
This will prevent food from sliding off.
WARNING
• DO NOT place aluminum foil directly on the
oven bottom.
Aluminum foil
WARNING
• Do not place food or cookware on the bottom
of the oven cavity.
WARNING
• Turn POWER OFF before removing the
Lower Oven Drawer.
- Failure to do so can result in severe personal
injury, death, or electrical shock.
DEEP FAT FRYERS
• Use extreme caution when moving or disposing of
hot grease.

6
IMPORTANT SAFETY INFORMATION
READ ALL INSTRUCTIONS BEFORE USE
SURFACE COOKING UNITS
• Use Proper Pan Sizes. This appliance is
equipped with one or more surface units of
different size. Select utensils having flat bottoms
large enough to cover the surface unit heating
element.
The use of undersized utensils will expose a
portion of the heating element to direct contact
and may result in ignition of clothing. Proper
relationship of utensil to burner will also improve
efficiency.
• Never Leave Surface Units Unattended at High
Heat Settings. Boil overs cause smoking and
greasy spillovers that may ignite.
• Glazed Cooking Utensils. Only certain types of
glass, glass/ceramic, ceramic, earthenware, or
other glazed utensils are suitable for range-top
service without breaking due to the sudden
change in temperature.
• Utensil Handles Should Be Turned Inward and
Not Extend Over Adjacent Surface Units. To
reduce the risk of burns, ignition of flammable
materials, and spillage due to unintentional
contact with the utensil, the handle of a utensil
should be positioned so that it is turned inward,
and does not extend over adjacent surface units.
• Be sure you know which control pads operate
each surface unit. Make sure you turned on the
correct surface unit.
SAFETY DURING USE
• Oven Racks. Always place oven racks in
desired position while oven is cool.
• A
lways use pot holders or oven mitts when
removing food from the oven or Center Warming
element as cookware and plates will be hot.
You can be burned because cookware and plates
will be hot.
• Always use an oven mitt to remove the
temperature probe after cooking.
• Use caution with the TIMED BAKE or
DELAYED TIMED BAKE features. Use the
automatic timer when cooking cured or frozen
meats and most fruits and vegetables. Foods
that can easily spoil, such as milk, eggs, fish,
meat or poultry, should be chilled in the
refrigerator first. Even when chilled, they
should not stand in the oven for more than 1
hour before cooking begins, and should be
removed promptly when cooking is
completed.
Eating spoiled food can result in sickness from
food poisoning.
• Should an oven fire occur, leave the oven
door closed and turn the oven off. If the fire
continues, throw baking soda on the fire or
use a fire extinguisher.
• DO NOT put water or flour on the fire.
Flour may be explosive and water can cause a
grease fire to spread and cause personal injury.
• DO NOT use the broiler pan without the grid.
DO NOT cover the grid with aluminum foil.
• Do not use plastic to cover food.
Plastic can melt onto oven surfaces. Use foil or
oven resistant lids only.
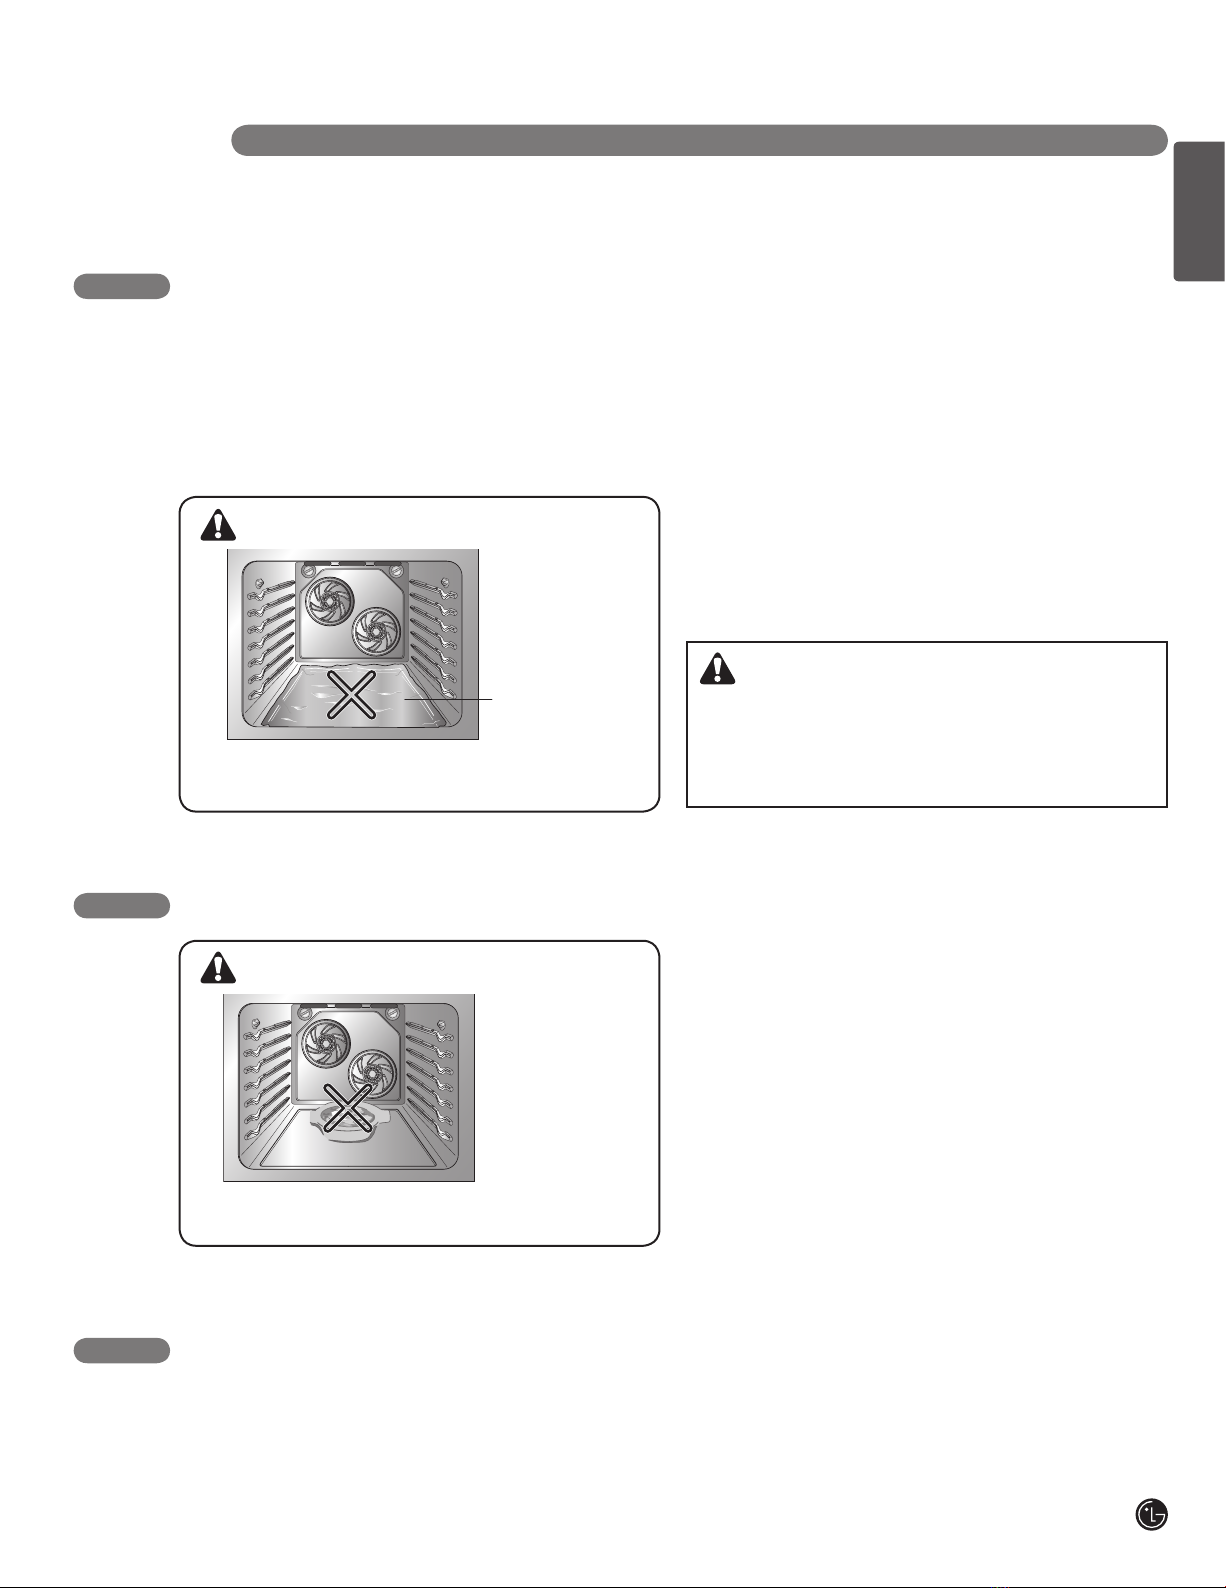
• If the oven is heavily soiled with oil, self clean
the oven before using the oven again. It could
cause a risk of fire.
Wipe up heavy soil on the oven bottom before
self clean. It requires longer cleaning cycles and
produces more smoke.

7
ENGLISH
IMPORTANT SAFETY INFORMATION
READ ALL INSTRUCTIONS BEFORE USE
CHILD SAFETY
GLASS/CERAMIC COOKING SURFACES
• DO NOT TOUCH SURFACE UNITS OR AREAS
NEAR UNITS.
Surface units may be hot even though they are
dark in color. Areas near surface units may
become hot enough to cause burns. During and
after use, do not touch, or let clothing or other
flammable materials contact surface units or
areas near units until they have had sufficient
time to cool. This includes the cooktop and the
area above the oven door.
• Do Not Cook on a Broken Cooktop. If the
cooktop should break, cleaning solutions and
spillovers may penetrate the broken cooktop and
create a risk of electric shock. Contact a qualified
technician immediately.
• Clean Cooktop With Caution. Do not use
sponges or cloth to wipe spills on a hot cooking
area. Use a proper metal scraper.
• DO NOT use the glass cooktop surface as a
cutting board.
• DO NOT place or store items that can melt or
catch fire on the glass cooktop, even when it is
not being used.
• Always turn the surface units on after placing
cookware.
• DO NOT store heavy items above the cooktop
surface that could fall and damage it.
WARNING
• Children should be kept away from the
oven.
• Accessory parts will become hot when the
broiler is in use.
CAUTION
• DO NOT leave small children unattended
near the appliance.
During the self clean cycle, the outside of the
oven can become very hot to the touch.
CAUTION
• NEVER leave children alone or
unsupervised near the appliance when it is
in use or is still hot. Children should never
be allowed to sit or stand on any part of the
appliance as they could be injured or
burned.
• NEVER store items of interest to children in
cabinets above an appliance. Children
climbing on the appliance or on the
appliance door to reach items could be
seriously injured.
• Children must be taught that the appliance
and utensils in it can be hot. Let hot utensils
cool in a safe place, out of reach of small
children. Children should be taught that an
appliance is not a toy. Children should not
be allowed to play with controls or other
parts of the appliance.

8
IMPORTANT SAFETY INFORMATION
READ ALL INSTRUCTIONS BEFORE USE
GLASS/CERAMIC COOKING SURFACES
(cont')
• DO NOT place aluminum foil or plastic items
such as salt and pepper shakers, spoon holders,
or plastic wrappings or any other material on the
range when it is in use.
• Make sure you turned on the correct surface unit.
• NEVER cook directly on the glass. Always use
cookware.
• Always place the pan in the center of the
surface unit you are cooking on.
NEVER leave surface units unattended at high
heat setting.
- Boil overs cause smoking and greasy spillovers
that may catch on fire.
• Always turn the surface units off before
removing cookware.
• DO NOT use plastic wrap to cover food.
- Plastic may melt onto the surface and be very
difficult to remove.
• DO NOT touch surface units until it has
cooled down.
• The surface elements may still be hot and burns
may occur if the glass surface is touched before it
has cooled down sufficiently.
• Immediately clean the spills on cooking area to
prevent a tough cleaning chore later.
• If cabinet storage is provided directly above
cooking surface, limit it to items that are
infrequently used and can be safely stored in an
area subjected to heat. Temperatures may be
unsafe for items such as volatile liquids, cleaners
or aerosol sprays.
• When warming foods do not use containers that
seal. Allow venting for heated air to escape
• DO NOT use a steel-wool pad.
- It will scratch the surface.
• DO NOT use scrub pads or abrasive cleaning
pads.
- They may damage your glass cooktop surface.
• Cookware with rough or bottoms can mark or
scratch the cooktop surface.
• Do not slide anything metal or glass across
the cooktop.
• Do not use cookware with dirt or dirt built-up
on the bottom.

9
ENGLISH
IMPORTANT SAFETY INFORMATION
READ ALL INSTRUCTIONS BEFORE USE
SAFETY WHEN CLEANING
• Open window or turn on a ventilation fan or
hood before self cleaning.
• Do Not Use Oven Cleaners. No commercial
oven cleaner or oven liner protective coating of
any kind should be used in or around any part of
the oven.
• Before self cleaning the oven. Remove broiler
pan, all oven racks, meat probe and any other
utensils from the oven cavity.
• Never keep pet birds in the kitchen. The health
of birds is extremely sensitive to the fumes
released during an oven self clean cycle. Fumes
may be harmful or fatal to birds. Move birds to
well-ventilated room.
• Clean in the self clean cycle only parts listed in
this manual. Before self clean the oven, remove
the broiler pan and any utensils of foods from the
oven.
• It is normal for the cooktop of the range to
become hot during a self clean cycle. Therefore,
touching the cooktop during a clean cycle should
be avoided.
• Important Instruction. In the event the self clean
error code F is displayed, and three long beeps
sound, the oven is malfunctioning in the self clean
mode. Switch off the electrical power to the main
fuse or breaker and have serviced by a qualified
technician.
• Make sure oven lights are cool before
cleaning.

10
LOCATIONS OF SURFACE ELEMENTS AND CONTROLS
SURFACE CONTROLS COOKING
Triple
Dual
Single
Dual
Single
200˚F
Warm
450˚F
400˚F
350˚F
300˚F
250˚F
SURFACE COOKING AREA LOCATOR : Identify
which element the knob controls.
ELEMENT ON/OFF INDICATOR LIGHT : Shows
whether the surface element is turned on/off or hot.
LEFT FRONT (DUAL) CONTROL KNOB : Use to
control Left Front Element.
LEFT REAR (SINGLE) CONTROL KNOB : Use to
control Left Rear Element.
CENTER (WARM) CONTROL KNOB : Use to
control Center Element.
RIGHT REAR (SINGLE) CONTROL KNOB : Use
to control Right Rear Element.
RIGHT FRONT (TRIPLE) CONTROL KNOB : Use
to control Right Front Element.
LOWER OVEN CONTROL KNOB : Use to control
LOWER OVEN.
ELECTRIC OVEN CONTROL : Use to control
Electric Oven.
HOT SURFACE INDICATOR LIGHT : It will glow
as long as any surface cooking area is too hot to
touch.

11
ENGLISH
SETTING SURFACE CONTROLS
Use to operate the surface elements. The control knobs can be set anywhere between HI and LO.
➊Place pan on surface element.
➋Push in and turn the knob in either direction to the
desired heat setting.
NOTE:
The Control Panel is marked
to identify where the
element is.
➌There are element indicator lights above the each
knob on the control panel. When any control knob
is turned on, the light will glow.
➍ After cooking, turn knob to OFF
To turn on a SINGLE
surface unit:
(Left Rear, Right Rear)
➊Push the knob in.
➋Turn the knob in either direction to the setting you
want.
The control knob clicks when it Is positioned at
both OFF and HI.
To turn on a DUAL surface unit:
(Left Front)
There is one dual element located in the left front
position. This allows you to change the size of
element.
➊Push the knob in.
➋-A Turn the knob counterclockwise to the
SINGLE surface unit settings.
➋-B Turn the knob clockwise to the DUAL surface
unit settings
HOT SURFACE INDICATOR
A Hot Surface indicator light will glow when
the surface is too hot to touch because of
the heating element. It will remain on after
the element is turned off and the surface
has cooled to approximately 150 deg F.
USING THE ELEMENT
SURFACE CONTROLS COOKING
22
1
A B
BA
2
1
2
22
1
A B
SINGLE DUAL
Dual
Single
22
1
A B
BA
2
1
2
22
1
A B
SINGLE DUAL
Dual
Single
22
1
A B
BA
2
1
2
22
1
A B
SINGLE DUAL
Dual
Single
22
1
A B
BA
2
1
2
22
1
A B
SINGLE DUAL
Dual
Single
22
1
A B
BA
2
1
2
22
1
A B
SINGLE DUAL
Dual
Single
22
1
A B
BA
2
1
2
22
1
A B
SINGLE DUAL
Dual
Single
OFF ON
CAUTION
• DO NOT touch surface elements until it has
cooled down sufficiently.
- The surface elements may still be hot and burns
may occur.
CAUTION
• NEVER leave food unattended at high or medium-
high setting.
- Boil overs can cause smoke.
Greasy spillovers may catch on fire.
22
1
A B
BA
2
1
2
22
1
A B
SINGLE DUAL
Dual
Single
22
1
A B
BA
2
1
2
22
1
A B
SINGLE DUAL
Dual
Single
Heating with inner
(smaller)element only
Heating with both
elements together

12
USING THE ELEMENT
(cont')
To turn on a TRIPLE surface unit:
(Right Front)
There is one triple element located in the right front
position. This allows you to change the size of
element.
➊Push the knob in.
➋-A Turn the knob counterclockwise to the
SINGLE surface unit settings.
➋-B Turn the knob clockwise or counterclockwise
to the DUAL surface unit settings.
➋-C Turn the knob clockwise to the TRIPLE
surface unit settings.
To turn on the Warming Zone:
(Center)
There is the Warming Zone element located in the
back center of the glass surface. It will keep hot
cooked food at serving temperature.
➊Push the knob in.
➋Turn the knob in either direction to the setting you
want.
RECOMMENDED SURFACE COOKING SETTING
SURFACE CONTROLS COOKING
CAB
22
1
A C
B
Triple
Dual
Single
CAB
22
1
A C
B
Triple
Dual
Single
CAB
22
1
A C
B
Triple
Dual
Single
Single Dual Triple
CAUTION
• Use only cookware and dishes recommended as
safe for oven and cooktop use.
• Always use oven mitts when removing food from
the warming center as cookware and plates will
be hot.
• When warming foods do not use containers that
seal. Allow venting for heated air to escape.
• DO NOT use plastic wrap to cover foods.
- Plastic may melt onto the surface and be very
difficult to clean.
• Food should be kept in its container and covered
with a lid or aluminum foil to maintain food quality.
• DO NOT warm food on the warming zone for
more than 2 hours.
- Placing uncooked or cold food on the warming
zone could result in foodborne illness.
Element
Dual
Triple
Single
Dual
Triple
Lv Recommended Use
• Large diameter cookware
• Large quantities of food
• Home canning
• Bring liquid to a boil
• Start cooking
•
Hold a rapid boil, frying, deep fat fry
• Quickly brown or sear food
• Maintain a slow boil
• Fry or saute foods
• Cook soups, sauces and gravies
• Stew or steam food
• Simmer
• Keep food warm
• Melt chocolate or butter
-
HI
8
5
2
Lo
Element
Warm
Lv Type of Cooking
• Fried Foods
• Hot Beverage
• Soups (Liquid)
• Dinner Plate with Food
• Sauces
• Soups (Cream)
• Stew
• Vegetables
• Meats
• Bread/Pastries
• Gravies
• Casseroles
• Eggs
Hi
Med
Lo

13
ENGLISH
TIPS TO PROTECT THE GLASS/CERAMIC COOKTOP SURFACE
Cleaning
(See pages 40~42 for more information).
Before first use, clean the cooktop.
Clean your cooktop daily or after each use. This will
keep your cooktop looking good and can prevent
damage.
If a spillover occurs while cooking, immediately clean
the spill from the cooking area while it is hot to
prevent a tough cleaning. Using extreme care, wipe
spill with a clean dry towel.
Do not allow spills to remain on the cooking area or
the cooktop trim for a long period of time.
Do not use abrasive cleansing powders or scouring
pads which will scratch the cooktop.
Do not use chlorine bleach, ammonia, or other
cleansers not specifically recommended for use on
glass-ceramic.
To Prevent Other Damages
Do not allow plastic, sugar, or foods with high sugar
content to melt onto the hot cooktop. Should this
happen, clean immediately. (See Cleaning pages
40~42.)
Do not let a pan boil dry as this will damage the
surface and pan.
Do not use cooktop as a work surface or cutting board.
Do not cook food directly on the surface.
To Prevent Marks and Scratches
Do not use glass pans. They may scratch the surface.
Do not place a trivet or wok ring between the surface
and pan. These items can mark or scratch the top.
Do not slide aluminum pans across a hot surface. The
pans may leave marks which need to be removed
promptly.
(See Cleaning pages 40~42).
Make sure the surface and the pan bottom are clean
before turning on to prevent scratches.
To prevent scratching or damaging to the glass-
ceramic top, do not leave sugar, salt, or fats on the
cooking area. Wipe the cooktop surface with a clean
cloth or paper towel before using.
Do not slide heavy metal pans across the surface
since these may scratch.
To Prevent Stains
Do not use a soiled dish cloth or sponge to clean the
cooktop surface. A film will remain which may cause
stains on the cooking surface after the area is heated.
Continuously cooking on a soiled surface will result in
result in a permanent stain.
GLASS/CERAMIC COOKTOP SURFACE
Cooktop Surface Notes:
• Cooktop may emit light smoke and odor the first
few times the cooktop is used. This is normal.
• Glass cooktops retain heat for a period of time
after the elements are turned off. Turn the
elements off a few minutes before food is completely
cooked and use the retained heat to complete
cooking. When the hot surface light turns off, the
cooking area will cool down enough to touch.
Because of the way the cooktop retains heat, the
elements will not respond to changes in the settings
as quickly as coil elements.
• In the event of a potential boilover, remove the pan
from the cooking surface.
• Do not attempt to lift the cooktop.
• The smoothtop surface may appear discolored when
it is hot. This is normal and will disappear when the
surface cools.
SURFACE CONTROLS COOKING

14
COOKING AREAS
The cooking areas on your range are identified by
permanent circles on the glass cooktop surface. For
the most efficient cooking, fit the pan size to the
element size.
Pans should not extend more than 1/2 to 1-inch
beyond the cooking area.
When a control is turned on, a glow can be seen
through the glass cooktop surface. The element will
cycle on and off to maintain the preset heat
setting, even on Hi.
For more information on cookware, refer to Cookware
Recommendations.
HOME CANNING TIPS
Be sure the canner is centered over the surface unit.
Make sure the canner is flat on the bottom.
The base must not be more than 1 inch larger than the
element. Use of water bath canners with rippled bottoms
may extend the time required to bring the water to a boil
and cooktops may be damaged.
Some canners are designed with smaller bases for use
on smooth top surfaces.
Use the high heat setting only until the water comes to a
boil or pressure is reached in the canner.
Reduce to the lowest heat setting that maintains the boil,
or pressure. If the heat is not turned down, the cooktop
may be damaged.
USING THE PROPER COOKWARE
Using the right cookware can prevent many problems,
such as food taking longer to cook or achieving
inconsistent results. Proper pans will reduce cooking
times and cook food more evenly. Stainless steel is
recommended.
Check pans for flat bottoms by
using a straight edge or ruler
➊Place a ruler across the bottom
of the pan.
➋ Hold it up to the light.
➌ No light should be visible under
the ruler.
NOTE:
• Do not use a small pan on a large element. Not only
does this waste energy, but it can also result in
spillovers burning onto the cooking area which
requires extra cleaning.
• Do not use non-flat specialty items that are
oversized or uneven such as round bottom woks,
rippled bottom, and/or oversized canners and griddles.
• Do not use foil or foil-type containers. Foil may melt
onto the glass. If metal melts on the cooktop, do not
use. Call an authorized Service agent.
SURFACE CONTROLS COOKING
Dual element Triple element
Single element
Warm Heater
Recommended
Flat bottom and
straight sides.
Heavy-gauge pans.
Pan sizes match the
amount of food to be
prepared and the size
of the surface element.
Weight of handle does
not tilt pan. Pan is well
balanced.
Tight-fitting lids.
Flat bottom woks.
Incorrect
Curved, grooved, or warped
pan bottoms. Pans with
uneven bottoms do not cook
efficiently and sometimes
may not boil liquid.
Very thin-gauge metal or
glass pans.
Pans are smaller or larger
than the element.
Cookware with loose or
broken handles. Heavy
handles that tilt the pan.
Loose-fitting lids.
Woks with a ring-stand
bottom.
Dual element Triple element
Single element
Warm Heater

15
ENGLISH
USING THE LOWER OVEN
The purpose of the Lower Oven is to bake foods using the same cooking times and temperatures you would in a
standard oven. Foods ideal for baking in the lower oven drawer include pizza, frozen foods, casseroles, biscuit, rolls
and many desserts.
To set the Lower oven control:
➊Push the knob in.
➋Turn the knob to any
desired setting between
Warm to 450˚F.
➌When the knob is in the on
position, the “LOWER
OVEN” indicator light will
glow. It remains ON until
the knob is moved to the
OFF position.
➍The “OVEN HEATING”
indicator light glows when
heating elements in the
drawer are active. Food
can continue to cook when
the indicator light is on.
➎Preheat is complete after
the “OVEN HEATING”
signal has turned off.
NOTE:
• The Lower Oven does not shut off automatically.
• The maximum food height that can be placed in the
Lower Oven is 4 inches.
• When turning the knob to use WARM function,
check the “OVEN HEATING” signal is ON.
• Opening the door may cause heat loss. Repeatly
opening may result in poor cooking results.
The Lower Oven uses less energy then a standard oven.
It takes more time for preheating than a standard oven.
Allow the following approximate times for preheating:
LOWER OVEN CONTROLS
200˚F
Warm
450˚F
400˚F
350˚F
300˚F
250˚F
200˚F
Warm
450˚F
400˚F
350˚F
300˚F
250˚F
200˚F
Warm
450˚F
400˚F
350˚F
300˚F
250˚F
200˚F
Warm
450˚F
400˚F
350˚F
300˚F
250˚F
Lower oven
Temperature
Warm
350˚F
425˚F
Preheat Time
10 Minutes
20 minutes
30 minutes
CAUTION
• Always use the drawer rack when using the Lower
oven.
- This will provide for some air space between the
drawer and the food.
• When cooking food in the Lower oven always use
a baking sheet or pan with 4 raised sides.
- This will prevent food from sliding off.
• Always use pot holders or oven mitts when
removing food from the Lower oven.
- You can be burned as cookware and plates will be
hot.
• Do not put food, foil or cookware directly on the
bottom of the Lower oven.
- This may result in damage to your drawer.
• Do not use plastic wrap to cover food.
- Plastic may melt onto the drawer or surrounding
areas. It is very difficult to clean Use only a lid or
aluminum foil able to with-stand baking temperature.
• Do not put liquid or water in the Lower oven.
• Never place plastics, paper, canned foods or
combustible material in the Lower Oven.
• Should a drawer fire occur, leave the drawer
closed and turn the drawer off. If the fire
continues, throw baking soda on the fire or use a
fire extinguisher.
• DO NOT put water or flour on the fire.
- Flour may be explosive and water can cause a
grease fire to spread and cause personal injury.
200˚F
Warm
450˚F
400˚F
350˚F
300˚F
250˚F

16
PARTS AND FEATURES
PARTS AND FEATURES
Roast Rack
Insert Broil Pan
Broiler Pan
Split Rack
Telescopic rack
Heavy Rack
Template
Cleaner Cleaning
pad
Screws
(6 ea)
Anchors
(6 ea)
Meat Probe
Rear filler & 2 Screws
Anti-tip bracket
Rotating Rack
Warming zone element
Single element
Triple element
Automatic oven light switch
Heavy racks
Telescopic rack
Split rack
Gasket
Oven door
Lower oven drawer
Model and serial
number plate
Anti-tip bracket
Broiler pan &
Insert Broil Pan
Ceramic glass
Dual element
Single element
Dual Purpose
Drawer Rack

17
ENGLISH
CONTROL PANEL FEATURES
READ THE INSTRUCTIONS CAREFULLY BEFORE USING THE OVEN. For satisfactory use of your oven,
become familiar with the various features and functions of the oven as described below. Detailed instructions
for each feature and function are listed in this Owner's Manual.
BAKE : Use to select the Bake function.
CONV. BAKE : Use to select the Conv. Bake
function.
CONV. ROAST : Use to select the Conv. Roast
funtion.
BROIL : Use to select the Broil funtion.
WARM/PROOF (OPTIONS)
• Use to select the Warm/Proof funtion.
• Use to change the special settings
(Press and hold for 3 seconds)
FAVORITE : Use to select the Favorite Cooking.
PROBE : Use to select the Probe function.
HEALTHIER ROAST : Use to select Healthier
Roast function.
NUMBER PADS : Use to enter temperature and
all times.
START TIME : Use to set Delay Time (Bake and
Conv Bake)
CLOCK : Use to set the Time of Day.
COOK TIME : Use to set the amount of cook
time. The oven will shut off automatically.
TIMER ON/OFF : Use to set or cancel the timer.
OVEN LIGHT :
Use to turn the oven lights on and off.
START : Use to START all oven functions. To
activate CONTROL LOCKOUT press and hold for
3 seconds.
CLEAR OFF :
Use to stop cooking, cancel settings.
SELF CLEAN : Use to select the Self Cleaning
function.
NOTE:
If F– and a number appear in the display and
the oven control signals, this indicates a
function error code.
See page 46.
Touch the CLEAR/OFF pad. Allow the oven to
cool for one hour. Put the oven back into
operation.
If the function error code repeats, disconnect the
power to the oven and call for service.
If your oven was set for a timed oven
operation and a power outage occurred, the
clock and all programmed functions must be
reset.
The time of day will flash in the display when
there has been a power outage.
PARTS AND FEATURES
1 2 3 4
5 6 98
10 11 12 13
14 15 16 177
1
11
12
13
14
15
16
17
2
3
4
5
6
7
8
9
10

18
CLOCK
How to set the Clock
The clock must be set to the correct time of day for
the automatic oven timing functions to work properly.
The time of day cannot be changed during a timed
baking or Self Clean cycle.
➊Touch the CLOCK pad once to
set.
➋Touch the number pad to enter
the time. Touch the number pad
with the correct time of day. For
example, to set 12:34, touch the
number pad 1, 2, 3 and 4.
If number pad is not touched
within 30 seconds after you touch
the CLOCK pad, the display
reverts to the original setting. If
this happens, touch the CLOCK
pad and reenter the time of day.
➌Touch START. This enters the
time and starts the clock.
To check the time of day when the display is showing
other information, simply touch the CLOCK pad.
How to change hour mode on Clock
(12HR or 24HR)
Your control is set to use a 12-hour clock. If you would
prefer to have a 24-hour time clock, follow the steps
below.
➊Touch the CLOCK pad for 3
seconds.
➋Touch the number 1pad for
12-hour, 2pad for 24-hour.
➌Touch the START pad to accept
the desired change.
Power outage
If a flashing time is in the display, you have
experienced a power failure. Reset the clock.
Touch the CLOCK pad once to reset.Enter the correct
time of day by touching the appropriate number pads.
Touch the START pad.
MINIMUM & MAXIMUM DEFAULT SETTINGS
All of the features listed have minimum and maximum
time or temperature settings that may be entered into
the control. An entry acceptance beep will sound each
time a control pad is touched.
An entry error tone (2 short melody)will sound if the
entry of the temperature or time is below the minimum
or above the maximum settings for the feature.
OPERATING INSTRUCTIONS
FEATURE
CLOCK TIME
KITCHEN
TIMER
COOKING
TIME
CONVECTION
BAKE
CONVECTION
ROAST
BROIL TEMP.
BAKE TEMP.
PROOF
WARM
SELF CLEAN
MIN. TEMP. /
TIME
MAX. TEMP. /
TIME
Default
1:00 Hr. / Min.
0:00 Hr. / Min.
0:01 Min.
0:01 Min.
0:01 Min.
0:01 Min.
300°F / 150°C
300°F / 150°C
Lo - 400°F
170°F / 80°C[77]
2 Hr.
12:59 Hr. / Min.
23:59 Hr. / Min.
11:59 Hr. / Min.
11:59 Hr. / Min.
11:59 Hr. / Min.
11:59 Hr. / Min.
550°F / 285°C
550°F / 285°C
Hi - 550°F
550°F / 285°C[288]
170°F/75°C, 3 hours
4 Hr.
12 Hr.
24 Hr.
12 Hr.
24 Hr.
12 Hr.
24 Hr.
12 Hr.
12 Hr.
3 Hr.
12 Hr.
12 Hr.
3 Hr.
3 Hr

19
ENGLISH
TIMER ON/OFF
The TIMER ON/OFF serves as an extra timer in the kitchen that will beep when the set time has run out.
It does not start or stop cooking.
The TIMER ON/OFF feature can be used during any of the other oven control functions.
To set the Timer (example for 5 minutes):
➊Touch TIMER ON/OFF twice.
0:00 and HR inside Owill appear
and TIMER
will flash in the display.
➋
Touch 5in the number pad.
You can see 0:05 in the display
➌Touch TIMER to start the Timer.
The time will count down with 5:00
and the time will show in the display.
NOTE:
If TIMER ON/OFF is not touched,
the timer will return to the time of
day.
➍When the set time has run out,
End will show in the display. The
indicator tones will sound every
15 seconds until TIMER ON/OFF
is touched.
NOTE:
If the remaining time is not in the display, recall the
remaining time by touching the Timer ON/OFF.
NOTE:
1. If you touch TIMER ON/OFF once, it allows you to
set the time in seconds.
(for example: if you touch 50, it means 50 seconds)
• If you touch TIMER ON/OFF twice, it allows you to
set the time in minutes.
(for example: if you touch 5, it means 5 minutes)
To cancel the Timer before the set time
has run out:
➊Touch TIMER ON/OFF once.
The display will return to the time
of day.
OPERATING INSTRUCTIONS

20
How to set convection auto conversion
function
When using convection bake and roast, the
Convection Auto Conversion feature will automatically
convert entered regular baking temperatures to
convection baking temperatures.
This feature is activated so that the display will show
the actual converted (reduced) temperature. For
example, if you enter a regular recipe temperature of
350°F and press the START function, the display will
show the converted temperature of 325°F.
➊Touch and hold the
WARM/PROOF pad for 3
seconds. “AUTO” will appear in
the display.
➋Touch the # 1 pad to ENABLE or
touch the # 2 pad to DISABLE.
➌Touch the START pad to accept
the change.
How to adjust the oven thermostat
You may find that your new oven cooks differently
than the one it replaced. Use your new oven for a few
weeks to become more familiar with it. If you still think
your new oven is too hot or too cold, you can adjust
the thermostat yourself.
Do not use thermometers,such as those found in
grocery stores, to check the temperature setting of
your oven. These thermometers may vary 20–40
degrees.
NOTE:
This adjustment will not affect the broiling or the Self
Clean temperatures. The adjustment will be retained
in memory after a power failure.
The oven temperature can be increased (+) or
decreased (-) as much as 35°F or 19°C.
NOTE:
Once the temperature is increased or decreased, the
display will show the adjusted temperature until it is
readjusted.
NOTE:
The thermostat adjustment for Bake will also affect
Convection Bake or Convection Roast.
To Adjust the Oven Temperature
➊
Touch and hold the WARM/PROOF
pad for 3 seconds. “AUTO” will
appear in the display.
➋Touch the WARM/PROOF pad 1
time and “Adj" will be displayed.
➌
Using the number pad enter the
temperature correction you wish to
adjust.
For example, to adjust the oven
temperature 15 degrees, touch 1 and 5.
➍Touch WARM/PROOF once to
increase (+) or twice to decrease
(-) the temperature.
➎Touch the START pad to accept
the change.
OPERATING INSTRUCTIONS
SPECIAL FEATURES OF YOUR OVEN CONTROL
Your new touch pad control has additional features that you may choose to use. The following pages
describe these features and how you may activate them.
The special feature modes can only be activated while the display is showing the time of day.
They remain in the control’s memory until the steps are repeated.
When the display shows your choice, touch the START pad. The special features will remain in memory after a
power failure.
or
Other manuals for Studio LSES302ST
2
Table of contents
Other LG Range manuals
Popular Range manuals by other brands

Viking
Viking Professional Custom VGSC548-4GQ Specifications

Smeg
Smeg CO68CMP manual

Whirlpool
Whirlpool YWGE745C0FS User instructions

Whirlpool
Whirlpool WDE350LVB02 installation instructions

Maytag
Maytag MGS5875BDW - Slide in Gas Range Use and care guide

Whirlpool
Whirlpool RF301OXTW01 installation instructions