LG VK882 series User manual

VK882****
OWNER'S MANUAL
êìäéÇéÑëíÇé èéãúáéÇÄíÖãü
New Ty e Cyclone Vacuum Cleaner
è˚ÎÂÒÓÒ Ò ˆËÍÎÓÌÌ˚Ï ÙËθÚÓÏ ÌÓ‚Ó„Ó ÚËÔ‡
This information contains im ortant instructions for the safe use and maintenance of the vacuum cleaner.
Es ecially, lease read all of the information on age 4,5,6 for your safety.
Please kee this manual in an easily accessible lace and refer to it anytime.
ùÚÓ ÛÍÓ‚Ó‰ÒÚ‚Ó ÒÓ‰ÂÊËÚ ‚‡ÊÌ˚ ËÌÒÚÛ͈ËË ÔÓ ·ÂÁÓÔ‡ÒÌÓÈ ˝ÍÒÔÎÛ‡Ú‡ˆËË Ë Ó·ÒÎÛÊË‚‡Ì˲ Ô˚ÎÂÒÓÒ‡.
èÓ˜ÚËÚÂ, ÔÓʇÎÛÈÒÚ‡, ‚Ò˛ ËÌÙÓχˆË˛, ‰‡ÌÌÛ˛ ̇ ÒÚ‡Ìˈ‡ı 7 Ë 8 Ë 9 ÔÓ ‚ÓÔÓÒ‡Ï ·ÂÁÓÔ‡ÒÌÓÒÚË ÁÍÒÔÎÛ‡Ú‡ˆËË
èÓʇÎÛÈÒÚ‡, ı‡ÌËÚ ̇ÒÚÓfl˘Û˛ ËÌÒÚÛÍˆË˛ ‚ Û‰Ó·ÌÓÏ ÏÂÒÚÂ, ˜ÚÓ·˚ Ó·‡ÚËÚ¸Òfl Í ÌÂÈ ‚ β·Ó ‚ÂÏfl
Aü46

2

3
Table of contents
ëÓ‰ÂʇÌËÂ
Important safety instructions ..............................................................................4~5
How to use.................................................................................................................8
Assembling vacuum cleaner....................................................................................................................8
Operating vacuum cleaner.....................................................................................................................10
Using carpet and floor nozzle................................................................................................................11
Using All Floor and mini turbine nozzle .................................................................................................12
Using accessory nozzles.......................................................................................................................13
Using the Sani punch nozzle.................................................................................................................14
Emptying dust tank................................................................................................................................18
Cleaning dust tank.................................................................................................................................19
Cleaning air filter and motor safety filter................................................................................................20
Cleaning exhaust filter...........................................................................................................................21
What to do if your vacuum cleaner does not work..............................................22
What to do when suction performance decreases..............................................22
LJÊÌ˚ Û͇Á‡ÌËfl ÔÓ ÚÂıÌËÍ ·ÂÁÓÔ‡ÒÌÓÒÚË ..................................................6~7
ä‡Í ÔÓθÁÓ‚‡Ú¸Òfl
ë·ÓÍ Ô˚ÎÂÒÓÒ
ùÍÒÔÎÛ Ú ˆËfl Ô˚ÎÂÒÓÒ
àÒÔÓθÁÓ‚ ÌËÂ Ì Ò ‰ÍË ‰Îfl ˜ËÒÚÍË ÔÓÎ Ë ÍÓ‚Ó‚
àÒÔÓθÁÓ‚ ÌËÂ Ì Ò ‰ÍË ‰Îfl ˜ËÒÚÍË ‚ÒÂı ÔÓÎÓ‚ Ë ÏËÌË-ÚÛ·Ó Ì Ò ‰ÍË
àÒÔÓθÁÓ‚ ÌË ‰ÓÔÓÎÌËÚÂθÌ˚ı Ì Ò ‰ÓÍ
àÒÔÓθÁÓ‚ ÌËÂ Ì Ò ‰ÍË ‰Îfl Ïfl„ÍÓÈ Ï·ÂÎË Ë ÔÓÒÚÂθÌ˚ı ÔËÌ ‰ÎÂÊÌÓÒÚÂÈ SuniPunch
é˜ËÒÚÍ ÍÓÌÚÂÈÌ ÓÚ Ô˚ÎË
óËÒÚÍ Ô˚ÎÂÒ·ÓÌËÍ
óËÒÚÍ ‚ÓÁ‰Û¯ÌÓ„Ó ÙËÎ¸Ú Ë Á ˘ËÚÌÓ„Ó ÙËÎ¸Ú ˝ÎÂÍÚÓ‰‚Ë„ ÚÂÎfl
óËÒÚÍ ‚˚ıÓ‰ÌÓ„Ó ÙËθÚ
óÚÓ ‰Â·ڸ, ÂÒÎË ‚‡¯ Ô˚ÎÂÒÓÒ Ì ‡·ÓÚ‡ÂÚ
óÚÓ ‰Â·ڸ, ÍÓ„‰‡ ÒÌËʇÂÚÒfl ÏÓ˘ÌÓÒÚ¸ ‚Ò‡Ò˚‚‡ÌËfl

4
IIMMPPOORRTTAANNTT SSAAFFEETTYY IINNSSTTRRUUCCTTIIOONNSS
Read and follow all instructions before using your vacuum cleaner to prevent the risk of fire,electric shock, personal injury,or
damage when using the vacuum cleaner.This guide do not cover all possible conditions that may occur.Always contact your
service agent or manufacturer about problems that you do not understand. This appliance complies with the following EC
Directives :-73/23/EEC,93/68/EEC-Low Voltage Directive–89/336EEC –EMC Directive.
This is the safety alert symbol.
This symbol alerts you to potential hazards that can kill or hurt you and others.
All safety messages will follow the safety alert symbol and either the word “WARNING” or “CAUTION.”
These words mean:
WARNING This symbol will alert you to hazards or unsafe practices which could cause serious
bodily harm or death.
CAUTION This symbol will alert you to hazards or unsafe practices which could
cause bodily injury or property damage.
WARNING
• Do not plug in if control switch is not in OFF position.
Personal injury or product damage could result.
• Keep children away and beware of obstructions when
rewinding the cord to prevent personal injury
The cord moves rapidly when rewinding.
• Disconnect electrical supply before servicing or cleaning
the unit or when cleaner is not in use.
Failure to do so could result in electrical shock or personal
injury.
• Do not use vacuum cleaner to pick up anything that is
burning or smoking such as cigarettes, or hot ashes.
Doing so could result in death, fire or electrical shock.
• Do not vacuum flammable or explosive substances such
as gasoline, benzene, thinners, propane (liquids or
gases).
The fumes from these substances can create a fire hazard or
explosion. Doing so could result in death or personal injury.
• Do not handle plug or vacuum cleaner with wet hands.
Doing so could result in death or electrical shock.
• Do not unplug by pulling on cord.
Doing so could result in product damage or electrical shock.
To unplug, grasp the plug, not the cord.
• Keep hair, loose clothing, fingers, and all parts of the
body away from openings and moving parts.
Failure to do so could result in electrical shock or personal
injury.
• Do not pull or carry by cord, use cord as a handle, close
a door on cord, or pull cord around sharp edges or cor-
ners. Do not run vacuum cleaner over cord. Keep cord
away from heated surfaces.
Failure to do so could result in electrical shock or personal
injury or fire or product damage.
• The hose contains electrical wires. Do not use it if it is
damaged, cut or punctured.
Failure to do so could result in death,or electrical shock.
• Do not allow to be used as toy. Close attention is neces-
sary when used by or near children.
Personal injury or product damage could result.
• Do not use the vacuum cleaner if the power cord or plug
is damaged or faulty.
Personal injury or product damage could result. In these
cases, contact LG Electronics Service Agent to avoid hazard.
• Do not use vacuum cleaner if it has been under water.
Personal injury or product damage could result. In these
cases, contact LG Electronics Service Agent to avoid hazard.
• Do not continue to vacuum if any parts appear missing
or damaged.
Personal injury or product damage could result. In these
cases, contact LG Electronics Service Agent to avoid hazard.
• Do not use an extension cord with this vacuum cleaner
Fire hazard or product damage could result.
• Using proper voltage.
Using improper voltage may result in damage to the motor
and possible injury to the user. Proper voltage is listed on the
bottom of vacuum cleaner.
• Turn off all controls before unplugging.
Failure to do so could result in electrical shock or personal
injury.
• Do not change the plug in any way.
Failure to do so could result in electrical shock or personal
injury or product damage. Doing so result in death. If plug
does not fit, contact a qualified electrician to install the proper
outlet.
• Repairs to electrical appliances may only be performed
by qualified service engineers.
Improper repairs may lead to serious hazards for the user.
• Do not put fingers near the gear.
Failure to do so could result in personal injury.

5
Thermal protector :
This vacuum cleaner has a special thermostat that protects the vacuum cleaner in case of motor overheating. If the vacuum
cleaner suddenly shuts off, turn off the switch and unplug the vacuum cleaner.
Check the vacuum cleaner for possible source of overheating such as a full dust tank, a blocked hose or clogged filter. If these
conditions are found, fix them and wait at least 30 minutes before attempting to use the vacuum cleaner. After the 30 minute peri-
od, plug the vacuum cleaner back in and turn on the switch.
If the vacuum cleaner still does not run, contact a qualified electrician.
IIMMPPOORRTTAANNTT SSAAFFEETTYY IINNSSTTRRUUCCTTIIOONNSS
CAUTION
• Do not put any objects into openings.
Failure to do so could result in product damage.
• Do not use with any opening blocked: keep free of dust,
lint, hair, and anything that may reduce air flow.
Failure to do so could result in product damage.
• Do not use vacuum cleaner without dust tank and/or fil-
ters in place.
Failure to do so could result in product damage.
• Always clean the dust bin after vacuuming carpet clean-
ers or fresheners, powders and fine dust.
These products clog the filters,reduce airflow and can cause
damage to the cleaner. Failure to clean the dust bin could
cause permanent damage to the cleaner.
• Do not use vacuum cleaner to pick up sharp hard
objects, small toys, pins, paper clips, etc.
They may damage the cleaner or dust bin.
• Store the vacuum cleaner indoors.
Put the vacuum cleaner away after use to prevent tripping
over it.
• The vacuum cleaner is not intended to use by young
children or infirm people without supervision.
Failure to do so could result in personal injury or product
damage.
• Only use parts produced or recommended by LG
Electronics Service Agents.
Failure to do so could result in product damage.
• Use only as described in this manual. Use only with LG
recommended or approved attachments and acces-
sories.
Failure to do so could result in personal injury or product
damage.
• To avoid personal injury and to prevent the machine
from falling when cleaning stairs, always place it at the
bottom of stairs.
Failure to do so could result in personal injury or product
damage.
• Use accessory nozzles in sofa mode.
Failure to do so could result in product damage.
• Don ’t grasp the tank handle when you are moving the
vacuum cleaner.
The vacuum cleaner’s body may fall when separating tank
and body. Personal injury or product damage could result.
You should grasp the carrier handle when you are moving
the vacuum cleaner. (Page 10)
• If after emptying the dust tank the indicator light is
on(red), clean the dust tank.
Failure to do so could result in product damage.
• Make sure the filters (exhaust filter and motor safety fil-
ter) are completely dry before replacing in the machine.
Failure to do so could result in product damage.
• Do not dry the filter in an oven or microwave.
Failure to do so could result in fire hazard.
• Do not dry the filter in a clothes dryer.
Failure to do so could result in fire hazard.
• Do not dry near an open flame.
Failure to do so could result in fire hazard.

6
ÇÇÄÄÜÜççõõÖÖ èèêêÄÄÇÇààããÄÄ ííÖÖïïççààääàà ÅÅÖÖááééèèÄÄëëççééëëííàà
ÑÎfl Ô‰ÓÚ‚ ˘ÂÌËfl ËÒÍ ‚ÓÁ„Ó ÌËfl, ÔÓ ÊÂÌËfl ˝ÎÂÍÚ˘ÂÒÍËÏ ÚÓÍÓÏ, ÔÓÎÛ˜ÂÌËfl Ú ‚Ï ËÎË Ì ÌÂÒÂÌËfl Û˘Â· ÔË ÔÓθÁÓ‚ ÌËË Ô˚ÎÂÒÓÒÓÏ,
ÔÓ˜ÚËÚ ‚Ò ËÌÒÚÛ͈ËË Ë ÒÚÓ„Ó Ëı Òӷβ‰ ÈÚÂ. Ñ ÌÌÓ ÛÍÓ‚Ó‰ÒÚ‚Ó Ì ‚Íβ˜ ÂÚ ‚Ò ‚ÓÁÏÓÊÌ˚ ÛÒÎÓ‚Ëfl, Ò ÍÓÚÓ˚ÏË ÏÓÊÌÓ ÒÚÓÎÍÌÛÚ¸Òfl. èÓ
‚ÓÁÌËÍ ˛˘ËÏ Û Ç Ò ‰ÓÔÓÎÌËÚÂθÌ˚Ï ‚ÓÔÓÒ Ï Ó· ˘ ÈÚÂÒ¸ ‚ Ì ¯Ë Ò‚ËÒÌ˚ ˆÂÌÚ˚. Ñ ÌÌ˚È ÔË·Ó ÒÓÓÚ‚ÂÚÒÚ‚ÛÂÚ ÒÎÂ‰Û˛˘ËÏ ÑËÂÍÚË‚ Ï Öë:
73/23/EEC, 93/68/EEC – ÑËÂÍÚË‚ ÔÓ ÌËÁÍÓ‚ÓθÚÌÓÈ ÔÔ ÚÛÂ, 98/336 EEC – ÑËÂÍÚË‚ ÔÓ ùåë.
ùÚÓ ÒËÏ‚ÓÎ, Ô‰ÛÔÂʉ ˛˘ËÈ Ó· ÓÔ ÒÌÓÒÚË.
ùÚÓÚ ÁÌ Í Ô‰ÛÔÂʉ ÂÚ ‚ Ò Ó ÔÓÚÂÌˆË Î¸Ì˚ı ËÒÚÓ˜ÌËÍ ı ÓÔ ÒÌÓÒÚË, ÍÓÚÓ˚ ÏÓ„ÛÚ ÒÚ Ú¸ Ô˘ËÌÓÈ Ú ‚Ï˚ ËÎË
ÒÏÂÚË ‰Îfl ‚ Ò ËÎË ‰Û„Ëı β‰ÂÈ. ã˛·˚ ÒÓÓ·˘ÂÌËfl ‚ ÓÚÌÓ¯ÂÌËË ·ÂÁÓÔ ÒÌÓÒÚË ÒÓÔÓ‚Óʉ ˛ÚÒfl
Ô‰ÛÔ‰ËÚÂθÌ˚Ï ÁÌ ÍÓÏ ËÎË ÒÎÓ‚ÓÏ «éëíéêéÜçé» ËÎË «ÇçàåÄçàÖ». ùÚË ÒÎÓ‚ ÓÁÌ ˜ ˛Ú:
éëíéêéÜçé
ùÚÓÚ ÁÌ Í Ô‰ÛÔÂʉ ÂÚ ‚ Ò Ó· ËÒÚÓ˜ÌËÍ ı ÓÔ ÒÌÓÒÚË, ÎË·Ó Ó· ÓÔ ÒÌ˚ı ‰ÂÈÒÚ‚Ëflı,
ÍÓÚÓ˚ ÏÓ„ÛÚ ÒÚ Ú¸ Ô˘ËÌÓÈ Ò¸ÂÁÌÓÈ Ú ‚Ï˚ ËÎË ÒÏÂÚË.
ÇçàåÄçàÖ
ùÚÓÚ ÁÌ Í Ô‰ÛÔÂʉ ÂÚ ‚ Ò Ó· ËÒÚÓ˜ÌËÍ ı ÓÔ ÒÌÓÒÚË, ÎË·Ó Ó· ÓÔ ÒÌ˚ı ‰ÂÈÒÚ‚Ëflı,
ÍÓÚÓ˚ ÏÓ„ÛÚ ÒÚ Ú¸ Ô˘ËÌÓÈ Ú ‚Ï˚ ËÎË ÔË‚ÂÒÚË Í Ï ÚÂË Î¸ÌÓÏÛ Û˘Â·Û.
éëíéêéÜçé
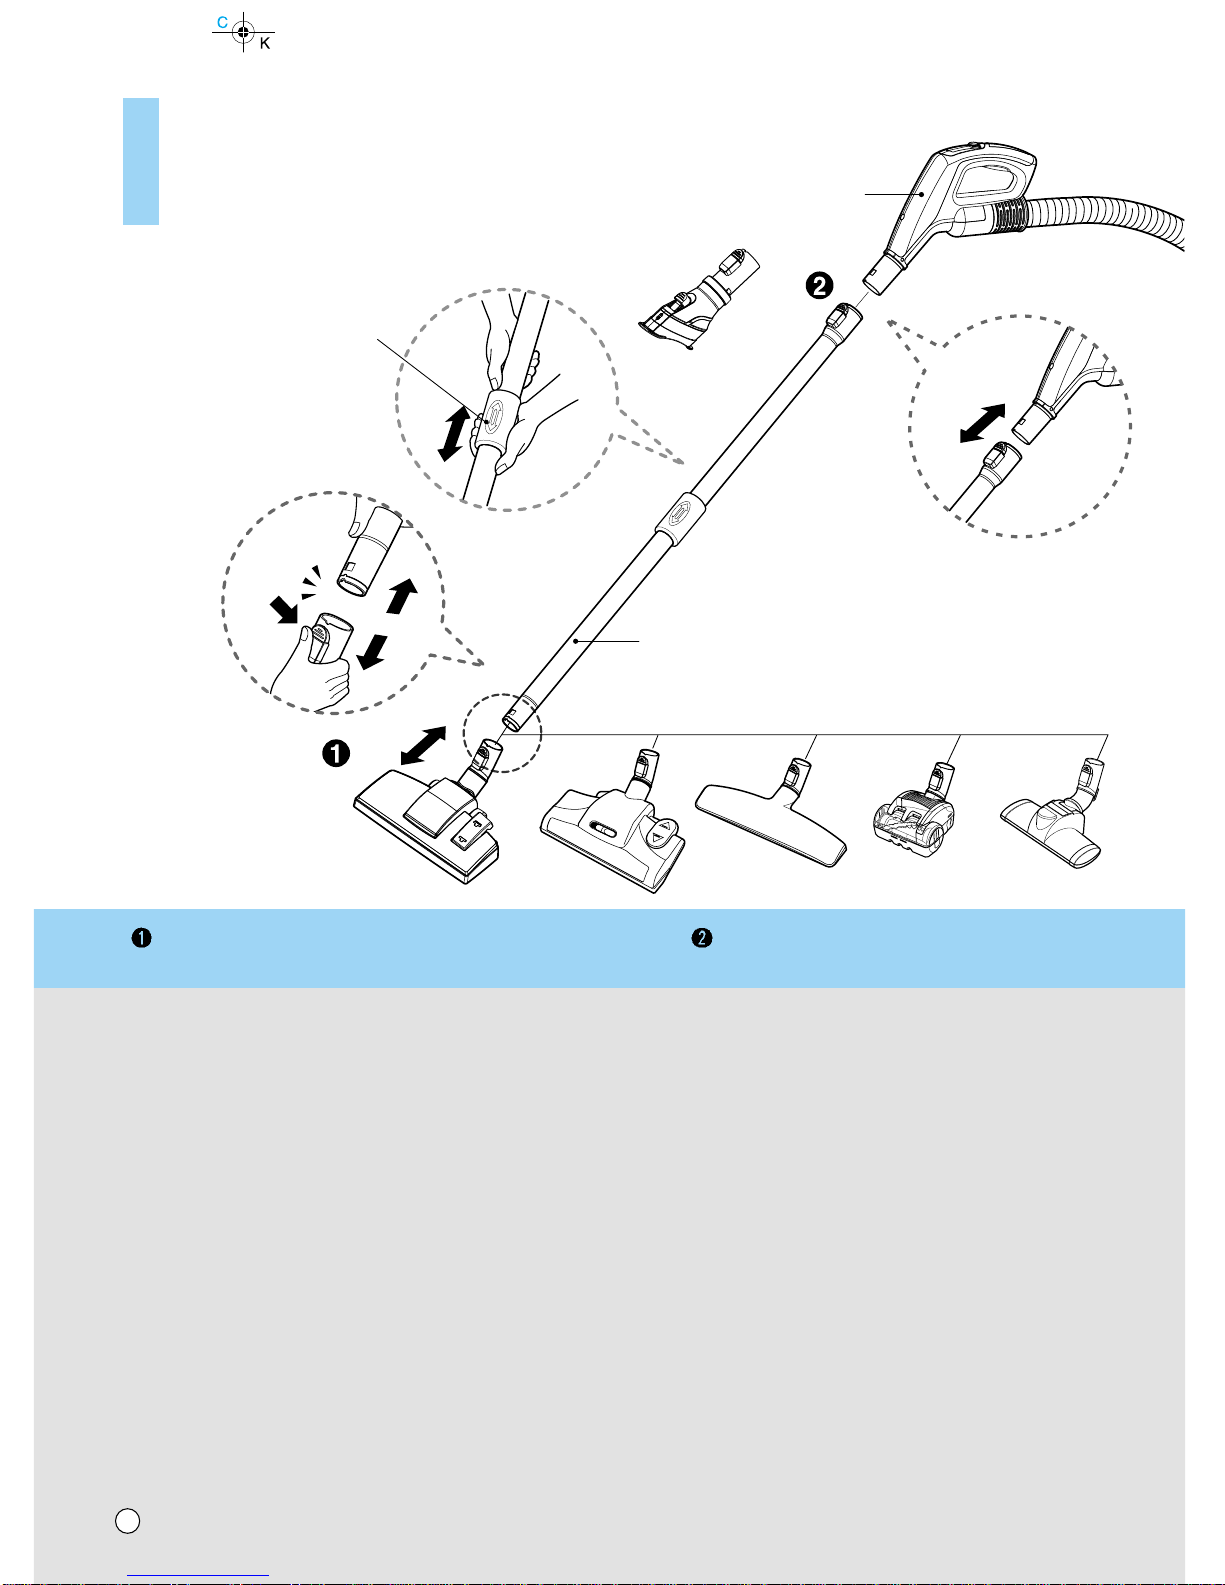
• ç ‚Íβ˜‡Ú¸ ‚ ÒÂÚ¸, ÂÒÎË ÔÂÂÍβ˜‡ÚÂθ ÛÔ‡‚ÎÂÌËfl
̇ıÓ‰ËÚÒfl ‚ ÔÓÎÓÊÂÌËË Çäã.
ùÚÓ ÏÓÊÂÚ ÔË‚ÂÒÚË Í Ú ‚Ï ËÎË ÔÓ‚ÂʉÂÌ˲ ÔË·Ó .
• ç ÔÓ‰ÔÛÒ͇ÈÚÂ Í ÔË·ÓÛ ‰ÂÚÂÈ, ‡ ÔË ÒχÚ˚‚‡ÌËË
¯ÌÛ‡, ‚Ó ËÁ·ÂʇÌË ڇ‚Ï˚, Ó·ÂÒÔ˜¸ÚÂ Â„Ó Ò‚Ó·Ó‰ÌÓÂ
‰‚ËÊÂÌËÂ.
èË ÒÏ Ú˚‚ ÌËË ¯ÌÛ ‰‚ËÊÂÚÒfl ·˚ÒÚÓ.
• è‰ Ôӂ‰ÂÌËÂÏ Ó·ÒÎÛÊË‚‡ÌËfl, ˜ËÒÚÍË ÔË·Ó‡ ËÎË ‚
ÒÎÛ˜‡Â, ÂÒÎË ÔË·Ó Ì ËÒÔÓθÁÛÂÚÒfl, ÓÚÍβ˜‡ÈÚ ÔË·Ó
ÓÚ ÒÂÚË.
çÂÒӷβ‰ÂÌË ˝ÚÓ„Ó ÛÍ Á ÌËfl ÏÓÊÂÚ ÔË‚ÂÒÚË Í ÔÓ ÊÂÌ˲
˝ÎÂÍÚ˘ÂÒÍËÏ ÚÓÍÓÏ ËÎË Ú ‚ÏÂ.
• ç ÒӷˇÈÚ ÔË·ÓÓÏ Í‡ÍË -ÎË·Ó „Ófl˘Ë ËÎË
‰˚Ïfl˘ËÂÒfl Ô‰ÏÂÚ˚, ̇ÔËÏ ÒË„‡ÂÚ˚ ËÎË „Ófl˜ËÈ
ÔÂÔÂÎ.
Ç ÂÁÛÎ¸Ú Ú ˝ÚÓ ÏÓÊÂÚ ÔË‚ÂÒÚË Í ÒÏÂÚÂθÌÓÏÛ ËÒıÓ‰Û,
‚ÓÁ„Ó Ì˲ ËÎË ÔÓ ÊÂÌ˲ ˝ÎÂÍÚ˘ÂÒÍËÏ ÚÓÍÓÏ.
• ç ÔÓ‚Ó‰ËÚÂ Ò·Ó „Ó˛˜Ëı ËÎË ‚Á˚‚˜‡Ú˚ı ‚¢ÂÒÚ‚,
̇ÔËÏ ·ÂÌÁË̇, ·ÂÌÁÓ·, ‡Á·‡‚ËÚÂÎfl, ÔÓԇ̇
(ÊˉÍÓ„Ó ËÎË „‡ÁÓÓ·‡ÁÌÓ„Ó).
àÒÔ ÂÌËfl Ú ÍËı ‚¢ÂÒÚ‚ ÏÓ„ÛÚ ÒÚ Ú¸ ËÒÚÓ˜ÌËÍÓÏ
‚ÓÁ„Ó ÌËfl ËÎË ‚Á˚‚ . çÂÒӷβ‰ÂÌË ˝ÚÓ„Ó ÛÍ Á ÌËfl
ÏÓÊÂÚ ÒÚ Ú¸ Ô˘ËÌÓÈ Ú ‚Ï˚ ËÎË ÒÏÂÚÂθÌÓ„Ó ËÒıÓ‰ .
• ç ·ÂËÚÂÒ¸ Á‡ ‚ËÎÍÛ ¯ÌÛ‡ ËÎË Ô˚ÎÂÒÓÒ ÏÓÍ˚ÏË
Û͇ÏË.
ùÚÓ ÏÓÊÂÚ ÒÚ Ú¸ Ô˘ËÌÓÈ ÒÏÂÚÂθÌÓ„Ó ËÒıÓ‰ ËÎË
ÔË‚ÂÒÚË Í ÔÓ ÊÂÌ˲ ˝ÎÂÍÚ˘ÂÒÍËÏ ÚÓÍÓÏ.
• ç ËÁ‚ÎÂ͇ÈÚ ‚ËÎÍÛ ËÁ ÓÁÂÚÍË Á‡ ÒÂÚ‚ÓÈ ¯ÌÛ.
ùÚÓ ÏÓÊÂÚ ÔË‚ÂÒÚË Í ÔÓ‚ÂʉÂÌ˲ ÔË·Ó , ÔÓ ÊÂÌ˲
˝ÎÂÍÚ˘ÂÒÍËÏ ÚÓÍÓÏ. óÚÓ·˚ ‚˚ÌÛÚ¸ ‚ËÎÍÛ ËÁ ÓÁÂÚÍË,
‰ÂÊËÚÂÒ¸ Á ‚ËÎÍÛ, Ì Á ¯ÌÛ.
• ÑÂÊËÚ ‚ÓÎÓÒ˚, Ò‚Ó·Ó‰ÌÛ˛ Ó‰ÂʉÛ, ԇθˆ˚ Ë ‚Ò ˜‡ÒÚË
Ú· ̇ ‡ÒÒÚÓflÌËË ÓÚ ÓÚ‚ÂÒÚËÈ Ë ‰‚ËÊÛ˘ËıÒfl ‰ÂÚ‡ÎÂÈ.
çÂÒӷβ‰ÂÌË ˝ÚÓ„Ó ÛÍ Á ÌËfl ÏÓÊÂÚ ÔË‚ÂÒÚË Í ÔÓ ÊÂÌ˲
˝ÎÂÍÚ˘ÂÒÍËÏ ÚÓÍÓÏ ËÎË Ú ‚ÏÂ.
• ç ÔÂÂÌÓÒËÚ¸ Ë Ì ÔÂÂÏ¢‡Ú¸ ÔË·Ó Á‡ ¯ÌÛ, ÌÂ
ËÒÔÓθÁÓ‚‡Ú¸ ¯ÌÛ ‚ ͇˜ÂÒÚ‚Â Û˜ÍË ‰Îfl ÔÂÂÌÓÒÍË, ÌÂ
Á‡˘ÂÏÎflÚ¸ ¯ÌÛ ‰‚¸ÏË, Ì ÚflÌÛÚ¸ ¯ÌÛ ˜ÂÂÁ ÓÒÚ˚Â
ÍÓÏÍË ËÎË Û„Î˚. ç ÒÚ‡‚¸Ú Ô˚ÎÂÒÓÒ Ì‡ ¯ÌÛ. ÑÂÊËÚÂ
¯ÌÛ ‚‰‡ÎË ÓÚ Ì‡„ÂÚ˚ı ÔÓ‚ÂıÌÓÒÚÂÈ.
çÂÒӷβ‰ÂÌË ˝ÚÓ„Ó ÛÍ Á ÌËfl ÏÓÊÂÚ ÔË‚ÂÒÚË Í ÔÓ ÊÂÌ˲
˝ÎÂÍÚ˘ÂÒÍËÏ ÚÓÍÓÏ, Ú ‚ÏÂ, ‚ÓÁ„Ó Ì˲ ËÎË ÔÓ‚ÂʉÂÌ˲
ÔË·Ó .
• óÂÂÁ ¯Î‡Ì„ ÔË·Ó‡ ÔÓıÓ‰flÚ ˝ÎÂÍÚ˘ÂÒÍË ÔÓ‚Ó‰‡.
ç ÔÓθÁÛÈÚÂÒ¸ ÔÓ‚ÂʉÂÌÌ˚Ï, ‡ÁÂÁ‡ÌÌ˚Ï ËÎË
ÔÓÍÓÎÓÚ˚Ï ¯Î‡Ì„ÓÏ.
çÂÒӷβ‰ÂÌË ˝ÚÓ„Ó ÛÍ Á ÌËfl ÏÓÊÂÚ ÔË‚ÂÒÚË Í ÔÓ ÊÂÌ˲
˝ÎÂÍÚ˘ÂÒÍËÏ ÚÓÍÓÏ ËÎË ÒÏÂÚË.
• ç ‰ÓÔÛÒ͇ÈÚ ËÒÔÓθÁÓ‚‡ÌË ÔË·Ó‡ ‚ ͇˜ÂÒÚ‚Â
˄ۯÍË. ÖÒÎË ÔË·ÓÓÏ ÔÓθÁÛ˛ÚÒfl ‰ÂÚË, ÎË·Ó ÂÒÎË ÓÌË
̇ıÓ‰flÚÒfl fl‰ÓÏ, ·Û‰¸Ú Ô‰ÂθÌÓ ‚ÌËχÚÂθÌ˚.
ùÚÓ ÏÓÊÂÚ ÔË‚ÂÒÚË Í Ú ‚Ï ËÎË ÔÓ‚ÂʉÂÌ˲ ÔË·Ó .
• ç ÔÓθÁÛÈÚÂÒ¸ Ô˚ÎÂÒÓÒÓÏ Ò ÔÓ‚ÂʉÂÌÌ˚Ï ËÎË
ÌÂËÒÔ‡‚Ì˚Ï ÒÂÚ‚˚Ï ¯ÌÛÓÏ ËÎË ‚ËÎÍÓÈ.
ùÚÓ ÏÓÊÂÚ ÒÚ Ú¸ Ô˘ËÌÓÈ Ú ‚Ï˚. ÇÓ ËÁ·ÂÊ ÌË ÒÓÁ‰ ÌËfl
ÓÔ ÒÌ˚ı ÒËÚÛ ˆËÈ, Ó· ˘ ÈÚÂÒ¸ Í Ô‰ÒÚ ‚ËÚÂβ ÔÓ
ÚÂıÌ˘ÂÒÍÓÏÛ Ó·ÒÎÛÊË‚ Ì˲ ÍÓÏÔ ÌËË LG Electronics.
• èÓÒΠÔÓÔ‡‰‡ÌËfl Ô˚ÎÂÒÓÒ‡ ‚ ‚Ó‰Û Ì ÔÓθÁÛÈÚÂÒ¸ ËÏ ‰Ó
Ôӂ‰ÂÌËfl ÂÏÓÌÚ‡.
ùÚÓ ÏÓÊÂÚ ÒÚ Ú¸ Ô˘ËÌÓÈ Ú ‚Ï˚ ËÎË ÔÓ‚ÂʉÂÌËfl
ÔË·Ó . Ç Ú ÍËı ÒÎÛ˜ flı, ‚Ó ËÁ·ÂÊ ÌË ÒÓÁ‰ ÌËfl ÓÔ ÒÌ˚ı
ÒËÚÛ ˆËÈ, Ó· ˘ ÈÚÂÒ¸ Í Ô‰ÒÚ ‚ËÚÂβ ÔÓ ÚÂıÌ˘ÂÒÍÓÏÛ
Ó·ÒÎÛÊË‚ Ì˲ ÍÓÏÔ ÌËË LG Electronics.
• ç ÔÓ‰ÓÎʇÈÚ ˜ËÒÚÍÛ ÔË Ì‡Î˘ËË Í‡ÍËı-ÎË·Ó
‰ÂÙÂÍÚÓ‚, ÓÚÒÛÚÒÚ‚Û˛˘Ëı ‰ÂÚ‡ÎÂÈ ËÎË ÔÓ‚ÂʉÂÌËflı.
ùÚÓ ÏÓÊÂÚ ÒÚ Ú¸ Ô˘ËÌÓÈ Ú ‚Ï˚ ËÎË ÔÓ‚ÂʉÂÌËfl
ÔË·Ó . Ç Ú ÍËı ÒÎÛ˜ flı, ‚Ó ËÁ·ÂÊ ÌË ÒÓÁ‰ ÌËfl ÓÔ ÒÌ˚ı
ÒËÚÛ ˆËÈ, Ó· ˘ ÈÚÂÒ¸ Í Ô‰ÒÚ ‚ËÚÂβ ÔÓ ÚÂıÌ˘ÂÒÍÓÏÛ
Ó·ÒÎÛÊË‚ Ì˲ ÍÓÏÔ ÌËË LG Electronics.
• ë ‰‡ÌÌ˚Ï Ô˚ÎÂÒÓÒÓÏ ÌÂθÁfl ËÒÔÓθÁÓ‚‡Ú¸ Û‰ÎËÌËÚÂθ.
ùÚÓ ÏÓÊÂÚ ÔË‚ÂÒÚË Í ÓÔ ÒÌÓÒÚË ‚ÓÁ„Ó ÌËfl ËÎË
ÔÓ‚ÂʉÂÌ˲ ÔË·Ó .
• ÇÍβ˜‡Ú¸ ÚÓθÍÓ ‚ ÒÂÚ¸ Ò ‰ÓÎÊÌ˚Ï Ì‡ÔflÊÂÌËÂÏ.
ÇÍβ˜ÂÌË ‚ ÒÂÚ¸ Ò ÌÂÌ ‰ÎÂÊ ˘ËÏ Ì ÔflÊÂÌËÂÏ ÏÓÊÂÚ
ÔË‚ÂÒÚË Í ÔÓÎÓÏÍ ˝ÎÂÍÚÓ‰‚Ë„ ÚÂÎfl Ë, ‚ÓÁÏÓÊÌÓ, Ú ‚ÏÂ
ÔÓθÁÓ‚ ÚÂÎfl. ÑÓÎÊÌÓ ÁÌ ˜ÂÌËÂ Ì ÔflÊÂÌËfl ÔËÚ ÌËfl
Ô˂‰ÂÌÓ Ì ‰Ìˢ Ô˚ÎÂÒÓÒ .
• è‰ ÓÚÍβ˜ÂÌËÂÏ ÓÚ ÒÂÚË, ‚˚Íβ˜ËÚ ‚Ò ˝ÎÂÏÂÌÚ˚
ÛÔ‡‚ÎÂÌËfl.
çÂÒӷβ‰ÂÌË ˝ÚÓ„Ó ÛÍ Á ÌËfl ÏÓÊÂÚ ÔË‚ÂÒÚË Í ÔÓ ÊÂÌ˲
˝ÎÂÍÚ˘ÂÒÍËÏ ÚÓÍÓÏ ËÎË Ú ‚ÏÂ.
• ç ‰ÂÙÓÏËÛÈÚ ‚ËÎÍÛ Í‡ÍËÏ-ÎË·Ó Ó·‡ÁÓÏ.
çÂÒӷβ‰ÂÌË ˝ÚÓ„Ó ÛÍ Á ÌËfl ÏÓÊÂÚ ÔË‚ÂÒÚË Í ÔÓ ÊÂÌ˲
˝ÎÂÍÚ˘ÂÒÍËÏ ÚÓÍÓÏ, Ú ‚Ï ËÎË ÔÓ‚ÂʉÂÌ˲ ÔË·Ó .
ÑÂÙÓÏ ˆËfl ‚ËÎÍË ÏÓÊÂÚ ÒÚ Ú¸ Ô˘ËÌÓÈ ÒÏÂÚË. ÖÒÎË
‚ËÎÍ Ì ÔÓ‰ıÓ‰ËÚ, Ó· ÚËÚÂÒ¸ Í Í‚ ÎËÙˈËÓ‚ ÌÌÓÏÛ
˝ÎÂÍÚËÍÛ ‰Îfl ÛÒÚ ÌÓ‚ÍË ÒÓÓÚ‚ÂÚÒÚ‚Û˛˘ÂÈ ÓÁÂÚÍË.
• êÂÏÓÌÚ ˝ÎÂÍÚÓÔË·ÓÓ‚ ‰ÓÎÊÌ˚ ‚˚ÔÓÎÌflÚ¸ ÚÓθÍÓ
Í‚‡ÎËÙˈËÓ‚‡ÌÌ˚ ËÌÊÂÌÂ˚ ÔÓ ÚÂıÌ˘ÂÒÍÓÏÛ
Ó·ÒÎÛÊË‚‡Ì˲.
çÂÔ ‚ËθÌÓ ‚˚ÔÓÎÌÂÌÌ˚È ÂÏÓÌÚ ÏÓÊÂÚ ÔË‚ÂÒÚË Í
Ò¸ÂÁÌ˚Ï ÓÔ ÒÌÓÒÚflÏ ‰Îfl ÔÓθÁÓ‚ ÚÂÎfl.
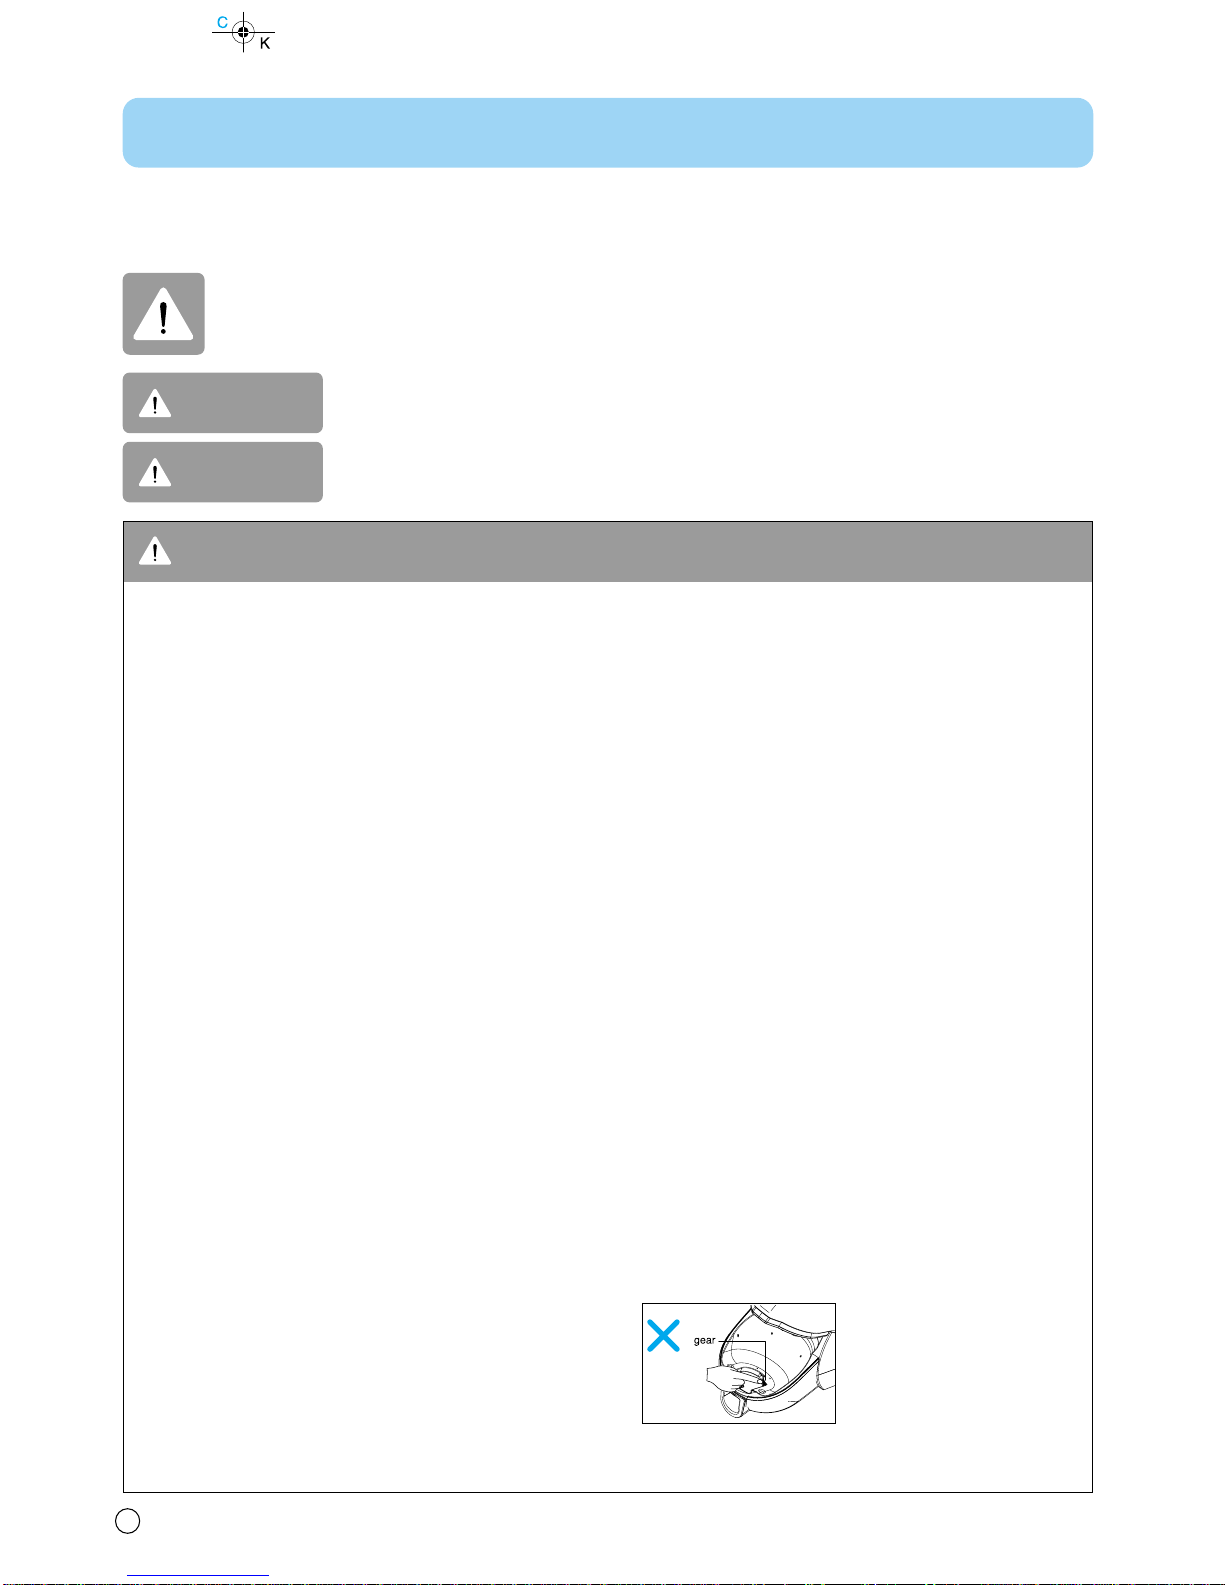
• ç ÔÓÏ¢‡ÈÚ ԇθˆ˚ fl‰ÓÏ Ò ¯ÂÒÚÂÌÂÈ.
çÂÒӷβ‰ÂÌË ˝ÚÓ„Ó ÛÍ Á ÌËfl ÏÓÊÂÚ ÔË‚ÂÒÚË Í Ú ‚Ï ËÎË
ÔÓÎÓÏÍ ¯ÂÒÚÂÌË.
˚˜ „

7
ÇÇÄÄÜÜççõõÖÖ èèêêÄÄÇÇààããÄÄ ííÖÖïïççààääàà ÅÅÖÖááééèèÄÄëëççééëëííàà
ÇçàåÄçàÖ
• ç ‚ÒÚ‡‚ÎflÈÚ ÔÓÒÚÓÓÌÌË Ô‰ÏÂÚ˚ ‚
ÌÂÔ‰̇Á̇˜ÂÌÌ˚ ‰Îfl ˝ÚÓ„Ó ÓÚ‚ÂÒÚËfl
çÂÒӷβ‰ÂÌË ˝ÚÓ„Ó ÛÍ Á ÌËfl ÏÓÊÂÚ ÔË‚ÂÒÚË Í
ÔÓ‚ÂʉÂÌ˲ ÔË·Ó .
• ç ÔÓθÁÓ‚‡Ú¸Òfl ÔË·ÓÓÏ Ò ·ÎÓÍËÓ‚‡ÌÌ˚ÏË ÓÚ‚ÂÒÚËflÏË:
‰Âʇڸ ÓÚ‚ÂÒÚËfl Ò‚Ó·Ó‰Ì˚ÏË ÓÚ „flÁË, ÍÓÏÍÓ‚ Ô˚ÎË,
‚ÓÎÓÒ Ë ‚Ò„Ó, ˜ÚÓ ÏÓÊÂÚ ÛÏÂ̸¯ËÚ¸ ÔÓÚÓÍ ‚ÓÁ‰Ûı‡.
çÂÒӷβ‰ÂÌË ˝ÚÓ„Ó ÛÍ Á ÌËfl ÏÓÊÂÚ ÔË‚ÂÒÚË Í
ÔÓ‚ÂʉÂÌ˲ ÔË·Ó .
• ç ÔÓθÁÛÈÚÂÒ¸ Ô˚ÎÂÒÓÒÓÏ ·ÂÁ ÍÓÌÚÂÈ̇ ‰Îfl Ò·Ó‡
Ô˚ÎË Ë/ËÎË ÛÒÚ‡ÌÓ‚ÎÂÌÌ˚ı ÙËθÚÓ‚.
çÂÒӷβ‰ÂÌË ˝ÚÓ„Ó ÛÍ Á ÌËfl ÏÓÊÂÚ ÔË‚ÂÒÚË Í
ÔÓ‚ÂʉÂÌ˲ ÔË·Ó .
• ÇÒ„‰‡ ÔÓ˜Ë˘‡ÈÚ Ô˚ÎÂÒ·ÓÌËÍ ÔÓÒΠ۷ÓÍË
Ò‰ÒÚ‚‡ÏË ‰Îfl ˜ËÒÚÍË ÍÓ‚Ó‚ ËÎË ÓÒ‚ÂÊËÚÂÎfl, ÔÓÓ¯ÍÓ‚
ËÎË ÏÂÎÍÓÈ Ô˚ÎË.
ùÚË ‚¢ÂÒÚ‚ Á ÒÓfl˛Ú ÙËÎ¸Ú Ë ÒÓÍ ˘ ˛Ú ÔÓÚÓÍ ‚ÓÁ‰Ûı ,
Ú ÍÊ ÒÔÓÒÓ·Ì˚ ÔË‚ÂÒÚË Í ÔÓÎÓÏÍ Ô˚ÎÂÒÓÒ . ÖÒÎË ÌÂ
˜ËÒÚËÚ¸ Ô˚ÎÂÒ·ÓÌËÍ, ÚÓ ˝ÚÓ ÏÓÊÂÚ ÔË‚ÂÒÚË Í
ÌÂËÒÔ ‚ËÏÓÈ ÔÓÎÓÏÍÂ Ô˚ÎÂÒÓÒ .
• ç ËÒÔÓθÁÛÈÚ Ô˚ÎÂÒÓÒ ‰Îfl Ò·Ó‡ ÓÒÚ˚ı, ڂ‰˚ı
Ô‰ÏÂÚÓ‚, ÏÂÎÍËı ˄ۯÂÍ, ·Û·‚ÓÍ, ÒÍÂÔÓÍ Ë Ú.‰.
éÌË ÏÓ„ÛÚ Ôӂ‰ËÚ¸ Ô˚ÎÂÒÓÒ ËÎË ÍÓÌÚÂÈÌ ‰Îfl Ò·Ó Ô˚ÎË.
• ï‡ÌËÚ Ô˚ÎÂÒÓÒ ‚ ÔÓÏ¢ÂÌËË.
ÇÓ ËÁ·ÂÊ ÌË ÒÎÛ˜ ÈÌÓ„Ó ‚Íβ˜ÂÌËfl, Û·Ë ÈÚ Ô˚ÎÂÒÓÒ
ÔÓÒΠËÒÔÓθÁÓ‚ ÌËfl.
• è˚ÎÂÒÓÒ Ì Ô‰̇Á̇˜ÂÌ ‰Îfl ÚÓ„Ó, ˜ÚÓ·˚ ËÏ
ÔÓθÁÓ‚‡ÎËÒ¸ ‰ÂÚË ·ÂÁ ̇·Î˛‰ÂÌËfl.
çÂÒӷβ‰ÂÌË ˝ÚÓ„Ó ÛÍ Á ÌËfl ÏÓÊÂÚ ÔË‚ÂÒÚË Í Ú ‚Ï ËÎË
ÔÓ‚ÂʉÂÌ˲ ÔË·Ó .
• àÒÔÓθÁÛÈÚ ÚÓθÍÓ ‰ÂÚ‡ÎË ËÁ„ÓÚÓ‚ÎÂÌÌ˚ ËÎË
ÂÍÓÏẨӂ‡ÌÌ˚ Ô‰ÒÚ‡‚ËÚÂÎÂÏ ÔÓ ÚÂıÌ˘ÂÒÍÓÏÛ
Ó·ÒÎÛÊË‚‡Ì˲ LG Electronics.
çÂÒӷβ‰ÂÌË ˝ÚÓ„Ó ÛÍ Á ÌËfl ÏÓÊÂÚ ÔË‚ÂÒÚË Í
ÔÓ‚ÂʉÂÌ˲ ÔË·Ó .
•
èÓθÁÛÈÚÂÒ¸ ÔË·ÓÓÏ ÚÓθÍÓ ‚ ÒÓÓÚ‚ÂÚÒÚ‚ËË Ò
ËÌÒÚÛ͈ËflÏË, Ô˂‰ÂÌÌ˚ÏË ‚ ̇ÒÚÓfl˘ÂÏ ÛÍÓ‚Ó‰ÒÚ‚Â.
àÒÔÓθÁÛÈÚ ÔË·Ó ÚÓθÍÓ Ò ÔËÒÔÓÒÓ·ÎÂÌËflÏË Ë Ì‡Ò‡‰Í‡ÏË
ÂÍÓÏẨӂ‡ÌÌ˚ÏË ËÎË Ó‰Ó·ÂÌÌ˚ÏË LG Electronics.
çÂÒӷβ‰ÂÌË ˝ÚÓ„Ó ÛÍ Á ÌËfl ÏÓÊÂÚ ÔË‚ÂÒÚË Í Ú ‚Ï ËÎË
ÔÓ‚ÂʉÂÌ˲ ÔË·Ó .
• ÇÓ ËÁ·ÂʇÌË ڇ‚Ï˚ Ë Ô‰ÓÚ‚‡˘ÂÌËfl Ô‡‰ÂÌËfl
χ¯ËÌ˚ ÔË ˜ËÒÚÍ ÎÂÒÚÌˈ, ‚Ò„‰‡ ÒÚ‡‚¸Ú ÔË·Ó Û
ÔÓ‰ÌÓÊËfl ÎÂÒÚÌˈ˚.
çÂÒӷβ‰ÂÌË ˝ÚÓ„Ó ÛÍ Á ÌËfl ÏÓÊÂÚ ÔË‚ÂÒÚË Í Ú ‚Ï ËÎË
ÔÓ‚ÂʉÂÌ˲ ÔË·Ó .
• Ç ÂÊËÏ ˜ËÒÚÍË "MIN" ‚˚ ‰ÓÎÊÌ˚ ËÒÔÓθÁÓ‚‡Ú¸ ̇҇‰ÍË.
çÂÒӷβ‰ÂÌË ˝ÚÓ„Ó ÛÍ Á ÌËfl ÏÓÊÂÚ ÔË‚ÂÒÚË Í
ÔÓ‚ÂʉÂÌ˲ ÔË·Ó .
•
ç ·ÂËÚÂÒ¸ Á‡ Û˜ÍÛ Ô˚ÎÂÒ·ÓÌË͇ ÔË ÔÂÂÏ¢ÂÌËË Ô˚ÎÂÒÓÒ‡.
äÓÔÛÒ Ô˚ÎÂÒÓÒ ÏÓÊÂÚ ÛÔ ÒÚ¸, ÔË ˝ÚÓÏ Ô˚ÎÂÒ·ÓÌËÍ
ÏÓÊÂÚ ÓÚ‰ÂÎËÚ¸Òfl ÓÚ ÍÓÔÛÒ . ùÚÓ ÏÓÊÂÚ ÔË‚ÂÒÚË Í Ú ‚ÏÂ
ËÎË ÔÓ‚ÂʉÂÌ˲ ÔË·Ó . èË ÔÂÂÏ¢ÂÌËË Ô˚ÎÂÒÓÒ
·ÂËÚÂÒ¸ ÚÓθÍÓ Á‡ Û˜ÍÛ ‰Îfl ÔÂÂÌÓÒÍË.
• ÖÒÎË ÔÓÒΠӘËÒÚÍË ÍÓÌÚÂÈ̇ ‰Îfl Ò·Ó‡ Ô˚ÎË
Á‡„Ó‡ÂÚÒfl ËÎË ÏË„‡ÂÚ Ë̉Ë͇ÚÓ (͇Ò̇fl ·ÏÔӘ͇),
ÔÓ˜ËÒÚËÚ ‚ÓÁ‰Û¯Ì˚È ÙËθÚ.
çÂÒӷβ‰ÂÌË ˝ÚÓ„Ó ÛÍ Á ÌËfl ÏÓÊÂÚ ÔË‚ÂÒÚË Í
ÔÓ‚ÂʉÂÌ˲ ÔË·Ó .
• èӂ¸ÚÂ, ˜ÚÓ·˚ ÙËÎ¸Ú (‚˚ıÓ‰ÌÓÈ ÙËθÚ, ‚ÓÁ‰Û¯Ì˚È
ÙËθÚ, Á‡˘ËÚÌ˚È ÙËÎ¸Ú ˝ÎÂÍÚÓ‰‚Ë„‡ÚÂÎfl) ÔÓÎÌÓÒÚ¸˛
‚˚ÒÓı Ô‰ ÔÓ‚ÚÓÌÓÈ ÛÒÚ‡ÌÓ‚ÍÓÈ ‚ ÔË·Ó.
çÂÒӷβ‰ÂÌË ˝ÚÓ„Ó ÛÍ Á ÌËfl ÏÓÊÂÚ ÔË‚ÂÒÚË Í
ÔÓ‚ÂʉÂÌ˲ ÔË·Ó .
• ç ÒÛ¯ËÚ ÙËÎ¸Ú ‚ ‰ÛıÓ‚Í ËÎË ÏËÍÓ‚ÓÎÌÓ‚ÓÈ Ô˜Ë.
çÂÒӷβ‰ÂÌË ˝ÚÓ„Ó ÛÍ Á ÌËfl ÏÓÊÂÚ ÔË‚ÂÒÚË Í ËÒÍÛ
‚ÓÁ„Ó ÌËfl.
• ç ÒÛ¯ËÚ ÙËÎ¸Ú ‚ ÒÛ¯ËÎÍ ‰Îfl Ó‰Âʉ˚.
çÂÒӷβ‰ÂÌË ˝ÚÓ„Ó ÛÍ Á ÌËfl ÏÓÊÂÚ ÔË‚ÂÒÚË Í ËÒÍÛ ‚ÓÁ„Ó ÌËfl.
• ç ÒÛ¯ËÚ¸ fl‰ÓÏ Ò ÓÚÍ˚Ú˚Ï Ô·ÏÂÌÂÏ.
çÂÒӷβ‰ÂÌË ˝ÚÓ„Ó ÛÍ Á ÌËfl ÏÓÊÂÚ ÔË‚ÂÒÚË Í ËÒÍÛ
‚ÓÁ„Ó ÌËfl.
• ç ҉‚Ë„‡ÈÚ ˚˜‡„ Ô˚ÎÂÒÓÒ‡.
ÖÒÎË ˚˜ „ ÔÓ‚ÂʉÂÌ, Ô˚ÎÂÒÓÒ Ì ·Û‰ÂÚ ·ÓÚ Ú¸ ‰ÓÎÊÌ˚Ï
Ó· ÁÓÏ, ÔË ˝ÚÓÏ ÏÓÊÂÚ ÏË„ Ú¸ Í ÒÌ˚È Ë̉ËÍ ÚÓ Ë
Á‚Û˜ Ú¸ ÒË„Ì Î Ú‚ӄË, ÌÂÒÏÓÚfl Ì ÚÓ, ˜ÚÓ ÍÓÌÚÂÈÌ ‰Îfl
Ò·Ó Ô˚ÎË ÌÂ Á ÔÓÎÌÂÌ. Ç ˝ÚÓÏ ÒÎÛ˜ Â, Ó· ÚËÚÂÒ¸ Í
ÒÔÂˆË ÎËÒÚÛ Ò‚ËÒÌÓ„Ó ˆÂÌÚ ÍÓÏÔ ÌËË LG Electronics.
ìÒÚÓÈÒÚ‚Ó ÚÂÏ˘ÂÒÍÓÈ Á‡˘ËÚ˚ :
Ñ ÌÌ˚È Ô˚ÎÂÒÓÒ ÓÒÌ ˘ÂÌ ÒÔÂˆË Î¸Ì˚Ï ÚÂÏÓÒÚ ÚÓÏ, ÍÓÚÓ˚È Á ˘Ë˘ ÂÚ Ô˚ÎÂÒÓÒ ÓÚ Ô„‚
˝ÎÂÍÚÓ‰‚Ë„ ÚÂÎfl. ÖÒÎË Ô˚ÎÂÒÓÒ ‚ÌÂÁ ÔÌÓ ÓÚÍβ˜ ÂÚÒfl, ‚˚Íβ˜ËÚÂ Â„Ó Ë ÓÚÍβ˜ËÚ ÓÚ ÒÂÚË.
èӂ¸Ú Ô˚ÎÂÒÓÒ Ì Ì Î˘Ë ËÒÚÓ˜ÌËÍÓ‚ Ô„‚ , Ì ÔËÏÂ, ˝ÚÓ ÏÓÊÂÚ ÔÓËÁÓÈÚË ÔË ÔÂÂÔÓÎÌÂÌËË
·ÛÌÍ , Á ÒÓÂÌËË ¯Î Ì„ ËÎË ÙËÎ¸Ú . Ç ˝ÚÓÏ ÒÎÛ˜  ÛÒÚ ÌËÚ Á ÒÓ˚ Ë ÔÓ‰ÓʉËÚ 30 ÏËÌÛÚ ‰Ó
ÔÓ‚ÚÓÌÓ„Ó Á ÔÛÒÍ Ô˚ÎÂÒÓÒ . óÂÂÁ 30 ÏËÌÛÚ ‚Íβ˜ËÚ Ô˚ÎÂÒÓÒ ‚ ÒÂÚ¸ Ë ÔÓ‚ÂÌËÚ ‚˚Íβ˜ ÚÂθ.
ÖÒÎË Ô˚ÎÂÒÓÒ Ì ‚Íβ˜ ÂÚÒfl, Ó· ÚËÚÂÒ¸ Í Í‚ ÎËÙˈËÓ‚ ÌÌÓÏÛ ˝ÎÂÍÚËÍÛ.

8
Telescopic pipe
íÂÎÂÒÍÓÔ˘ÂÒÍ fl ÚÛ·Í
Spring latch
ê„ÛÎflÚÓ ‰ÎËÌ˚
ÚÂÎÂÒÍÓÔ˘ÂÒÍÓÈ ÚÛ·ÍË
Hose Handle
êÛ˜Í ¯Î Ì„
(depending on model)
(Ì ‚Ó ‚ÒÂı ÏÓ‰ÂÎflı) (depending on model)
(Ì ‚Ó ‚ÒÂı ÏÓ‰ÂÎflı)
(depending on model)
(Ì ‚Ó ‚ÒÂı ÏÓ‰ÂÎflı)
(depending on model)
(Ì ‚Ó ‚ÒÂı ÏÓ‰ÂÎflı)
How to use Assembling vacuum cleaner
ä‡Í ÔÓθÁÓ‚‡Ú¸Òfl ë·Ó͇ Ô˚ÎÂÒÓÒ‡
Car et and floor nozzle
ç‡Ò‡‰Í‡ ‰Îfl ˜ËÒÚÍË ÔÓ· Ë ÍÓ‚Ó‚
Push the nozzle into the telescopic pipe.
ëÓ‰ËÌËÚÂ Ì Ò ‰ÍÛ Ë ÚÂÎÂÒÍÓÔ˘ÂÒÍÛ˛ ÚÛ·ÍÛ.
Telesco ic i e
íÂÎÂÒÍÓÔ˘ÂÒ͇fl Ú۷͇
• Push telescopic pipe firmly into hose handle.
• Grasp the spring latch to expand.
• Pull out the pipe to desired length.
• èÎÓÚÌÓ ÒÓ‰ËÌËÚ ÚÂÎÂÒÍÓÔ˘ÂÒÍÛ˛ ÚÛ·ÍÛ Ë
Û˜ÍÛ ¯Î Ì„ .
• ÇÓÁ¸ÏËÚÂÒ¸ Á „ÛÎflÚÓ ‰ÎËÌ˚ ÚÛ·ÍË,
˜ÚÓ·˚ ‚˚ÚflÌÛÚ¸ ÚÛ·ÍÛ
• Ç˚ÚflÌËÚ ÚÛ·ÍÛ Ì ÊÂÎ ÂÏÛ˛ ‰ÎËÌÛ.

9
Click!
ôÂΘÓÍ!
Attachment Point
íÓ˜Í ÍÂÔÎÂÌËfl
Flexible Hose
ÉË·ÍËÈ ¯Î Ì„
Fitting pipe
ëÓ‰ËÌËÚÂθÌ˚È Ô ÚÛ·ÓÍ
Button
äÌÓÔÍ
Connecting the hose to the vacuum cleaner
èÓ‰ÒÓ‰ËÌÂÌË ¯Î‡Ì„‡ Í Ô˚ÎÂÒÓÒÛ
Push the fitting pipe on the flexible hose
into the attachment point on the vacuum cleaner.
To remove the flexible hose from the vacuum
cleaner, press the button situated on the fitting pipe,
then pull the fitting pipe out of the vacuum cleaner.
ÇÒÚ ‚¸Ú ¯Î Ì„ ‚ ÒÔÂˆË Î¸ÌÓ ÓÚ‚ÂÒÚËÂ Ì ÍÓÔÛÒÂ
Ô˚ÎÂÒÓÒ . Ì ÊÏËÚÂ Ì ÍÌÓÔÍÛ, ÒÔÓÎÓÊÂÌÌÛ˛ Ì Û˜ÍÂ
¯Î Ì„ , Á ÚÂÏ ËÁ‚ÎÂÍËÚ ¯Î Ì„ ËÁ Ô˚ÎÂÒÓÒ .

Indicator
à̉ËÍ ÚÓ
Control knob
êÛ˜Í ÛÔ ‚ÎÂÌËfl
Plug,
òÚÂÔÒÂÎ¸Ì fl ‚ËÎÍ
Cord reel button
äÌÓÔÍ ÒÏ Ú˚‚ ÌËfl
¯ÌÛ
Carpet
äÓ‚Â
Floor
èÓÎ
How to operate
ä‡Í ÔÓθÁÓ‚‡Ú¸Òfl
•
Pull out the power cord to the desired
length and plug into the socket.
•Place the control knob of the hose
handle to the required position.
•To turn off, slide control knob to
OFF position.
•Press the cord reel button to
rewind the power cord after use.
• Ç˚ÚflÌËÚ ÒÂÚ‚ÓÈ ¯ÌÛ Ì
ÊÂÎ ÂÏÛ˛ ‰ÎËÌÛ Ë ‚ÒÚ ‚¸ÚÂ
‚ËÎÍÛ ‚ ÓÁÂÚÍÛ.
• èÂÂÏÂÒÚËÚ ÔÓÎÁÛÌÓÍ Ì Û˜ÍÂ
¯Î Ì„ ‚ ÊÂÎ ÂÏÓ ÔÓÎÓÊÂÌËÂ.
• óÚÓ·˚ ‚˚Íβ˜ËÚ¸ Ô˚ÎÂÒÓÒ,
ÔÂÏÂÒÚËÚ ÔÓÎÁÛÌÓÍ Ì Û˜ÍÂ
‚ ÔÓÎÓÊÂÌËÂ Çõäã.
Indicator and alarm sound
à̉Ë͇ÚÓ Ë Ò˄̇ΠÚ‚ӄË
•The indicator light of the hose handle
is on and alarm will sound when dust
tank is full.
After about 1 min 30 sec, vacuum
cleaner will turn itself off and alarm
will sound.
Empty the dust tank and reuse the
vacuum cleaner
• à̉ËÍ ÚÓ Ì Û˜Í ¯Î Ì„
Á „Ó ÂÚÒfl Ë Á‚Û˜ËÚ ÒË„Ì Î Ú‚ӄË,
ÍÓ„‰ ÍÓÌÚÂÈÌ ‰Îfl Ò·Ó Ô˚ÎË
Á ÔÓÎÌÂÌ. èËÏÂÌÓ ˜ÂÂÁ 1 ÏËÌ 30
ÒÂÍÛ̉, Ô˚ÎÂÒÓÒ ÓÚÍβ˜ËÚÒfl Ë
Á Á‚Û˜ËÚ ÒË„Ì Î. é˜ËÒÚËÚÂ
ÍÓÌÚÂÈÌ ‰Îfl Ò·Ó Ô˚ÎË Ë
‚Íβ˜ËÚ Ô˚ÎÂÒÓÒ.
Park mode
êÂÊËÏ Ô‡ÍÓ‚ÍË
•To store during vacuuming, for
example to move a small piece
of furniture or a rug, use park
mode to support the flexible
hose and nozzle.
- Slide the hook on the nozzle
into the slot on the side of
vacuum cleaner.
• óÚÓ·˚ ÔÓÏÂÒÚËÚ¸ Ô˚ÎÂÒÓÒ
Ì ı ÌÂÌËÂ ÔÓÒÎÂ Û·ÓÍË,
ËÒÔÓθÁÛÈÚ ÂÊËÏ
Ô ÍÓ‚ÍË, ÍÓÚÓ fl
ÔÓÁ‚ÓÎflÂÚ Û‰ÂÊË‚ Ú¸
„Ë·ÍËÈ ¯Î Ì„ Ë Ì Ò ‰ÍÛ.
- ÇÒÚ ‚¸ÚÂ Í˛Í Ì Ò ‰ÍË ‚
Ô Á, ÒÔÓÎÓÊÂÌÌ˚È Ì
·ÓÍÓ‚ÓÈ ˜ ÒÚË Ô˚ÎÂÒÓÒ .
Storage
ï‡ÌÂÌËÂ
•When you have switched off
and unplugged the vacuum
cleaner, press the cord reel
button to automatically
rewind the cord.
•You can store your vacuum
cleaner in a vertical position
by sliding the hook on the
nozzle into the slot on the
underside of the vacuum
cleaner.
• èÓÒÎÂ ÚÓ„Ó, Í Í ‚˚
‚˚Íβ˜ËÚ Ô˚ÎÂÒÓÒ Ë
‚˚ÌÂÚÂ ‚ËÎÍÛ ËÁ ÓÁÂÚÍË,
Ì ÊÏËÚÂ Ì ÍÌÓÔÍÛ
ÒÏ Ú˚‚ ÌËfl ¯ÌÛ , ˜ÚÓ·˚
‚ÚÓÏ Ú˘ÂÒÍË ÒÏÓÚ Ú¸
¯ÌÛ.
• Ç˚ ÏÓÊÂÚÂ ı ÌËÚ¸
Ô˚ÎÂÒÓÒ ‚ ‚ÂÚËÍ Î¸ÌÓÏ
ÔÓÎÓÊÂÌËË , ‚ÒÚ ‚Ë‚ ͲÍ
Ì Ò ‰ÍË ‚ Ô Á Ì ‰ÌˢÂ
Ô˚ÎÂÒÓÒ .
How to use O erating vacuum cleaner
ä‡Í ÔÓθÁÓ‚‡Ú¸Òfl ùÍÒÔÎÛ‡Ú‡ˆËfl Ô˚ÎÂÒÓÒ‡
NOTICE
When indicator light flashes and alarm sounds :
1. Dust tank is full
slide handle knob to OFF position and empty dust tank
2. Power is on without dust tank
slide handle knob to OFF position and reattach dust tank
3. Rotating plate in the dust tank is restricted because of obstruction
slide handle knob to OFF position and remove obstruction
èêàåÖóÄçàÖ
äÓ„‰ ÏË„ ÂÚ Ë̉ËÍ ÚÓ Ë Á‚Û˜ËÚ ÒË„Ì Î ÚÂ‚Ó„Ë :
1. è˚ÎÂÒ·ÓÌËÍ Á ÔÓÎÌÂÌ
ÔÂÂÏÂÒÚËÚ ÔÓÎÁÛÌÓÍ Ì Û˜Í ‚ ÔÓÎÓÊÂÌË Çõäã Ë Ó˜ËÒÚËÚÂ
ÍÓÌÚÂÈÌ ‰Îfl Ò·Ó Ô˚ÎË.
2. ÇÍβ˜ÂÌÓ ÔËÚ ÌË ·ÂÁ ÛÒÚ ÌÓ‚ÎÂÌÌÓ„Ó Ô˚ÎÂÒ·ÓÌËÍ ,
ÔÂÂÏÂÒÚËÚ ÔÓÎÁÛÌÓÍ Ì Û˜Í ‚ ÔÓÎÓÊÂÌË Çõäã Ë ÛÒÚ ÌÓ‚ËÚÂ
Ô˚ÎÂÒ·ÓÌËÍ.
3. èÓ‚ÓÓÚ ÔÎ ÒÚËÌ˚ Ô˚ÎÂÒ·ÓÌËÍ Ë Ó„ Ì˘ÂÌ ËÁ - Á Ì Î˘Ëfl
ÔÂÔflÚÒÚ‚Ëfl.
ÔÂÂÏÂÒÚËÚ ÔÓÎÁÛÌÓÍ Ì Û˜Í ‚ ÔÓÎÓÊÂÌË Çõäã Ë Û‰ ÎËÚ ÔÂÔflÚÒÚ‚ËÂ.
10

-
Carpet
äÓ‚Â
Carpet
äÓ‚Â
Pedal
è‰ θ
Floor
èÓÎ
Floor
èÓÎ
11
Cleaning carpet and floor nozzle
óËÒÚ͇ ̇҇‰ÍË ‰Îfl ÔÓ· Ë ÍÓ‚Ó‚‡
•Clean the hole and brush of the nozzle.
• èÓ˜ËÒÚËÚ ÓÚ‚ÂÒÚË ‚ Ì Ò ‰ÍÂ Ë ˘ÂÚÍÛ.
11
How to Use Using carpet and floor nozzle
àÒÔÓθÁÓ‚‡ÌË ËÁ‰ÂÎËfl
àÒÔÓθÁÓ‚‡ÌË ̇҇‰ÍË ‰Îfl ˜ËÒÚÍË ÔÓ· Ë ÍÓ‚Ó‚
Car et and floor nozzle (de end on model)
ç‡Ò‡‰Í‡ ‰Îfl ˜ËÒÚÍË ÔÓ· Ë ÍÓ‚Ó‚ (Ì ‚Ó ‚ÒÂı ÏÓ‰ÂÎflı)
• The 2 osition nozzle
This is equipped with a pedal which allows you to
alter its position according to the type of floor to be cleaned.
• Car et or rug osition
press the pedal ( ) to lower brush.
• Hard floor osition(tiles, parquets floor)
Both pedal position are suitable.
• ç‡Ò‡‰Í‡, ÍÓÚÓ‡fl ÏÓÊÂÚ ‡·ÓÚ‡Ú¸ ‚ 2-ı ÔÓÎÓÊÂÌËflı.
ùÚ Ì Ò ‰Í ÓÒÌ ˘ÂÌ Ô‰ θ˛, ÍÓÚÓ fl ÔÓÁ‚ÓÎflÂÚ ‚ Ï ÏÂÌflÚ¸
ÔÓÎÓÊÂÌËÂ ‚ Á ‚ËÒËÏÓÒÚË ÓÚ ÚËÔ Û·Ë ÂÏÓ„Ó ÔÓÎ .
• ÑÎfl ˜ËÒÚÍË ÍÓ‚‡ ËÎË ÍÓ‚Ë͇,
Ì ÊÏËÚÂ Ì Ô‰ θ ( ), ˜ÚÓ·˚ ÓÔÛÒÚËÚ¸ ˘ÂÚÍÛ.
• èÓÎÓÊÂÌË ‰Îfl ˜ËÒÚÍË ÊÂÒÚÍÓ„Ó ÔÓ· (ÔÎËÚÍË, Ô ÍÂÚÌÓ„Ó ÔÓÎ ).
óËÒÚÍÛ ÏÓÊÌÓ ÔÓ‚Ó‰ËÚ¸ ‚ β·ÓÏ ÔÓÎÓÊÂÌËË Ô‰ ÎË.
Hard Floor Nozzle (de end on model)
ç‡Ò‡‰Í‡ ‰Îfl Ú‚fi‰˚ı ÔÓÍ˚
• Efficient cleaning of hard floors
(wood, linoleum, etc)
• ùÙÙÂÍÚË‚Ì fl Û·ÓÍ Ú‚Â‰˚ı ÔÓÍ˚ÚËÈ (‰Â‚Ó,
ÎËÌÓÎÂÛÏ, Ë Ú.‰.)

Carpet
äÓ‚Â
Carpet
äÓ‚Â
Pedal
è‰ θ
Floor
èÓÎ
Floor
èÓÎ
How to Use Using All Floor nozzle and mini turbine nozzle
àÒÔÓθÁÓ‚‡ÌË ËÁ‰ÂÎËfl
àÒÔÓθÁÓ‚‡ÌË ̇҇‰ÍË ‰Îfl ˜ËÒÚÍË ‚ÒÂı ÔÓÎÓ‚ Ë ÏËÌË-ÚÛ·Ó Ì‡Ò‡‰Í
Cleaning All Floor nozzle
ç‡Ò‡‰Í‡ ‰Îfl ˜ËÒÚÍË ÔÓÎÓ‚ ‚ÒÂı ÚËÔÓ‚
•Open the cover by pulling the hook.
• éÚÍÓÈÚ ÍÓÊÛı, ÔÓÚflÌÛ‚ Á ͲÍ.
•Clean the hole and brush of the nozzle.
• èÓ˜ËÒÚËÚ ÓÚ‚ÂÒÚËÂ Ë ˘ÂÚÍÛ
Ì Ò ‰ÍË.
All Floor nozzle (de end on model)
ç‡Ò‡‰Í‡ ‰Îfl ˜ËÒÚÍË ÔÓÎÓ‚ ‚ÒÂı ÚËÔÓ‚ (Ì ‚Ó ‚ÒÂı ÏÓ‰ÂÎflı)
• The 2 osition nozzle
This is equipped with a pedal which allows you to alter
its position according to the type of floor to be cleaned.
• Car et or rug osition
Press the pedal ( ), then brush is will rotate
• Hard floor osition
Press the pedal ( ), then brush will stop rotating
• ç‡Ò‡‰Í‡, ÍÓÚÓ‡fl ÏÓÊÂÚ ‡·ÓÚ‡Ú¸ ‚ 2-ı ÔÓÎÓÊÂÌËflı,
ÓÒÌ ˘ÂÌ Ô‰ θ˛, ÍÓÚÓ fl ÔÓÁ‚ÓÎflÂÚ ‚ Ï ÏÂÌflÚ¸ ÔÓÎÓÊÂÌË ‚
Á ‚ËÒËÏÓÒÚË ÓÚ ÚËÔ Û·Ë ÂÏÓ„Ó ÔÓÎ .
• èÓÎÓÊÂÌË ‰Îfl ˜ËÒÚÍË ÍÓ‚‡ ËÎË ÍÓ‚Ë͇,
Ì ÊÏËÚÂ Ì Ô‰ θ ( ), ÔÓÒΠ˜Â„Ó ˘ÂÚÍ ·Û‰ÂÚ ‚ ˘ Ú¸Òfl.
• èÓÎÓÊÂÌË ‰Îfl ˜ËÒÚÍË ÊÂÒÚÍÓ„Ó ÔÓ·.
ç ÊÏËÚÂ Ì Ô‰ θ ( ), ÔÓÒΠ˜Â„Ó ˘ÂÚÍ ÔÂÍ ÚËÚ ‚ ˘ Ú¸Òfl.
Mini turbine nozzle (de end on model)
åËÌË-ÚÛ·Ó Ì‡Ò‡‰Í‡È (Ì ‚Ó ‚ÒÂı ÏÓ‰ÂÎflı)
• Mini turbine is used for stairs and other hard to reach places.
• To clean the mini turbine nozzle, remove the nozzle cover :
Remove 2 screws on the bottom and take mini turbine nozzle
cover off as shown.
• Frequently clean and remove hair, string, and lint build-up in
the brush area. Failure to do so could damage to mini turbine
nozzle.
• åËÌË-ÚÛ·Ó Ì Ò ‰Í ËÒÔÓθÁÛÂÚÒfl ‰Îfl ˜ËÒÚÍË ÎÂÒÚÌˈ Ë
‰Û„Ëı ÚÛ‰ÌÓ‰ÓÒÚÛÔÌ˚ı ÏÂÒÚ.
• óÚÓ·˚ ‚˚˜ËÒÚËÚ¸ ÏËÌË-ÚÛ·Ó Ì Ò ‰ÍÛ, ÒÌËÏËÚ ÍÓÊÛı
Ì Ò ‰ÍË. Ç˚‚ÂÌËÚ 2 ‚ËÌÚ Ì ‰ÌË˘Â Ë ÒÌËÏËÚ ÍÓÊÛı
Ì Ò ‰ÍË Ò ÏËÌË-ÚÛ·ËÌÓÈ, Í Í ÔÓÍ Á ÌÓ Ì ËÒÛÌÍÂ.
• ó ˘Â ˜ËÒÚËÚÂ Ë Û‰ ÎflÈÚ ‚ÓÎÓÒ˚, ÌËÚË Ë ÔÛı,
ÒÍ ÔÎË‚ ˛˘ËÂÒfl ‚ Ó·Î ÒÚË ˘ÂÚÍË. çÂÒӷβ‰ÂÌË ˝ÚÓ„Ó
ÛÍ Á ÌËfl ÏÓÊÂÚ ÔË‚ÂÒÚË Í ÔÓ‚ÂʉÂÌ˲ ÏËÌË-ÚÛ·Ó
Ì Ò ‰ÍË.
12

Carpet
äÓ‚Â
Floor
èÓÎ
Upholstery nozzle
ç‡Ò‡‰Í‡ ‰Îfl ˜ËÒÚÍË Ó·Ë‚ÍË Dusting brush
è˚΂‡fl ˘ÂÚ͇ Crevice tool
ôÂ΂‡fl ̇҇‰Í‡
13
Upholstery Nozzle
ç‡Ò‡‰Í‡ ‰Îfl ˜ËÒÚÍË Ó·Ë‚ÍË
Upholstery Nozzle is for vacuuming upholstery,
mattresses, etc.
ç Ò ‰Í ‰Îfl ˜ËÒÚÍË Ó·Ë‚ÍË ÔËÏÂÌflÂÚÒfl
‰Îfl ˜ËÒÚÍË Ó·Ë‚ÍË, Ï Ú ÒÓ‚ Ë Ú. ‰.
Dusting Brush
è˚΂‡fl ˘ÂÚ͇
Dusting Brush is for vacuuming pic-
ture frames, furniture frames, books
and other irregular surfaces.
è˚΂ fl ˘ÂÚÍ ÔËÏÂÌflÂÚÒfl ‰Îfl
˜ËÒÚÍË Ï Í ÚËÌ, Í Í ÒÓ‚
Ï·ÂÎË, ÍÌË„ Ë ‰Û„Ëı ÌÂÓ‚Ì˚ı
ÔÓ‚ÂıÌÓÒÚÂÈ.
Crevice Tool
ôÂ΂‡fl ̇҇‰Í‡
Crevice Tool is for vacuuming in those
normally hard-to-reach places such as
reaching cobwebs, or between the
cushions of a sofa.
ôÂ΂ fl Ì Ò ‰Í ÔËÏÂÌflÂÚÒfl ‰Îfl
˜ËÒÚÍË ‚ ÚÛ‰ÌÓ‰ÓÒÚÛÔÌ˚ı ÏÂÒÚ ı,
Ú ÍËı Í Í ÏÂÒÚ ÒÍÓÔÎÂÌËfl Ô ÛÚËÌ˚
ËÎË ÏÂÊ‰Û ÔÓ‰Û¯Í ÏË ‰Ë‚ ÌÓ‚.
NOTICE
Use accessory in the sofa mode
èêÖÑìèêÖÜÑÖçàÖ
àÒÔÓθÁÛÈÚÂ Ì Ò ‰ÍÛ ‚ ÂÊËÏ ˜ËÒÚÍË
‰Ë‚ Ì .
How to Use Using accessory nozzles
àÒÔÓθÁÓ‚‡ÌË ËÁ‰ÂÎËfl àÒÔÓθÁÓ‚‡ÌË ‰ÓÔÓÎÌËÚÂθÌ˚ı ̇҇‰ÓÍ
•Accessory nozzles include in the "PE BAG" with owner's manual.
•ÑÓÔÓÎÌËÚÂθÌ˚ ̇҇‰ÍË Ì‡ıÓ‰flÚÒfl ‚ ÔÓÎË˝ÚËÎÂÌÓ‚ÓÏ Ô‡ÍÂÚÂ
‚ÏÂÒÚÂ Ò ÛÍÓ‚Ó‰ÒÚ‚ÓÏ ÔÓθÁÓ‚‡ÚÂÎfl.
< Upholstery nozzle mode >
< êÂÊËÏ ˜ËÒÚÍË Ó·Ë‚ÍË >
< Dusting brush mode >
< ôÂÚÍ ‰Îfl Û·ÓÍË Ô˚ÎË >
•BOX •
•äéêéÅäÄ •
Push the button
ç ÊÏËÚÂ Ì ÍÌÓÔÍÛ Pull the cover
ç ÚflÌÛÚ¸ ÍÓÊÛı

14
How to use Using the Sani unch nozzle
ä‡Í ÔÓθÁÓ‚‡Ú¸Òfl
àÒÔÓθÁÓ‚‡ÌË ̇҇‰ÍË ‰Îfl Ïfl„ÍÓÈ Ï·ÂÎË Ë ÔÓÒÚÂθÌ˚ı ÔË̇‰ÎÂÊÌÓÒÚÂÈ
Sani punch nozzle
ç‡Ò‡‰Í‡ ‰Îfl Ïfl„ÍÓÈ Ï·ÂÎË Ë ÔÓÒÚÂθÌ˚ı ÔË̇‰ÎÂÊÌÓÒÚÂÈ
Set the suction power control switch to MAX POWER before vacuuming.
Depending on the type of bedding, handling may be awkward or it may cause a lot of noise.
If this is the case, adjust the suction power control switch to a lower setting.
è‰ ·ÓÚÓÈ ÛÒÚ ÌÓ‚ËÚ ÔÓÎÁÛÌÓÍ Ì Û˜Í Ô˚ÎÂÒÓÒ ‚ ÔÓÎÓÊÂÌË MAX POWER.
Ç Á ‚ËÒËÏÓÒÚË ÓÚ ÚËÔ ÔÓÒÚÂθÌ˚ı ÔËÌ ‰ÎÂÊÌÓÒÚÂÈ Ó· ·ÓÚÍ ÏÓÊÂÚ ÓÍ Á Ú¸Òfl ÌÂÛ‰Ó·ÌÓÈ ËÎË ÒÎ˯ÍÓÏ ¯ÛÏÌÓÈ.
Ç ˝ÚÓÏ ÒÎÛ˜  ÛÒÚ ÌÓ‚ËÚ ÔÓÎÁÛÌÓÍ Ì ÔÓÌËÊÂÌÌÛ˛ ÏÓ˘ÌÓÒÚ¸.
Features
ÇÓÁÏÓÊÌÓÒÚË
This nozzle picks up even dust inside through beating.
The bottom part can be separated to be cleaned.
Since the bottom does not stick to the surface, vacuuming is easy.
ç Ò ‰Í Û‰ ÎflÂÚ Ô˚θ ÒÓ ‚ÒÂÈ ÔÓ‚ÂıÌÓÒÚË ·Î „Ó‰ fl ˝ÙÙÂÍÚÛ
‚˚·Ë‚ ÌËfl. çËÊÌflfl ˜ ÒÚ¸ Ì Ò ‰ÍË Ò‚Ó·Ó‰ÌÓ Á ÍÂÔÎÂÌ ‰Îfl
ӷ΄˜ÂÌËfl ˜ËÒÚÍË.
óËÒÚÍ ÔÓÒÚÂθÌ˚ı ÔËÌ ‰ÎÂÊÌÂÒÚÂÈ Ì ‚˚Á˚‚ ÂÚ Á ÚÛ‰ÌÂÌËÈ, Ú Í
Í Í ÌËÊÌflfl ˜ ÒÚ¸ Ì Ò ‰ÍË Ì ÔËÎËÔ ÂÚ Í ÔÓ‚ÂıÌÓÒÚË.
How to use
àÒÔÓθÁÓ‚‡ÌË Ô˚ÎÂÒÓÒ‡
Follow the directions below for proper use.
ÑÎfl ÌÓÏ Î¸ÌÓÈ ·ÓÚ˚ Ì Ò ‰ÍË ÔˉÂÊË‚ ÈÚÂÒ¸ ÒÎÂ‰Û˛˘Ëı
ËÌÒÚÛ͈ËÈ.
Assembly
Connect the nozzle to the telescopic tube.
ë·Ó͇
èËÒÓ‰ËÌËÚÂ Ì Ò ‰ÍÛ Í ÚÂÎÂÒÍÓÔ˘ÂÒÍÓÈ ÚÛ·ÍÂ

15
This Sani Punch nozzle is for effective cleaning of beds and blankets to remove mites and dust.
ç Ò ‰Í ÔÂ‰Ì ÁÌ ˜ÂÌ ‰Îfl ˜ËÒÚÍË ÔÓÒÚÂÎË, Ó‰ÂflÎ Ë Ó·Ë‚ÍË Ï·ÂÎË ÓÚ Ô˚΂˚ı Í΢ÂÈ Ë Ô˚ÎË.
Effective cleaning
ùÙÙÂÍÚË‚Ì fl ˜ËÒÚÍ
Bed & blanket
äÓ‚ ÚË Ë Ó‰ÂflÎ
Bulky & heavy blanket
íÓÎÒÚ˚Â Ë ÚflÊÂÎ˚ ӉÂflÎ
Light blanket & sheet
íÓÌÍË ӉÂflÎ Ë ÔÓÒÚ˚ÌË
When using on the bed
óËÒÚ͇ ̇ ÍÓ‚‡ÚË
Lay out the blanket
and vacuum it on the bed
ê ÁÎÓÊËÚ ӉÂflÎÓ Ë ÔÓÔ˚ÎÂÒÓÒ¸ÚÂ
Â„Ó Ì ÍÓ‚ ÚË.
When using on the floor
óËÒÚ͇ ̇ ÔÓÎÛ
It is easier to clean a light blanket or sheet
by pushing the nozzle in the direction of the arrow.
To increase cleaning efficiency for light blankets,
lay on top of a bulky blanket and then clean.
ã„ÍË ӉÂflÎ ËÎË ÔÓÒÚ˚ÌË Î„˜Â ˜ËÒÚËÚ¸, ‰‚Ë„ fl
Ì Ò ‰ÍÛ ‚ Ì Ô ‚ÎÂÌËË ÒÚÂÎÓÍ(ÒÏ. ËÒÛÌÓÍ ‚˚¯Â).
ÑÎfl ·ÓΠ·˚ÒÚÓÈ Ë ˝ÙÙÂÍÚË‚ÌÓÈ ˜ËÒÚÍË Î„ÍÓ„Ó
Ó‰ÂflÎ Ô‰ ˜ËÒÚÍÓÈ ÒÒÚÂÎËÚÂ Â„Ó Ì ‰Û„ÓÏ, ·ÓÎÂÂ
ÚÓÎÒÚÓÏ.

16
For simple cleaning of the vacuum nozzle, detach the Sani Punch nozzle from the telescopic tube and attach the crevice tool
to vacuum dust.
óÚÓ·˚ ·˚ÒÚÓ Ó˜ËÒÚËÚ¸ Ì Ò ‰ÍÛ SaniPunch, Ô‚ÂÌËÚ ÂÂ Ë Ò ÔÓÏÓ˘¸˛ ˘Â΂ÓÈ Ì Ò ‰ÍË Ú˘ ÚÂθÌÓ ÔÓ˜ËÒÚËÚÂ.
Since the vibrator inside is composed of precision parts, never disassemble the body.
Be careful not to let foreign objects clog the air suction part on top of the vacuum nozzle.
Since removal of the punch bar may cause performance problems, do not warp or remove it.
Attach the bottom plate properly before using. Without this bottom plate, it may not function.
í Í Í Í ‚Ë· ÚÓ ÒÓÒÚÓËÚ ËÁ ÚÓ˜ÌÓ ÔË„Ì ÌÌ˚ı ‰ÂÚ ÎÂÈ, ÌË ‚ ÍÓÂÏ ÒÎÛ˜ Â Ì Á·Ë ÈÚÂ Ì Ò ‰ÍÛ.
ç ‰ÓÔÛÒÍ ÈÚÂ, ˜ÚÓ·˚ ÔÓÒÚÓÓÌÌË Ô‰ÏÂÚ˚ ϯ ÎË ‰‚ËÊÂÌ˲ ‚ÓÁ‰Ûı ˜ÂÂÁ ‚ÂıÌ˛˛ ˜ ÒÚ¸ Ì Ò ‰ÍË.
ç ҄˷ ÈÚÂ Ë Ì ÒÌËÏ ÈÚ ‚˚·Ë‚ ˛˘ËÈ ˝ÎÂÏÂÌÚ, Ú Í Í Í ˝ÚÓ ÏÓÊÂÚ ÔË‚ÂÒÚË Í Ò·ÓflÏ ‚ ·ÓÚÂ.
ÅÂÁ ÌËÊÌÂÈ ÔÎ ÒÚËÌ˚ Ì Ò ‰Í Ì ·Û‰ÂÚ ·ÓÚ Ú¸.
Since this vacuum nozzle has been made exclusively for cleaning beds, blankets and upholstery, use it only for these cleaning purposes.
(Using it to clean the floor may result soiling it or a drop in performance, do not use it for such purposes.)
ùÚ Ì Ò ‰Í ÒÎÛÊËÚ ‰Îfl ˜ËÒÚÍË ÔÓÒÚÂÎË, Ó‰ÂflÎ Ë Ï·ÂθÌÓÈ Ó·Ë‚ÍË. èËÏÂÌflÈڠ ÚÓθÍÓ ‰Îfl ˜ËÒÚÍË ˝ÚËı ÔÓ‚ÂıÌÓÒÚÂÈ.
(óËÒÚÍ ÔÓÎ ˝ÚÓÈ Ì Ò ‰ÍÓÈ ÏÓÊÂÚ ÔË‚ÂÒÚË Í Âfi Á ÒÓÂÌ˲ ËÎË ÒÌËÊÂÌ˲ ÁÙÙÂÍÚË‚ÌÓÒÚË Ì Ò ‰ÍË
— Ì ÔËÏÂÌflÈڠ ̠ÔÓ Ì ÁÌ ˜Â˲. )
Top
Çˉ Ò‚ÂıÛ
Bottom
Çˉ ÒÌËÁÛ

17
1 2 3
4 5 6
Bottom plate
çËÊÌflfl ÔÎ ÒÚËÌ
Bottom plate
çËÊÌflfl ÔÎ ÒÚËÌ
Punch bar
Ç˚·Ë‚ ˛˘ËÈ
˝ÎÂÏÂÌÚ
Punch bar
Ç˚·Ë‚ ˛˘ËÈ
˝ÎÂÏÂÌÚ
Follow the instruction below for through washing.
(Do not soak the entire body of the vacuum nozzle in water, it may cause the vibrator to malfunction)
èË Ï˚Ú¸Â Ì Ò ‰ÍË Òӷβ‰ ÈÚ ÒÎÂ‰Û˛˘Ë ËÌÒÚÛ͈ËË.
(ç ÔÓ„ÛÊ ÈÚÂ Ì Ò ‰ÍÛ ‚ ‚Ó‰Û ˆÂÎËÍÓÏ, ˝ÚÓ ÏÓÊÂÚ Ôӂ‰ËÚ¸ ‚Ë· ÚÓ.)
Press the button on the
rear side of the vacuum
nozzle to separate the
bottom plate.
ç ÊÏËÚÂ ÍÌÓÔÍÛ Ì
Á ‰ÌÂÈ ˜ ÒÚË Ì Ò ‰ÍË
˜ÚÓ·˚ ÓÚÒÓ‰ËÌËÚ¸
ÌËÊÌ˛˛ ÔÎ ÒÚËÌÛ.
Wipe all the soiled parts
of the vacuum nozzle
body with a cloth.
èÓÚËÚÂ ‚ÒÂ
Á „flÁÌÂÌÌ˚ ˜ ÒÚË
Ì Ò ‰ÍË ÚflÔÍÓÈ.
Straighten the punch bar
on the lower section.
ìÒÚ ÌÓ‚ËÚÂ
‚˚·Ë‚ ˛˘ËÈ ˝ÎÂÏÂÌÚ ‚
ÌËÊÌÂÂ ÔÓÎÓÊÂÌËÂ.
Insert the attachment
projections on bottom
plate to the vacuum
nozzle grooves.
ÇÒÚ ‚¸ÚÂ
‚˚ÒÚÛÔ ˛˘Û˛ ˜ ÒÚ¸
ÌËÊÌÂÈ ÔÎ ÒÚËÌ˚ ‚
Ô Á.
Push down the tabs
to secure.
á ÍÂÔËÚ ÌËÊÌ˛˛
ÔÎ ÒÚËÌÛ, Ì Ê ‚ Ì
‚˚ÒÚÛÔ˚ ‰Ó ÛÔÓ .
Wash the removed bot-
tom plate with water and
dry it.
èÓÏÓÈÚ ÌËÊÌ˛˛
ÔÎ ÒÚËÌÛ ‚Ó‰ÓÈ Ë
ÔÓÒÛ¯ËÚ ÂÂ.

Pull out
Ç˚ÌÛÚ¸
Tank handle
Û˜Í Ô˚ÎÂÒ·ÓÌËÍ
Tank separation lever
ÍÌÓÔÍ ÒÌflÚËfl Ô˚ÎÂÒ·ÓÌËÍ
Indicator
à̉ËÍ ÚÓ
Dust tank cap
ä˚¯Í Ô˚ÎÂÒ·ÓÌËÍ
18
How to use Em tying dust tank
ä‡Í ÔÓθÁÓ‚‡Ú¸Òfl é˜ËÒÚ͇ ÍÓÌÚÂÈ̇ ÓÚ Ô˚ÎË
The dust tank needs emptying when indicator light is on.
• Turn off the vacuum cleaner and unplug it.
• Grasp the handle of the tank and then press the tank separation lever.
• Pull out the dust tank.
• Empty the tank and then assemble the dust tank as below
äÓ„‰ Á „Ó ÂÚÒfl Ë̉ËÍ ÚÓ ÌÂÓ·ıÓ‰ËÏÓ Ó˜ËÒÚËÚ¸ Ô˚ÎÂÒ·ÓÌËÍ.
• Ç˚Íβ˜ËÚ Ô˚ÎÂÒÓÒ Ë ‚˚̸Ú ‚ËÎÍÛ ËÁ ÓÁÂÚÍË.
• ÇÓÁ¸ÏËÚÂÒ¸ Á Û˜ÍÛ Ô˚ÎÂÒ·ÓÌËÍ , Á ÚÂÏ Ì ÊÏËÚÂ Ì ÍÌÓÔÍÛ
ÒÌflÚËfl Ô˚ÎÂÒ·ÓÌËÍ .
• àÁ‚ÎÂÍËÚ Ô˚ÎÂÒ·ÓÌËÍ.
• é˜ËÒÚËÚ Ô˚ÎÂÒ·ÓÌËÍ, Á ÚÂÏ ‚ÒÚ ‚¸ÚÂ, Í Í ÔÓÍ Á ÌÓ ÌËÊÂ.
NOTICE, èêàåÖóÄçàÖ
• If suction power decreases after empting dust tank, clean dust tank next page
• Since dust tank is full, indicator continues to flash for 1 minute and suction ower will
decrease for a while, then vacuum cleaner will turn itself off.
• ÖÒÎË ÔÓÒΠÓÔÛÒÚÓ¯ÂÌËfl Ô˚ÎÂÒ·ÓÌËÍ ÏÓ˘ÌÓÒÚ¸ ‚Ò Ò˚‚ ÌËfl ÛÔ Î , ÔÓ˜ËÒÚËÚÂ
ÍÓÌÚÂÈÌÂ Í Í ÛÍ Á ÌÓ Ì ÒÎÂ‰Û˛˘ÂÈ ÒÚ ÌˈÂ. ëÎÂ‰Û˛˘ fl ÒÚ Ìˈ
• èÓÒÍÓθÍÛ Ô˚ÎÂÒ·ÓÌËÍ Á‡ÔÓÎÌÂÌ, Ë̉Ë͇ÚÓ ÔÓ‰ÓÎʇÂÚ ÏË„‡Ú¸
‚ Ú˜ÂÌË 1 ÏËÌÛÚ ˚ Ë Ì‡ ÌÂÍÓÚÓÓ ‚ÂÏfl ÏÓ˘ÌÓÒÚ¸ ‚Ò‡Ò˚‚‡ÌËfl Ô‡‰‡ÂÚ,
Á‡ÚÂÏ Ô˚ÎÂÒÓÒ ‚˚Íβ˜ËÚÒfl ‡‚ÚÓχÚ˘ÂÒÍË.
Moving the vacuum cleaner
• Don't grasp the tank handle when you are moving the vacuum cleaner.
The vacuum cleaner's body may fall when separating tank and body.
You should grasp the carrier handle when you are moving the vacuum cleaner.
èÂÂÌÓÒ͇ Ô˚ÎÂÒÓÒ‡
• He ·ÂËÚÂÒ¸ Á Û˜ÍÛ Ô˚ÎÂÒ·ÓÌËÍ ÔË ÔÂÂÏ¢ÂÌËË Ô˚ÎÂÒÓÒ .
äÓÔÛÒ Ô˚ÎÂÒÓÒ ÏÓÊÂÚ ÛÔ ÒÚ¸, ÔË ˝ÚÓÏ Ô˚ÎÂÒ·ÓÌËÍ ÏÓÊÂÚ ÓÚ‰ÂÎËÚ¸Òfl ÓÚ
ÍÓÔÛÒ . èË ÔÂÂÌÓÒÍ Ô˚ÎÂÒÓÒ ·ÂËÚÂÒ¸ ÚÓθÍÓ Á Û˜ÍÛ ‰Îfl ÔÂÂÌÓÒÍË.
Assembling dust tank
ìÒÚ‡Ìӂ͇ Ô˚ÎÂÒ·ÓÌË͇
Tank handle
Û˜Í Ô˚ÎÂÒ·ÓÌËÍ
Carrier handle
êÛ˜Í ‰Îfl ÔÂÂÌÓÒÍË

19
Pull out
Ç˚ÌÛÚ¸
Tank handle
Û˜Í Ô˚ÎÂÒ·ÓÌËÍ
Tank separation lever
ÍÌÓÔÍ ÒÌflÚËfl Ô˚ÎÂÒ·ÓÌËÍ
How to use Cleaning dust tank
ä‡Í ÔÓθÁÓ‚‡Ú¸Òfl óËÒÚ͇ Ô˚ÎÂÒ·ÓÌË͇
• Press tank separation button and pull out dust tank.
• Raise dust tank cap
• Dry fully in shade so that moisture is entirely removed.
• ç ÊÏËÚÂ Ì ÍÌÓÔÍÛ ÒÌflÚËfl Ô˚ÎÂÒ·ÓÌËÍ Ë ËÁ‚ÎÂÍËÚÂ
Ô˚ÎÂÒ·ÓÌËÍ.
• èÓ‰ÌËÏËÚ Í˚¯ÍÛ Ô˚ÎÂÒ·ÓÌËÍ
• Ç˚ÒÛ¯ËÚ ˝ÚË ‰ÂÚ ÎË ‚ ÚÂÌË ‰Ó ÔÓÎÌÓ„Ó ÛÒÚ ÌÂÌËfl ‚Î „Ë.
NOTICE
If suction power decreases after cleaning dust tank, clean air filter
and motor safety filter. Next page
èêàåÖóÄçàÖ
ÖÒÎË ÏÓ˘ÌÓÒÚ¸ ‚Ò Ò˚‚ ÌËfl ÛÔ Î ÔÓÒΠ˜ËÒÚÍË Ô˚ÎÂÒ·ÓÌËÍ ,
ÔÓ˜ËÒÚËÚ ‚ÓÁ‰Û¯Ì˚È ÙËÎ¸Ú Ë Á ˘ËÚÌ˚È ÙËθÚ
˝ÎÂÍÚÓ‰‚Ë„ ÚÂÎfl. ëÎÂ‰Û˛˘ fl ÒÚ Ìˈ

20
Dust Seperator
è˚ÎÂÒ·ÓÌËÍ
Guide cover
ä˚¯Í ÒÂÔ ÚÓ
Pre-filter cover
ä˚¯Í Ô‰‚ ËÚÂθÌÓ„Ó ÙËθÚ
Air filter
ÇÓÁ‰Û¯Ì˚È ÙËθÚ
Motor safety filter
á ˘ËÚÌ˚È ÙËθÚ
˝ÎÂÍÚÓ‰‚Ë„ ÚÂÎfl
How to use Cleaning air filter and motor safety filter
ä‡Í ÔÓθÁÓ‚‡Ú¸Òfl
óËÒÚ͇ ‚ÓÁ‰Û¯ÌÓ„Ó ÙËθڇ Ë Á‡˘ËÚÌÓ„Ó ÙËθڇ ˝ÎÂÍÚÓ‰‚Ë„‡ÚÂÎfl
NOTICE
If filters are damaged, do not use them.
In this cases, contact LG Electronics Service Agent.
Wash filters at least every 3-6 months.
èêàåÖóÄçàÖ
ÖÒÎË ÙËθÚ˚ ÔÓ‚ÂʉÂÌ˚, Ì ÔÓθÁÛÈÚÂÒ¸ ËÏË.
Ç ˝ÚÓÏ ÒÎÛ˜ Â, Ó· ÚËÚÂÒ¸ Í Ô‰ÒÚ ‚ËÚÂβ ÔÓ
ÚÂıÌ˘ÂÒÍÓÏÛ Ó·ÒÎÛÊË‚ Ì˲ ÍÓÏÔ ÌËË LG Electronics.
îËθÚ˚ ÌÂÓ·ıÓ‰ËÏÓ Ï˚Ú¸ ˜ÂÂÁ Í Ê‰˚ 3-6 ÏÂÒflˆÂ‚.
If suction power is decreased after cleaning dust tank or indicator light is on, clean air
filter and motor safety filter.
Air filter and motor safety filter are located at the up of vacuum cleaner in the above
figure.
• Open the Vacuum cleaner cover by pushing the button.
• Grasp the handle of the dust seperator and take out it.
• Open the guide cover by pulling the guide cover lever and remove dust.
• Open the pre filter cover by pulling the pre filter cover lever and take out pre filter assem-
bly.
• Wash air filter and motor safety filter with water.
• Do not wash filters with hot water.
• Dry fully in shade so that moisture is entirely removed.
• Air filter and motor safety filter should be cleaned in the above case.
ÖÒÎË ÒËÎ ‚Ò Ò˚‚ ÌËfl ÛÏÂ̸¯ËÎ Ò¸ ÔÓÒΠӘËÒÚÍË Ô˚ÎÂÒ·ÓÌËÍ ËÎË Ò‚ÂÚÓ‚ÓÈ
Ë̉ËÍ ÚÓ ÍÚË‚ÂÌ, ÔÓ˜ËÒÚËÚ ‚ÓÁ‰Û¯Ì˚È ÙËÎ¸Ú Ë Ô‰ÏÓÚÓÌ˚È ÙËθÚ.
ÇÓÁ‰Û¯Ì˚È ÙËÎ¸Ú Ë Ô‰ÏÓÚÓÌ˚È ÙËÎ¸Ú ÒÔÓÎÓÊÂÌ˚ Ò‚ÂıÛ ·ÎÓÍ
‚ ÍÛÛÏÌÓÈ Ó˜ËÒÚÍË, Í Í ÔÓÍ Á ÌÓ Ì ÒÔÓÎÓÊÂÌÌÓÈ ‚˚¯Â ËÎβÒÚ ˆËË.
• éÚÍÓÈÚ Í˚¯ÍÛ ÙËÎ¸Ú ˆËÓÌÌÓÈ ÒËÒÚÂÏ˚, Ì Ê ‚ Ì ÍÌÓÔÍÛ.
• ÇÁfl‚¯ËÒ¸ Á Û˜ÍÛ, ‚˚Ú ˘ËÚ ÒËÒÚÂÏÛ ÍÓÔÛÒ
• éÚÍÓÈÚ Í˚¯ÍÛ ÒÂÔ ÚÓ , ÔÓ‰ÚÓÎÍÌÛ‚ ˚˜ „ Ë Ó˜ËÒÚËÚ ÛÒÚÓÈÒÚ‚Ó ÓÚ
Ô˚ÎË.
• éÚÍÓÈÚ Í˚¯ÍÛ ÙËÎ¸Ú Ë ‚˚Ú ˘ËÚ ÒËÒÚÂÏÛ ÙËθÚÓ‚ Ì ÛÊÛ
• èÓÏÓÈÚ ‚ÓÁ‰Û¯Ì˚È ÙËÎ¸Ú Ë Ô‰ÏÓÚÓÌ˚È ÙËÎ¸Ú ‚Ó‰ÓÈ
• á Ô¢ÂÌÓ Ï˚Ú¸ ÙËθÚ˚ „Ófl˜ÂÈ ‚Ó‰ÓÈ
• èÓÎÌÓÒÚ¸˛ ‚˚ÒÛ¯ËÚ ‚ ÚÂÌË Ë Û·Â‰ËÚÂÒ¸ ˜ÚÓ ÊˉÍÓÒÚ¸ ÔÓÎÌÓÒÚ¸˛ Û‰ ÎÂÌ
• ÇÓÁ‰Û¯Ì˚È ÙËÎ¸Ú Ë Ô‰ÏÓÚÓÌ˚È ÙËÎ¸Ú ‰ÓÎÊÌ˚ ·˚Ú¸ Ó˜Ë˘ÂÌ˚ Ì ıÓ‰flÒ¸
‚ÌÂ ÍÓÔÛÒ .
Other manuals for VK882 series
1
Table of contents
Other LG Vacuum Cleaner manuals