manuals.online logo
Brands
  1. Home
  2. •
  3. Brands
  4. •
  5. LIBERTY AV SOLUTIONS
  6. •
  7. Transmitter
  8. •
  9. LIBERTY AV SOLUTIONS intelix DIGI-HD-IR3 User manual

LIBERTY AV SOLUTIONS intelix DIGI-HD-IR3 User manual

Popular Transmitter manuals by other brands

Seneca K120RTD installation manual

Seneca

Seneca K120RTD installation manual

Nautel GV40 installation manual

Nautel

Nautel GV40 installation manual

HumanTechnik cm-light operating instructions

HumanTechnik

HumanTechnik cm-light operating instructions

INOR APAQ C130 TC User instructions

INOR

INOR APAQ C130 TC User instructions

Linear DXS-64 operating instructions

Linear

Linear DXS-64 operating instructions

FeinTech ABT00102 instruction manual

FeinTech

FeinTech ABT00102 instruction manual

Geo Web Pack quick start guide

Geo

Geo Web Pack quick start guide

Inovonics EchoStream EN1210W installation instructions

Inovonics

Inovonics EchoStream EN1210W installation instructions

IKONNIK KA-6 quick start guide

IKONNIK

IKONNIK KA-6 quick start guide

Rohde & Schwarz SR8000 Series System manual

Rohde & Schwarz

Rohde & Schwarz SR8000 Series System manual

Audio Technica UniPak ATW-T93 Installation and operation

Audio Technica

Audio Technica UniPak ATW-T93 Installation and operation

NIVELCO EasyTREK SCA-300 Series Programming manual

NIVELCO

NIVELCO EasyTREK SCA-300 Series Programming manual

Honeywell 5816WMBR installation instructions

Honeywell

Honeywell 5816WMBR installation instructions

Kamstrup READy MTU Installation and operation guide

Kamstrup

Kamstrup READy MTU Installation and operation guide

Omega ZW Series user guide

Omega

Omega ZW Series user guide

ABB Field 264H Instructions for installation

ABB

ABB Field 264H Instructions for installation

Dejero EnGo 3x manual

Dejero

Dejero EnGo 3x manual

Rosemount 4600 Reference manual

Rosemount

Rosemount 4600 Reference manual

manuals.online logo
manuals.online logoBrands
  • About & Mission
  • Contact us
  • Privacy Policy
  • Terms and Conditions

Copyright 2025 Manuals.Online. All Rights Reserved.

8001 Terrace Ave.
Suite #201
Middleton, WI 53562
Phone: 608-831-0880
Toll-Free: 866-4-MATMIX
Fax: 608-831-1833
DIGI-HD-IR3 Installation Manual
The Intelix DIGI-HD-IR3 transmits HDMI and bi-directional IR
up to 300’ over two twisted pair cables. In environments with
high electromagnetic interference (EMI), shielded twisted pair
cable should be used.
Built-in HDshāk® technology provides dynamic HDMI,
EDID/DDC and HDCP mode selection, guaranteeing
performance and image quality.
The DIGI-HD-IR3 features electrostatic discharge (ESD)
protection circuitry which safegaurds the HDMI circuit against
static electricity and other destructive stray voltage.
Maximum Recommended Distances
1080p
1080i
720p
576i/p
480i/p
Cat 6a
(shielded)
150’
300’
300’
300’
300’
Cat 6
110’
220’
220’
220’
220’
Cat 5e
100’
200’
200’
200’
200’
The Intelix DIGI-
HD-IR3 conforms
to HDMI and
HDCP
specifications.
Intelix does not
guarantee
operation with
devices that do
not conform to
these
specifications.
The Intelix DIGI-
HD-IR3-WP complies with HDCP standards.
Distances and picture quality may be affected by cable grade, cable
quality, source and destination equipment, RF and electrical
interference, and cable patches.
Instructions
1. Turn off power and disconnect the
audio/video equipment by following the
manufacturer’s instructions.
2. Adjust DIP switches for desired mode.
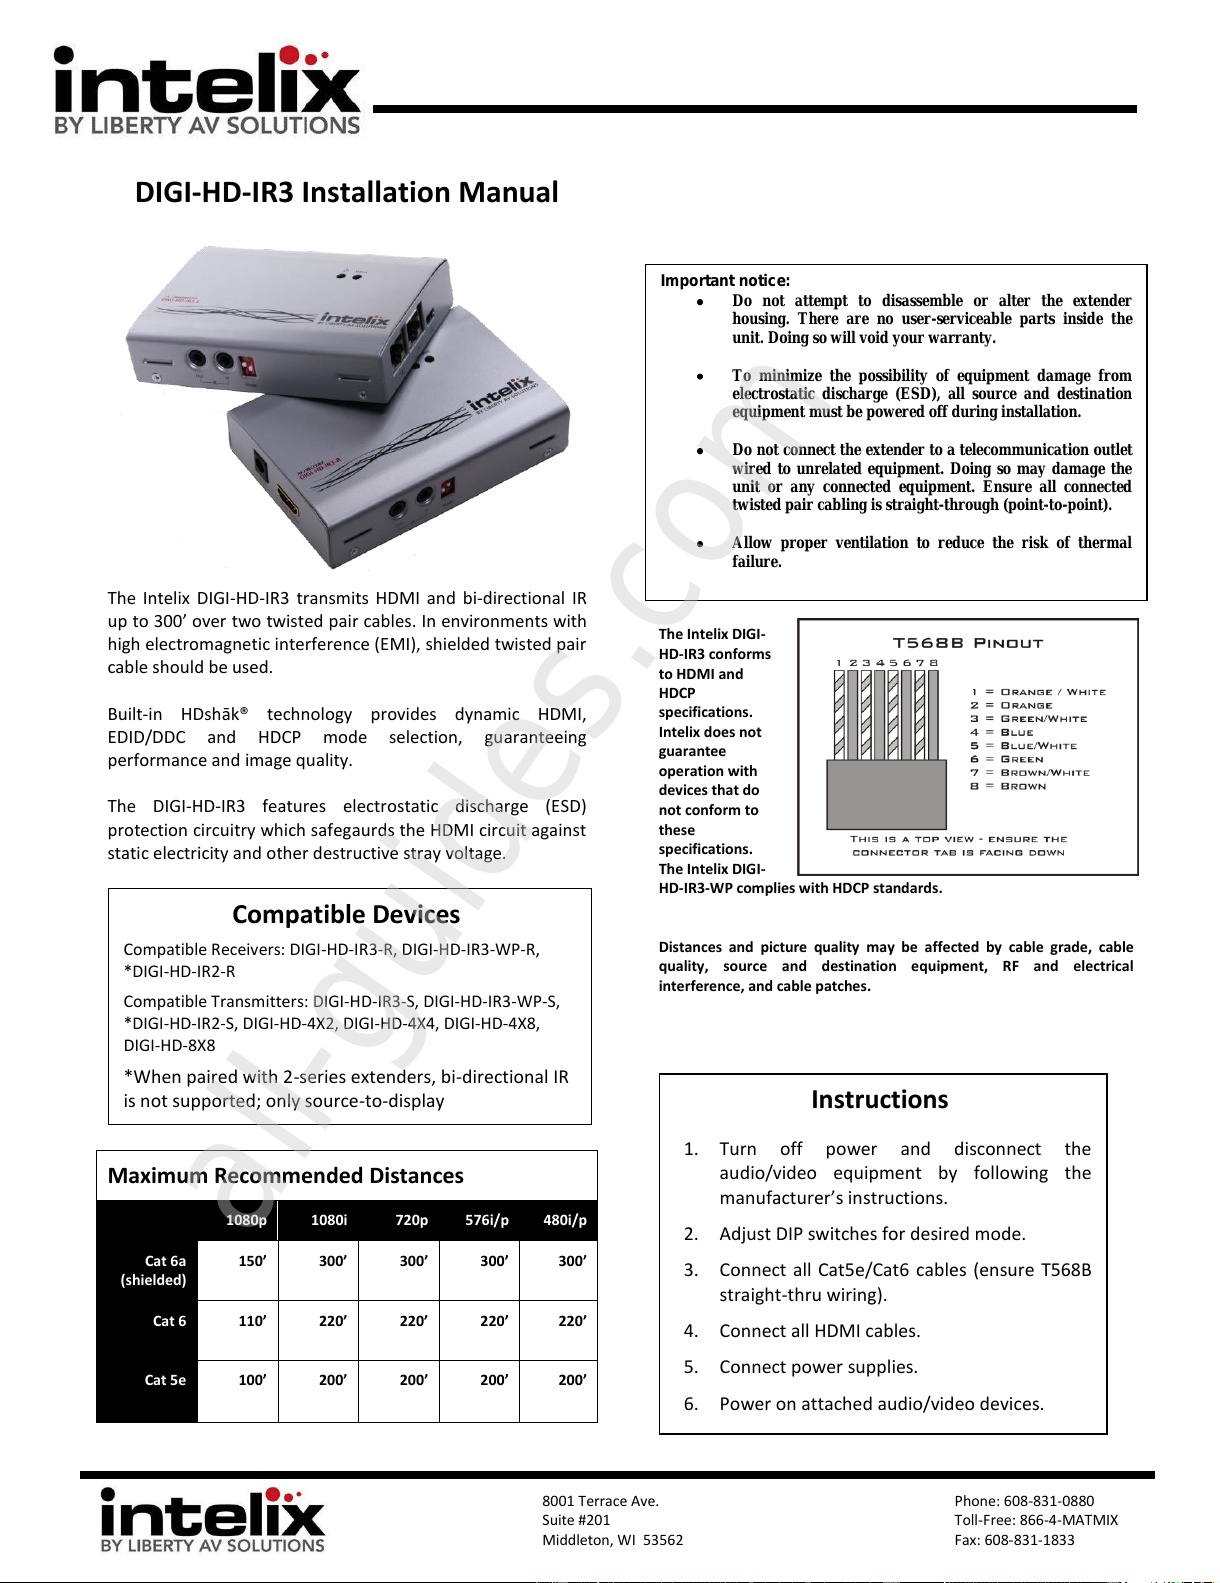
3. Connect all Cat5e/Cat6 cables (ensure T568B
straight-thru wiring).
4. Connect all HDMI cables.
5. Connect power supplies.
6. Power on attached audio/video devices.
Compatible Devices
Compatible Receivers: DIGI-HD-IR3-R, DIGI-HD-IR3-WP-R,
*DIGI-HD-IR2-R
Compatible Transmitters: DIGI-HD-IR3-S, DIGI-HD-IR3-WP-S,
*DIGI-HD-IR2-S, DIGI-HD-4X2, DIGI-HD-4X4, DIGI-HD-4X8,
DIGI-HD-8X8
*When paired with 2-series extenders, bi-directional IR
is not supported; only source-to-display
Important notice:
Do not attempt to disassemble or alter the extender
housing. There are no user-serviceable parts inside the
unit. Doing so will void your warranty.
To minimize the possibility of equipment damage from
electrostatic discharge (ESD), all source and destination
equipment must be powered off during installation.
Do not connect the extender to a telecommunication outlet
wired to unrelated equipment. Doing so may damage the
unit or any connected equipment. Ensure all connected
twisted pair cabling is straight-through (point-to-point).
Allow proper ventilation to reduce the risk of thermal
failure.
All manuals and user guides at all-guides.com
all-guides.com
8001 Terrace Ave.
Suite #201
Middleton, WI 53562
Phone: 608-831-0880
Toll-Free: 866-4-MATMIX
Fax: 608-831-1833
DIP Switch Settings
DIGI-HD-IR3 Transmitter Dip Switch Positions
SW 1
SW 2
Mode
Off
Off
Read EDID data from displays
Off
On
1080p with multi-channel audio
On
Off
1080p with stereo audio
On
On
No function
DIGI-HD-IR3 Receiver Dip Switch Positions
SW 1
SW 2
Mode
Off
Off
Normal Operation
Off
On
Compatibility Mode
On
Off
Compatibility Mode
On
On
No function
*The DIGI-HD-IR3 system must be power cycled for the changes
to take effect. Please remove ALL cables from extender, change
DIP switches, and then reconnect.
Troubleshooting
Symptom
Possible Solutions
No signal
Status LED is off
Verify that both ends of the twisted pair cables
use 568B crimp pattern.
Verify HDMI cables and source and destination
HDMI ports are operational.
No signal
Verify the power supplies are connected to both
the send and receive baluns.
Verify the power LEDs on both the send and
receive units are brightly illuminated.
Unusual colors in the
video
Power off the destination device and power it
back on to force renegotiation.
Unplug and re-plug the HDMI cable from receive
balun to force renegotiation.
No signal
Screen is completely
snowy
Speckling in the video
image
Occasional signal dropouts
Use shorter runs of twisted pair cabling.
Drop the HDMI signal to the next lower
resolution; i.e., decrease resolution from 1080p
to 1080i, etc.
Replace the twisted pair cable with a higher
grade twisted pair cable; i.e., replace Cat 5e with
Cat 6.
Set the receive extender dipswitches to
compatibility mode.
Speckling in the video
image
If the destination device is incapable of displaying
the video signal, alter the source signal; i.e.,
decrease resolution from 1080p to 1080i, etc.
Video without audio
Change source device to output PCM other than
Bitstream audio
Enable PCM down sampling if supported by your
source device
All manuals and user guides at all-guides.com