manuals.online logo
Brands
  1. Home
  2. •
  3. Brands
  4. •
  5. Liberty Grandview
  6. •
  7. Interactive Whiteboard
  8. •
  9. Liberty Grandview SkyShow Series C User manual

Liberty Grandview SkyShow Series C User manual

Integrated Motorized Screen
User Manual for SkyShow
Series Model C
Suitable for Model Named SK-MI(F)
Protecting your Screen:
To ensure long lasting viewing enjoyment keep
the screen rolled up when not in use. Check both
the front and back surfaces before retracting into
the case to make sure it is free of dust, dirt, insects
or other foreign matter. Use a soft brush or cloth to
lightly remove any foreign particles.
Cleaning your Screen:
Use warm water with a mild detergent to remove
any marks on the surface or screen casing (only
dab, do not rub). Immediately dry the screen with
a soft cloth or towel. Do not leave it to air dry.
Never use any solvents, chemicals or abrasive
cleaners on the screen surface as they can
permanently damage the screen surface.
Screen: Voltage AC220-230V/50-60HZ, 0.8Amp, power 190watts.
RF remote(F): Voltage 3V, use CR2450*1 battery.
Radio Frequency: 433Hz. maximum control distance 15m.
Setting for Up and Down Limited Positioning for Motor:
The limited positioning of motor has been defaulted when
EX-factory, it is not allowed to reset.
Note:
When setting RS232 or RS485, if the screen is not able to
operate as it is, please switch position of No. 1 and No. 2.
The electric resistance of return circuit is less than 20Ω.
Do not do wiring nearby interference sources.
RS485/RS232 control protocal:
Baud Rate: 2400
Data Bits: 8
Stop Bits: 1
Parity: None
Hex command:
Screen UP: ff ee ee ee dd
Stop: ff ee ee ee cc
Down: ff ee ee ee ee
In some cases you may need to
enable the RS-232 control by
sending hex command:
ff ee ee ee aa
P1
DB9
1
6
2
7
3
5
TXD
GND
6
5
4
3
2
1
6P6C
8
4
9
D. RS485 or RS232 :
From left to right, 1 & 2 cable for control.
For RS485, cable 1 is D-, cable 2 is D+. The
connecting of RS232 as figure shows.
USB Ser ial Port (COM3) Pr operty
Detail Event
Drive Program
General Port
Conf irm
Adva nced Rest ore
Baud Ra te: 2400
Data Bi ts: 8
Pari ty: Non e
Stop Bi ts: 1
Flow Co ntrol : None
Canc el
RJ12
6P6C
6
5
4
3
2
1
UP S1
S2
S3
DOWN
STOP
COM
RJ12
6P6C
6
5
4
3
2
1
UP S1
DOWN
STOP
COM
S2
S3
1 2 3 4 5 6
EXTERNAL
CTRL
C. LVC:
Simply contact
RJ12 6P6C connector.
From left to right, 3-6
is control signal cable,
3 is common cable,
4 is stop, 5 is lower,
6 is lift. Trigger control
In order to ensure product safety during transportation, we
install fixing screws at the two ends of product. Fixing
screws must be taken out before screen installation,
CAUTION
Caution:
Please remove all the stickers before operate the screen.
Recessed mounting
Based on installation requirement, the
recessed mounting can hide part of casing
into ceiling, and it's almost same as ceiling
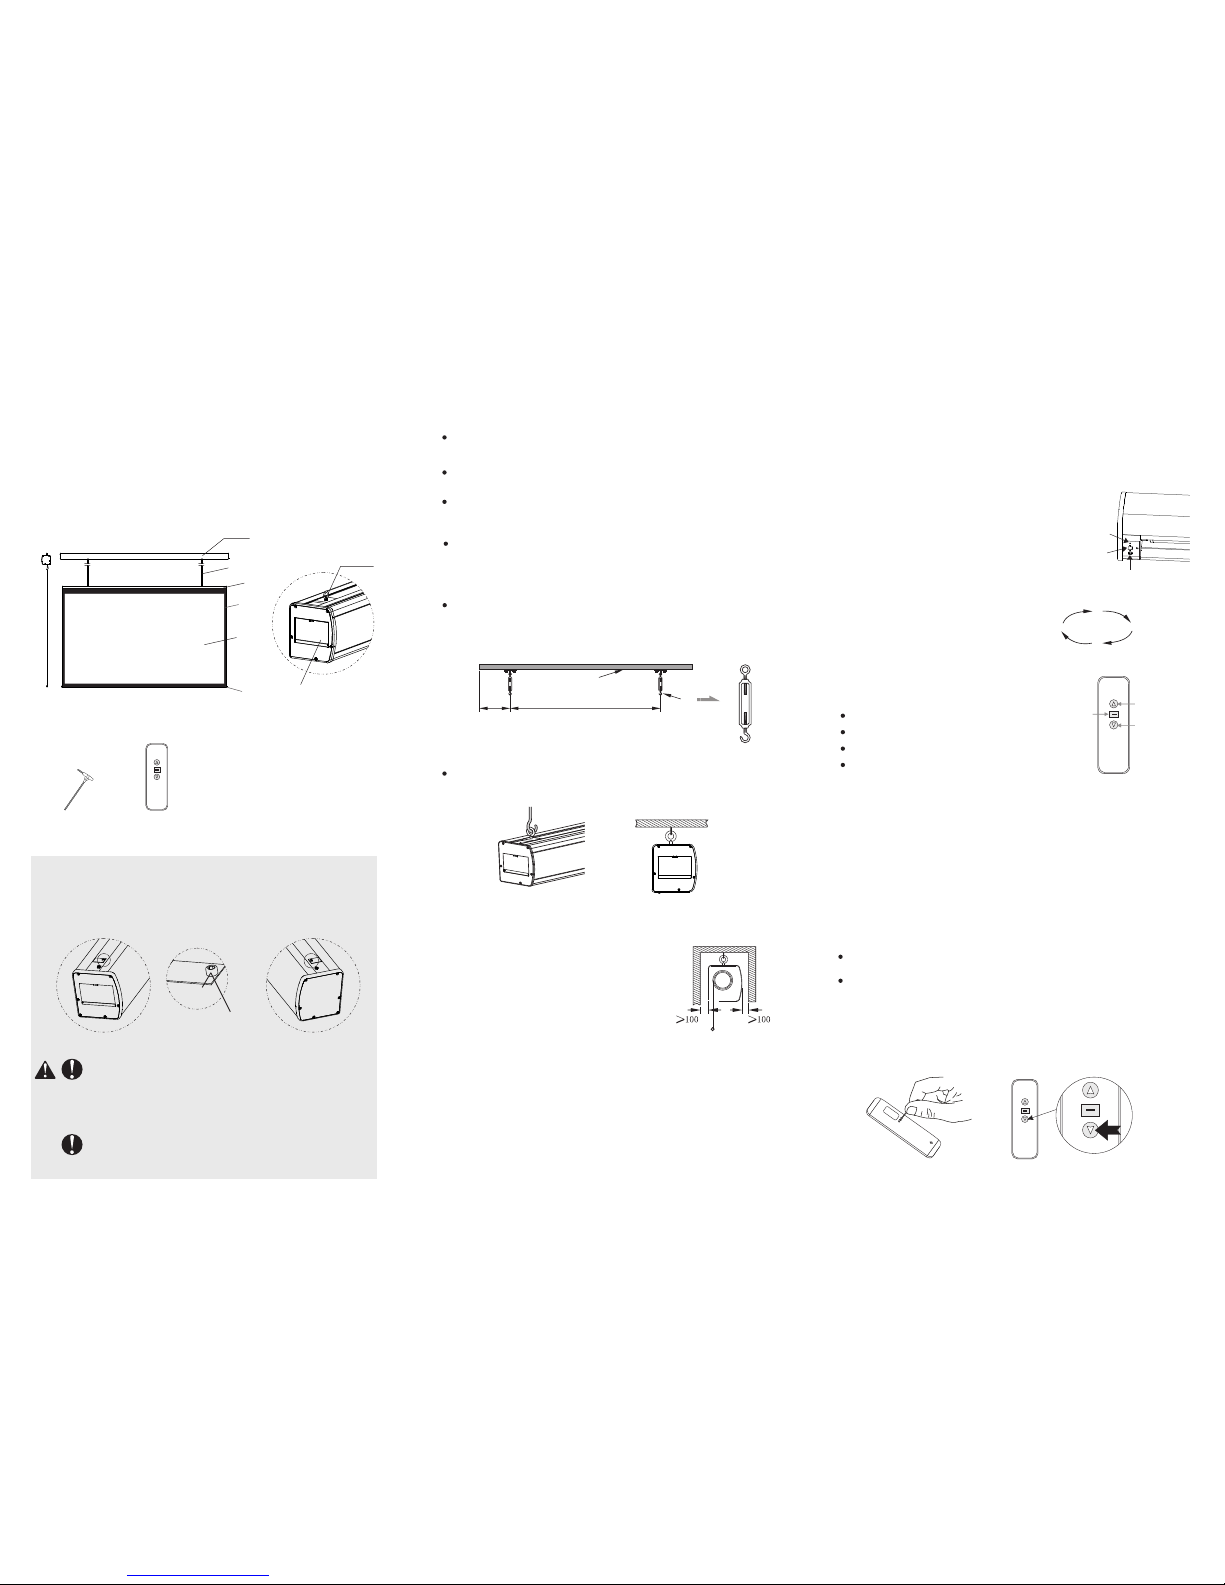
Note: 100mm distance from casing to wall
is highly recommended for easier
Installation consider.
Make sure the hook is well fixed onto the ceiling, hang the
screen on and lock the buckle. Ensure the hook and buckle is
well installed in case of dropping accidentally, figure below:
Recommend leaving
Min. 1000mm distance
from edge in case of
future repairing.
Required Installation
distance
Hook
Concrete ceiling
Mark the installation position according to installation
distance required and product size, hooks must be fasten on
solid ceiling that can bear enough weight, adjustable length
Important note:
This product is using Single-phase AC power supply, must well
Please prepare below necessary Installation tools: Screws
driver, leveling Instrument, tape measure and marker.
Before installation, please measure the installation screws
Choose the correct screws based on wall conditions. (Wooden
ceiling uses Self-tapping screws, concrete ceiling uses Self-
After installation, keep the casing both edge level.
Dear Customers:
Thank you for the purchasing of Grandview Skyshow series C-
type projection screen. Before your normal using of product,
please read the specification first, and keep it well for future
Screen
Black
Screen
hanging
ring
Motor/Circuit Board
Inspection Hole
Accessaries:
M5 Adjustment
Spanner(1pcs)
Remote
controller(1pc)
fixing
screw
take out before installation
(Recommend to take out
after unpacking the carton)
WARNING: Please guarantee ceiling or wall or
suspension device can bearing 4 times of product
net weight before installation,otherwise people
hurt and property losses possible to happen by the
reason of screen falling.
WARNING: Installation position must strictly fit for
the dimension of product, to avoid problems like
product cannot be installed or install leaning.
Sto p
Sto p
Up Down
Cycle control
Power connection:
Grandview screen is pre-install with your local plug, you can
B. RF remote with model name :
Press Up button, screen retract
Press Stop button, screen stop
Press Down button, screen expand
RF remote is pre-setting in factory with
the screen, also can reset if necessary.
Electronic positioning by Remote:
User could set the down limit with remote according to requirement.
Remote pairing:
It's the remote paring status once motor connect to the power within
10 seconds. Press UP & STOP button together for remote pairing with
Remote un-pairing:
It's the remote paring status once motor connect to the power within
10 seconds. Press UP & STOP button together for clear the memory,
Down
button
Stop
button
Fabric control instruction
4 Control ways are available for integrated
A. Manual control (cyclic key)
B. Wireless remote
C. LVC
RF emitter for
model named
A. Manual control:
Manual control button is on the left
side of the casing (close to RS485 and
dry contact interface), this is a cycle
control button.
6P output
port for
RS485 and
Use a small pin fit to size to insert into positioning setting
keyhole at rear side of remote and press it to make the light on.
Then press “down” key on remote to operate screen to go
down. When screen moves to the required position, then press
“stop” button. And please press positioning setting keyhole
with pin again. This is the down positioning set as required.
Please follow the same to set up limit, Please check below:
Note: The maximum travelling distance of pulling cable is 5 meters.

Popular Interactive Whiteboard manuals by other brands

Ricoh D5500 manual

Ricoh

Ricoh D5500 manual

TeamBoard T4 quick start guide

TeamBoard

TeamBoard T4 quick start guide

Wacom DTU-1141 user manual

Wacom

Wacom DTU-1141 user manual

SMART Board 400 series Overlay panel guide

SMART Board

SMART Board 400 series Overlay panel guide

SMART Board 600i Series Installation and configuration guide

SMART Board

SMART Board 600i Series Installation and configuration guide

SMART 8055i installation guide

SMART

SMART 8055i installation guide

3M DB565 Product safety guide

3M

3M DB565 Product safety guide

SMART Board Interactive whiteboard quick reference

SMART Board

SMART Board Interactive whiteboard quick reference

promethean activboard 100 series installation guide

promethean

promethean activboard 100 series installation guide

SMART SPNL-6065 install guide

SMART

SMART SPNL-6065 install guide

Panasonic Panaboard UB-5310 Brochure & specs

Panasonic

Panasonic Panaboard UB-5310 Brochure & specs

SMART 600i installation instructions

SMART

SMART 600i installation instructions

Dukane LeaderBoard LB77S Specifications

Dukane

Dukane LeaderBoard LB77S Specifications

Smarttech SMART Board 8055i user guide

Smarttech

Smarttech SMART Board 8055i user guide

SMART Board M600 series user guide

SMART Board

SMART Board M600 series user guide

SMART Board MX quick start guide

SMART

SMART Board MX quick start guide

Orion OPE-11701 user manual

Orion

Orion OPE-11701 user manual

SMART Board Board 600 Series Installation and user guide

SMART Board

SMART Board Board 600 Series Installation and user guide

manuals.online logo
manuals.online logoBrands
  • About & Mission
  • Contact us
  • Privacy Policy
  • Terms and Conditions

Copyright 2025 Manuals.Online. All Rights Reserved.