Lievers Prefab Easy Screed User manual

2/18 Operation Manual PREFAB EASY SCREED, revision 2: 29-6-2016
© Lievers Holland, NL 2016
All rights are reserved. Reprints, copies, adaptations for new editions and publications in any form or through any
media, including abstract forms are not permitted unless written permissions is first obtained from Lievers Holland.
Lievers Holland may not be held responsible for any guarantees or liabilities for the contents of this publication and
points to, in this case, all implied securities for suitability of merchantability or any other purposes. Lievers Holland
further retains the right to revise this publication and to alter the contents over certain periods of time, without the
obligation to report such alterations and changes first.
CONTENT
1. PREFACE ...........................................................................................................................................................................3
2. PREFACE ...........................................................................................................................................................................4
3. TECHNICAL DATA..........................................................................................................................................................5
4. SAFETY...............................................................................................................................................................................6
5. USE.......................................................................................................................................................................................8
6. MAINTENANCE..............................................................................................................................................................10
7. PARTS LIST .....................................................................................................................................................................11
8. TROUBLESHOOTING, REPAIRS................................................................................................................................16
9. DISMANTLING, DISPOSAL..........................................................................................................................................17
10. DECLARATION OF CONFORMITY.........................................................................................................................18

3/18 Operation Manual PREFAB EASY SCREED, revision 2: 29-6-2016
1. Preface
This manual has been written to help you operate and maintain Prefab Easy Screed safely. This manual is
intended for dealers and operators of Prefab Easy Screed and contains useful instructions for use,
maintenance and repair. These instructions need to be respected and followed.
Guarantee provisions
All damage to parts of this machine, occurring within 12 months after date of purchase as a consequence of material,
production or construction defects, will be replaced by the manufacturer as soon as possible.
The manufacturer declines all responsibility for unsafe situations, accidents and damage caused by:
Ignoring safety and using instructions as described on the machine or the instruction manual.
Incompetent or incorrect maintenance.
Use of the machine by unqualified personnel (employees who are unfamiliar with the content of this instruction
manual).
Storing the machine in a damp place.
Other use than the prescribed use.
Cleaning of the machine with a high pressure cleaner or by a water jet under high pressure.
Alternations of the machine carried out by other than manufacturer. This also includes assembling of non-
original parts.
(Furthermore are applicable the general terms of delivery and payment of the “METAALUNIE”)
Garantiebepalingen
Alle schade aan delen van deze
Guarantee
Prefab Easy Screed nr. _______________________________
Date of purchase: ___________________________________
Fig. 1: Rating plate Prefab Easy Screed
The rating plate can be found on the drive unit

4/18 Operation Manual PREFAB EASY SCREED, revision 2: 29-6-2016
2. Preface
Intended use
Prefab Easy Screed is an easy-to-use vibrating profile for finishing prefab elements. The Prefab Easy Screed consists of
an electrical drive unit with speed regulator mounted on a lightweight profile with 2 carrying handles. The drive unit
has a user friendly clamping system for easy exchanging of beams. The drive unit is available in 230V / 50-60 Hz. On
request available in 115V / 50-60 Hz. The profiles are available in various lengths.
Working
Prefab Easy Screed is used with forms / rails. The profile has a dual purpose and can be used for form-to-form
screeding or wet screeding. By rotating the power-unit 180 degrees the operator can choose which side of the blade
he prefers.
Fig. 2: Overview important components
1. Motor 230V/50 Hz
2. Carrying handle
3. Profile
4. Speed regulator
5. Plug
6. Cable

5/18 Operation Manual PREFAB EASY SCREED, revision 2: 29-6-2016
3. Technical data
Technical data
Prefab Easy Screed
(230V/50-60 Hz)
Prefab Easy Screed
(115V/50-60 Hz)
Voltage
Capacity
Revolutions
Weight
fuel
Insulation
Sound press. Level ISO 6081
Value of accelaration **
Comfort exposure
230V/ 1 phase/ 50-60Hz.
350 watt
11.000 rpm.
2.44 m 19,6 Kg
---------------------------
IP 54, splash proof
Double insulated
76 dB(A)
at operator’s place
2,46 m/s²
=8,3 hr
=33 hr max.
115V/ 1 phase/ 50-60Hz.
350 watt
11.000 rpm.
2.44 m 19.6 Kg
---------------------------
IP 54, splash proof
Double insulated
76 dB(A)
at operator’s place
2,46 m/s²
=8,3 hr
=33 hr max.
Table 1: Technical data Prefab Easy Screed
** The weighted effective value of acceleration, determined according to ISO 5349

6/18 Operation Manual PREFAB EASY SCREED, revision 2: 29-6-2016
4. Safety
Explanation of the used safety symbols:
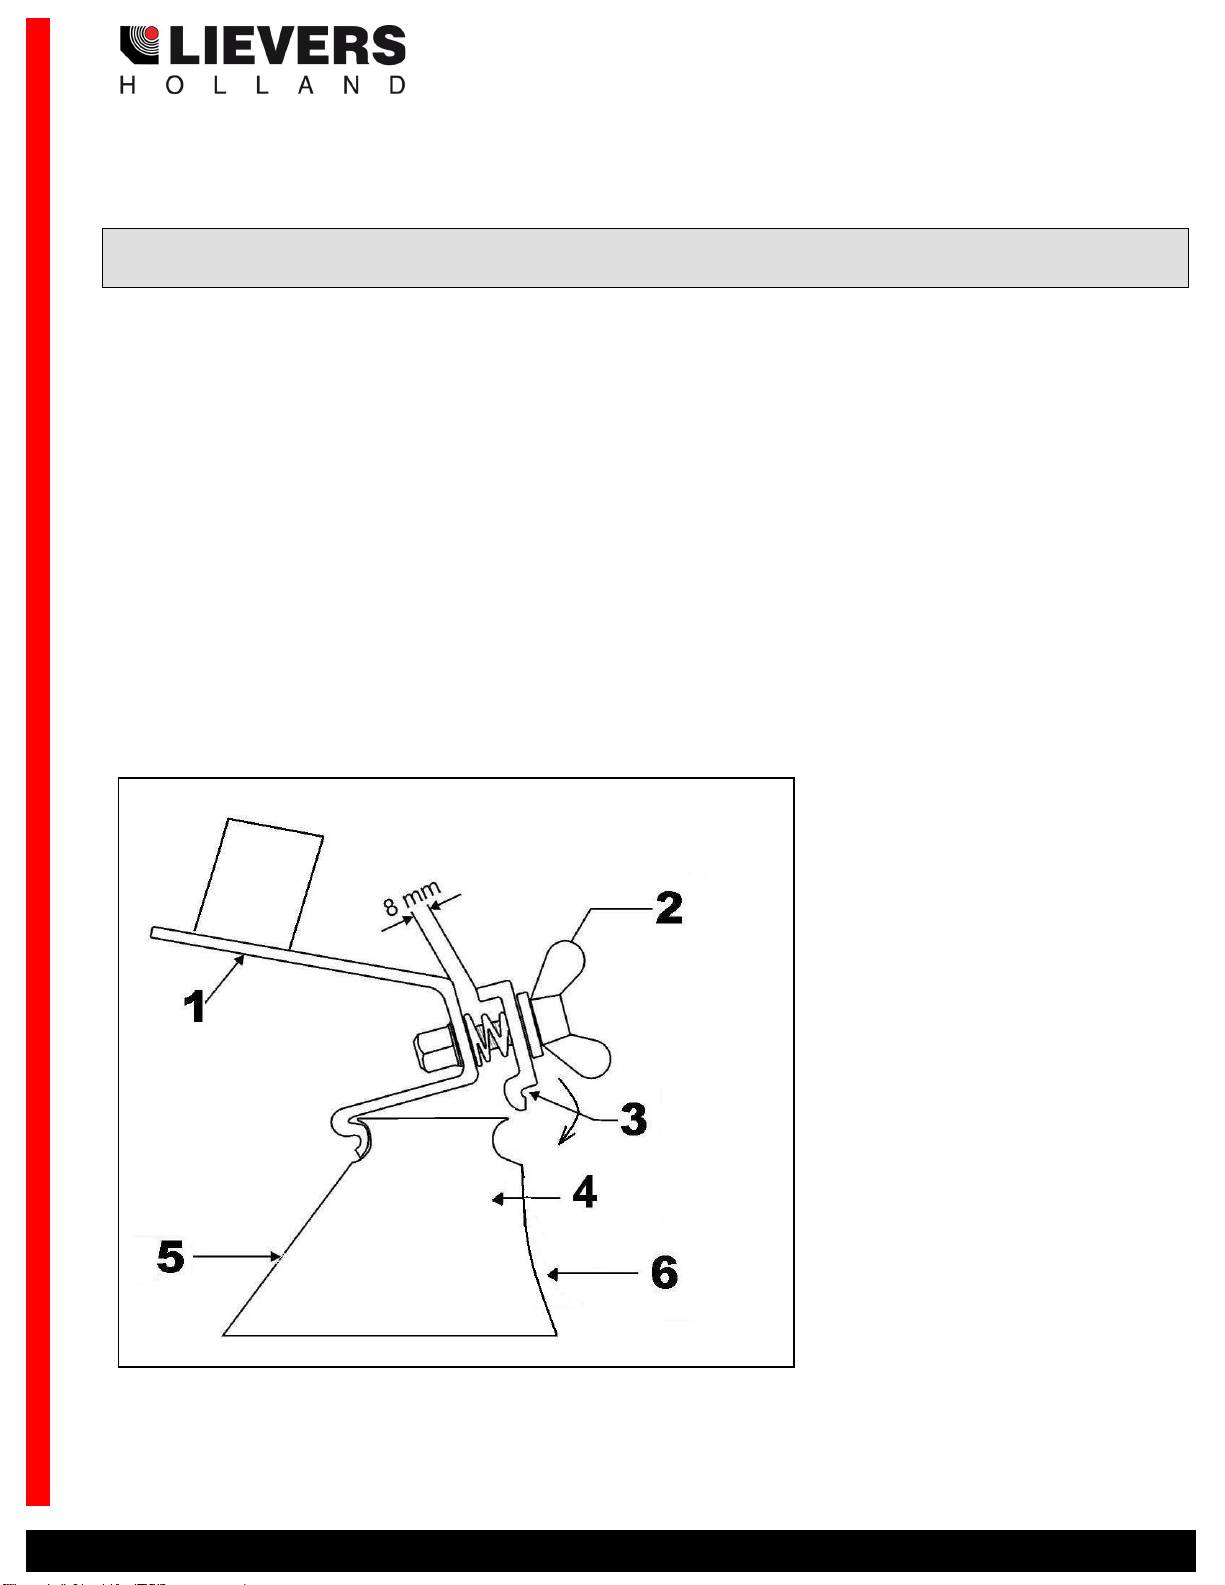
Fig. 3: Safety symbols Prefab Easy Screed
ENSURE,THAT ALL SYMBOLS ON THE MACHINE,CAN ALWAYS BE CLEARLY READ.
4.1 Safety aspects
The following safety aspects apply to the machine:
Safety symbols are present on the Prefab Easy Screed
4.2 Safety precautions
The Lievers bullfloats have been developed and tested in accordance with the strict international safety standards.
Before operating these machines, make sure to have read this manual carefully. If you have any questions , do not
hesitate to contact the supplier.
Ensure that you are qualified (familiar with the contents of this manual), to operate and carry out light
maintenance work to the machine.
Wear safety shoes with extra protection (steel caps and anti-slip soles).
Wear a safety helmet and hearing protection.
Wear safety glasses, working gloves which do not conduct electricity and protective clothing.
Ensure that all symbols on the machine, can always be clearly read.
Be careful when lifting and carrying the bullfloat. Do not bend forwards when picking up the machine, but bend
your knees.
When cleaning the machine, ensure that no water or cleaning detergents get into the motorhousing.
When the machine is not being used for longer periods of time, then it must be stored in a dry and clean area.
Regular maintenance of the machine promotes safe operation.
1. Read the instruction manual before using the
machine.
2. Safety glasses, safety helmet and ear
protection compulsory.
3. Working gloves compulsory.
4. Safety shoes with extra protection
compulsory.
5. Before opening remove the plug.
6. Dangerous electric voltage
7. Be careful.

7/18 Operation Manual PREFAB EASY SCREED, revision 2: 29-6-2016
The following safety-aspects specifically apply to those Lievers products which are equipped with an electrical drive
unit:
Place the wires between the electrical source and the work place in such a way, that they cannot be damaged and
your colleagues cannot trip over them.
Do not use the machine in an explosion endangered area.
Check that the electrical source complies with the local valid regulations.
Use an electrical source which is provided with an earth leakage switch or attach a safety transformer between the
electrical mains and the machine.
Regularly check the connections of the supply-cable to the switch.
Ensure that the wall socket and possible connections between the extension leads are protected against dampness.
Do not pull the plug out of the wall socket or extension lead by its lead.
Check the feeder cable’s outercasing and if in use extension lead’s outercasing before you connect the machine to
the electrical mains. The outercasing may not be damaged. Replace the cable if you cannot read the marks on the
outercasing anymore.
Check the machine’s cable-connections before you connect the machine to the electrical mains. The cables must be
properly connected.
Switch off the machine, when the electrical power cuts off. This prevents the machine from starting suddenly when
the electrical power comes on again.
Disconnect the electrical supply to the machine, before you start to clean or maintain the machine.
Ensure that the ventilation slots of the machine are free from dirt and moisture.

8/18 Operation Manual PREFAB EASY SCREED, revision 2: 29-6-2016
5. Use
This chapter describes the use of the Prefab Easy Screed
FOR THE LOCATION AND DESCRIPTION OF THE PREFAB EASY SCREED PARTS,WHICH ARE MENTIONED IN THE TEXT,WE REFER TO FIGURE 2
ON PAGE 4.
5.1. Assembling
When delivered the screed is not ready-for-use. The drive unit and the handles need to be mounted. Required
material: 2 x socket wrench.
1) Mount the drive unit onto the middle of the blade profile with wingbolts. To connect the power-unit to the
blade profile loosen the 3 wingbolts about 8mm. until the front clamping plate no. 3 fits into the collar of the
profile. (see figure 4). Now tighten the 3 wingbolts no.2. Careful: Make sure that the unit is mounted between
the 2 indication arrows, located on the blade.
2) Mount the handles onto both ends of the profile. Use 2 socket wrenches.
3) Attach the cable between the motor and speed regulator onto the profile with cable clamps. Make sure that
the cable is not coming off while finishing the prefab element,
Fig. 4: Quick Connection System
1. Motor Mounting Plate
2. Wingbolt
3. Clamping Plate Profile
4. Blade profile
5. wet screed side
6. Form-to-form screed side

9/18 Operation Manual PREFAB EASY SCREED, revision 2: 29-6-2016
Fig. 5: Speed regulator
5.2. Use
1. Check that the profile is properly assembled and that the switch is in the OFF- position.
2. Place the machine in the direct vicinity of where you are going to finish the concrete.
3. Put the plug of the drive-unit’s feeder cable in the wall socket.
4. Place the machine on the surface of the freshly poured concrete, and turn the speed regulator slowly to the
required revolutions.
5. Now start to finish the surface.
6. After having finished one lane of concrete, switch of machine by turning the speed regulator’s knob to the
position –MIN-, You will hear a “CLICK”. Tip: If the processed concrete-surface is not smooth enough, repeat
the procedures 4, 5 and 6.
7. Pull the plug of the feeder cable out of the wall socket.
8. Clean the machine with water and a brush.
9. After use, place the Prefab Easy Screed on a dry and stable surface.

10/18 Operation Manual PREFAB EASY SCREED, revision 2: 29-6-2016
6. Maintenance
Although the Prefab Easy Screed only has a few moving parts, regular maintenance promotes a long and
trouble-free life.
WARNING: NEVER USE A HIGH PRESSURE WATER CLEANER TO CLEAN THIS MACHINE WITH AN ELECTRICAL DRIVE UNIT.
WARNING: CUT OFF THE ELECTRICAL SUPPLY TO THE PREFAB EASY SCREED,BEFORE CARRYING OUT ANY MAINTENANCE ACTIVITIES TO
THE MACHINE.
In order to achieve a maximum cooling effect the ventilation openings must stay free from dirt, grease and concrete.
Check them at the end of each working day. If necessary clean them with a brush or a damp cloth.

11/18 Operation Manual PREFAB EASY SCREED, revision 2: 29-6-2016
7. Parts list

12/18 Operation Manual PREFAB EASY SCREED, revision 2: 29-6-2016

13/18 Operation Manual PREFAB EASY SCREED, revision 2: 29-6-2016

14/18 Operation Manual PREFAB EASY SCREED, revision 2: 29-6-2016

15/18 Operation Manual PREFAB EASY SCREED, revision 2: 29-6-2016

16/18 Operation Manual PREFAB EASY SCREED, revision 2: 29-6-2016
8. Troubleshooting, repairs
The table below shows the most occurring problems, causes and solutions (Prefab Easy Screed):
PROBLEM
CAUSE
SOLUTION
The machine does not
vibrate in the ‘ON’
position.
Fault in the electrical connections of the
feeder cable.
Check the electrical connections to the
bullfloat, switch, plug and feeder cable for
breakage. Replace the faulty part(s).
The machine does not
vibrate at the required
frequency.
Extensive voltage drop, due to the feeder
cable being too long (longer than 25 m).
Move the electrical source closer to the
working area and use shorter cable.
The electrical motor
rotates irregularly and
makes a lot of noise.
1. the bearings are worn out, and/or
2. an electrical defect in the stator, and/or
3. a break in the feeder cable.
1. replace the bearings, and/or
2. replace the stator, and/or
3. repair or replace the feeder cable.
The connected and
running screed rotates
irregularly and does not
vibrate at the required
frequency.
Insufficient current supply.
Electrical supply via a safety transformer,
check the distributed power from the safety
transformer. Electrical supply via electrical
mains, check the plug connections for
defects. Use an extension lead of a maximum
length of 25 m. with a cross section of 2.5
mm².
The electrical motor
runs irregularly.
The carbon brushes are worn out.
Replace the carbon brushes (replace every 6-
12 months).
Table 2: Possible problems, causes and solutions.
Tip: Please contact Lievers Holland if problems occur that are not mentioned in the list, or if a
mentioned problem is not solved by the solutions in the list.
Contact details Lievers Holland:
PO Box 103
3640 AC Mijdrecht
Tel: +31 (0)297-231900
Fax: +31 (0)297-231909
E-mail: info@lieversholland.nl
Internet: www.lieversholland.com
Repairs
It is not strictly necessary to keep spare parts in stock. If you prefer to have parts in stock, please ask your supplier or
dealer for advice.
When ordering parts please state the following information:
Type of machine.
Year of construction / serial number.

17/18 Operation Manual PREFAB EASY SCREED, revision 2: 29-6-2016
Order number plus description of the part.
The required quantity.
The dispatch address and dispatch mode.
Tip: When ordering parts, fill in the order form accurately. Lievers Holland declines all responsibility
for the supply of incorrect spares due to incomplete or unclear requests.
9. Dismantling, disposal
National and local regulations concerning dismantling and disposal of materials need to be obeyed (separated
disposal).
Instructions for the protection of the environment. The old machine contains valuable materials. Take the discarded
apparatus and accessories to the nearest official collection point.

18/18 Operation Manual PREFAB EASY SCREED, revision 2: 29-6-2016
10. Declaration of Conformity
EC DECLARATION OF CONFORMITY
EC-declaration of agreement for machinery
(Directive 2006/42/EC, Annexe II, under A)
Supplier: Bouwmachinefabriek Lievers B.V.
Address: Groot Mijdrechtstraat 68, 3641 RW Mijdrecht
Hereby declares that
The Prefab Easy Screed
1) Complies with the regulations for the Machine Directive 2006/42/EC and the EMC-Directive 2004/108/EC.
2) Complies with the following harmonised standards: NEN- EN 12100-1:2003, NEN- EN 12100-2:2003, NEN- EN
12649
Mijdrecht, June 29, 2016
Supplier: Bouwmachinefabriek Lievers B.V.
Address: Groot Mijdrechtstraat 68, 3641 RW Mijdrecht
Name: C.M. de Wit
Position: Managing director
Table of contents
Popular Industrial Equipment manuals by other brands

Baker
Baker Druck ics IDT 600 instruction manual

Rockwell Automation
Rockwell Automation Allen-Bradley 194U Series installation instructions

Grundfos
Grundfos CMB-SP Booster PM2 installation instruction and operating instructions

Siemens
Siemens Simatic S7-1500/ET 200MP System manual

Ecolab
Ecolab DG1-III-DLA-PCB operating instructions

Tsubaki
Tsubaki Mini M Series instruction manual