Lifan lf200 III User manual


PREFACE
The manual describes the basic operation and maintenance for the motorcycle,which should be read carefully before driving. Correctly use, service and
maintenance can keep on a safe driving so as to minimize troubles of the
usage . our service station can
The data in the manual is the latest .wereserve the right to amend the data, instructions andspecifications without advice.If this handbook is different
from the actual motorcycle status ,please do as practical.
Thank you for your purchasing our motorcycle. May you enjoy the driving allthe time.
IMPORTANT BULLETIN
Driver and passenger
The motorcycle can carry drivers and one passenger ,whose max loading is 150kg. the rear luggage carrier forbidden to overload 5kg. please read carefully
the handbook.
DRIVING ROAD SURFACE
This motorcycle only apply to drive on the road.
CUSTOMERS MUST CAREFULLY READ THISHANDBOOK
Especially take note of quoting contents as follows:
DANGER: if anybody does not obey this instruction ,it will cause serious casualtyaccidents
WARNING:if anybody does not obey this instruction, it will lead to casualty injury and device damages
REMARKS:OFFERING HELPFUL INFORMATION
This manual forms a integral part of the motorcyclye,transferring with themanual attached
motorcycle and keep it at an optimal performance, which can extend the period of
provide technical inquiry and after-sale service.

CONTENTS
SAFE DRIVING OF THE MOTORCYCLE .................................................. 2
SAFE DRIVING RULES ............................................................................... 2
PROTECTIVE DEVICE ................................................................................ 2
CHANGING APPEARANCE OF THE VEHICLE ........................................ 2
LOADING OF THE GOODS ......................................................................... 2
PARTS ............................................................................................................ 3
USING INSTRUCTIONS .............................................................................. 3
POSITION OF PARTS ................................................................................... 3
VIN OF THE MOTORCYCLE ...................................................................... 4
FUNCTION OF THE PARTS ........................................................................ 4
LOCK OF THE HEAD OF THE MOTORCYCLE ....................................... 4
SWITCH OF LEFT HANDLEBAR ............................................................... 4
SWITCH OF RIGHT HANDLEBAR ............................................................ 4
SWITCH OF THE FUEL TANK AND THE COVER
OF THE FUEL TANK AND THE FUEL ..................................................... 5
OPTION OF THE FUEL ANDLUBRICATION ........................................... 5
TYRES ........................................................................................................... 6
OPERATION GUIDELINES ........................................................................ 6
INSPECTING ITEMS BEFORE DRIVING .................................................. 6
STARTING OF THE ENGINE ....................................................................... 7
BREAK-IN OF THE ENGINE ....................................................................... 7
DRIVING OF THE ENGINE ......................................................................... 7
BRAKE AND STOPPING OF THE MOTORCYCLE .................................. 8
MAINTENANCE AND PROTECTION ........................................................8
INSPECTING AND CHANGING OF LUBRICATION ................................ 8
CLEARANCE OF ACCUMULATED CARBON .......................................... 9
OPTION AND CHANGING OF SPARK PLUG ............................................ 9
WASHINGAND ASSEMBLING OF AIR FILTER ....................................... 9
WASHING AND ASSEMBLING
OF FUEL SWITCH FILERING NET ............................................................ 10
INSPECTING OF LEAKAGE OF GAS PASSAGE ......................................10
OPERATION AND INSPECTION AND
ADJUSTING OF THE THROTTLE .............................................................. 10
IDLE SPEED OF CARBURETOR OFAD JUSTING ................................... 10
CLUTCH ADJUSTING ................................................................................. 10
INSPECTING AND ADJUSTINGAND
LUBRICATING OFTHE DRIVING CHAIN .............................................. 11
INSPECTING OF FRONT SHOCK ABSORBER ........................................ 11
INSPECTING OF REAR SHOCK ABSORBER .......................................... 11
INSPECTING AND ADJUSTING OF FRONT BRAKE............................... 11
INSPECTING AND ADJUSTING OF REARBRAKE .................................12
ADJUSTING OFTHE SWITCH OFTHE BRAKELIGHT .......................... 12
MAINTENANCE AND CHANGING OFTHE SILENCER ......................... 12
WORKING PRINCIPLE OF THREE ELEMENTS CALALYST
TRANSMISSION (OPTION LOADING PRODUCTS ) .............................. 12
PROTECTION OF BATTERY ...................................................................... 13
USING INSTRUCTION OF FUSE OVERFLOWING PROTECTOR .......... 13
TOOL KITS ................................................................................................... 13
INSTRUCTION OF THE BUMPER
(OPTION LOADING PRODUCTS ) ............................................................. 14
FAILURE CHECKING /REPAIRING ........................................................... 14
WASHINGAND KEEPING .......................................................................... 14
USING AFTER KEEPING ............................................................................ 15
MAINTENANCE SCHEDULE .....................................................................15
ELECTRIC DIAGRAM .................................................................................16
SPECIFICATIONS ........................................................................................ 17
1

WARNING:
To prevent casualtyand device damages, driving the motorcycle while must take
note of the traffic security.
Can not drive until the motorcycle check carefully
SAFE DRIVING RULES
1.before starting, must check the vehicle. Take note of checking all kinds of fasteners,
connecting parts and adjusting parts whether be fit so that can prevent against
accidents and avoiding device damages.
2.motorcycle drivers must past traffic administration examination and gain driving
license till can drive it. forbidding to borrow the motorcycle to have no license
personnel driving.
3.to avoid causing casualty accidents to you and other people,specially keep an eye
on several points given below:
(1).wearing bright clothes
(2).keep a certain distance with other vehicles, correctly use the lights and horn of
the vehicle etc signal devices.
(3).no pulling ahead
(4) strictly obey traffic regulations all over the country.
(5)forbidding to over-speed driving. speed never exceed the limitation scope.
(6)when turning and diversion, correctly use winker so as to bring to other drivers
attention.
(7)taking special care of driving on the entry and exit of the crossroad and parking
and on the road.
(8)when driving ,drivers grap at the steeringbar and tread with feet on the footrest
comp.
(9)in the rainy weather driving must be remember: brake distance is two times of the
cloudyweather. when driving, takespecial careof damp road surface with hole and
oil spot. when no understanding traffic status, should slow down.
PROTECTIVE DEVICE
to guarantee your security driving, you should put on a helmet, dust hood and face
shield and gloves etc.protective tools.
the silencer of the motorcycleis the part of the highertemperature , to avoid con-
tacting burn,when driving, must wearboot so r the dress of covering leg. no wear-
ing loose clothes which may be easily hooked by theoperation handlebar, kick rod,
footrest comp and wheel.
CHANGING APPEARANCE OFTHE VEHICLE
WARNING:freely alter motorcycles or change original devices, which can
not guarantee motorcycles drivingsecurity, is illegal, user must obey traffic
administration regulations to use vehicles.
If you have a good suggestion,can send away from us.don t approval of it until
you can alter this vehicle, otherwise you have brought all consequences on
yourself.
GOODS LOADING
REMARKS:the itemizing of the loading quality has certain demands: goods loading
will not affect the performance and stabilityof the vehicle
the gravitational core of goods should lie low-placealongside close to the core of
the vehicle.loading weight is split in two sides which tries to keep balance. when the
gravitational core is farther away, the gravitational core of the vehicle,which will
have an effect on thevehicle operation.
in the light of the circumstances ofloading weight and driving,and then properly
adjust the air pressure of tyresand front shock absorber and rear shock absorber
all goods must fix stoutly on thevehicle for guaranteeing the operation stability.
no attaching bulk andover-weight items on the steering-bar and front fork and
fenders, otherwise will cause driving unevenly or steering no sensitivity
no over-loading (max loading 150kg)
2

ACCESSORIES :
our producing accessories went through special designing and passed testing on the motorcycle.being it is impossible for us to test all other factories products ,and so if no
selecting our components ,resettling and using that you will allow for yourself .please you comply with safe driving regulations and obey the followings everalpoints:
carefully check components, no hindering sight, lessening clearance ground and side leaning angle,limiting suspension and steering structure shifting ,limiting and
controlling operation
no resettling the cooling device of the generator
no adding electrical equipment,if do so , which will make your motorcycle electric volume over-loading so that could lead to circuit turning off ,flashing system cut off or
engine stalling .
LOCATION OFTHE PARTS (FIG.1-3)
(1)rear wheel (2)silencer(3)rear footrest right(4)front footrest right
(5)rear brake pull rod(6)rear ring board right (7)rightdown guide hood
(8)front wheel (9)front disc brake (10)front shock absorberright
(11)front fender (12)front sheering lightright (13)kick rod
3
(1)headlight (2)headlight hood (3)left down guide hood (4)front guide hood (5)meter
(6)rear view mirror (7)fuel tank (8)seat cushion (9)left rear ring board (10)rear handlebar
(11)tail light guard plate (12)rear mudguard (13)front left sheering light
(14)front left shock absorber (15)flexiable shaft of the speedometer
(16)gearshift pedal (17)side stand (18) main stand (19)front footrest left
(20)rear footrest left (21)chain box (22)chain (23)rear fork (24)rear light
FIG.1
11
12
13
14 15 16 17 18 19 20 21 22 23 24
FIG.2
11
12
13

(1)left handlebar
(2)left handlebar switch
(3)meter
(4)ignition switch
(5)right handlebar switch
(6)right handlebar
VIN OF THE MOTORCYCLE (FIG.4-6)
motorcycle vin engine number frame bodynameplate
Engine code:
Please fill in vehicle vin and engine numberin the offering blank place ,which will
help you order spareparts to us or when vehicle stolen , which will be used to inquiry
(THE LOCATION OF VIN)
1) vehicle vin printed on the right sideof steering pipe of the frame body (FIG4)
2) engine number printed on the left down side of the camshaft box of the engine(FIG5)
3) the nameplate of the framebody fixed on the left side of the frame body steering pipe (FIG6)
FUNCTION OF THE PARTS
METER AND INDICATOR (FIG7)
(1) speedometer
(2) tachometer
(3) fuel meter
IGNITION SWITCH (FIG8)
ignition switch resettled on the connecting plate .ignitionswitch key has two posi-
tions and
off: when the key is off circuit is off ,
engine can t start ,the key can take out
on: when the key is on , circuit is on ,
engine can start , thekey can not take out
LOCK OF THEHEAD OF THEMOTORCYCLE (FIG9)
If need lock the head of the vehicle ,make handlebar turn left
to the limitation patch ofthe lock core of thevehicle head
and stand of the frame bodyoverlapped .insert the key into
lock core ,according to counterclockwise rotating thekey ,
make sure the head of thevehicle locked ,and then take out
the key.
If need let the lockloose , according to theopposite sequence going on theabove
procedures.
SWITCH OF THELEFT HANDLEBAR(FIG10-1)
SWITCH OF THE CHANGINGILLUMINATION
position : switchof the changing illumination is the
position ,far-light of the headlight comp ison .
position: switch of the changingillumination is the
position, near-light of the headlight comp ison.
SWITCH OF THE SHEERINGFLARE
position :when turnleft ,move the switch to the
position ,left sheering flare is shine
position : whenturn right ,move the switch to the
position, right sheering flare is shine
position: after normal driving or turning ,keep the po-
sition of the switch, left and rightsheering light are off.
HORN SWITCH
press the switch horn blaring .
RIGHT HANDLEBAR SWITCH (FIG10-2)
LIGHT CONTROLLING SWITCH
Fig.3
Fig.3
Fig.4 Fig.5 Fig.6
VIN:
Fig.7
Fig.10-1
Horn switch
Turn signal switch
Emergency switch
Starter button Lightswitch
Fig.10-2
Fig.9 Steering lock
Headlight dimmer
Ignition switch
Fig.8
4

position: headlight , rear light ,meterindicating
light are on.
position: position light ,rear light ,meter indicat-
ing light are on
position: position light headlight ,rear light ,meter
indicating light are off
SWITCH OF ELECTRIC STARTING
press the button ,drive engine of starting motor starts .
FUEL TANK, COVER OF THE FUELTANK ,
FUEL SWITCH (FIG11)
COVER OF THE FUELTANK
insert the key of the ignition switch ,according to clockwise turning the key to 90 ,
open the cover of the fuel tank. When need close ,press the cover of the fueltank.
FUEL TANK
capacity of the fuel tank is 13L ,among spare fuel is2.0L.
WARNING: only when the key insert the lock ,can close the cover of the fuel
tank. If the cover don t correctly close ,ca n t take out the key .when injecting
fuel ,should add the gauze for filtering & before injecting ,specially filtering.
Gasoline is flammable material,should place it ventilated position ,and then
powering . should not close the power station & the place of the stored gasoline
.but no smoking and no placing flammable matter.
Fuel in the fuel tank should not over-fill .afterinjecting ,must tightly compact
the cover of the fuel tank.
FUEL SWITCH(FIG 12, FIG 13 , FIG 14)
there are there positions on the switch of the fuel , .
On : rotate the handlebar of the fuel switch to on fuel passage opened ,
begin to supply normally.
Off: rotate the handlebar of the fuel switch to off ,fuel passage cut off ,stop to
supply.
Spare : during driving ,if the fuel level is lower in the fuel tank ,main fuel
passage can t supply fuel,rotate the handleb ar of the fuel switch to this place ,use
spare fuel ,but inject fuel in the fuel tank as fast as possible.
AFTER INJECTING FUEL ,NEVER CAN KEEP HANDLEBAR IN ,OTH-
ERWISE THE FUEL RUNS OUT OF ,NO SPARE FUEL SUPPLYING .
IF YOU DON T USE MOTORCYCLE IN AL ONGTIME,SHOULD KEEP
HANDLEBAR IN CLOSED POSITION PREVENT ABAIN ST LEAKING FUEL.
OPTION OF THE FUELAND LUBRICATION
OPTION OF THE FUEL
quality of the fuel is the important factor influencing on the level of the emission ,
option of the fuel must according to the rules of this handbook .
fuel should use no pb & containing lower pb octine figure is RQ-93 or RQ-93
above petrol.
If don t properly select fuel , which will make the engine explode and shock & have
difficulty in starting so that influence on the using life of the engine ,power and oil-
consumption.
no overfill the fuel ,otherwise , fuel will overflowand erode the surface of the
paint and plastic parts ,at thesame time , may give riseto fire destruction .after
filling in fuel ,must coverthe cover of the fuel.
gasoline is flammable ,under the certain circumstance , which easily give rise to
burn and explode . when opening the cover of the fueltank ,check engine whether
stalls , injecting fuel in theventilated place .when injecting fuel .no smoking ,no
closing the flammable materials. .
when injecting fuel ,should add the gauze to distil & can specially distil before
5
Fig.11
Cover of the fuel tank
WARNING
WARNING:
Fig.12 Fig.13 Fig.14
On Off Spare
P

injecting .
OPTION OF THE LUBRICATION (FIG 15)
It is the main factor that the lubrication influences on
the performance of the engine and life ,at the same
time , influences on the emissionof the motorcycle .
And so ,must according to the rules forselection and
lubrication of the changing . no using general engine
oil ,gear oil ,vegetable oil ,etc replacement .
When the motorcycles ex-factory with the engine oil
of the gasoline engine of 15w/40-SE grade ,whose optimal temperature is-
gasoline engine of API( USA petrol organization ) . if need change other lubrications
,whose the grade of the quality shouldcome to SE grade ,adhensive degree should
select the reference caption according to the circumstances ofthe various regions
and weather changing . when change the lubrication ,please release the original lu-
brication of the camshaft till finishing.after cleaning , according to the rules injecting
the new lubrication.
If can not buy the engine oilof the gasoline engine of 15W/40-SE grade,can make
use of RQB-10 #(temperature isbelow -10 e regions using HQB-6#) engineoil
instead .forbidding to use general engine oil &vegetable oil.
REMARKS:
FORBIDDING TO USE THE LUBRICATION OF OTHER BRANDS ,OTHERWISE
WILL DAMAGE TO ENGINE .
TYRES
Right tyre pressure will keep the optimal driving stability ,and driving comfortable ,
the durability of the tyres .
REMARKS;
No proper tyre pressure will give rise to the aberrant arasion of the tyre thread so that
cause security accidents . insufficient tyre pressure will cause tyres damaging &
wheel rim detached .
The standard of the air pressure of the tyre underthe cooling state ( TABLE1)
s/driving
d/driving
tyre specs
front wheel:175kpa
front wheel:225kpa
front wheel:80/100-18-47p
rear wheel:200kpa
rear wheel:225kpa
rear wheel:90/100-18-56p
before driving , when cooling tyre ,inspect the tyre pressure .inspecting tyre pres-
sure whether has cuttingprint ,nails & otheracute matter breaking in . inspecting
wheel rim whether hasdent print &reduction .iffind any status ofthe breakage ,
please go and come to maintenance station(point) repairing &changing.
when tyre thread of in the middle of thetyre come to the following figure ,please
change tyres( TABLE 2)
BEFORE DRIVING ,INSPECTING ITEMS
Before driving ,must inspect the motorcycle . the following itemsonly need a few
minutes , can save the time of the maintenance failureduring driving ,can guarantee
the driving security too.
1.check the oil levelof the injecting lubrication of the engine in the light of
requirement ,inject the lubrication ,but inspectwhether leak the fuel .
2.check the oil level of the fuel in the light of the requirement ,injectthe fuel ,
but inspect whether leak oil .
3.before inspecting , the performance of rear brake before inspecting ,the situ-
ation of the movementof rear brake ,free stroke is big &small ,which should be
adjusted.
4.check the tyre before inspecting,the situation of airpressure of rear wheel
and arasion and impairing .
5.check battery electrolyte check the liquid level of the electrolyte
6.check the movement ofthe throttle inspect the movement ofthe throttle ,
connecting cable and the statusof free stroke of the handlebar , when need badly,
correct & change.
7.check illumulation and horn check headlight ,rear light ,position light ,steer-
ing light,indicator and the performance ofthe horn whether are good.
6
Fig.15
40
30
20
20W/40
25W/40
20W
15W/30
10W/20
-30 -20 -10 0 10 20 30 40 50
10W/30
15W
10W
5W/30
5W/20
5W
table 1
min limitation of the tyre thread depth(mm)
front wheel 1.5 rear wheel 2
table 2
10 e+40 e. without purchasing , can make use of SE ,SF &SC grade engine of the

8.check the tension ofthe drive chain ,thelubricated status . if serious abrasion
&damage , need change in time .
9.check the operation system of steering check the sensitivity and stability of
the operation
10.check the front wheel and rearwheel , front and rear shockabsorber of the rear
fork ,suspensive bolt and nut of the engine ,etcfasteners .
ENGINE STARTING
No starting the engine in the narrow place so that cause danger
No starting the engine when hanging gear,otherwise ,cause equipments and
parts damages and accidents
rotate the fuel switch to ON
insert ignition key into ignition switch ,rotate to ON
tread gearshift pedal ,which makes engine lie in the idle gear,whose indicator N
flashing
be sure to the quantity of thefuel
REMARKS:
MAKING USE OF THE FOOTSTARTING ,NO TREAD THEKICK ROD SO
THATREBOUND AND IMPAIR FEET &DAMAGE THEEQUIPMENTS AND
PARTS .AVOID IDLE(SPECIALLY THE HIGHROTATING SPEED ) FOR RE-
DUCING THE ABRASION OF THEENGINE .
IN THE PLACE OFTHE SPECIAL LOWTEMPERATURE ,BEFORE DRIV-
ING ,PLEASE ROTATETHE KEY OF THE IGNITION SWITCH TO OFF ,
SLIGHTLYOPEN THE THROTTLE ,MEANWHILE ,USE THE KICK ROD OF
THE FEET TREADING MAKES CAMSHAFT MOVE SEVERAL TIMES ,LATER
OPEN THE IGNITION SWITCH TILL CAN NORMALLY START
FOR ELECTRIC /FOOT STARTING ENGINE ,WHICH CAN NOTSTART AT
THE SAME TIME . WHEN CAN NOT START WITH ELECTRIC STARTING
WITHIN 5 MINUTES,AFTER 10 SECONDSINTERVALS ,USE ELECTRIC
STARTING AGAIN PREVENTAGAINST THAT THE BATTERY OVER-DIS-
CHARGE SO THAT DAMAGED.IF ELECTRIC STARTING CAN NOTSTART ,
PLEASE USE FOOT STARTING.
BREAK-IN OF THE ENGINE
During driving 0-1000km ,which it is essential phase that motorcycle rotating .avoid
engine over-loading
During driving the break-in of150km,avoid the throttle opening 1/4above.after
When driving ,should pay attention to shiftgears frequently .forbidding to use one
gear in a long term.
during 150-500km ,avoid the throttle opening1/2 above .notes ; anytime noopen-
ing completely the throttle.
during 500-1000km ,avoid the throttle opening of 3/4above .
exceeding 1000km ,have no special demands,but still should avoid opening com-
pletely the throttle in a long term
REMARMS: AFTER BREAK-IN ,SHOULD MAINTAIN .WHOSE MAIN PUR-
POSE IS THATCOMPENSATESTHE SLIGHT ABRASION OF THE BEGINNING
SO THAT COULD OBVIOUSLY LAST THE USING LIFEOF THE ENGINE.
MOTORCYCLE DRIVING (FIG16)
after driving ,preheat fully the engine
grasp at the clutch handlebar and make the clutch sepa-
rate ,tread the gearshift rod entering the fristgear .
slowly rotate the throttle handlebar .meanwhile slowly loose .the clutch handlebar
till the clutch completely combined.
if need change to thehigher gear ,first close the throttle and swiftly grasp at the
clutch handlebar . move the gearshift rod to the second gear .
increase throttle , meanwhile slowly let the clutch handlebar go so that can drive
normally.
repeat the above movement so that enter into thehigher gear & lower gear .
REMARKS: WHEN NOLETTING GO THECLUTCH AND REDUCE THE
THROTTLE ,NO SHIFTINGGEAR ,OTHERWISE,WILLCAUSE ENGINE ,
DRIVE CHAIN AND OTHER ENGINESAND PARTS DAMAGED
7
WARNING
_
continuing operation an hour ,should stopping operation and cooling to 5 10 mins.
Fig.16
1
2
3
4
5
6
0

BRAKE AND STOPPING OF THE MOTORCYCLE
When need stop ,should close the throttle ,grasp at the handle of the clutch letting go
the clutch ,meanwhile evenly use the front and rear brake till completely stop driving.
The motorcycle moves to the blank gear , the switch button of the engine stalling
rotate to off so that make the engine rotate ,make the switch of the fuel rotate to
off ,stand the bracket a nd make the motorcycle stop evenly .
Turn the ignition switch to off ,take out the key of the ignition switch
Lock the lock of the head of the motorcycle, take out the key of the ignition switch
REMARKS:
Slow down the stopping vehicle while must use the front and rear of the brake in
order to prevent from side sliding or side turning over ,but independently operate the
front and rear brake which will give rise to the swift abrasion and damage of the
brake.
Overspeed or in the wet and sliding surface of the road , should avoid braking
urgently ,otherwise , it would cause the danger of the accidents.
When need slow down ,in the first place ,should reduce thethrottle ,gradually use
the front and rear brake , which may come to deceleration and stopping .when need
brake urgently ,first should reset the throttle , and then using decisively the front and
rear brake .
On the damp surface of the road where goingon the brake is quite difficult: avoid
braking urgently and stopping movement .owing to this easily cause the turnover of
the motorcycle .when need stop on the damp surface of the road ,should slowly brake
so that the vehicle can evenly stop .
When closing near to the zigzagor turning , should close thethrottle and use the
brake slowing down .otherwise , whichhas difficulty in controlling that give rise to
side sliding and turning over .
On the wet or soft surface of theroad ,should take note of operation evenly .other-
wise ,it would be out of control.
When pass by the other vehicles stopping onthe roadside , must be careful:owing
to inside the drivers perhaps do not see you and open the door of the motorcycle ,
shelter your advance direction.
The road rail on the road ,steel boardon the building place and channel which are
damp so slip ,when the vehiclespass by ,should slow down aheadof time and take
note of keeping the vertical body ,otherwise may be cause the side sliding of thetyre
and out of control.
The grinding slice ofthe brake may be wet when the motorcycle cleaned. before
starting,should check all controlling systems .
No over-loading on the motorcycle,above all no hanging anygoods,otherwise it
would make the motorcycle lose balance.
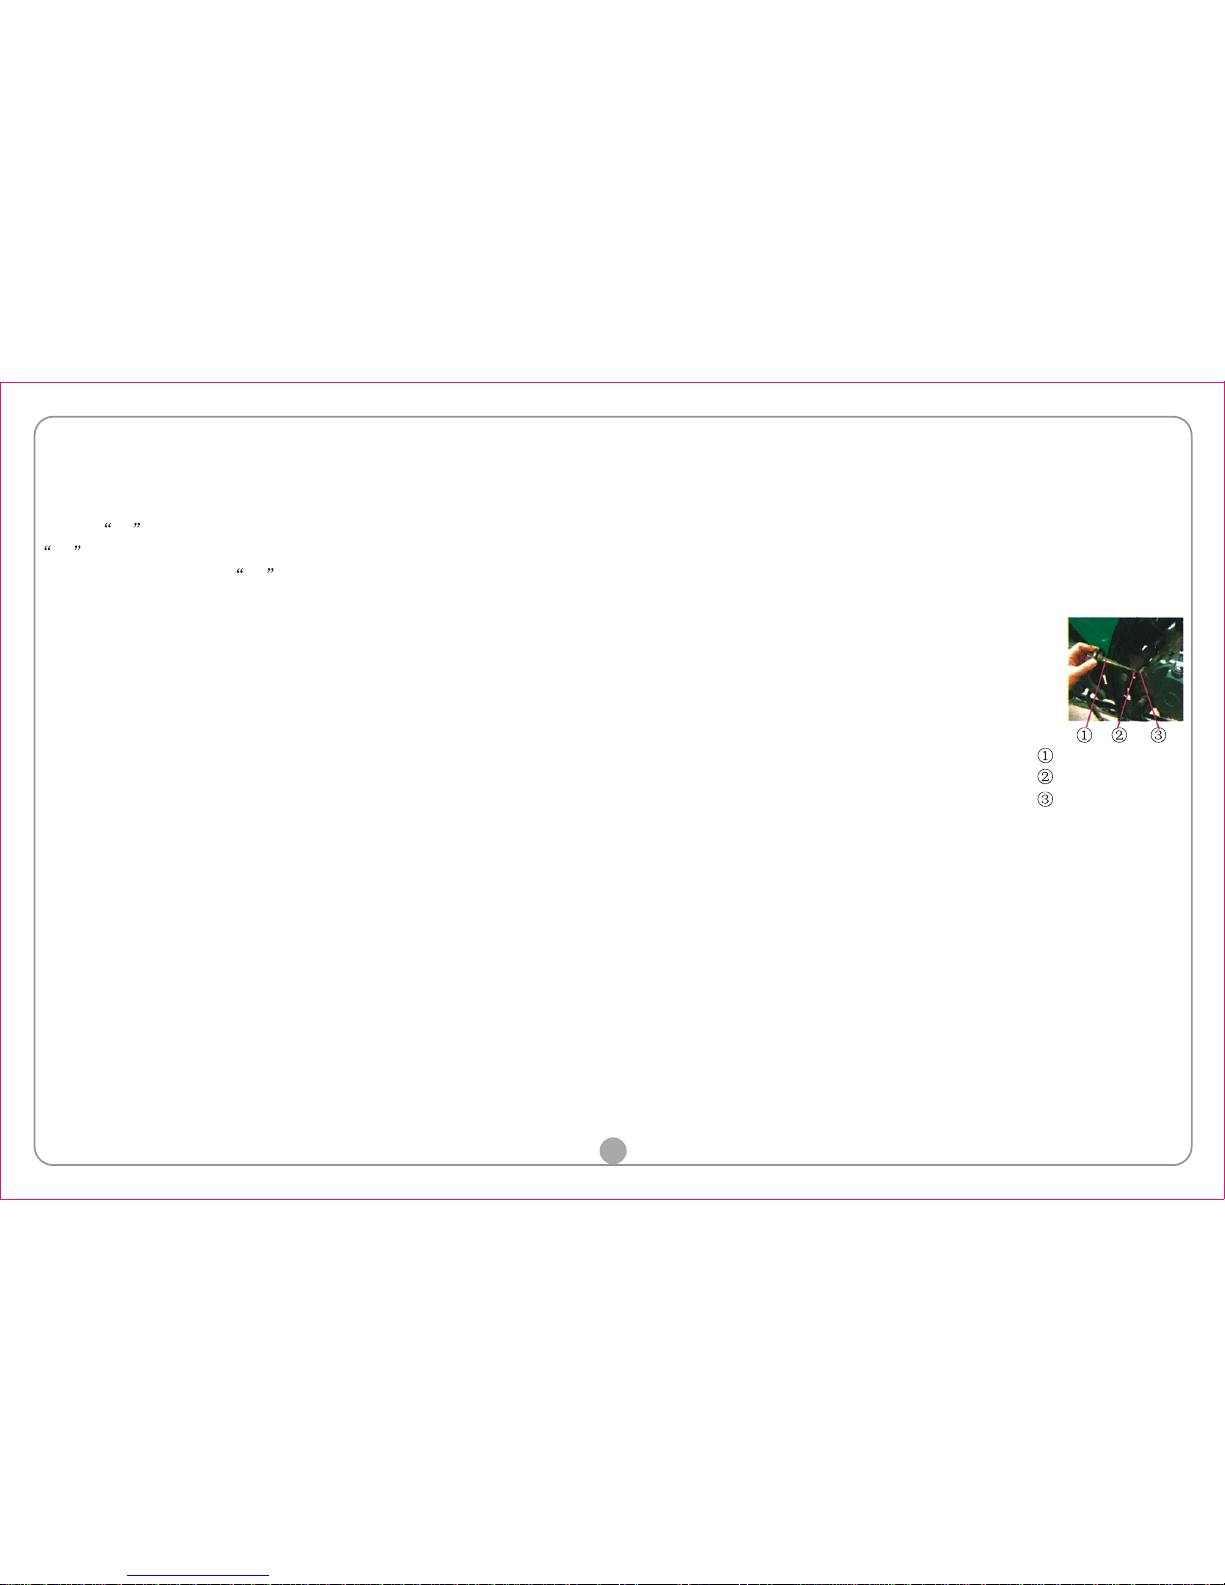
INSPECTING AND REPLACEMENT OF THE LUBRICATION
(INSPECTING OF THE FUEL LEVEL) (FIG17)
before driving,check the level of the lubrication .
the rear ofthe box ofthe camshaft hasno the rulerof the
engine oil ,measuring the level ofthe lubrication ,which in
between the two scales indicated up and down.
*lay the motorcycle down on the ground ,support the bracket
,take out the ruler of the engine oil ,aftercleaning,insert the
ruler, and then take outand observe .
*add to the engine oil ofthe gasoline of 15w/40-SE up toupper scale ,no filling up
*resettle the ruler of the engine oil ,inspect whetherleaks oil
REMARKS :
WHEN THE ENGINE OILIS NOT ENOUGH ,DRIVING MAY CAUSE EQUIP-
MENTS AND PARTS DAMAGED .
(REPLACEMENT OF THE LUBRICATION )
*lay the motorcycle down on the ground ,support the side stand ,startthe engine and
let it idle a fewminutes ,and then unscrew the ruler of the engine oilof the engine
and the bottom of the plug of thetaking oil,tread and press the kick rod manytimes
,thoroughly give off the left oil .
*check the gasket of the plugof the taking oil whether is good ,if damaged ,should
change ,and reset the plug of thefuel and screw tightly.
*inject the engine oilof the dictating quantity,start the engine ,afterrotate many
minutes with idle speed ,andthen stopping ,check the level of the fuel again ,but
8
Upper leve mark
Lower leve mark
Fig.17
Oil filler cap/Dipstick

check whether leaks oil.
REMARKS
DURING THE REPLACEMENT OF THE LUBRICATION ,MUST MOVE TO THE
BLANK GEAR.NO ADDING TO ANYTHE CHEMICAL ADDITION IN THE
LUBRICATION.JUNKOIL ANDCLEANSER NEVER CAN READILY DUMP,
SHOULD HAND OVER THE RELEVANT PROFESSIONAL UNIT TO TREAT .
CLEARANCE OF THE ACCUMULATED CARBON
According to the regulations ,regularly clear up the accumulated carbon of the spark
plug ,the top of the piston,piston ring and gap ,burning roometc the relevant parts
by the professional personnel so that couldmake the engine burn fully and itsstate
better.
OPTION AND REPLACEMENT OF THE SPARK PLUG (FIG.18)
The spark plug is the important part of the engine ,which must
regularly make use of the cylinderof the spark plug disman-
tling ,check its electrocute and accumulated carbon.
The use of the pattern ofthe spark plug is D7/D8.
Dismantle the cap of the spark plug and checkits accumu-
lated carbon .if its accumulated carbon is very serious,which
will have an effect on thepower of the engine and the perfor-
mance of the ignition ,replace withthe iron brush.
Measure the gap of the electrocute of the spark plug with the rectangle &the ruler of
the spark plugshould be 0.6-0.8mm.ifthe gap isincorrect ,should adjustto the
dictating figure.
When resettle the spark plug with hands screwing to motionless position ,again screw
tightly with the cylinder of the spark plug (thenew spark plug rotates 1/2 cycles,the
old spark plug rotates 1/8-1/4 cycles)
NOTES: THE VARIOUS TYPES OF THE SPARK PLUG WHOSE DURABILITY
SCOPE ARE DIFFERENT,CHANGING THE IMPROPER SPARK PLUG WILL
CAUSE THE ENGINE NO STARTING EVEN SERIOUS DAMAGE .IF CAN NOT
BUY THE SPARK PLUG OF THIS TYPE,SHOULD CONTACT WITH THE DEAL-
ERS OR THE MAINTENANCE STATION,SELECT THE PROPER REPLACE-
MENT .WHEN TAKE OUT THE SPARK PLUG ,SHOULD PAY ATTENTION TO
AVOID PECULIAR OBJECTS PASSINGTHE HOLE OF THE SPARK PLUG EN-
TERING INTO THE CYLINDER ,WHICH SPEED UPTHE ABRASION OF THE
CYLINDER AND THEPISTON .WHEN RESETTLE THE SPARK PLUG ,FOR-
BIDDING TO SCREWTIGHTLYSO THAT DAMAGE TOTHE THREAD OF
THE SPARK PLUG RESETTLINGHOLE OF THE COVER OF THE CYLINDER
WASHING AND RESTALLING OF THEAIR FILTER(FIG19)
After the air filter driving1000km per hour ,which atleast should be cleaned and
immersed oil one time .if you driveon the dusty area ,must do muchmaintenance .
in the light ofyour driving conditions ,ourcompany will help youdecide on the
schedule of the right maintenance
*take apart the left guard plate
*take apart the cover of the aircleaner .
*decompose the air cleaner,take out the gauzecore of the
air filter
*immerse the gauze coreof the air filterinto the cleaning
solvent ,after cleaning ,make it dry completely .
*immerse the gauze coreinto the engine oilof the petrol
engine of the 15W/40-SE, crowd out over-oil ,and keep the
light state of the lubrication.
the air cleaner ,and scrub drying .
*refit the air cleaner ,the air cleanermust be good goo.
REMARKS:
IF NO RESETTLING THE GAUZE CORE ,NO STARTING THE ENGINE ,OTH-
ERWISE ,WILL CAUSE THE EXCESSIVEABRASION OF THE PISTON OR THE
CYLINDER.
THE GAUZE CORE NEVER CAN BREAK ,OTHERWISE,SHOULD CHANGE.
DURING WASHING ,NEVER USE THE METHODS OF THE MIXTURE SO THAT
9
Fig.18
C=0.7 0.1mm
*wash the dust and peculiar objects of theinner and outer surface of the housing of
Fig. 19
Screw
Air cleaner housing

THE GAUZE CORE DAMAGED.
WHEN WASHING THE GAUZE CORE , NO USINGTHE CLEANSER OF THE
PETROL OR LOW POINT OF BURNING .
WHEN WASHING ,SHOULD AVOID THE AIR CLEANER INWASHING ,AT
THE SAME TIME ,PAYATTENTION TO THE BALANCE PIPE OFTHE CAR-
BURETOR CLIPPING THE LEFT SIDE SINK OF THE AIR CLEANER INSIDE ,
THE BALANCE PIPE NO INRUSHING WATER,PREVENT AGAINST DUST,
SILT BLOCKINGTHE BALANCE PIPE .
WASHING AND RESTALLING OF THE GAUZE OF THE
THROTTLE SWITCH
*unscrew the plug of thethrottle switch ,take out the gauze ,after washing ,restall
and reset and screw tightly the plug .
INSPECTING OF THE LEAKAGE OFTHE GAS CHANNEL
Joint of the gas channel should check the leakage according to dictate ,above all ,the
joint of the silencerand the engine ,airfilter ,carburetor ,intake pipe,ifexist the
leakage,must maintain &change at once to the relevant parts so that the exhaust
enters into directly the atmosphere ,cause enviromental pollution.
OPERATION AND CHECKING AND ADJUSTING OF THE
THROTTLE(FIG20)
The free stroke ofthe throttle handlebar is2.6mm,if the
free stroke exceed thisscope ,should adjust it.specific
method of the adjusting as follows:
*release the locked nut and take out the boot.
*rotate theadjustable nut and adjust the length of the
throttle cable
*after gap adjusting ,lock the lockednut ,and trap the
boot completely.
REMARKS: after adjusting , check thethrottle handlebar whether can restore the
normal position ,rotate thehandlebar of the throttleand check whether exists in
fiction and the sense of the resistance .
ADJUSTING OF THE IDLE SPEED OF THE CARBURET OR(FIG21)
*starting engine for preheating,can t operate until the tem-
perature goes up
*adjust the screw of the idlespeed,according to clockwise
adjusting the idle speed to 1500r/min,rotatethe screw and
make the idle speedrise ,quite the opposite ,according to
the counterclockwise .
*when the engine comes to theno idle speed &deceleration ,put thescrew into be-
tween the middle of the two limitations so that cooperate themixture of the fuel and
the air .
*try to rotate ,if improperly adjust the idlespeed ,in need of the readjusting it .
NOTES :THE CARBURETOR BELONGS TO THE CLOSE PARTS,IF HAVE
NO EXPERIENCE ENOUGH ,NO TAKING APART FREELY.
ADJUSTING OF THE CLUTCH(FIG22)
Adjusting of the clutchshould be under thestopping state .the freestroke of the
handlebar of the clutch is 10-15mm,if isincorrect ,should adjust as follows :
*release the locked nut of lying in the clutch line of the fuel tank below ,rotate in or
out the adjustable nut till cometo the free stroke ,lock thelocked nut.
*after adjusting ,starting the engine , make sure that the clutch whetheris normal .If
the adjusted clutch shows thedifficulties of the sliding&hanging gear ,and so in
need of readjusting till come to thedemands.
CHECKING AND ADJUSTING AND LUBRICATING OF THE
DRIVE CHAIN (FIG23)
Specifications of the drive chain is 10MA
10
Lock nut
Adjuster
Fig. 20
Throttle stop screw
Fig. 22
Fig. 21
Clutch lever
Adjusting nut
Lock nut

Not only does theadjusting of the drivechain directly
have an effecton the life ofthe drive chain ,butaffects
the effectivity of the driving and securityof the driving ,
and so must strictly and regularly check and maintain ac-
cording to the maintenance schedule.
(ADJUSTING OF THECHAIN)
check the releasing degree of the chain is 10-15mm, check
overtight &over loose which should adjustaccording to
the following methods :
(1)release the rear wheel nut ,the adjustablenut of the chain
(2)adjust the nut of the adjustor ofthe left and right chain and theloosing degree of
the adjustable chain
(3)lock the adjustable nut of thechain and the rear wheel nut
NOTES:THE LEFTAND RIGHT ADJUSTOR OF THECHAIN WHICH MUST
ADJUST ITTO THE SAMEPOSITION OF THESCALE,MAKE SURE THAT
THE FRONT/REAR WHEELARE IN THE SAME SURFACE OF THE CENTER.
(LUBRICATING OFTHE CHAIN)
(1)release the clip of the chain and take outthe chain,dry up with the cleanser wash-
ing the chain wheel and chain .
(2)Rub the lubrication on the chainand refit the chain.
REMARKS :
THE OPENING DIRECTIONOF THE CHAINCLIP OPPOSITES WITH THE
DRIVE DIRECTION OF THE CHAIN
IF FIND THE CHAIN&CHAIN WHEEL DAMAGEDSERIOUSLY*SERIOUS
ABRASION WHICH SHOULD BE CHANGED.
CHECKING OF THE FRONT SHOCKABSORBER
(APPEARANCE CHECKING)
check whether the front/rear shock absorber havebend and reduction etc abnormal
circumstances
(OPERATION CHECKING)
grasp at the handlebarof the front brakebraking the front wheel,press the front
shock absorber ,up and down observe the restoring several times whether isnormal.
NOTES: IF FIND THE FRONTSHOCK ABSORBER DAMAGED,PLEASEAT
ONCE REPAIR&CHANGE
THE REAR SHOCK ABSORBERCHECKING (FIG24)
Check the rear shock absorber whetherleakage ,bend ,reduc-
tion etc abnormal circumstances.
Press the rear shock absorber ,up and down observe therestor-
ing several times whether is normal
Spring pre-loading of the rear shock absorber can adjustin the
light of the various loading anddriving conditions as the cap-
tion,according to A direction adjusts the min preloading of the spring,according
to B direction adjusts the pr eloadingad dition ofthe spring.
CHECKING AND ADJUSTING OF THE FRONT BRAKE
(FIG25)
To thedisc brake grasp at the handlebar of the front brake ,measure it s the free
stroke on the top of the brake handlebar ,whose figure is 10-20mm.when need adjust
the free stroke ,rotate theadjustable nut .after adjusted the free stroke ,must make
the arc sink of the adjustable nut and the connecting rod overlap .Grasp at the handle-
bar many times ,and then release it,again rotate the wheel whether is sensitive
(THE FRONT BRAKE CHECKING )
*check the main pump of the brake whether the height of the oil surface ofthe brake
keeps the dictated the bottom line above,otherwise should take apart screw taking
out the cover of the mainpump ,inject the brake oil intothe main pump
*unscrew the bolt ,take out the split pump ofthe brake and check it whether exceed
the limitation of the abrasion .if exceed the limitation of the abrasion ,should change
11
Fig.23
rear wheel axle
adjustable nut
adjustable bolt
Fig.24
Fig.25
Brake caliper
Brake disc
Brake main cylinder

(THE FRONT BRAKE ADJUSTING)
the free stroke of thehandlebar of the front brakeis 10-20mm,if the free strokeis
incorrect,should adjust as follows:
continuously operate the handlebar many times , grasp at the handlebar of the brake
,take apart the the exhaustcap of the nut of the brake pump ,give off theair of the
cylinder later swiftly lock the locked the cap ofthe nut.if can t finish adjusting in a
lump ,as the abovemethods repeat till thehandlebar of the brakecoming to the
dictated free stroke.
WARNING:the brake oil should strictlyselected as the dictated specifications ,never
can use the brake oil of theother specifications & the engine oil instead.otherwise
maybe influence on the effectivity of the brake ,can erode the brake .when injecting
the brake oil ,avoid mixing into the peculiar objects of the blocking theoil passage .
NOTES:IF THE ABOVE METHODS DON T ADJUST BETTER,PLEASE LOOK
FOR OUR PERSONNEL OF MAINTENANCE STATION FORADJUSTING .
CHECKING AND ADJUSTING OF THE REAR BRAKE (FIG26)
After checking ,the free strokeof the pedal of the rear brake is 20-30mm,if itis
incorrect ,adjust as follows :
After treading the pedal of the rear brake several times ,and then release therotating
wheel of the brake whether can rotate freely.
REMARKS: CHECK THE CIRCUMSTANCES OF THE ABRASION OF THE FIC-
TION SLICE,IF THE FICTION SLICE EXCEEDS THE L IMITATION OF THE FIC-
TION ,PLEASE CHANGE IT .
THE SWITCH OF THE BRAKE LIGHT ADJUSTING (FIG27)
The switch of the frontbrake light lies in thehandlebar of the front brakeinside ,
which produces the brake momentum while turn on the circuit of the brake light ,
otherwise , which adjusted .
The switch of the rearbrake lies in the rightside of the frame
body ,which produces the brake momentum whileturn on the
circuit of the brake light ,otherwise,should adjust the adjust-
able nut of the switch ofthe rear brake light .if themovement
of the switch lag ,rotatethe adjustable nut as A direction.if
the movement of the switchin advance ,rotate the adjustable
nut as B direction .
REMARKS:INDEPENDENTLYOPERATETHE FRONT/REAR BRAKE WHICH
CAN TURN ON THE BRAKELIGHT.
MAINTENANCE AND CHANGING OFTHE SILENCER
Should according to dictates clearing up thecarburetor of the silencer pipe inside ,
check the silencer pipe inside whether have loosing , breakage & bush coil loosing .
If have the above phenomena,should maintain &change
REMARKS: EACH TIME TAKEAPART THE SILENCER ,RESETTLING THAT
SHOULD USE THE NEW GASKET.
AFTER OPERATINGTHE ENGINE ,SILENCER AND EXHAUST PIPE ALLARE
VERY HOT,SHOULD AVOID BURNING.
THE WORKING PRINCIPLE OF THE TRANSMISSION OF
THREE ELEMENTS CATALYSIS (SELECTING PRODUCTS)
Transmission of three elements catalyst whichis restalled in the exhausting system
of the motorcycle ,through catalystthe reaction of the oxidationand deoxiditing ,
which can obviously fall down CO , HC and NOX etc the device ofthe catalys t
and convertation of the emissionquantity of the pollution make use of the catalyst
controlling the emission of thepollution of the motorcycle ,whichlet the exhaust
into the atmosphere ,first throught the transmissiondevice reacting fully .the cata-
lyst is of thechemical absorbing trait,which increasesthe speed of thechemical
reaction and don t cause the rare matter of the chemical change.during giving off,
the reacting objects (e.g CO CH NOX flow to the catalyst ,first diffuse inside
the micro-hole,absorb on thesurface of the catalyst ,and then the results(CO2 ,
H20 N2 etc separated again,through the micro-hole diffusing outside ,finish the
12
Fig.26
Rr.brake pedal
Rear brake
Fig. 27
Adjusting nut

course of the reaction,through the reaction ofthe oxidation and deoxiditing,the
cleaning efficiency ofthe catalyst will changewith the temperature ,densityand
speed of the flowing air .
during maintaining ,pay attention to the follow items:
1.three elements of the catalyst must take slightly,no stroking and pressing .forbid-
ding to the pollution of the oil spot and dust .pay attention tokeeping the enviroment
of the dry and good ventilation.
2.forbidding to acid liquid, chromeliquid penetrating the exhaust silencerso that
cause the failure of the catalyst.
3.must use petrol of no pb .
Notes: three elements of the catalyst belongsto the option products , which thereis
the type of the producton the silencer marked onthe enviromental bus with LC-
X mark.In details see thefollowing table.
PROTECTION OF THE BATTERY (FIG28)
In the light of maintenance schedule and checking that be-
fore driving recounted the interval of the mile inspecting the
battery .the height of the electrolyte shouldkeep the marking
line of the liquidsurface of the standard.ifliquid surface is
lower ,which properly add to the distillation water .when add-
ing the distillation water ,can t exceed the standard scale ,oth-
erwise may be overflow the electrolyte causing the erosion.
REMARKS:THERE IS THE ELECTROLYTE IN THE BATTERY ,BEOF ERO-
SION CHARACTER.IF SULPHUR CONTACTTHE SKIN &EYES WHICH WILL
CAUSE THE SERIOUSBURN .PLEASE MUSTTAKE THE RELIABLEAND
PROTECTIVE MEASURES. KEEP THE BEYONDREACH THE CHILDREN.
ELECTROLYTE ,JUNK BATTERY WHICH DEALT WITH AS THE
REGULATIONS.NO LITTERING.
WARNING:
Electrolyte contains sulfur ,which avoids contacting skins &clothes ,if splashing the
skins &clothes ,should flush with a plenty of water . serious victim whichshould
send to the hospital .if be careless of drinking ,whichshould drink a plenty of water
&milk ,and then drinking the lotion of theMgO2&vegetable oil .
When the battery electrifying ,which will causethe exloding gas ,which should far
away the source of the water under the ventilated place .when restallingthe battery ,
should make sure that the ventilated pipesmooth of the battery .When washing ,
avoid immersing around the battery.
When the new battery add to liquidhalf an hour till can use, whenelectric starting,
the light of the blank gear becomes dim andcan not start for lasting the using life of
the battery ,under the low temperature ,please use the foot starting.when the battery
comes out the losselectricity,should usethe current of the1A below continuing
charging 10-15hours,at the same time ,please check regularly electrolyte whetheris
the normal scale . in order to guaranteethe using life of the battery ,pleasestrictly
operate as the brochure of the battery.
THE HANDBOOK OF THE PROTECTOR ABOUT FUSING (FIG29)
When happen the fusing of the circuit&over-loading ,
whose protective pipe will automatically cut off .atthe
time ,need inspect the circuit,after removing the fail-
ure ,the insurance pipe of spareparts instead.
WARNING:
Check &change the fuse which should closethe ignition ,avoid happening the cut-
off..
No using the extra fuse &evendirectly joint the conductor ,otherwise ,willcause a
wide range of the electric system damaged ,which may give rise to the fire destruction.
TOOL KITS(FIG30)
During driving,tool kits which can offer to simply repair ,adjust and change the parts
etc emergency . the tool boxlain down the seat cushion . toolsas follows:
13
_
LCX
H2OCO
2N
2
HCCO NOx
engine type
IP39QMB,IP50FMG(IP50QMG)
162FMJ,161MJ,156FMI,161FMJ
IP52QMI
2V49FMM
161FMJ,162FMJ
symbol
LC-2A
LC-2
LC-3
LC-3A
LC-4
LC
IP52FMH,IP50FMG,IP47FMF,IP52FMH,IP53FMH
Fig. 28
Upper level mark
Lower level mark
Fig. 29
Fuse

14
(1)screw driver handlebar
(2)stud (3)spark plug wrench
_
(4)five inch slip joint pliers
(5)8mm 10mm open- ended spanner
(6)12mm 14mm open-ended spanner
(7)13mm 16mm open- ended spanner (8)17mm 19mm open- ended spanner
(9)allen key5# (10)allen key6# (11) tool bag
MANUAL OFTHE BUMPER(SELECT RESTALL)
1.when the motorcycle is the blank gear ,ignition switch is the state of the closing ,
use the electric starting of the swing-controlling.
2.electric starting with the swing-controlling activates the action of the warm motor-
cycle .within 2-5mins the motorcycle will automatically stall.
3.after using electric starting , before turning on the ignition switch which will not
use the front/rear brake .otherwise the starting engine will operate again.
4.call off driving without the key, be sure that the reliable function of the bumper .
NOTES: the bumper belongs to the option restalling products as per the actual needs
selecting.
FAILURE CHECKING AND REPAIRING
Even if before ex-factory ,passing strictly inspection ,but in the course of the using ,
which still exists failures to respective vehicle
If your motorcycles come out the failure ,in need of repairing, which at once contact
with our maintenance station (point) ,our well-skilledprofessional personnel who
will offer excellent maintenance service for you.
WARNING:
Assembly and parts of this motorcycle etc ,all of which went through special design-
ing .if you are not of the relevant professional knowledgeof the motorcycles,please
do not take leave to take apartand maintain.
WASHING AND KEEPING
(WASHING)
1.before washing ,first check the spark plug and all of the mouth of the injecting oil
restalling whether is correct
2.flush the spot and oil print with the hose
3.after washing ,scrub all surfaces with the towel of trim& the soft cloth of absorbing
4.drying and lubricating chain for preventingagainst rusting.
5.after washing, let the idle speed of theengine rotate several mins
REMARKS:
IFTHE PRESSURE OF THE FLUSHING IS TOO BIG TO CAUSE LEAKAGE ,
WHEEL AXLE,REAR FORK,BRAKE ,THE SEAL PARTS OF THE
CHANGEAGBLE SPEED AND THE LOOSING OF THE ELECTRIC PARTS
&CONSUMPTION.
WHEN WASHING,PREVENTAGAINST THE SILENCER INRUSHING WATER
AND THE SPARK PLUG IMMERSING.
(KEEPING)
AFTER WASHING,IFNEED KEEP 60 DAYS&THE LONGER TIME ,WHICH
SHOULD OPERATEAS FOLLOWS:
1.RELEASE COMPLETELYTHE FUEL OF THE FUEL TANK,FUEL PIPE ,CAR-
BURETOR AND OTHER FUEL PASSAGE .
2.TAKE OFFTHE SPARK PLUGWHILE INJECTINGTHE PROPERLUBRICA-
TION OF THE SAE10W/40QE GRADEINTO THESPARKPLUG HOLE.CLOSE
THE IGNITION SWITCH ,USE THE FOOT KICK ROD MOVE THE CAMSHAFT
SEVERAL TIMESAGAIN ,WHICH MAKE THE WALL OF THECYLINDER
COVER EVENLYTHE LUBRICATION.
3.TAKEAPART THE DRIVECHAIN, WHICHWASHEDAND LUBRICATED
COMPLETELY.
4.LUBRICATE ALL THE CONTROLLING CABLE
5.put up the frame body with pad,whichmake the whole body (including tyres) far
away from the ground
6.use the plastic boot tightening the mouth of the exhaust pipe,which prevent against
the damp air entering.
11
Fig.30

15
7.under the atmosphere of damp and salt ,should cover a ply ofthin protecting tar on
the surface of the outer metal
8.take apart the battery ,electrify and keep the drying place and the normal temperature,
later electrify every month one time.
USING AFTER KEEPING
1.Take off thecover and clean the motorcycle.
2.inspect the voltage of thebattery ,if the voltage is lower ,the battery electrifying
come to the demands which will berestalled on the frame body
3.remove the anti-rust inside the fuel tank,inject the dictated the fuel
4.before driving ,inspect all contents,and then trying in thespacious place of the
security ,and make sure that the motorcycle can drivenormally and safely.
MAINTENANCE SCHEDULE
The motorcycle should be maintained as the dictated time .all meanings in the table
as follows:
1.inspect ,wash ,adjust ,lubricate and change
C.wash, .R.change A.adjust L.lubricate
the item maintained by the professional personnel of the maintenance station.if
the user has the professional tool ,maintenance material &maintenance ability ,which
can maintain by yourself. Theknowledge of the maintenance canrefer to this bro-
chure
for security ,this item only can be maintained by the professional personnel of the
dictated maintainance station.
REMARKS;
1.SHOULD OFTEN CLEAN THE MOTORCYCLE IN THE DUSTYAREA DRIV-
ING
2.WHEN THE SPEEDOMETER READINGS EXCEED THEHIGHEST FIGURE
OF THE DICTATED,WHOSE MAINTENANCE SCHEDULE REPEATEDAS THE
INTERVAL OF THE DICTATED SPEEDOMETER .
MAINTENANCE SCHEDULE AS FOLLOWS
MAINTENANCE SCHEDULE
1
2
3
4
5
6
7
8
9
10
11
12
13
14
15
16
17
18
19
20
21
fuel passage
petrol filter
carburetor choke
air filter
spark plug
lubrication
idle speed
drive chain
gap of the throttle
brake shoe/abrasion
brake system
brake light switch
clutch
side stand
suspension
bolt ,nut ,fastenner
wheel/spoke
front fork bearing
S/N
ITEM
ODOMETER READING or PERIOD (Note 2)
Item
Schedule
First
1000km
4000km or
6 months
8000km or
12 months
12000km or
18 m onths
throttle operating system
gauze of the lubrication
headlight adjusting light
remarks(1)
each year
each year
1
1
R
1
1
1
1
1
1
1
1
1
1
1
1
1
1
1
c
1
c
1
1
1
1
1
1
1
1
1
1
1
1
1
1
1
c
1
c
1
1
1
1
1
1
1
1
1
1
1
1
1
1
1
c
1
c
1
1
1
1
1
1
1
1
1
1
1
1
per 2.000km change each time
per 5.000km change each time

16
ELECTRIC DIAGRAM

17
SPECIFICATIONS
Length width height
Wheelbase
Clearance ground
Dry weight
Steeringbar turning angle
Max loading
Max speed
Grade ability( )
Specs and pressure of the front wheel
Specs and pressure of the rear wheel
Economic consumption
brake type(front/rear)
ignition method
drive chain
gap of the spark plug
volume of the oil tank
the type number of the spark plug
lubrication volume
volume of the spare oil tank
engine type
engine model
bore stroke
compression ratio
standard power
2080mm 680mm 1130mm
1330mm
160mm
140kg
41
150kg
100km/h
20
80/100-18(4PR) 225KPa
100/90-18(6PR)225KPa
2.3L/100km
disc/drum
CDI perpetuation AC ignition
10MA
0.6-0.8mm
13L
D7/D8
1.1L
2.0L
single cylinder,water-cooling,four stroke
163FML
63.5 62.2
9.0:1
11.5kw/8500r/min
max power
max torque
volume of the cylinder
starting method
driving method
changing speed ratio
junior grade
first gear
second gear
third gear
fourth gear
fifth gear
sixth gear
end gear
fuel number
lubrication number
magneto
headlight
steering light
rear brake light/tail light
horn specs
meter light specs
protector
battery specs
12.5kw/8500r/min
15N.m/7000r/min
196.9ml
electric/foot
chain drive
3.091
2.5454
1.6875
1.28
1.0417
0.9032
0.8148
3.538
RQ-93#
15W/40-SE
perpetuation AC electromotor
12V35W/35W
12V10W
12V5W/21W
12V
12V3W
15A
12V-9Ah
Table of contents
Other Lifan Motorcycle manuals
Popular Motorcycle manuals by other brands

Razor
Razor RSF650 owner's manual

Yamaha
Yamaha YX600 Radian Service manual

Indian Motorcycle
Indian Motorcycle 1972 Super Enduro SE-74 owner's manual

Husqvarna
Husqvarna 2005 CR125 Workshop manual

Husqvarna
Husqvarna TE 250 - 310 2011 I.E. Specifications - operation - maintenance

KTM
KTM 250 XC-F 2021 Setup instructions