B. Beside the Aquarium Installation
B1. Place filter in desired location next to the aquarium.
Make sure the unit is level.
B2. Screw in plugs on each side of the bottom manifold. Make
sure plug “O” rings are seated properly. The bottom inlet ports
will not be needed in this type of installation.
B3. Wrap thread seal tape on the male threads
of the two 3/4” MPT x 1/2” barb elbow
fittings provided. Wrap each fitting 5-7
times with the tape.
B4. Screw one 3/4” MPT x 1/2” barb elbow
fitting into top inlet port. Screw in the elbow so that the barb
portion is pointing straight up vertically. Screw in the other elbow
fitting into the outlet port located at the top of the unit and align
the barb portion straight up vertically.
B5. Install the power head pump (not included with unit) inside the
aquarium in the desired location following the instructions of the
pump manufactur er.
B6. Attach one end 1/2” ID x 11/16” OD flexible tubing on the outlet side of the power head pump.
B7. Attach the other end of the flexible tubing to the 3/4” MPT x barb elbow located at the top
inlet side of the AquaStep Pro. Cut the tubing to the proper length. Attach a hose clamp
and tighten accordingly.
B8. Attach the rest of the tubing to the 3/4” MPT x 1/2” barb elbow located at the top outlet side
of the AquaStep Pro. Attach a hose clamp and tighten accordingly.
B9. Place the other end of the flexible tubing up and over the side or back of the aquarium so
that the water returns to the aquarium and agitates the surface to aerate the system. In some
cases it may be desirable to connect the flexible tubing to a rigid plastic “U” or “J” tube (not
supplied in this unit) that hangs on the aquarium. Attach a hose clamp to the rigid tube and
tighten accordingly. We recommend using the CustomFlo Water System in place of the
“U” or “J” tube for professional looking installlations.
C. Hanging on a Wet/Dry Filter Installation
C1. Carefully follow all steps in section A (Side or Back of the Aquarium).
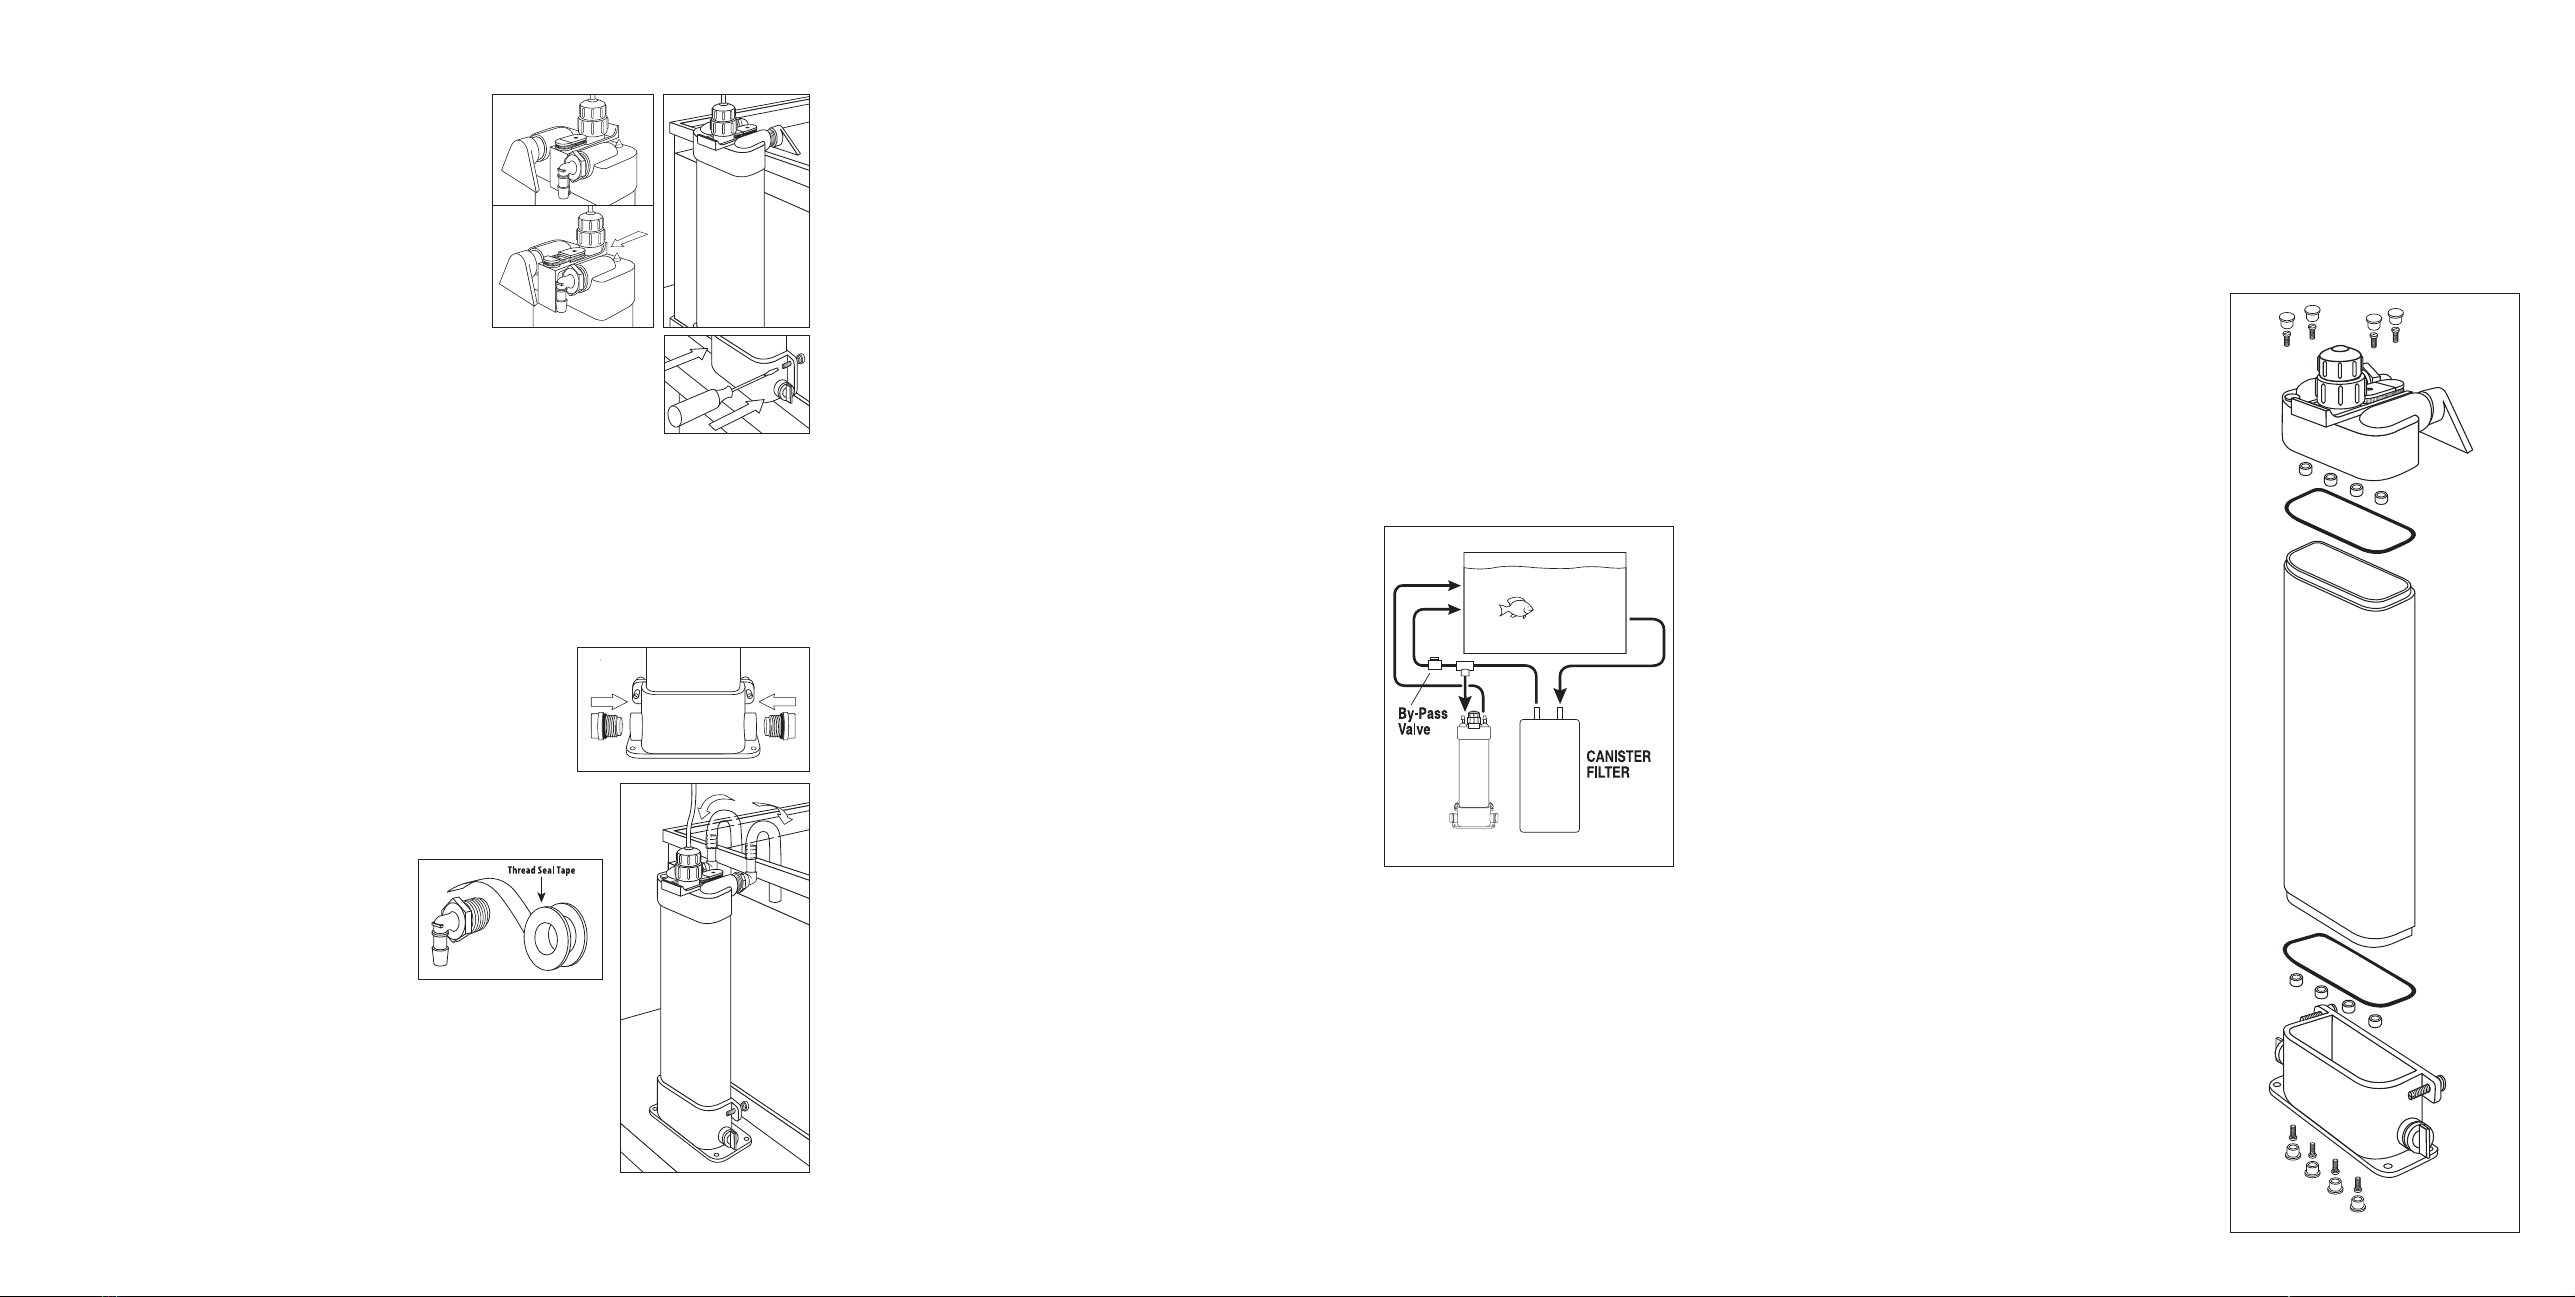
D. Underneath Aquarium with a Canister Filter
D1. Place AquaStep Pro in desired location next to the
canister filter. Position the AquaStep Pro so that it can
be plumbed on the outlet side of the canister filter.
D2. Screw in the plugs on each side of the bottom
manifold. Make sure the plug “O” rings are seated
properly. In most cases, the bottom inlet ports will
not be needed in this type of installation. In steps
D2 and D4, refer to installation drawings in section
#B (Beside the Aquarium).
D3. Wrap thread seal tape on the male threads of the two
3/4” MPT x 1/2” barb elbow fittings provided. Wrap
each fitting 5-7 times with the tape.
D4. Screw one 3/4” MPT x 1/2” barb elbow fitting into the top inlet port. Screw in the other
elbow fitting into the outlet port located at the top of the unit.
D5. Turn off the valve on the outlet side of the canister filter and completely drain the flexible
tubing on the outlet side of the canister filter. In most cases, it will be necessary to remove
the “U” or “J” tube from the back of the aquarium. Cut the flexible tubing on the outlet side
of the canister filter and plumb in line a by-pass valve and “tee” which will divert only a
portion of the water from the canister filter and into the inlet port of the top manifold.
Attach hose clamp and tighten accordingly.
D6. Attach one end of the 1/2” ID x 11/16” OD flexible tubing to the 3/4” MPT x 1/2” barb elbow
located at the top outlet side of the filter. Attach hose clamp and tighten accordingly.
D7. Place the other end of the tubing up and over the side or back of the aquarium so that the
water returns to the aquarium and agitates the surface to aerate the system. In some cases,
flexible tubing can be attached to a rigid plastic “U” or “J” tube (not supplied in this unit)
that hangs on the aquarium. Attach hose clamp to the rigid tube and tighten accordingly.
We recommend using the CustomFlo Water System in place of the “U” or “J” tube for
professional looking installlations.
D8. Adjust the by-pass valve to direct appropriate amount of water into the UV. See Size and
Specification Chart for proper flow rate.
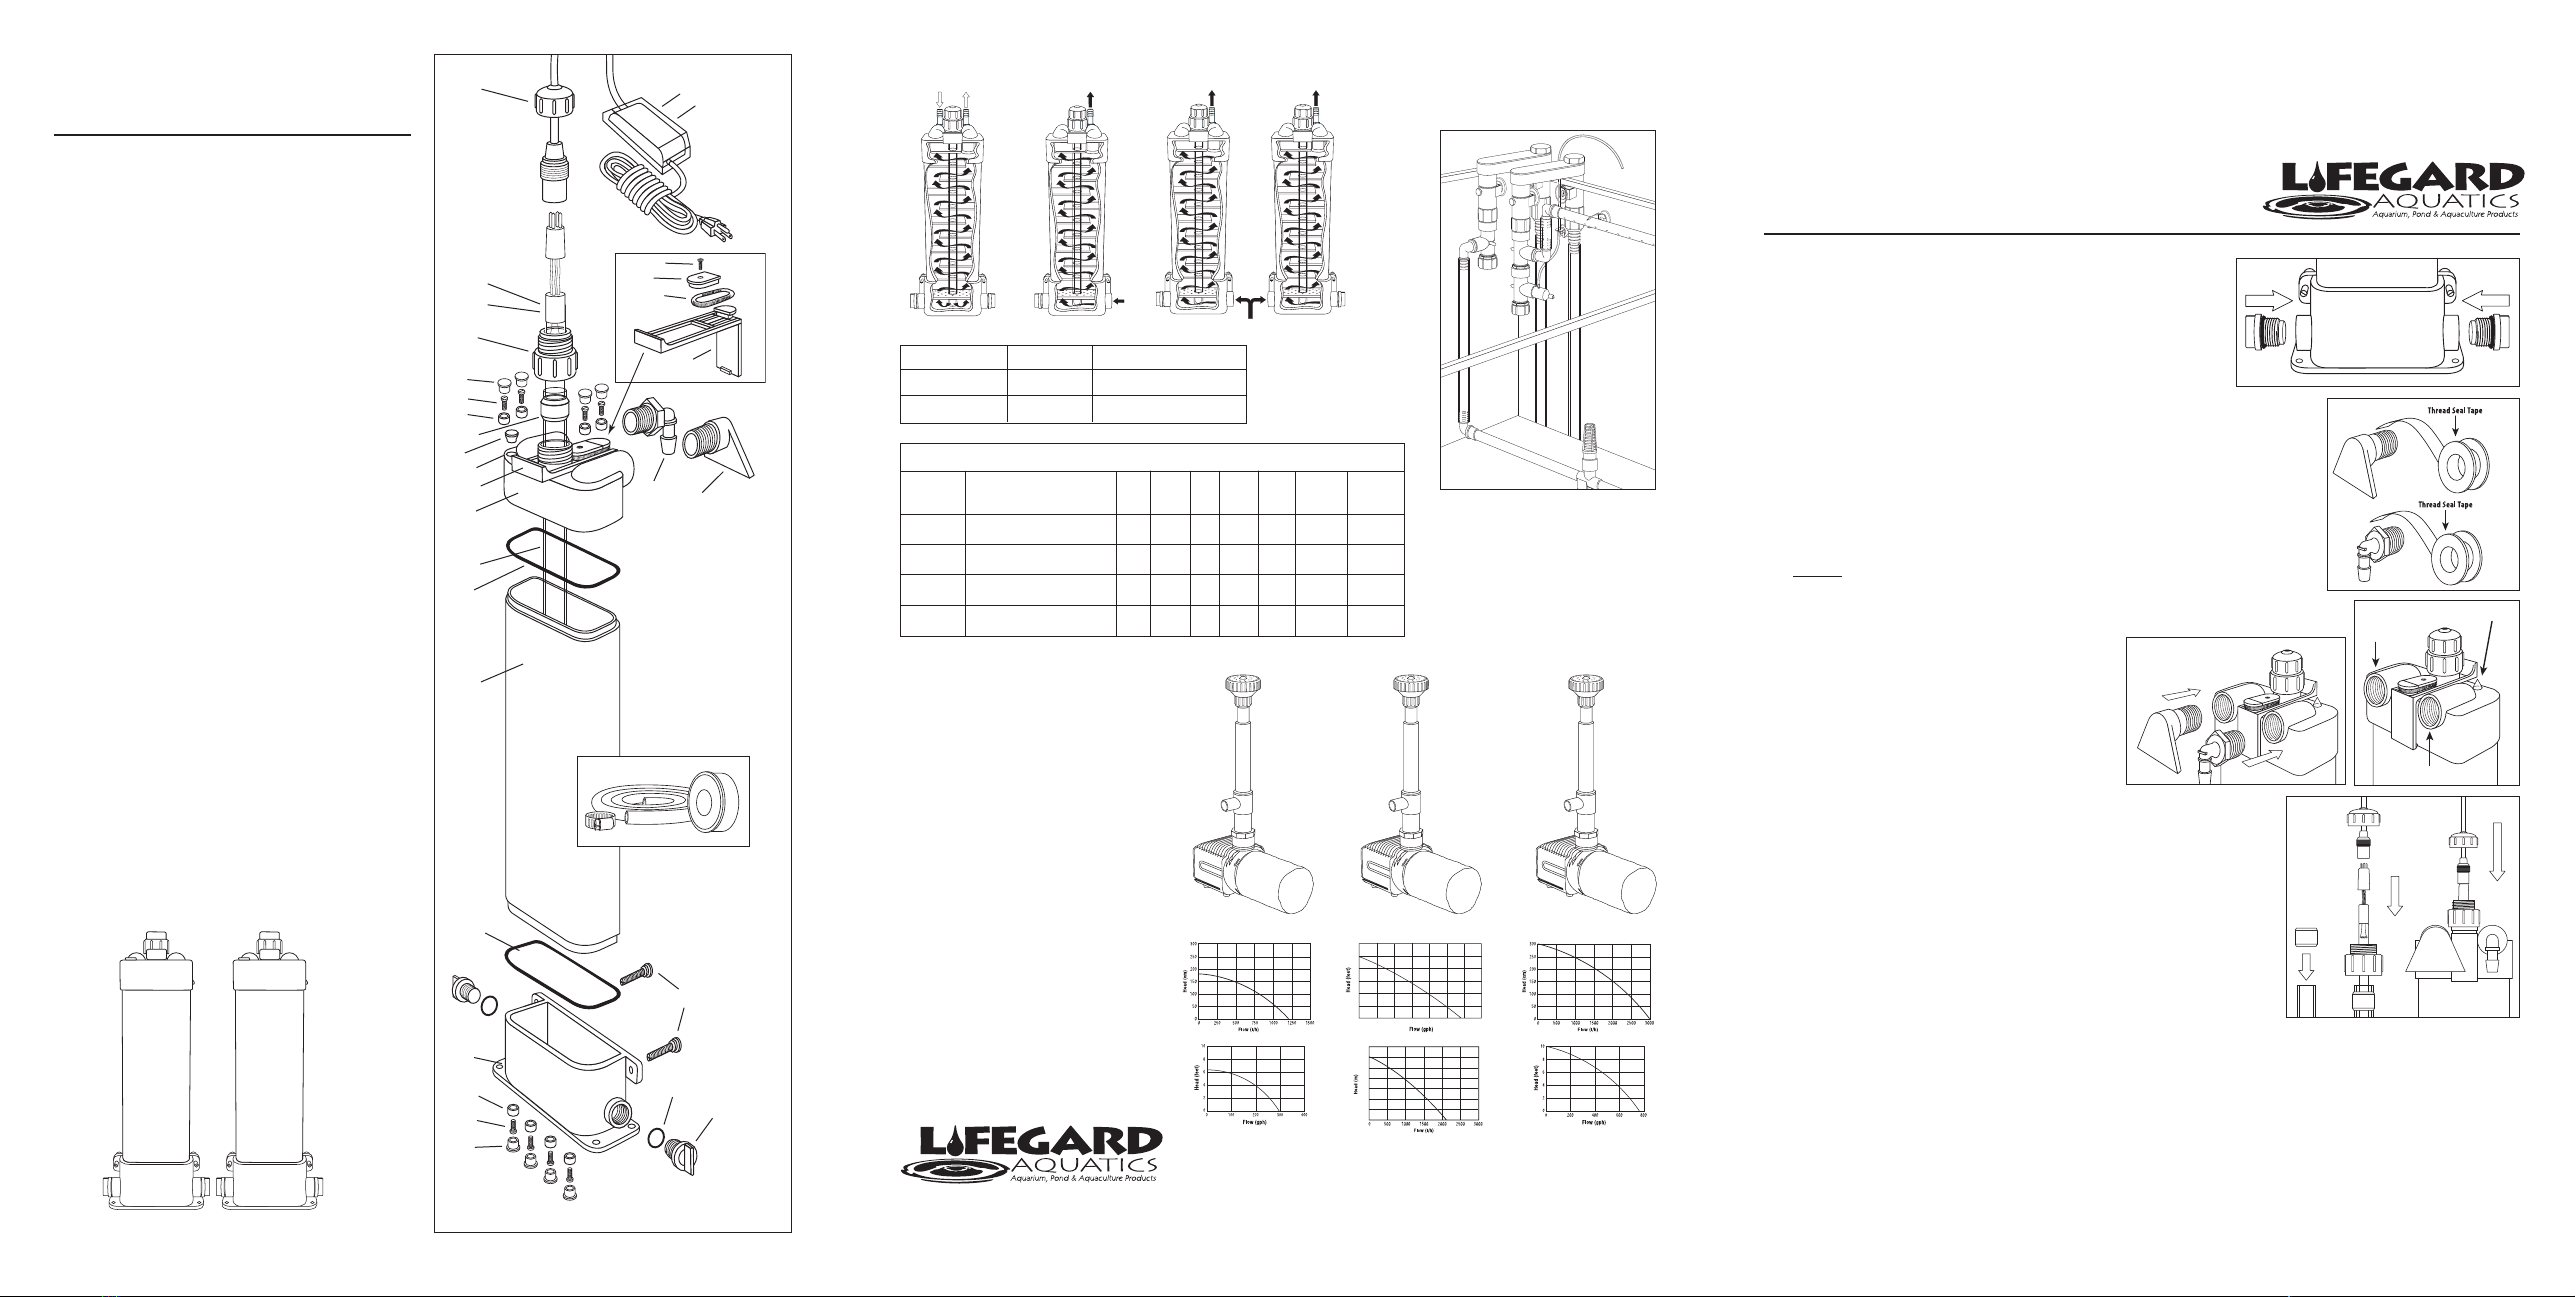
2 3 4
A. Side or Back of the Aquarium Installation
A1. Install the AquaStep Pro UV Sterilizer on the side
on back of the aquarium by pushing the mounting
bracket spring attachment located at the top with
your thumb and hang the unit over the edge of the
aquarium. It may be necessary to move the triangular
portion of the water fall assembly to one side so that
the mounting bracket can be pushed far enough to
clear the moulding on the top edge of the aquarium.
A2. Make sure the unit is completely level by adjusting
the plastic screws located on each side at the bottom of the AquaStep.
A3. Install the power head pump (not included with the unit) inside the
aquarium in the desired location following the instructions of the
pump manufacturer.
A4. Attach one end of the 1/2” ID x 11/16” OD flexible tubing to the outlet side of the power
head pump.
A5. Attach the other end of the flexible tubing to the 3/4” MPT x 1/2” barb elbow located on
the top inlet side of the AquaStep. In most cases the flexible tubing will need to be cut to
the proper length.
E. To Replace Main Body Housing Assembly
It is recommended the main body housing assembly
be replaced each year along with the UV bulb. Over
extended time UV rays can weaken the structural
integrity of the housing which may cause leaks or
damage to the step design.
E1. Unplug water pump and UV ballast. Shut off
valve(s) to isolate unit from aquarium. Remove
bulb and Quartz sleeve.
E2. Unscrew one plug from bottom side of unit and
drain out all the water from the unit.
E3. Remove 4 screws caps and unscrew the 4 s.s.
screws from the top housing. Remove top
from main housing body. Repeat steps for bottom
housing.
E4. Replace main body housing assembly. Clean and
replace D-shaped Sealing O-rings, top and bottom.
Clean and lubricate “O” rings with Lifegard
Silicone Lubricant (part #R172036X) prior to
re-assembling.
E5. Reinstall s.s. screws and screw caps. All screws
must be installed and evenly tightened to seal
properly. Do not over tighten.
E6. Replace Quartz sleeve making sure that the
gasket is properly positioned below the top lip
of the quartz sleeve before tightening the
compression fitting. Failure to install the gasket
properly will result in water leaking and damage
to the bulb and ballast. Replace UV bulb sliding
into quartz sleeve.