Light & Motion Vega LED light User manual

2007-2008 Bike Light Owner’s Manual

Congratulations. You’ve purchased the best bicycle
lighting system available—a Light & Motion Bicycle Lighting
System. We hope that our lights will inspire you to leave
your car at home, rediscover your old stomping grounds,
and ride your bike year-round.
To receive maximum benefit from your new Light & Motion
system, please take a moment to familiarize yourself with
your new light by reading the instructions.
cover photo: © iStockphoto.com

Caution
Bicycling in the dark is an inherently dangerous activity
and no lighting system will guard you against inattentive
motorists or other night time hazards.
When not in use, ALWAYS unplug the light head from
the battery. When unplugging the light head cable from
the battery, always pull the connector, not the cable.
Please ride with an approved helmet and use extreme
caution. You should always carry an auxiliary light with
you and wear reflective clothing. Make sure your bicycle
is equipped with the legally required reflectors. ONLY use
Light & Motion chargers to charge your Light & Motion
batteries. Failure to do so will void the warranty and
damage the system.
Bench Testing
When testing the charge or functionality of your light while
stationary (off of the bike), it is important to run a fan
over the light while it is powered on. Failure to do so will
overheat the light and cause damage to the system.

Warranty
Light & Motion offers a 60-day warranty on halogen bulbs,
1-year warranty on HID bulbs, 6-months on all batteries,
1-year on all chargers and lifetime on everything else.
Warranty will be effective as long as the product has not
been tampered with or damaged in use.
Returning Products for
Warranty Evaluation & Repair
Should your system malfunction for any reason, contact
the Light & Motion service department at (831) 645-1538
to schedule service and receive an RMA number to return
your light to us. Please make sure to unplug the battery
from the light before shipping. All warranty and repair
product should be returned, with proof of purchase from
an authorized dealer, to:
Light & Motion
RMA#_______
300 Cannery Row
Monterey, CA 93940
International customers, please contact your local bicycle
dealer for warranty return instructions.
4

5
Table of Contents
WarrantyandRepairInformation...................................4
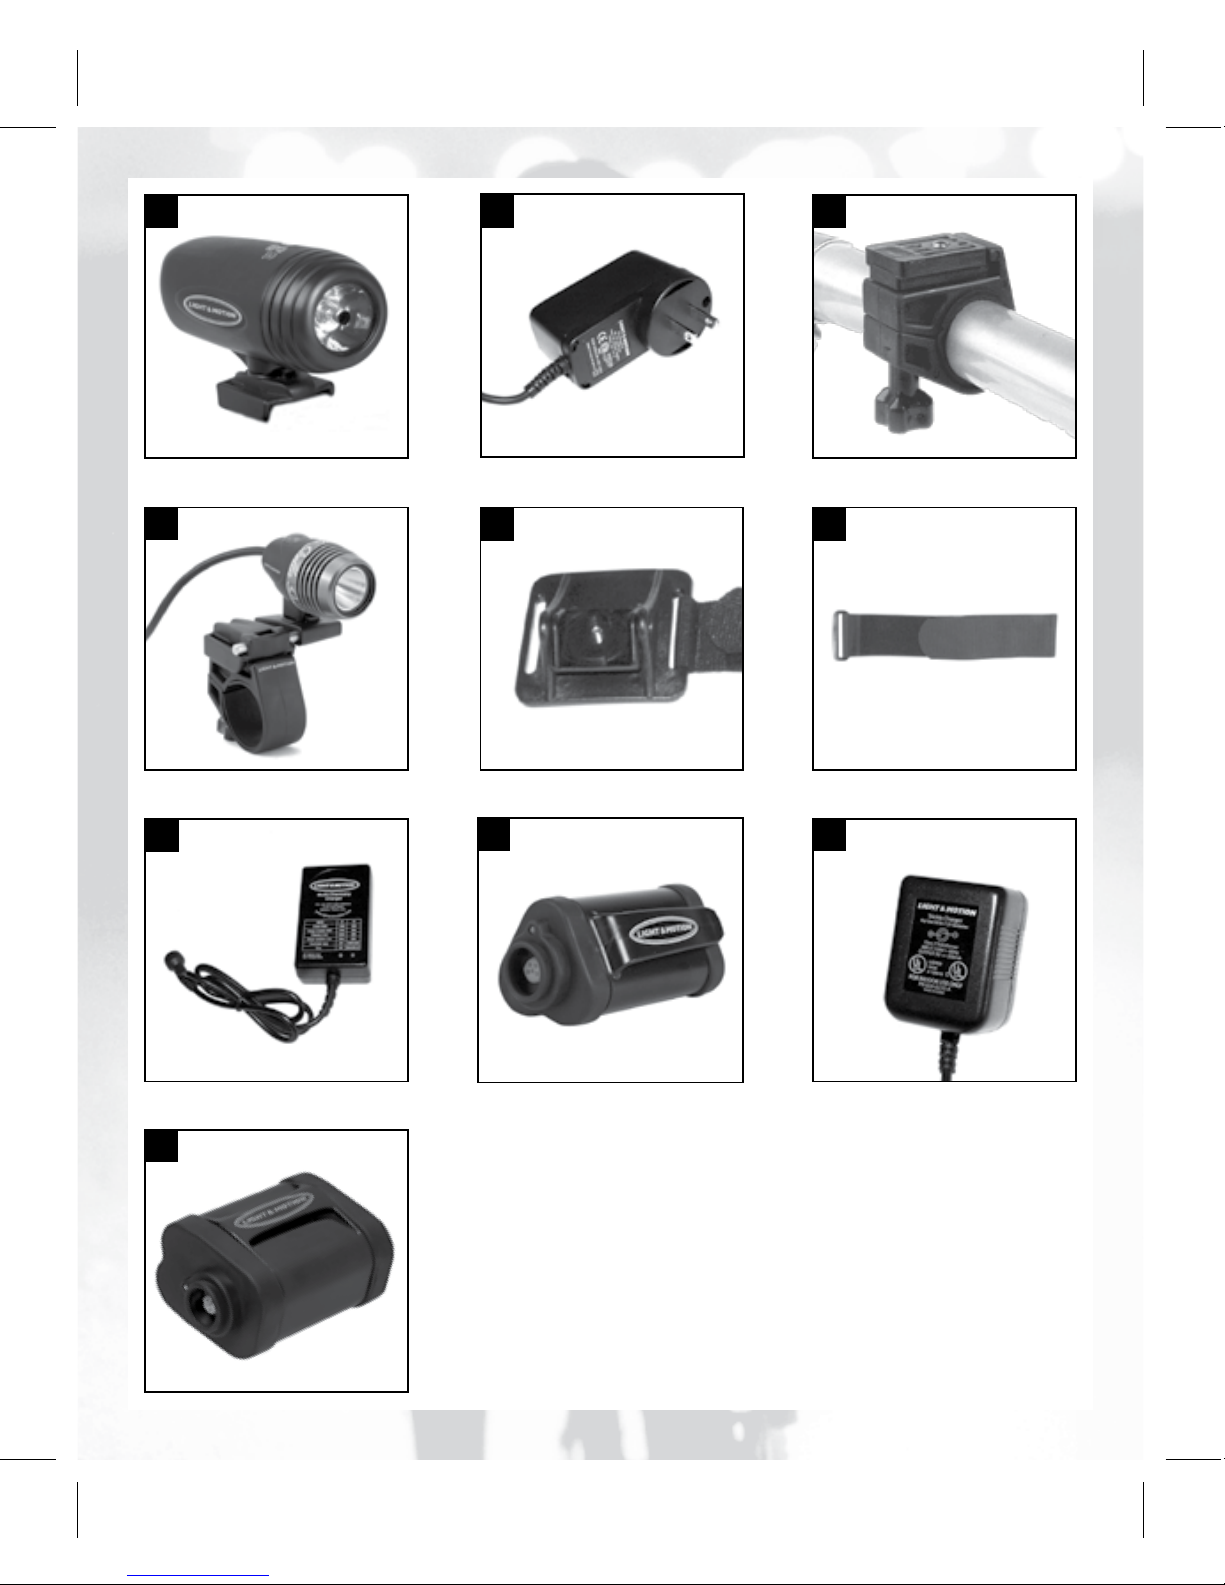
ARC Light System (All) Parts Identification . . . . . . . . . . . . . . . . . . . . . . . . . . . 6
Vega Light System Parts Identification . . . . . . . . . . . . . . . . . . . . . . . . . . . . . . . 8
Stella Light System (All) Parts Identification . . . . . . . . . . . . . . . . . . . . . . . . . . . 8
Solo System (All) Parts Identification . . . . . . . . . . . . . . . . . . . . . . . . . . . . . . . 10
Charging the 7.2v NiMH Battery Using the Trickle Charger . . . . . . . . . . . . 12
Charging Your NiMH Batteries Using the Multi-Chem Charger. . . . . . . . . . 13
Charging Your Li-ion Batteries Using the Multi-Chem Charger . . . . . . . . . . 14
Installation of Light and Battery . . . . . . . . . . . . . . . . . . . . . . . . . . . . . . . . . . . 16
Handlebar Mounted Light Break-Away Disk Replacement . . . . . . . . . . . . . . 17
Installing the Bomber Strap on 7.2v NiMH and Li-ion Batteries . . . . . . . . . . 18
Installing the Bomber Strap on 10.8v NiMH and 11.1v Ultra Batteries . . . . 18
Mounting the Battery to Your Bike . . . . . . . . . . . . . . . . . . . . . . . . . . . . . . . . 19
Attaching the Light Head to the Battery . . . . . . . . . . . . . . . . . . . . . . . . . . . . 20
Mounting the Light Head to the Cabeza Mount . . . . . . . . . . . . . . . . . . . . . . 21
Mounting the Cabeza Light Head . . . . . . . . . . . . . . . . . . . . . . . . . . . . . . . . . . 21
ARC Light System (All) Operation . . . . . . . . . . . . . . . . . . . . . . . . . . . . . . . . . 22
ARC Light System (All) Low-Battery Warning and Discharge Protection . . 23
ARCLightSystemRunTimes.....................................24
Solo Logic Light System Operation. . . . . . . . . . . . . . . . . . . . . . . . . . . . . . . . . 24
Solo Logic/Solo Logic Li-ion Cub Run Times . . . . . . . . . . . . . . . . . . . . . . . . . 25
SoloLightSystemOperation .....................................26
SoloLightRunTimes............................................26
StellaLightSystemOperation.....................................27
Stella Normal/Race Mode Operation . . . . . . . . . . . . . . . . . . . . . . . . . . . . . . . 27
Stella Low Batter/Auto-Shutoff Protection. . . . . . . . . . . . . . . . . . . . . . . . . . . 27
Stella Thermal Protection Circuitry . . . . . . . . . . . . . . . . . . . . . . . . . . . . . . . . 27
StellaRunTimes ...............................................29
VegaLightSystemOperation.....................................30
VegaRunTimes................................................30
Charging the Vega . . . . . . . . . . . . . . . . . . . . . . . . . . . . . . . . . . . . . . . . . . . . . . 30
LampReplacement..............................................32
RecyclingInstructions...........................................34
Light & Motion Parts & Accessories . . . . . . . . . . . . . . . . . . . . . . . . . . . . . . . . 35

6
Arc Li-ion HID Systems
Please take a moment to verify the contents of your Light & Motion
lighting system.
1. Arc Li-ion HID light with Base Slide mount
2. 11.1v Li-ion battery
or
3. 11.1v Ultra Li-ion battery
5. Light & Motion Multi-Chem Charger
6. Handlebar Mount with 25.4/31.8mm spacers
7. Cabeza helmet mount
8. Slimline battery mount (11.1v Li-ion Ultra battery ONLY)
9. Hook-and-Loop Bomber Strap
10. Spare Break-Away disks (2)
Arc NiMH HID
1. Arc HID light with Base Slide mount
4. 10.8v NiMH Slimline battery
5. Light & Motion Multi-Chem Charger
6. Handlebar Mount with 25.4/31.8mm spacers
7. Cabeza helmet mount
8. Slimline battery mount with Bomber Strap
10. Spare Break-Away disks (2)

7
1 2 3
4 5 6
8 97
10

8
Vega LED
1. Vega light head with Base Slide Mount
2. Vega wall-charger
3. Handlebar Mount with 25.4/31.8mm spacers
Stella 180-L LED
3. Handlebar Mount with 25.4/31.8mm spacers
4. Stella light head with Lefty Base Slide mount
5. Cabeza helmet mount
6. Hook-and-Loop Bomber Strap
7. Multi-chem Charger
8. 11.1v Lithium Ion Cub Battery
Stella 180-N LED
3. Handlebar Mount with 25.4/31.8mm spacers
4. Stella light head with Lefty Base Slide mount
5. Cabeza helmet mount
6. Hook-and-Loop Bomber Strap
9. 110v Trickle Charger
10. 7.2v NiMH Battery

1 2 3
456
78
10
9
9

10
Solo Logic Li-ion Cub Halogen
1. Solo Logic light head with “Lefty” Base Slide mount
2. Handlebar Mount with 25.4/31.8mm spacers
3. Cabeza helmet mount
4. Hook-and-Loop Bomber Strap
5. Light & Motion Multi-Chem Charger
6. 11.1v Lithium ion Cub Battery
9. Spare break-away disks (2)
Solo Logic NiMH Halogen
1. Solo Logic light head with “Lefty” Base Slide mount
2. Handlebar Mount with 25.4/31.8mm spacers
3. Cabeza helmet mount
4. Hook-and-Loop Bomber Strap
7. 110v/Overnight Trickle Charger
8. 7.2v NiMH battery
9. Spare break-away disks (2)
Solo Halogen
1. Solo light head with “Lefty” Base Slide Mount
2. Handlebar Mount with 25.4/31.8mm spacers
3. Cabeza helmet mount
4. Hook-and-Loop Bomber Strap
7. 110v/Overnight Trickle Charger
8. 7.2v NiMH battery
9. Spare break-away disks (2)

11
12 3
4 5 6
87 9

12
Charging
Charging your 7.2v NiMH battery with a Trickle Charger
Always fully charge your battery before its first use. Batteries are
shipped partially charged and must be fully charged to achieve the
proper run time. Only 7.2v NiMH batteries can be charged using the
Trickle Charger.
After plugging the charger into a wall socket, insert the keyed
charger plug into the socket on the top of the battery by aligning the
raised yellow arrow with the yellow dot on the battery.
Charge time for a fully discharged battery is approximately 8-10
hours. The battery will become warm to the touch when fully
charged. For partially discharged batteries the charge time is
approximately proportional to the run time ( i.e. 1 hour run time
would require about a 5 hour charge). To prolong battery life, do not
leave battery attached to charger for more than 14 hours.
Hint: A timer attached to the wall socket will help prevent
over charging the battery if left on the trickle charger.
Note: NiMH batteries require approximately 5-10 charge
and discharge cycles to reach full capacity. Until the battery
reaches full capacity your run times may be less than stated.
The 7.2v trickle charger operates only on the specified wall
voltage and should be used to charge the 7.2v NiMH battery
pack only.

13
Charging a NiMH battery using the Multi-Chem Charger
The Light & Motion Multi-Chem Charger is a universal input system
that will work on any wall voltage from 90-260 volts with NiMH or
Li-ion batteries. If charging outside North America you may require
an adapter to plug the charger into the wall outlet.
Always fully charge your battery before its first use. Batteries are
shipped partially charged and must be fully charged to achieve the
proper run time.
1. Begin by plugging the power cord into the charger and then
into the appropriate wall socket.
2. Attach the battery to the Multi-Chem Charger by aligning the
arrow on the socket from the charger with the yellow
dot (7.2v NiMH) or arrow on the (10.8V NiMH) battery.
3. Once the battery is attached to the charger, left and right side
orange LEDs will illuminate indicating the battery is receiving a
charge.
4. After the battery has received a full charge, a green LED
will illuminate on the right side of the charger, indicating that
the battery is fully charged.
Note: NiMH batteries require approximately 5-10 charge and
discharge cycles to reach full capacity. Until the battery reaches
full capacity your run times may be less than stated.

An alternating orange/green right LED indicates an error. If this
happens, please remove the battery and unplug the Multi-Chem
Charger from the wall and wait about 5 minutes. Then try to charge
the system again.
The Multi-Chem Charger will charge a fully depleted NiMH battery
in approximately 2 hours. Leaving the battery on for approximately 1
additional hour will “top off” the battery for highest capacity.
The Multi-Chem Charger is designed to fully maintain the battery’s
capacity throughout it’s life cycle. The battery can be left connected
to the charger indefinitely to keep the battery fully charged and ready
for use.
Charging a Li-ion battery using the Multi-Chem Charger
Always fully charge your battery before its first use. Batteries are
shipped partially charged and must be fully charged to achieve the
proper run time.
14
Hint: Always store your battery in a cool dry place and fully
recharge it before every ride. Never leave your battery in a
discharged state and always fully recharge it after 60-90 days
of storage.
Note: The Multi-Chem Charger is ONLY compatible with
Light & Motion batteries.

15
1. Begin by plugging the power cord into the charger and then
into the appropriate wall socket.
2. Attach the battery to the Multi-Chem Charger by aligning the
yellow arrow on the socket from the charger with the red dot
or arrow on the Li-ion batteries.
3. Once the battery is attached to the Multi-Chem Charger, an
orange LED will illuminate on the right side and a green LED
will illuminate on the left side of the charger indicating the
battery is receiving a charge.
4. After approximately 2 hours both LEDs will illuminate green.
This indicates the battery is charged.
An alternating orange/green LED indicates an error. If this happens
remove the battery and unplug the Multi-Chem Charger from the
wall and wait about 5 minutes. Then try to charge the system
again.
The Multi-Chem Charger will charge a fully depleted battery in
approximately 2 hours and will automatically shut off. The battery
may be left on the charger indefinitely, without harming the battery.
Note: The Multi-Chem Charger uses a DT/dt charging
algorithm and is most efficient if the ambient temperature is
between 65-80 degrees Fahrenheit. Extreme heat will cause
the temperature sensor to give a false “charge complete”
reading and will lead to decreased capacity in the battery.

16
Installation of Light and Battery
Installing light head assembly
Your Light & Motion Light head comes pre-assembled with the bar
style mount attached to the light head.
1. Determine the best location for your handle bar mount as it
relates to your specific brake/shifter bar layout. Ideally, the bar
mount should be attached to the right and as close to the stem
as possible.
2. After determining which bar spacer(s) to use (it may be
necessary to cut spacers), orient the bar mount with the
opening facing rear and the Light & Motion logo facing forward.
Securely tighten with the thumb screw.
3. The light head is then secured to the bar mount by using the
slide mount. Slide the base of the light head onto the bar
mount until it seats securely.
4. Once flush to front of mount, it will “lock” into place.
5. To remove, use your thumb to press the front edge of the
light base and push backwards.
a. Push base this direction to
attach light.
b. Push base this direction to
detach light.
a. b.

17
Break-Away Disk Replacement
The adjustability of the Light & Motion bar mount and light head
allow it to resist varying degrees of impact. If the light head receives
a hard enough impact, it is designed to break away from the mount,
thus protecting the main components.
To replace the break-away disk, remove the Phillips head screw from
the underside of the bar mount and replace the break-away disk
(two additional disks are included). Align the track on the disk with
the cut out on the light head and secure using the supplied Phillips
head screw.
Contact Light & Motion at 831-645-1538 or www.bikelights.com for
additional replacement parts.
a. Light & Motion Light Head
b. Handlebar Base Slide Mount
c. Break-Away Disk
d. Phillips-head screw
a.
b.
c.
d.

18
Installing the Bomber Strap
7.2v NiMH, 11.1v Li-ion Cub, 11.1v Arc Li-ion Batteries
Before mounting the battery to the frame you will need to first
attach the supplied hook and loop strap to the battery.
1. Feed the strap through the slot on the side of the battery with
the hook side facing outward.
2. Pull the strap until the sewn end with the buckle is above and
about even with slot on the battery.
3. Now feed the loose end through the second slot.
10.8v NiMH and 11.1v Li-ion Ultra batteries
Before mounting the 10.8v NiMH, or 11.1v Li-ion Ultra battery to
the frame you will need to first attach the supplied hook and loop
strap to the battery mount. Feed the strap through the slot on the
side of the battery mount with the hook side facing outward. Pull
the strap until the sewn end of the buckle is about even with slot on
the mount. Wrap the strap around the bottom of the battery and
through the second slot. The battery assembly is now ready to be
mounted to your frame, or seat post (ref. images on next page).

19
Mounting the Battery to Your Bike
1. Press the side of the battery with the groove against the frame
tube, or seat post.
2. Hold the battery between your thumb and fingers with the
buckle oriented flush against the side of the battery near the
top. Wrap the strap around the frame tube.
3. Once the strap is around the frame tube, pull the strap tight
and affix to the back side. (Note: It is very important to
squeeze the buckle against the battery with your thumb to
keep it from sliding.

20
4. If you are mounting the battery on a tube with cables, always
run the strap on the inside against the frame). When in the
correct position, the strap should reach all the way around the
bottom of the battery.
Attaching the Light Head to the Battery
Plug the light head cable into the socket on top of the battery by
aligning the yellow arrow on the cable with the arrow, or colored
(red, or yellow) dot on the top of the battery. You may choose to
loosely coil the excess cable around the frame. Make sure the cable
has enough slack to move freely when your handlebar is turned in
the furthest position (run the cable first over the handlebar, then
back to the battery, see illustration), this will keep the cable from
being pulled out of the light head in a crash.
This manual suits for next models
2
Table of contents
Other Light & Motion Bicycle Accessories manuals