Lightmen Apollo User manual


2
LIGHTMEN™
TABLE OF CONTENTS
1 Introduction.......................................................................................................................
1. 1 Maintenance.........................................................................................................................
1.2 Operating elements and connections....................................................................................
1.3 Menu button overview..........................................................................................................
1.4 Operating elements and connections (charging case)..........................................................
1.5 Dimensions...........................................................................................................................
1.6 Photometrics.........................................................................................................................
2 Functions and settings..........................................................................................................
2.1 Menu structure...........................................................................................................................
2. 2 Operating elements and connections (charging case) ..........................................................
2. 3 Wireless DMX operation..........................................................................................................
2. 4 Example of possible DMX configurations and address settings................................................
2. 5 Wireless DMX status display code descriptions........................................................................
2. 6 DMX control..........................................................................................................................
2. 7 DMX control: 10-channel mode..................................................................................................
2. 8 Wireless DMX operation........................................................................................................
2. 9 Infrared IR6 remote control........................................................................................................
3
4
5
5
6
7
7
8
8
9
10
10
10
11
12
13
13
LIGHTMEN™

LIGHTMEN™
-1- INTRODUCTION
APOLLO is a compact, high-power, outdoor-rated, cable-free, battery-powered LED uplight with onboard wireless DMX,
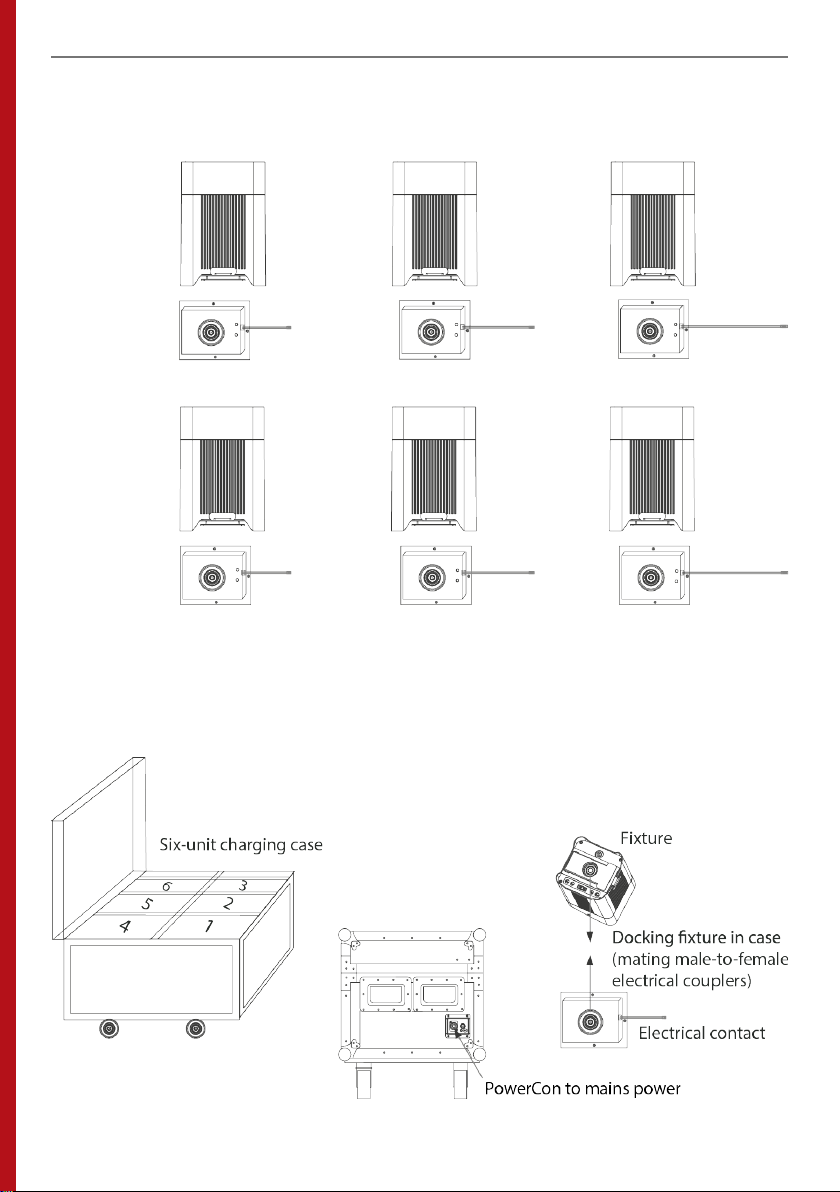
infrared remote, and manual control via OLED function menu + Six-unit road-worthy custom charging case.
FEATURES
» 4 x 10 W RGBW LED
» 8 hours continuous battery-powered operation at full output, 20 hours with single color
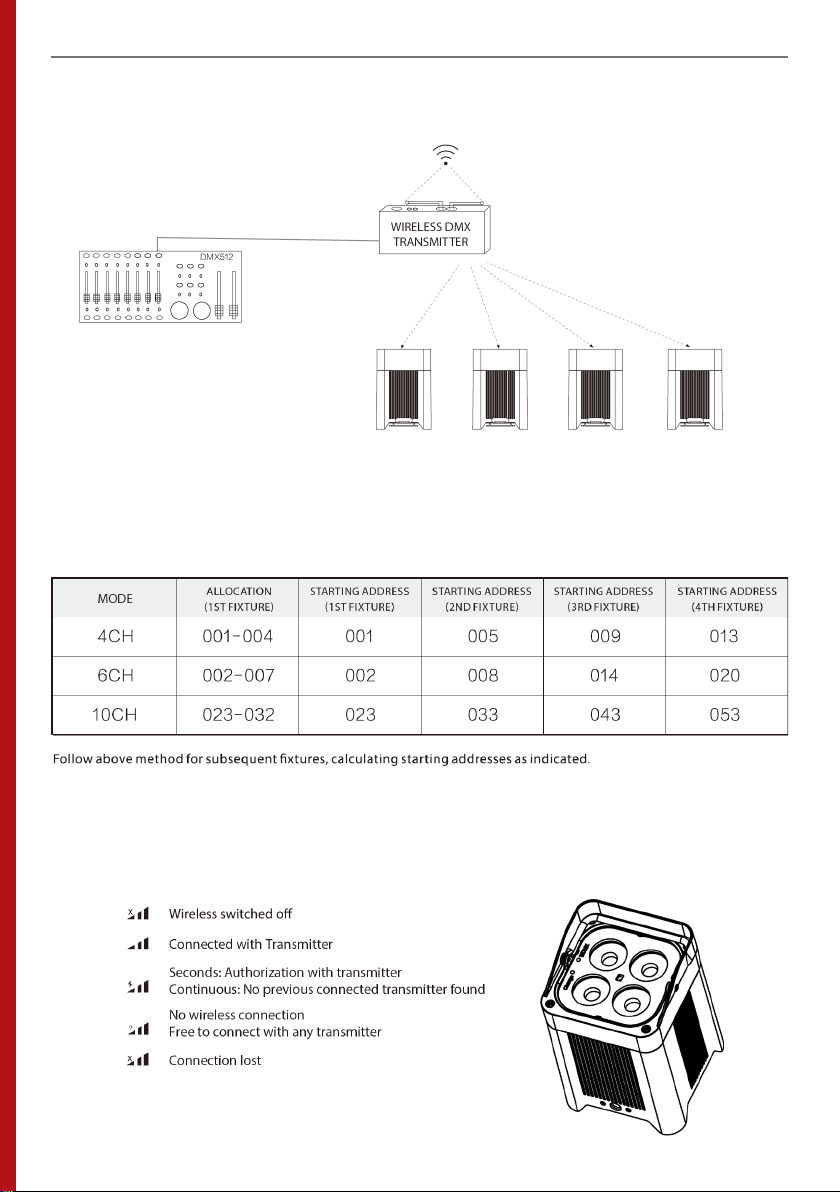
» Onboard wireless DMX
» 3-channel Hue-Saturation-Value and Hue-Saturation-Intensity modes
» Ultra-linear dimming technology for flawless color mixing
» Patented structural design delivers superior passive cooling
» High frequency 1200 Hz LED modulation for flicker-free output
» Adjustable white balance
» IP65: Designed for both indoor and outdoor use
» Patented structural design delivers superior passive cooling
» Charging station in rugged touring case holds 6 units
» Password protected key lock
» Black finish
» Threaded receiver for clamp mounting
» DMX, Manual, Standalone (Auto Shows), Master/Slave, IR control
SPECIFICATIONS
Light Source:
Beam Angle:
Field Angle:
Output:
Color Mixing:
Strobe:
Dimming:
Control:
DMX Channels:
Display:
Mains:
Consumption:
Power connections:
Battery:
Housing:
Finish:
IP rating:
Cooling:
Max. Amblent:
Min. Amblent:
Max. Housing:
Dimensions:
Weight:
Charging case dims:
Charging case weight:
Charging case power:
Power connections:
4 x 10W RGBW LED
11°
21°
743 LUX @ 5 meters
RGBW
0-30 Hz
4 dimming curve modes
W-DMX, Manual, Standalone, Master/Slave, Infrared remote
4 / 6 / 10 / HSV / HSI
OLED function menu with 4 touch buttons
100 - 240 VAC, 50/60 Hz
44W
Proprietary
Lithium Ion
Diecast Aluminum
Black
IP65
Passive
40°C
-20°C
58°C
145 x 138 x 202 mm
3.68 KG
470 x 555 x 547 mm
22.3 kg (empty) ; 44.38 kg (loaded)
Consumption : 350W / Charging output: DC 24V 14.58A
Neutrik PowerCon

4
LIGHTMEN™
1.1 MAINTENANCE
Maintenance and cleaning the unit
»Make sure the area below the installation place is free from unwanted persons during setup.
»Swich of the unit, unplug the main cable and wait until the unit has cooled down.
»All screws used for installing the device and any of its parts should be tightly fastened and should not be
corroded.
»Housings, fixations and installation spots (ceiling, trusses, suspensions) should be totaly free from any
deformation.
»The main cables must be in impeccable condition and should be replaced immediately even when a small
problem is detected.
»It is recommended to clean the front at regular intervals, from impurities caused by dust, smoke, or other
particles to ensure that the light is radiated at maximum brightness. For cleaning, disconnect the main plug
from the socket. Use a soft, clean cloth moistened with a mild detergent.Then carefully wipe the part dry. For
cleaning other housing parts use only a soft, clean cloth. Never use a liquid, it might penetrate the unit and
cause damage to it.
Troubleshooting
Contact an authorized service center in case of technical problems or not reported in the table can not be resolved by
the procedure given in the table.

5
LIGHTMEN™
1.2 OPERATING ELEMENTS AND CONNECTIONS
1.3 MENU BUTTON OVERVIEW

6
LIGHTMEN™
1.4 OPERATING ELEMENTS AND CONNECTIONS (CHARGING CASE)
apollo
Fixture
Charging case
contact
Flight case with PowerCon power in and six charging stations:

7
LIGHTMEN™
1.6 DIMENSIONS
202
138
138
178
145
Beam Angle 11°
Luminance (lux) (RGBW)
Projection Distance (m)
full
0
1m
18580
3m
2064
5m
743
7m
379
10m
186
1.7 PHOTOMETRICS
Lumens
1162
1 3 5 7
R
W
G
B
distance
(m)
color 10
RGBW (lux)
4422 491 177 90 44
9823 1091 393 200 98
1541 171 62 31 15
12188 1354 488 249 122
18580 2064 743 379 186
Lumens
335
572
113
705
1162

8
LIGHTMEN™
2.1 MENU STRUCTURE
-2- FUNCTIONS AND SETTINGS

9
LIGHTMEN™
2.2 OPERATING ELEMENTS AND CONNECTIONS (CHARGING CASE)
1. Auto Show
Five auto programs to choose from. Auto program #5 includes playback of programs 1-4.
Speed can be adjusted 0-100 (slow to fast).
2. Static
Select color presets under <static> menu option or use <manual color> option to mix custom colors.
3. Dimmer Mode
Four selectable dimmer curves: <OFF>, <Dimmer1> (fast), <Dimmer2> (medium), <Dimmer3>
(slow) .
4. Back light
Set delay time for menu display to go dark at either 10, 20 or 30 seconds or choose always ON.
5. Information
Fixture software version and runtime clock.
6. DMX Address
Set DMX starting address at a value between 001-512.
7. DMX Channel
Select DMX mode: 3-channel HSV or HSI, or 4-, 6- or 10-channel operation.
8. Master/Slave
Assign fixture to operate as either Master or Slave unit in configurations with multiple apollo fixtures.
9. White Balance
Adjust RGB levels to achieve desired white light.
10. Wireless setting
Turn wireless DMX receiver on/off or reset.
11. IR SETUP
Turn IR sensor on/off to enable/disable infrared remote control.
12. KEY LOCK
Password protection option.
13. FACTORY RESET
Restore factory settings.

10
LIGHTMEN™
2.3 WIRELESS DMX OPERATION
2.4 EXAMPLE OF POSSIBLE DMX CONFIGURATIONS AND ADDRESS SETTINGS:
2.5 WIRELESS DMX STATUS DISPLAY CODE DESCRIPTIONS

2.4 EXAMPLE OF POSSIBLE DMX CONFIGURATIONS AND ADDRESS SETTINGS:
11
LIGHTMEN™
2.6 DMX CONTROL
4-Channel mode
6-Channel mode
3-Channel hsv mode
3-Channel hsi mode

12
LIGHTMEN™
2.7 DMX CONTROL : 10-CHANNEL MODE

13
LIGHTMEN™
2.8 WIRELESS DMX OPERATION
apollo can operate in W-DMX mode up to 300m from the W-DMX transmitter.The W-DMX receiver in the apollo must
be paired with a W-DMX transmitter for wireless operation.
INITIAL SETUP
1. Turn on the W-DMX transmitter
2. Connect the W-DMX transmitter to a DMX controller
3. Position the Apollo fixture MAX 300m of the W-DMX transmitter in line of sight
4. Turn on the apollo fixture
CONFIGURATION
1. On the apollo control panel, go to DMX ADDRESS
2. Select the starting address
3. On the apollo control panel, go to WIRELESS SETTING
4. Set <Receive> to ON (the apollo signal indicator will display a ? above the bars)
5. Press the Reset button on the W-DMX transmitter
(the apollo signal indicator will change to a symbol above the bars while connection is establish)
PAIRING
Once successfully paired, the apollo signal indicator will indicate the strength of the signal. At this point, the apollo is
ready to be operated wirelessly by DMX. If the apollo fixture is subsequently used with a different W-DMX transmitter,
follow steps below.
1. On the apollo control panel, go to WIRELESS SETTING
2. Select <Reset> (the apollo signal indicator will display a ? above the bars)
3. Press the Reset button on the W-DMX transmitter
4. The apollo signal indicator will display the strength of the signal
once pairing has been successful
2.9 INFRARED IR6 REMOTE CONTROL
The IR6 infrared controller enables remote control of the apollo. To pair the IR6 to the apollo, follow these steps:
1. Press MENU button until IR Setup is displayed
2. Press ENTER
3. Press UP or DOWN to turn infrared operation ON or OFF
4. Press ENTER

14
LIGHTMEN™
IR6 BUTTON FUNCTIONS
Buttons not listed below are not used with apollo
AUTO
FADE
SPEED
+/-
MANUAL
0-9
RGBW
+/-
%
+/-
STROBE
+/-
STROBE
BLACKOUT
BLACKOUT
STROBE
Run auto programs
: Fade auto programs
: Enable speed adjustment of auto programs
: Increase / decrease speed of auto programs
: Enable manual selection of colors
: Press numbers between 0 - 9 to choose colors
: Corresponding to white (full output) / red / orange /
yellow / green / purple / blue / magenta / pink / amber
: Press MANUAL, then Press R, G, B, or W buttons
: Increase / decrease output of each color using +/- buttons
: Adjusts total output level
: Increase / decrease output level
: Enable adjustment of strobe rate
: Increase / decrease strobe rate
: Press again to turn off strobe
: Turn off all output
: Press again to exit blackout mode
: If IR6 remote is not responding, press BLACKOUT to confirm
that blackout mode was not mistakenly activated

15
LIGHTMEN™
NOTES:

Address: Stureparksvägen 7 Phone: 0522 440 880
Sweden Web: www.interlite.se
Contact Information
Table of contents
Other Lightmen Lighting Equipment manuals