manuals.online logo
Brands
  1. Home
  2. •
  3. Brands
  4. •
  5. Lightolier
  6. •
  7. Indoor Furnishing
  8. •
  9. Lightolier Swivel Stem Mounting Kits User manual

Lightolier Swivel Stem Mounting Kits User manual

FALL RIVER, MASSACHUSETTS 02720
MONTREAL, QUEBEC, CANADA © 1997
INSTRUCTION SHEET NO.
Caution:
•Turn off power at fuse box before installing track.
•Instructions for grounding must be followed. Failure to do
so may result in a hazardous condition.
•Use only #12 ga. solid copper wire in connectors to maintain
proper track rating.
• Do not supply Advent Track from two separate 120V branch
circuits as this could overload the neutral track conductor
leading to an electrical safety hazard.
•Observe polarity, white (neutral) wire must be connected to
terminal marked "NEUT". Failure to observe Polarity may
result in an electrical hazard.
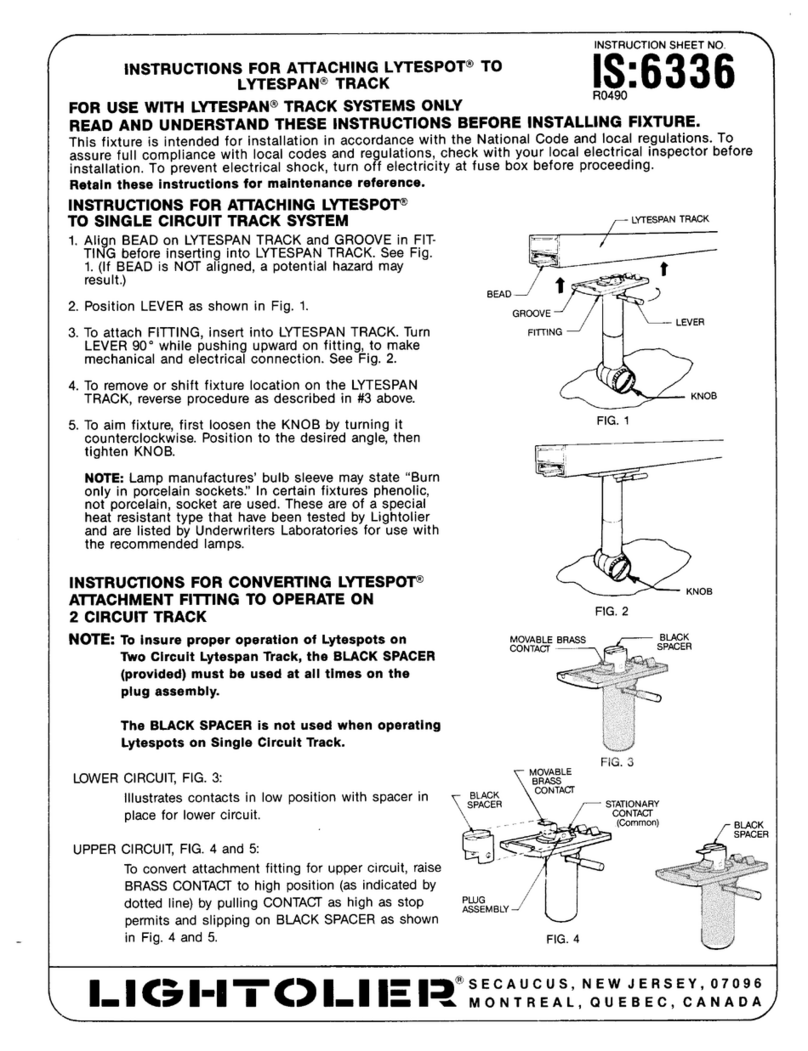
Swivel Stem mounting kits (0-90 deg., 48" long), for use in sloped
ceilings, may be attached to the track at any point and may be spaced
up to 4' apart. They are also used to feed power to the track: use the
stem closest to the track feed-in point. The unthreaded end of the
stem may be field cut using a hacksaw or similar cutting devise. The
Stem Extension Kit (48") is used to lengthen a stem (this stem cannot
be field cut).
A. FASTEN NON-POWER FEED STEMS TO CEILING
1. Mark centerline for track through center of outlet box.
2. Thread Mounting Screws into Stem Mounting Plates (Fig. C).
Remove green screw and washer from Non-Power Feed Stems.
Fasten Stem Mounting Plates to ceiling, either to building structure
or with permanent fasteners capable of supporting at least 50 lbs.
each. Space Stems no more than 4' apart. (See Fig. A.)
3. Attach all Stems which do not carry Supply Leads as follows:
Slide Upper Swivel Housing over Swivel Casting Assembly and
attach to Neck Wireway. (See Fig. C).
Drive Longer Set Screw into Upper Swivel Housing and through
hole in front of casting until you engage the hole in Neck Wireway.
Place Canopy over Swivel Casting Assembly and Mounting Screws.
(See Fig. C).
Secure with Cap Screws until Canopy rests tightly against ceiling.
Slide Stem into Swivel Casting Assembly and drive Set Screw
through hole in the side of casting. Slide Lower Casting Assembly.
Drive Set Screw into Lower Swivel Housing and through the hole in
the front of casting until Stem is held tight. Assembly Track Clamps
using Flat Head Screws. Screw Track Clamps onto bottom of Stem.
(See Figs B and E.)
B. Fasten Power Feed Stem to Outlet Box
1. Outlet Box must be capable of supporting a maximum weight of 50
pounds. Power Feed Stem must be adjacent to track feed-in point.
Note: Wires cannot pass beneath two stems.
2. Thread Mounting Screws into Stem Mounting Plate (Fig. Cc).
3. Pass Supply Leads (#12 AWG solid TW wires supplied by others)
through Swivel Casting Assembly. Leave at least 6" of Supply Lead
B1197 Page 1 of 2
IS:7480
READ AND UNDERSTAND ALL TRACK, CONNECTOR, FEED-IN-KITS, AND ACCESSORY
INSTRUCTION SHEETS BEFORE INSTALLING ANY TRACK ITEM.
This fixture is intended for installation in accordance with the National Electrical Code and local or Federal
code specifications. To assure full compliance with codes and regulations, check with your local electrical
inspector before installation. To prevent electric shock, turn off electricity at fuse box before proceeding.
Retain these instructions for maintenance reference.
Installation Instructions for Swivel Stem Mounting Kits
for use with Lytespan and ProSpec™Track Systems Only.
4' Max.
Fig. A
LowerSwivelHousing
Fig. C
SupplyLeads
(#12 Solid TW wire
suppliedbyothers)
Stem
SwivelCastingAssembly
UpperSwivel Housing
Canopy
Fig. B
StemMounting
Plate
Centerline
3" or 4" octagonal
outlet box (by others)
FlatHead Screws
Side of Casting
Set Screw
TrackClamps
6"
Ground Spring
Outlet Box
Wirenuts
Ground Wire
Stem Mounting
Plate
Mounting
Screws
Longer Set
Screw
Outlet Box
Screws
Front of
Casting
Supply Leads
(#12 solid
TW Wires
by others)
Lower
Swivel
Housing
Stem
Neck Wireway
Upper Swivel
Housing
Swivel Casting
Assembly
Canopy
Cap Screws
© 1997
INSTRUCTION SHEET NO.
Fig. E
IS:7480
B1197 Page 2 of 2
Installation Instructions for Stem Mounting Kit
for use with Lytespan and ProSpec™Track Systems Only.
Fig.D-1
Basic Track
Individual
Track Unit
Screw
Sidewall
BottomCover
LiveEnd
Advent Track
WirewayCover TrackRib
Center Barrier
Broken Off
Live End
Supply
Leads
Bottom Cover
Screw
Wireway Cover
Track Clamp Track Unit Bead
Track Rib
Stem
Screw
Center Barrier
Stem
Coupling
SupplyLeads
Fig. D-3Fig. D-2
WirewayCover
TrackRib
Bead
Bead
WirewayCover
TrackRib
ProSpec Track
for splicing, and enough wire to run horizontally along upper
section of track to power feed-in point, plus additional wire for
attaching to power feed connections. Slide Upper Swivel Housing
over Supply Leads and Swivel Casting Assembly. Feed Supply
Leads through Neck Wireway. Attach Upper Swivel Housing and
Swivel Casting Assembly to Neck Wireway, by driving Longer Set
Screw into Upper Swivel Housing and through the hole in the front
of the casting until you engage the hole in the Neck Wireway.
(Fig. C).
4. Splice Supply Leads to branch circuit wiring in outlet box. White to
white, black to black (red to red in Advent). Attach 12 AWG Branch
Circuit ground wire between washer and green screw on Mounting
Plate.(Fig. C.)
5. Fasten Stem Mounting Plate to Outlet Box with Outlet Box Screws.
Place Canopy over assembly and Mounting Screws. Secure with
Cap Screws until Canopy rest tight against ceiling.
6. Pass supply leads through unthreaded end of stem. Slide stem into
Swivel casting Assembly and drive Set Screw through hole on the
side of casting until tight. Slide Lower Swivel Housing over Stem
and onto Swivel Casting Assembly. Drive Set Screw into Lower
Swivel Housing and through hole in the front of casting until Stem
is held tight.
7. Drive Flat Head Screws into Track Clamps. Screw Track Clamps
onto bottom of Stem. (See Figs. C and E.)
C. Mounting Track Units onto Stems
1. Loosen Screws on Track Clamps. For feed stem, the Track Clamp
must be positioned as shown in Fig.D-1. Place Track Ribs (Fig. D-3)
between Track lamps and slide track into position. Make sure Bead
(Fig. D-3) of Track Units are in-line with one another when using
more than one Track Unit..
2. Run Supply Leads along top of track toward Live End. Loosed screw
in Live End and remove from track.
3. Cut Wireway Cover to distance from Track Clamp to end of Track
Unit. Slide Wireway Cover into track over Supply Leads. (Fig. D-1,
D3).
4. Remove Bottom Cover from Live End.
5. Break off Barrier in Live End by bending it back and forth. (Fig. D-2)
6. Pass Supply Leads through Barrier opening in Live End. Insert Live
End into Track Unit and tighten Screw. For ProSpec feed track
place wire cover into track before attaching the stems to the track
unit.
7. Connect Supply Leads to screw terminals as shown in Instruction
Sheet IS:6020, IS:6121, for Advent, or IS:26000, IS:26046, IS:26050
for ProSpec. Ground terminal in Live End is not used when feeding
power from a Stem.
8. Fasten Bottom Cover to Live End. Tighten Screws on all Track
Clamps.
D. Instructions for Stem Extension Kits

1. Screw Coupling to threaded end of Stem supplied with Stem
Mounting Kit (Fig. E).
2. Screw Stem supplied with Stem Extension Kit to Coupling (Fig. E).
3. Complete installation of Stem Mounted Lytespan Track following
steps in B.
FeedTrack
Barrier
Barrier

Other Lightolier Indoor Furnishing manuals

Lightolier Calculite ProSpec Linear Downlight PS4M1650 User manual

Lightolier

Lightolier Calculite ProSpec Linear Downlight PS4M1650 User manual

Lightolier Helios 5412 Guide

Lightolier

Lightolier Helios 5412 Guide

Lightolier Calculite Compact Fluorescent Downlights User manual

Lightolier

Lightolier Calculite Compact Fluorescent Downlights User manual

Lightolier Calculite C2X21LEDWW User manual

Lightolier

Lightolier Calculite C2X21LEDWW User manual

Lightolier Lytecaster 1108 User manual

Lightolier

Lightolier Lytecaster 1108 User manual

Lightolier LYTECASTER REFLECTOR TRIM Instructions for use

Lightolier

Lightolier LYTECASTER REFLECTOR TRIM Instructions for use

Lightolier UCA User manual

Lightolier

Lightolier UCA User manual

Lightolier PTS7-2 User manual

Lightolier

Lightolier PTS7-2 User manual

Lightolier Aleron Series 1-1 User manual

Lightolier

Lightolier Aleron Series 1-1 User manual

Lightolier POINT POWER JACK Instructions for use

Lightolier

Lightolier POINT POWER JACK Instructions for use

Lightolier Calculite C4CFL18 User manual

Lightolier

Lightolier Calculite C4CFL18 User manual

Lightolier A.D.A. TRIO FIXTURES Guide

Lightolier

Lightolier A.D.A. TRIO FIXTURES Guide

Lightolier Lytecaster 1101FIC_3d User manual

Lightolier

Lightolier Lytecaster 1101FIC_3d User manual

Lightolier Lytecaster 2090LV User manual

Lightolier

Lightolier Lytecaster 2090LV User manual

Lightolier Brisa FB5114UDA User manual

Lightolier

Lightolier Brisa FB5114UDA User manual

Lightolier Lighting Systems LSBW-7 User manual

Lightolier

Lightolier Lighting Systems LSBW-7 User manual

Lightolier Lytespan 6351 User manual

Lightolier

Lightolier Lytespan 6351 User manual

Lightolier Lytespan 8704E User manual

Lightolier

Lightolier Lytespan 8704E User manual

Lightolier 6.5 PENDALYTE Instructions for use

Lightolier

Lightolier 6.5 PENDALYTE Instructions for use

Lightolier Calculite C4AD User manual

Lightolier

Lightolier Calculite C4AD User manual

Lightolier 6700S2UEM User manual

Lightolier

Lightolier 6700S2UEM User manual

Lightolier Calculite ProSpec PB1M1675 User manual

Lightolier

Lightolier Calculite ProSpec PB1M1675 User manual

Lightolier Lensed 1050SQIN User manual

Lightolier

Lightolier Lensed 1050SQIN User manual

Lightolier Calculite 6132BU User manual

Lightolier

Lightolier Calculite 6132BU User manual

Popular Indoor Furnishing manuals by other brands

Manhattan Comfort Mulberry 109GMC manual

Manhattan Comfort

Manhattan Comfort Mulberry 109GMC manual

Acme Furniture Devayne 50687 Assembly instruction

Acme Furniture

Acme Furniture Devayne 50687 Assembly instruction

Otto KOSMO 86100844 manual

Otto

Otto KOSMO 86100844 manual

GRAMMER OFFICE SAIL 7A operating instructions

GRAMMER OFFICE

GRAMMER OFFICE SAIL 7A operating instructions

Seconique Furniture Corona Assembly instructions

Seconique Furniture

Seconique Furniture Corona Assembly instructions

Target Southport FTS70837A Assembly instructions

Target

Target Southport FTS70837A Assembly instructions

Kvik OU845 manual

Kvik

Kvik OU845 manual

Trasman 6810A Bo3 Assembly manual

Trasman

Trasman 6810A Bo3 Assembly manual

HOMCOM 920-011V82 manual

HOMCOM

HOMCOM 920-011V82 manual

STRUCTUBE NELSON Assembly instructions

STRUCTUBE

STRUCTUBE NELSON Assembly instructions

Lloyd Pascal 3 Tier Shaker Caddy manual

Lloyd Pascal

Lloyd Pascal 3 Tier Shaker Caddy manual

Stryker 4821 Operation & maintenance manual

Stryker

Stryker 4821 Operation & maintenance manual

Atlantic DVD Tower 93 Assembly instructions

Atlantic

Atlantic DVD Tower 93 Assembly instructions

STAND STEADY SS-SLOTM16BL quick guide

STAND STEADY

STAND STEADY SS-SLOTM16BL quick guide

Ferno 082-1998 manual

Ferno

Ferno 082-1998 manual

Fashion Sewing Cabinets Of America 97 Assembly instructions

Fashion Sewing Cabinets Of America

Fashion Sewing Cabinets Of America 97 Assembly instructions

porada ALAN TONDO 3 GAMBE Assembly instruction

porada

porada ALAN TONDO 3 GAMBE Assembly instruction

CB2 HYDE Assembly instructions

CB2

CB2 HYDE Assembly instructions

manuals.online logo
manuals.online logoBrands
  • About & Mission
  • Contact us
  • Privacy Policy
  • Terms and Conditions

Copyright 2025 Manuals.Online. All Rights Reserved.