LightSKIN S311B
Schlussleuchte für Fahrräder.
(in Sattelstütze integriert)
LightSKIN S311B
tail light for bicycles.
(integrated into the seat post)
Vielen Dank, dass Sie sich für ein Produkt von
LightSKIN entschieden haben. Die in die Sattel-
stütze integrierte Schlussleuchte für Fahrräder
sorgt mit den blendfreien LEDs für Sichtbarkeit
und Sicherheit im Straßenverkehr. Das Rücklicht
ist nach der StVZO zugelassen und darf somit
in Deutschland im öffentlichen Straßenverkehr
benutzt werden. Mit der in der Sattelklemme
integrierten Micro-USB-Ladebuchse kann der in-
tegrierte Lithium-Polymer-Akku geladen werden.
Eine Ladeanzeige signalisiert den Ladezustand.
Leuchtet die Ladebuchse blau, muss der Akku
aufgeladen werden. Der Akku hat dann noch
genug Kapazität für 1 Stunde Leuchtkraft. Die
unteren beiden LEDs dürfen im Rahmen versenkt
werden. Die maximale Leuchtdauer beträgt 15 h
bei 3-LED-Betrieb) und 10 h bei 5-LED-Betrieb.
Die zweite LED von oben dient als Schalter for An
und Aus und den Wechsel zwischen 3- und 5-LED-
Betrieb.
Thank you for choosing a LightSKIN product. This
bicycle seatpost with integrated taillight ensures
the visibility and safety on the road with its gla-
re-free LEDs. The taillight is approved according
to German Road Trafc Licensing Regulations
(StVZO) and may therefore be used on public
roads in Germany. Its built-in lithium-polymer-bat-
tery can be charged with the micro USB charging
socket integrated in the saddle clamp. There is a
charge indicator indicating charge status. If the
charging socket lights up blue, the battery must
be charged. The battery still has enough capacity
for 1 hour of luminosity. The lower two LEDs may
be sunk in the frame. The maximum lighting dura-
tion is 15 hours for 3 LED operation and 10 hours
for 5 LED operation. The second LED from the top
serves as a switch for on and off and the change
between three and ve LED operation.
Sicherheitsinstruktionen:
• Bei Inbetriebnahme muss das Produkt trocken
sein. Etwaige Nässe vor Fahrtbeginn entfernen.
• Testen Sie nach der Montage, dass die Schluss-
leuchte bei Belastung nicht absinkt.
• Beachten Sie, dass die LEDs bei der Fahrt
nicht von einer Tasche oder Kleidung verdeckt
werden.
• Nehmen Sie keine eigenständigen Verände-
rungen an dem Produkt vor. Versuchen Sie
nicht, das Produkt zu öffnen.
• Das Produkt enthält einen Li-Po Akku.
Montage:
• Bitte achten Sie bei der Sattelmontage darauf,
die kleine transparente Silikonkappe für den
Micro-USB-Anschluss mit unter die Strebe zu
klemmen.
Inbetriebnahme:
• Kontrollmodi: Die zweite Leuchte von oben
dient als An- und Aus-Schalter sowie, um
zwischen dem 3- und 5- LED-Modus zu
wechseln. Die maximale Leuchtdauer liegt bei
15 h (3 LEDs), minimale Leuchtdauer liegt bei
10 h (5 LEDs). Aus → 5 LEDs → 3 LEDs
• Niedriger-Ladezustand-Alarm: Sobald der Akku
einen geringen Ladezustand erreicht, (ca. 1 h
verbleibend) leuchtet der USB-Anschluss blau
auf. Der Akku muss dann aufgeladen werden.
Safety instructions:
• At startup, the product must be dry. Remove
any moisture before riding.
• After installation, test that the seatpost does
not drop under load.
• Take care that the LEDs are not covered by a
bag or clothing when riding.
• Do not make any independent changes to the
product. Do not try to open the product.
• The product contains one Li-Po battery.
Assembly:
• When tting the saddle, please make sure that
the small transparent rubber cap for the micro
USB connection is clamped under the strut.
Operation:
• Control Modes: The second top light is used as
an on/off switch and to switch between the 3
and 5 light modes. The maximum illumination
time is 15 hours (3 LEDs), minimum illumi-
nation time is 10 hours (5 LEDs). Off → 5 LEDs
→ 3 LEDs.
• Battery life: 5 LEDs > 10 hours; 3 LEDs > 15
hours.
• Low battery alert: When the battery reaches
a low charge state (approximately 1 hour
remaining), the USB port lights up blue. The
battery must then be charged.
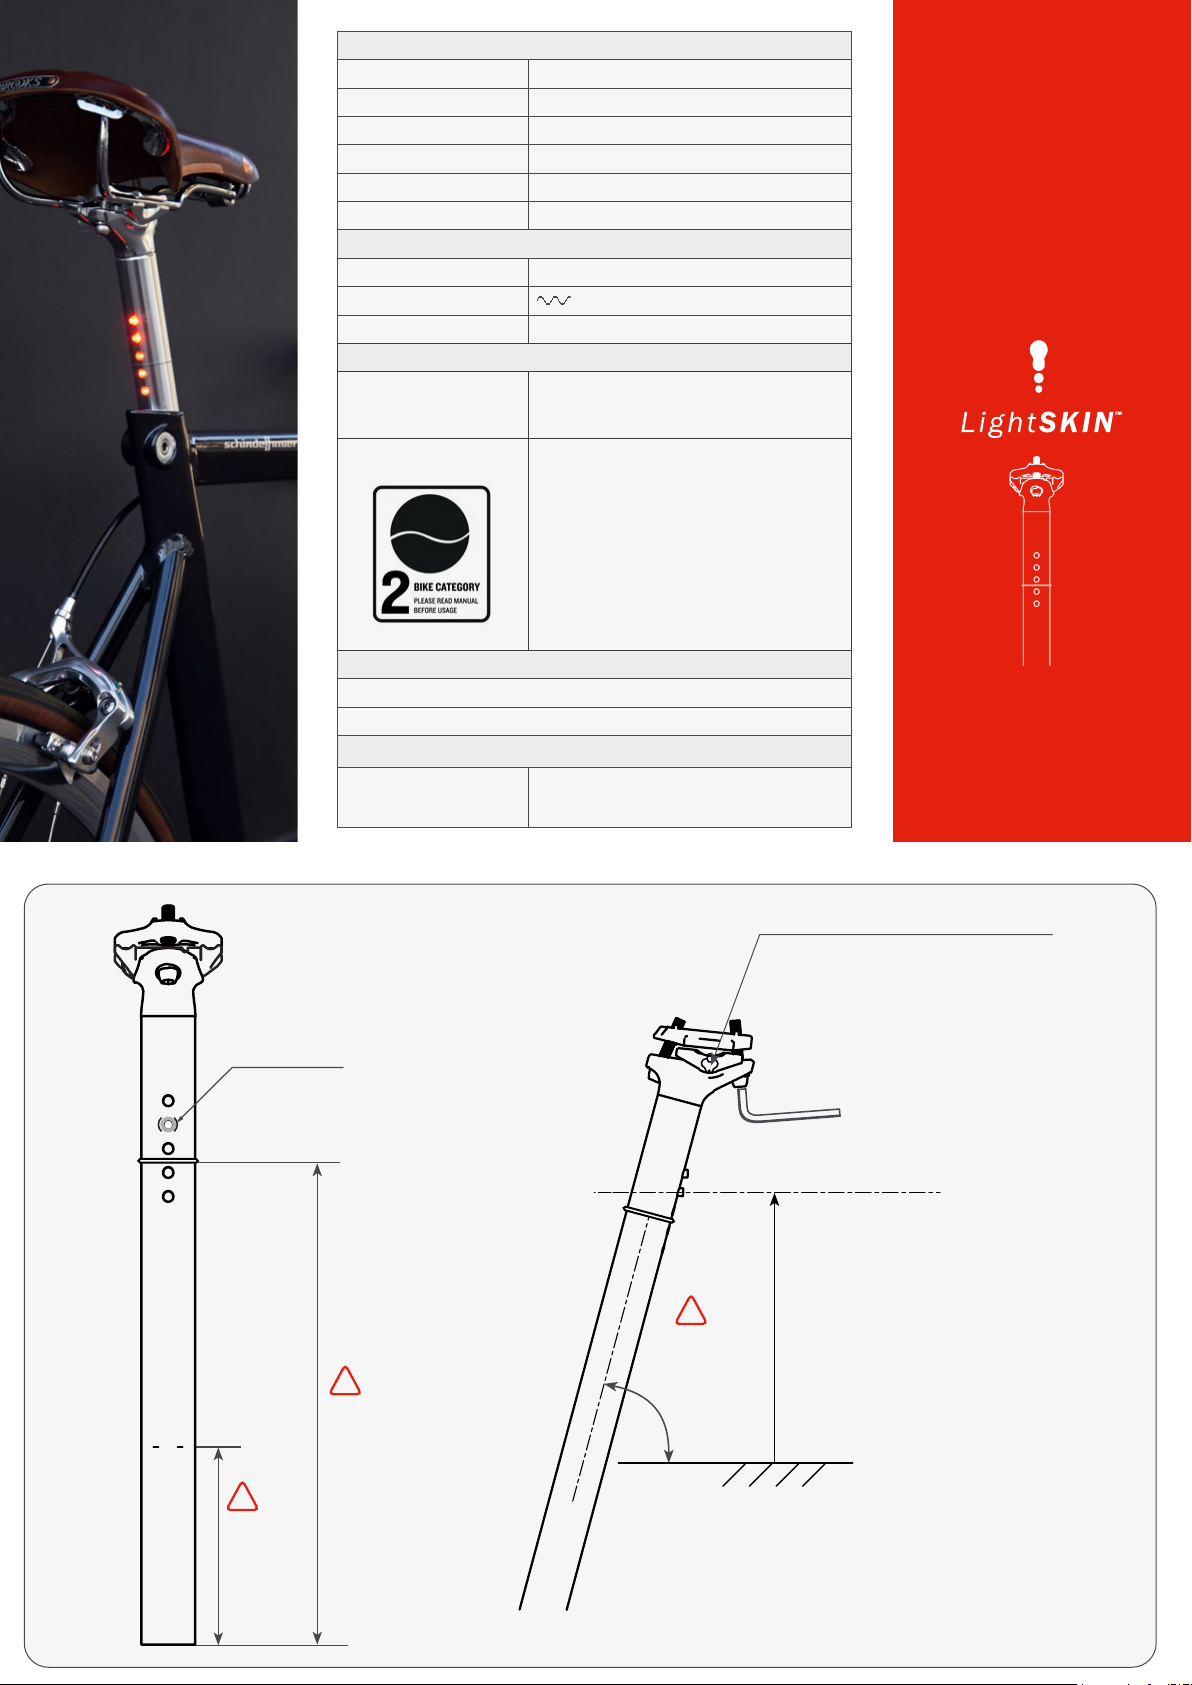
Installation:
• Benutzen Sie nur den Durchmesser, der Ihrem
Fahrradrahmen entspricht.
• Benutzen Sie das passende Werkzeug, um die
Schlussleuchte zu befestigen.
• Beachten Sie die Sicherheitslinien der
minimalen- sowie maximalen Einschubtiefe.
• Die Schlussleuchte darf nur in dem folgenden
Winkelspektrum (entspricht dem Sitzrohr-
winkel des Rahmens) betrieben werden: Max
76˚, Min 72˚.
• Die unteren beiden LEDs dürfen im Rahmen
versenkt werden. Bitte beachten Sie den
mechanischen Stopper der maximalen
Einschubtiefe!
• Die Schlussleuchte muss so montiert werden,
dass sie rückseitig abstrahlt. Die Bezugsachse
(siehe Zeichnung) muss parallel zur Fahrzeug-
längsachse ausgerichtet sein.
USB-Anschluss:
• Nicht übermäßig am Ladekabel ziehen.
• Schließen Sie die Abdeckung am USB-An-
schluss ordnungsgemäß.
• Wenn der USB-Stecker Hitze ausgesetzt wird,
kann dieser seine Form verlieren.
• Wir empfehlen den Gebrauch des mitgelie-
ferten USB-Kabels, um ein korrektes Laden
des Akkus zu gewährleisten. Sollten Sie ein
anderes Kabel verwenden, stellen Sie bitte
sicher, dass es sich um ein original Micro-USB-
Kabel, handelt.
• Sollte sich der USB-Stecker verformt haben,
muss dieser ersetzt werden.
USB-Kabel (2 m)
Powerbank
(nicht im Lieferumfang
enthalten)
Micro USB Kappe
(transparent)
Ladegerät
(nicht im Lieferumfang
enthalten)
Laden:
• Um die volle Ladekapazität zu erreichen,
braucht es zwischen 2,5 und 3 h.
• Während des Ladevorgangs blinkt die erste
Leuchte mit schwachem Licht, das Blinken
stoppt, sobald der Akku vollständig geladen
ist. Wenn der Akku vollständig geladen ist,
entfernen Sie das Kabel vom USB-Anschluss.
• Sollte sich das Produkt während des Ladevor-
gangs übermäßig erhitzen, brechen Sie den
Ladevorgang ab.
• Laden Sie den Akku nie, wenn der USB-An-
schluss nass oder feucht ist.
• Vollständige Lade- und Entladezyklen: 500
Installation:
• Use the correct diameter corresponding to your
bicycle frame.
• Use the appropriate tool to fasten the saddle
support.
• Adhere to the safety lines of the minimum and
maximum insertion heights.
• The taillight may only be operated in the
following angular range: Max 76˚, Min 72˚.
• The lower two LEDs may be sunk in the frame.
Always pay attention to the mechanical
stopper of the maximum insertion depth!
• The taillight must be mounted in such a way
that it is illuminated at the rear. The reference
axis (see drawing) must be aligned parallel to
the bicycle‘s longitudinal axis.
USB port:
• Do not pull on the charging cable excessively.
• Close the cover on the USB port properly.
• If the USB connector is exposed to heat, it may
lose its shape.
• We recommend using the supplied USB cable
to ensure proper battery charging. If you use
another cable, please make sure that it is an
original Micro USB cable.
• If the USB plug has deformed, it must be
replaced.
USB Cable (2 m)
Powerbank
(not contained in the
scope of delivery)
Micro USB cover
(transparent)
Charger
(not contained in the
scope of delivery)
Charging:
• In order to reach the full load capacity, it takes
between 2.5 and 3 hours.
• During charging, the rst light ashes with low
light, the ashing stops when the battery is
completely charged. When the battery is fully
charged, remove the cable from the USB port.
• Should the product become excessively hot
during charging, cancel the charging process.
• Never charge the battery when the USB port
is wet.
• Full charge and discharge cycles: 500
Fehlfunktionen:
• Die LEDs sind von oben nach unten durch
nummeriert:
Nr. 1
Nr. 2
Nr. 3
Nr. 4
Nr. 5
• Fällt, eine der 5 LEDs oder mehrere davon aus,
schaltet die Elektronik die gesamte Strom-
zufuhr aller LEDs ab und lässt sich auch nicht
wieder einschalten. Das Rücklicht muss in dem
Fall zur Reparatur an den Importeur gesendet
werden oder ersetzt werden.
Garantie:
• Schlussleuchte und Lichtmodul: 2 Jahre ab
Kaufdatum
• Im Gewährleistungsfall, (Austausch oder
Reparatur), wenden Sie sich bitte an den
Vertriebspartner, über den das Produkt
bezogen wurde.
Entsorgungshinweis:
• Verpackung: Die Produktverpackung besteht
aus recyclingfähigen Materialien. Entsorgen
Sie diese umweltgerecht in den bereitge-
stellten Sammelbehältern.
• Produkt: Altgeräte und Batterien dürfen nicht
im normalen Hausmüll entsorgt werden.
Entsprechend EU-Richtlinie 2012/19/EU ist
das Produkt am Ende seiner Lebensdauer einer
geordneten Entsorgung zuzuführen. Geben Sie
das Altgerät an einer Sammelstelle für Elektro-
schrott oder einem Wertstoffhof ab.
Malfunctions:
• The LEDs are numbered from top to bottom:
Nr. 1
Nr. 2
Nr. 3
Nr. 4
Nr. 5
• If one or more of the 5 LEDs is defective,
the electronics switches off the entire power
supply of all LEDs and cannot be switched on
again. In this case the tail light must be sent to
the importer for repair or replaced.
Warranty:
• Seatpost and light module: 2 years from the
date of purchase.
• In case of warranty, (replacement or repair),
please contact the distributor through whom
the product was purchased.
Waste Disposal:
• Packaging: The product packaging is made of
recyclable materials. Dispose of these environ-
mentally friendly in the provided collection
containers.
• Product: Old appliances and batteries must not
be disposed of with normal household waste.
According to EU Directive 2012/19/EU, the
product must be disposed of properly at the
end of its service life. Return the old device
to a collection point for electronic waste or a
recycling center.