Ligier JS SO User manual

Usermanual


Ligier would like to thank you
Thank you for choosing one of our products. This manual has been designed to
help you get the most out of your vehicle.
We suggest that you read it in detail before driving it for the first time.
In it you will find information, advice and instructions for use; as well as hints, tips
and more about the distinctive characteristics of your vehicle, which will prove
once again that you have made the right choice.
Using this manual will make it easy to get to know your new vehicle and enjoy
many miles of carefree motoring.
The manual
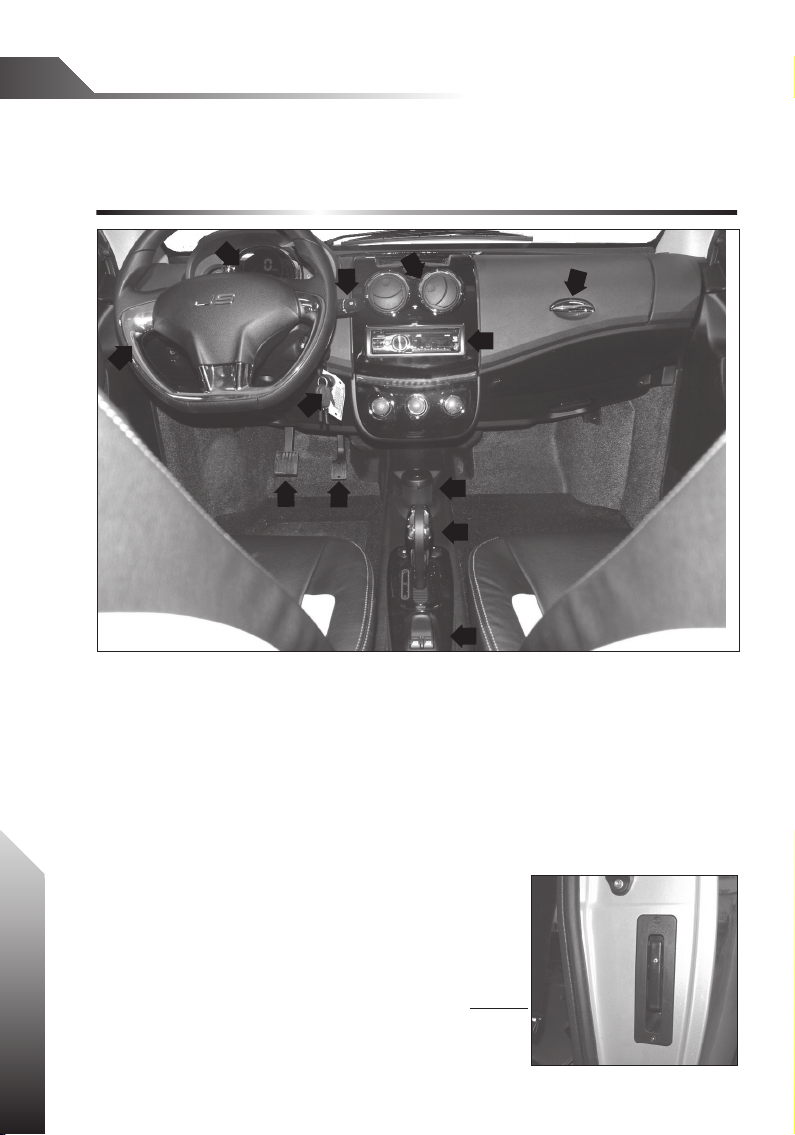
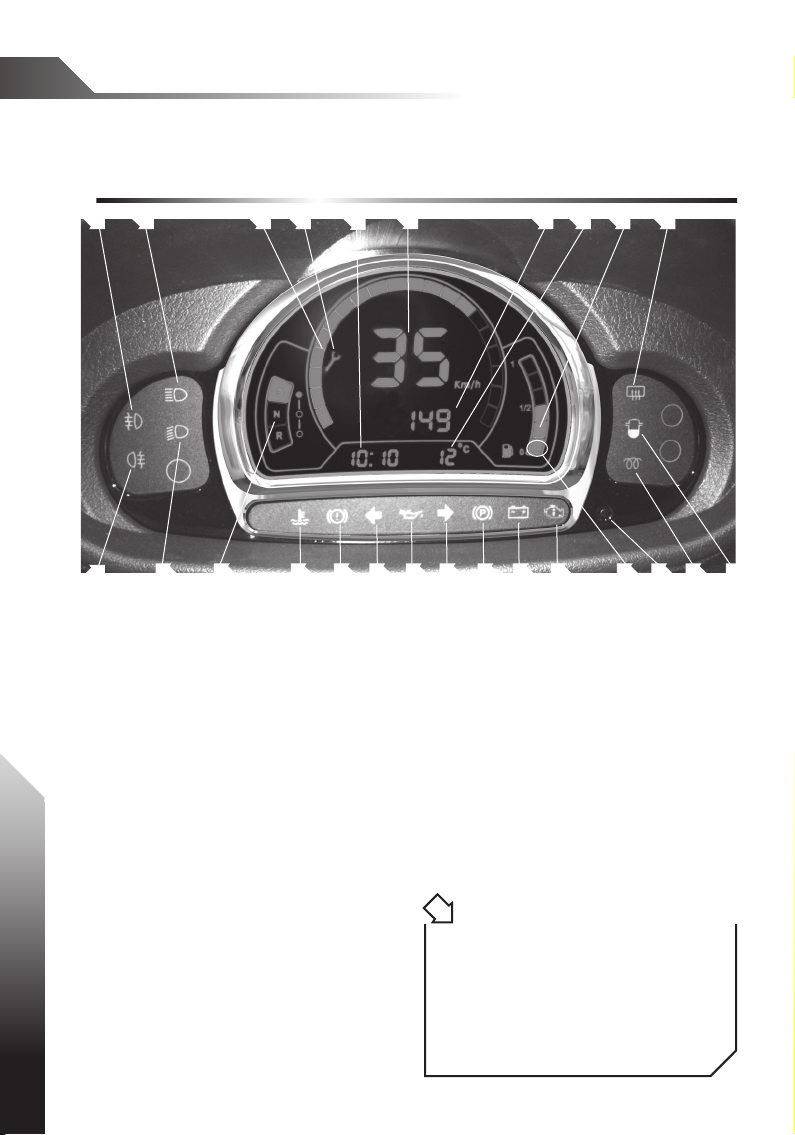
Certain photographs, illustrations and descriptions in this maintenance manual
may not always match the model of vehicle used.
The instructions in this manual have been written essentially as a simple and
straightforward guide to use. It also contains the basic maintenance procedures
and the routine servicing which the vehicle should undergo at any professionnal
workshop.
The handbook also contains instructions for some simple repair tasks.
The operations which are not explicitly described are those for which special
equipment and/or technical expertise are necessary. In these circumstances you
are advised to contact your local Distributor or authorized LIGIER's Dealer.
Text in bold type or on a grey background contains important safety and vehicle
usage instructions.
3

Table of contents
1. YOUR VEHICLE
Driver's seat....................................................1.1
Dashboard......................................................1.2
Controls............................................................1.3
Central console...........................................1.4
Opening the doors and adjusting
rear view mirrors.........................................1.5
Identification and keys......................... 1.6
Know your car..............................................1.7
2. USAGE
Running in.......................................................2.1
Starting............................................................2.2
Revolution specific engine functionning
492 DCI ........................................................... 2.3
Fuel.................................................................... 2.4
4

3. MAINTENANCE
In the event of a puncture ...................3.1
Lifting of the vehicle.............................. 3.2
Bulb replacement .................................... 3.3
Fuses................................................................ 3.4
Fluid level in the braking system . 3.5
Gear Oil level...............................................3.6
Engine Oil level.......................................... 3.7
Transmission/Steering/windscreen
washer liquid...............................................3.8
Coolant air filter ........................................3.9
Servicing ......................................................3.10
4. TECHNICAL FEATURES
General features.........................................4.1
Bodywork and vehicle
maintenance............................................... 4.2
5. ROAD SIGNS
5


1. YOUR VEHICLE
Driver's seat....................................................1.1
Dashboard......................................................1.2
Controls............................................................1.3
Central console...........................................1.4
Opening the doors and adjusting
rear view mirrors.........................................1.5
Identification and keys......................... 1.6
Know your car..............................................1.7
7
1. YOUR VEHICLE

1. 1 - DRIVER'S SEAT
Main 4 position key operated
ignition
Multi-purpose control for
headlights, indicators, horn &
front (according to model) and
rear fog lamps
Digital kilometre counter
Car radio (according to model)
Multi-purpose control for front
and rear (according to model)
windscreen wipers, wing mirror
and rear windscreen defrost
(according to model)
Central console
Glove box
(lift handle to open)
Brake pedal
1.
2.
3.
4.
5.
6.
7.
8.
Accelerator pedal
Position for movable ashtray
(according to model)
Forward and reverse drive gear
lever
Electric window switch
9.
10.
11.
12.
1.1 - DRIVER'S SEAT
8
1. 1 - DRIVER'S SEAT
Photo 2
The boot is opened
by a pull-lever
(in left hand door panel)
1
2
3
4
56
89
7
10
11
12

1.2 - SEATS AND STORAGE
9
1. 1 - DRIVER'S SEAT
Photo 2
Photo 3
Photo 4
Photo 5 Photo 6
Driver sun visor, with pocket for papers and
ability to be moved sideways to protect the
driver from glare.
Interior ceiling light, 3 positions with
function
select button (photo 2).
Light permanently on.
Light permanently off.
Light comes on when door is opened,
switches off within approximately 20 sec-
onds after door is closed.
Attention, leaving the ceiling light on
when the engine is off will cause the battery to
discharge and could cause permanent damage
to it.
Passenger sun visor, with vanity mirror and
sideways rotation.
Passenger grab handle (photo 3).
Driver and passenger seat belt fastenings
(photo 4).
Driver's horizontal seat position adjustment. Lift
bar to enable slide mechanism and release to
lock it (photo 5).
Lift the lever to tilt the seat back. The same
method is used for both seats (photo 6).
1.
2.
3.
4.
5.
6.
7.
4
5
6
7
5
Photo 1
13
2

1.2 - DIGITAL DASHBOARD
Front fog lamp indicator (accord-
ing to model)
Headlamp indicator
Digital speedbar
Oil change indicator
Clock
Speed indicator
Trip counter
External temperature indicator
Fuel level indicator
Rear windscreen defrost indica-
tor (according to model)
Rear fog-lamp indicator
Dipped beam indicator
Forward gear indicator "D",
n
eu-
tral "N"and reverse gear "R"
Engine coolant temperature alert
indicator
B
rake pad wear and brake uid
level indicator
Left indicator
Oil pressure alert indicator
1.
2.
3.
4.
5.
6.
7.
8.
9.
10.
11.
12.
13.
14.
15.
16.
17.
Right indicator
Hand brake indicator
Battery charge indicator
Engine fault indicator (DCI only)
Fuel level indicator
Trip counter reset
Pre-heat indicator Water in fuel
lter indicator
(DCI engine only)
ATTENTION!
If one of the safety lamps (engine
coolant temperature, oil pressure or
engine fault) should illuminate whilst
driving, you must stop the vehicle
as soon as possible and contact
your Ligier dealer.
18.
19.
20.
21.
22.
23.
24.
25.
10
1. 2 - DIGITAL DASHBOARD
!
1
14
2 3 4 567 8 9 10
11 1312 15 16 17 18 19 20 22 23 24 2521

Setting the clock
Turn the ignition key to the ACC
position (Accessory).
The number of kilometres to the next
oil change appears (photo 1).
Hold down button "23" on the
dashboard for 5 seconds:
the clock is
displayed and the numbers will ash
(photo 2).
One short press (less than 1 second)
on button "23" increments the hour
display.
One long press (more than 3
seconds) on button "23" will switch to
the ashing minutes display.
One short press on button "23" will
then increment the minutes display.
One long press will then conrm the
changes made.
Total kilometres and trip
counter
When the ignition key is in the APC
position (vehicle in operation), the
display shows the total kilometres of
the vehicle.
One short press on button "23"
on the dashboard will display the trip
counter. One long press on button "23"
will then reset the trip counter.
One short press returns to the total
kilometre display.
11
1. 2 - DIGITAL DASHBOARD
Neiman key positions
S. Engine stop
A. (ACC) Accessory
M. (APC) + after ignition
D. Start
D
M
A
S
Photo 1
Photo 2

1.3 - THE CONTROLS
12
1. 3 - THE CONTROLS
2
1
A. Gear lever
1 Forward drive
•Neutral
2 Reverse gear
To go forwards, push the lever in the direction
of forward drive "D" until it engages and then
accelerate gradually. A "D" indicator light will
illuminate on the dashboard screen.
ATTENTION!
(FOR VEHICLES WITH THE DCI ENGINE
ONLY).
In neutral "N", the rpm engine can
be increased only when : the brake
pedal is simultaneously pressed OR
a door is opened OR the handbrake
is engaged.
!
Turn the white round of the trimmer Bin position 1to switch on the side lights
front and rear, in position 2to switch on the dipped beam, pull the levertowards
you to switch on the full beam headligths.
Turn the white round of the trimmer C in position 3to switch on the front fog
lamps, in position 4to switch on rear+front fog lamps.
Push up the lever will switch on the right indicator light, push down the lever will
switch on the left indicator light.
ATTENTION !
It is obligatory to push the gear lever
only when the engine rpm is in slow
motion, vehicle not in motion.
!
A1
2
3
4
BC
B. Full/dipped beam switch
A : Press this button to
activate the horn.
To put the vehicle into reverse, push down on the top of the gear lever and
then pull it backwards until it engages in the "R" position.
If tted to the vehicle, the beep of the reversing sensor will sound. A "D"
indicator light will illuminate on the dashboard screen.

13
1. 3 - THE CONTROLS
D. Electric window switch
(photo 2, according to model)
If the vehicle has electric windows, hold
down the button to lower the window on
the required side. Release it to stop the
window at the height desired. Pull the
button upwards to raise the window and
release it to stop the window at the height
desired. The left hand switch is equipped
with a seqential mode. With the window
closed, press on the button until a click is
felt, and then release it: the window will
lower fully automatically. This system also
works when raising the window.
E. Central locking
(photo 3, according to model)
A single press on button "3" will lock the
driver and passenger doors from the inside.
An orange lamp will illuminate on the button
to show that it is in operation. A further
press will unlock the doors.
Photo 1
Photo 2
Photo 3
3
ATTENTION!
Do not operate the windscreen wipers if the
windscreen is dry and dirty. Always use the
windscreen washer liquid before switching
on the wipers in order not to scratch the
windscreen.
!
C. Windscreen washer/wiper switch
(photo 1)
A long press on the button Aactivates the defrosting of the rear window and
external rearview mirrors, according to model. The extinction is automatic.
Turn the trimmer Bin position 1will activate the rear windscreen wiper, according
to model. The position above is not used. Push down the lever will make a going/
return of the front wiper. Push up the lever on rst step will activate the intermittent
functionning of front windscreen wiper, according to model, on second step :
slow speed, on third step : high speed.
A
1
B

A. Storage space
B. Slot for car radio
C. Rotational air vents
D. Ventilation speed adjustment
E. Ventilation temperature
adjustment
F. Ventilation direction adjustment
(detail below)
G. Hazard lights switch
H. Interior central locking button
I. Forward/neutral/reverse gear
selection lever
J. Driver side sequential electric
window switch (according to model)
K. Handbrake lever.
Detail of ventilation
positions
Windscreen demister vent
Windscreen demister
+ air at feet
Air at feet + rotating air vent
Rotating air vent
14
1. 4 - CENTRAL CONSOLE
ATTENTION!
Whenever the vehicle is stopped for
any length of time, the handbrake
should be used.
!
H
J
K
I
A
D E F
B
CC
G
1.4 - CENTRAL CONSOLE

15
1. 5 - DOOR / BONNET OPENING
15
A. Exterior door handle (photo 1).
B. Interior door handle (photo 2).
C. Wing mirror adjustment knob (photo3).
Attention: the doors should not be
used as support for getting in and
out of the vehicle, as this could cause
them to become misaligned and lead
to leakage problems.
Opening the front bonnet
D. Front bonnet release, located
under the dashboard on the left
hand side. Pull to release the
bonnet catch (photo 4) and then, push
it back.
Lift the locking lever "1" in order
to open the bonnet (photo 5).
Lift the bonnet, unclip the prop
"2" from the holder "3" (photo 6).
Insert the bent end of the prop
"4" into the slot "5" in the plastic
casing of the bonnet (photo 7).
1.5 - DOOR/BONNET OPENING
Photo 1
Photo 2
Photo 3
Photo 7
Photo 4 Photo 5
B
Photo 6
3
2
D
A
C
1
5
4

16
1. 6 - IDENTIFICATION AND KEYS
Vehicle identification
Each car can be identied in two
different ways:
The serial number is stamped
onto the front oor of he vehicle;
in front of the passenger's seat.
(photo 1).
The engine specications are
shown on a plate xed to the front
of the engine block.
Manufacturer's plate with the
serial number etched onto it.
This is located under the bonnet,
riveted onto the right headlight
cover next to the screen wash
bottle (photo 2). Push up the engine
soundproong cover to have
access to it.
In the event of any claim or order
for spare parts, always give the
chassis number.
Keys
(photo 3)
The vehicle is delivered with a set
of keys including:
2 door and ignition keys
(including one with remote control
locking, if the vehicle is tted with
it);
2 keys for opening the fuel tank;
1 bar coded label to be
retained.
1.6 - IDENTIFICATION AND KEYS
Photo 1
Photo 3
Photo 2

17
1. 7 - KNOW YOUR CAR
Reversing sensor/
parking aid
(photo 3, according to model).
Detects potential obstacles when the car
is reversing. The closer the vehicle gets the
faster the beep sounds. A continuous beep
means that the obstacle is less than 20 cm
from the rear bumper of your vehicle.
The sensor is automatically activated when
reverse gear is selected. 2 beeps sound to
indicate that it is activated.
12 V socket
A 12 volt socket is located beneath the glove
compartment (photo1) for electrical connection
of external devices.
Lift the plastic cover and plug
in (photo 2).
Attention: using this socket with the engine
switched off will discharge the battery and
could cause damage.
1.7 - KNOW YOUR CAR
Photo 1
Photo 2
Photo 3
Photo 4
Photo 6
Photo 5
1
Storage
There are several open or closed storage compartments
in the car:
deep side pockets in each door (photo 2) ;
the glove compartment on the dashboard (photo 3).
Lift handle 1 to open (photo 4) ;
on the central tunnel in front of the gear lever;
under the passenger seat for the handbook and
logbook, as well as the puncture repair spray.

18
2. -USAGE
2. UTILISATION
Running in.................................................................2.1
Starting.......................................................................2.2
Revolution engine Specific functionning
(492 DCI)....................................................................... 2.3
Fuel...............................................................................2.4

19
2.1 - RUNNING IN
For the first kilometres:
Avoid fast acceleration and sharp braking.
Check oil and coolant levels frequently.
Carry out the rst service at 5,000 km (see servicing section)
2.1 - RUNNING IN

20
2. 2 - STARTING
Photo 1
Photo 2
Starting the engine
(photos 1 and 2)
Ensure that the gear lever is in neu-
tral "N" on the lever and "N" dis-
played on the dashboard "1".
Put the handbrake on.
Switch on the ignition. At the
starting position ("M")
(diagram
page 5) a beep will sound.
Wait for the preheating indicator to
turn off.
Activate the starter within 6 seconds
after the preheating light has gone
off. 2 beeps will sound if the engine
has not been started within the time
limit. In this event repeat the proce-
dure.
If a beep sounds instead of the engine
starting, then one of the gears is
engaged. In this event, return the lever
to neutral and activate the starter.
If the engine does not start immediately,
repeat the procedure.
IMPORTANT :
once the engine has
started, check that the oil pressure
and engine fault lights have gone out.
Switching off the engine
1.
Put the vehicle into neutral ("N")
2. Switch off the ignition
3. Wait for the engine to stop
4. Put on the handbrake
Starting the vehicle
1. With the engine running in slow motion,
put the gear lever into the drive position
without pressing on the accelerator.
2. Release the handbrake.
3. Accelerate gradually
1.
2.
3.
4.
5.
ATTENTION!
The engine will not start if a gear is
engaged. (warning beep).
In neutral "N", a safety device
prevents the engine from being
accelerated using the pedal unless
the brake pedal has been previously
pressed.
(ON VEHICLES WITH THE DCI ENGINE
ONLY).
Exhaust gases are toxic. Do not
carry out these procedures in an
enclosed area.
!
2.2 - STARTING
1
Table of contents
Popular Motorized Toy Car manuals by other brands

Carrera RC
Carrera RC 370402006 Assembly and operating instructions

Jamara
Jamara Mercedes-Benz Antos Instruction

Kyosho
Kyosho Integra Instruction booklet

Fenix
Fenix Mistral 2-0 instruction manual

ECX
ECX Torment ECX4000S instruction manual

Global Hobby
Global Hobby XTM Racing X-Terminator Pro Assembly manual

REVELL
REVELL Bell AH-1F Cobra quick start guide

HPI Racing
HPI Racing Savage X 4.6 Big Block instruction manual

Redcat Racing
Redcat Racing Everest GEN7 Sport manual

Serpent Model Racing Cars BV
Serpent Model Racing Cars BV f110 SF3 instruction manual

Duratrax
Duratrax Nitro Evader BX Assembly and operation manual

AE
AE TEAM ASSOCIATED RC10T4 TRUCK instruction manual