manuals.online logo
Brands
  1. Home
  2. •
  3. Brands
  4. •
  5. LilGadgets
  6. •
  7. Automobile Accessories
  8. •
  9. LilGadgets CarBuddy User manual

LilGadgets CarBuddy User manual

Step 1. Adjust the 2 front seat backs to
the same position and the headrest
posts to the same level to ensure
best fit.
Step 2. Loosen the lock lever at the
two ends of the pole. Once the hooks
are tightly secured, tighten the lock
lever to secure the pole.
Step 2. Loosen the lock lever at the
two ends of the pole. Once the hooks
are tightly secured, tighten the lock
lever to secure the pole.
As a rule of thumb, anything in
your car that is not installed by
the manufacturer can become a
projectile risk during an accident.
Please use all products including
ours in a safe manner.
If you have any issues or need
any assistance, please call us at
1.866.291.8635 or email us at
[email protected]
Thank you!
LilGadgetsTM
54 Hyde Court,
Manhasset, NY, 11030,
1-866-291-8635;10-5 EST, M-F
support@lil-gadgets.com
100% Satisfaction
Guarantee &
1 Year Warranty
CarBuddyTM Installation Instructions
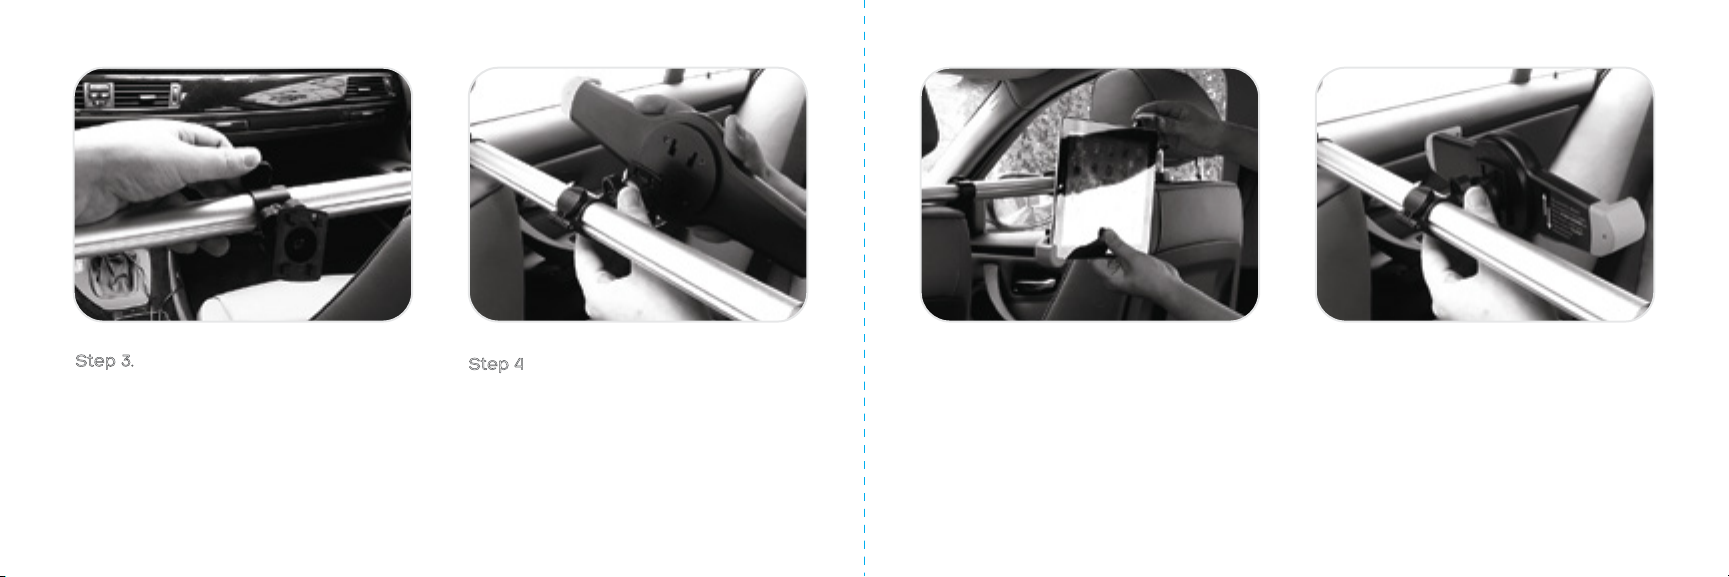
Step 5. Spread the adjustable zarms
and insert the tablet, making sure the
arms hold the tablet from the corners,
not the sides. You can adjust the
angle of the mount for best viewing
angle.
Step 6. Make sure to regularly check
the tightness of the clamps that are
attached to the headrests as well as
the knob on the back of the mount so
your device stays securely stays in
place. The knobs can loosen with
regular use in a normal driving
environment.
Step 6. Make sure to regularly check
the tightness of the clamps that are
attached to the headrests as well as
the knob on the back of the mount so
your device stays securely stays in
place. The knobs can loosen with
regular use in a normal driving
environment.
Step 3. Loosen the lever on the tablet
mount bracket, and adjust to desired
location. When you find the best
location, tighten to secure.
Step 4. Attach the adjustable mount
to the bracket. PUSH DOWN firmly to
lock until “CLICK” is heard.
Step 4. Attach the adjustable mount
to the bracket. PUSH DOWN firmly to
lock until “CLICK” is heard.

Popular Automobile Accessories manuals by other brands

Magneti Marelli AC161 Installation instruction

Magneti Marelli

Magneti Marelli AC161 Installation instruction

FDI uEZ GUI Start here

FDI

FDI uEZ GUI Start here

JCROffroad JT Install instructions

JCROffroad

JCROffroad JT Install instructions

Rostra VOXXElectronics 250-1930 owner's guide

Rostra

Rostra VOXXElectronics 250-1930 owner's guide

TOP VEHICLE TECH GR3FORD5 installation manual

TOP VEHICLE TECH

TOP VEHICLE TECH GR3FORD5 installation manual

Safe Fleet PRIME DESIGN AR-2000-BLK manual

Safe Fleet

Safe Fleet PRIME DESIGN AR-2000-BLK manual

Skoda Fabia Combi 5J Fitting instructions

Skoda

Skoda Fabia Combi 5J Fitting instructions

Camcar 40077 Al Mounting instructions

Camcar

Camcar 40077 Al Mounting instructions

Camcar 40089 AL Mounting instructions

Camcar

Camcar 40089 AL Mounting instructions

Impac Tradesman 2000 installation manual

Impac

Impac Tradesman 2000 installation manual

DVB OFFROAD BRSB-01 installation manual

DVB

DVB OFFROAD BRSB-01 installation manual

Safari Snorkel SS385HF installation guide

Safari Snorkel

Safari Snorkel SS385HF installation guide

ULTIMATE SPEED 279746 Assembly and Safety Advice

ULTIMATE SPEED

ULTIMATE SPEED 279746 Assembly and Safety Advice

SSV Works DF-F65 manual

SSV Works

SSV Works DF-F65 manual

ULTIMATE SPEED CARBON Assembly and Safety Advice

ULTIMATE SPEED

ULTIMATE SPEED CARBON Assembly and Safety Advice

Witter F174 Fitting instructions

Witter

Witter F174 Fitting instructions

WeatherTech No-Drill installation instructions

WeatherTech

WeatherTech No-Drill installation instructions

TAUBENREUTHER 1-336050 Installation instruction

TAUBENREUTHER

TAUBENREUTHER 1-336050 Installation instruction

manuals.online logo
manuals.online logoBrands
  • About & Mission
  • Contact us
  • Privacy Policy
  • Terms and Conditions

Copyright 2025 Manuals.Online. All Rights Reserved.