Lincat CO133M Owner's manual

IS 731 ECN 4421 Page 1 of 15
Installation, Operating and Servicing
Instructions
CONVECTOR
Electric Convection Ovens
CO133M, CO133T, CO223M, CO223T
CO235M, CO235T
Please make a note of your product details for
future use:
Date Purchased:_________________________
Model Number:__________________________
Serial Number:__________________________
Dealer:_________________________________
_______________________________________

IS 731 ECN 4421 Page 2 of 15
CONTENTS
Important Information 2
Warnings and Precautions 3
Checklist of Enclosures 3
Technical Data 3 - 4
Installation and Commissioning 5
Operating Instructions 6 - 10
Fault Finding 10
Cleaning 11
Servicing, Maintenance and Component Replacement 11 - 12
Spare Parts List 13
Accessories 14
Service Information and Guarantee 15
IMPORTANT INFORMATION
Read these instructions carefully before using this product, paying particular
attention to all sections that carry warning symbols, caution symbols and notices.
Ensure that these are understood at all times
.
WARNING!
This symbol is used whenever there is a risk of personal injury.
CAUTION!
This symbol is used whenever there is a risk of damaging your Lincat product.
NOTE:
This symbol is used to provide additional information, hints and tips.
KEEP THIS MANUAL FOR FUTURE REFERENCE

IS 731 ECN 4421 Page 3 of 15
WARNINGS AND PRECAUTIONS
This appliance must be installed, commissioned and serviced by a qualified person
in accordance with national and local regulations in force in the country of
installation.
If the supply cord is damaged, it must be replaced by the manufacturer, its service
agent or similarly qualified person.
Ensure that the plug/socket is accessible at all times.
Strip plastic coating and clean the appliance before use.
During operation parts may become hot - avoid accidental contact.
Disconnect this appliance before servicing, maintenance or cleaning.
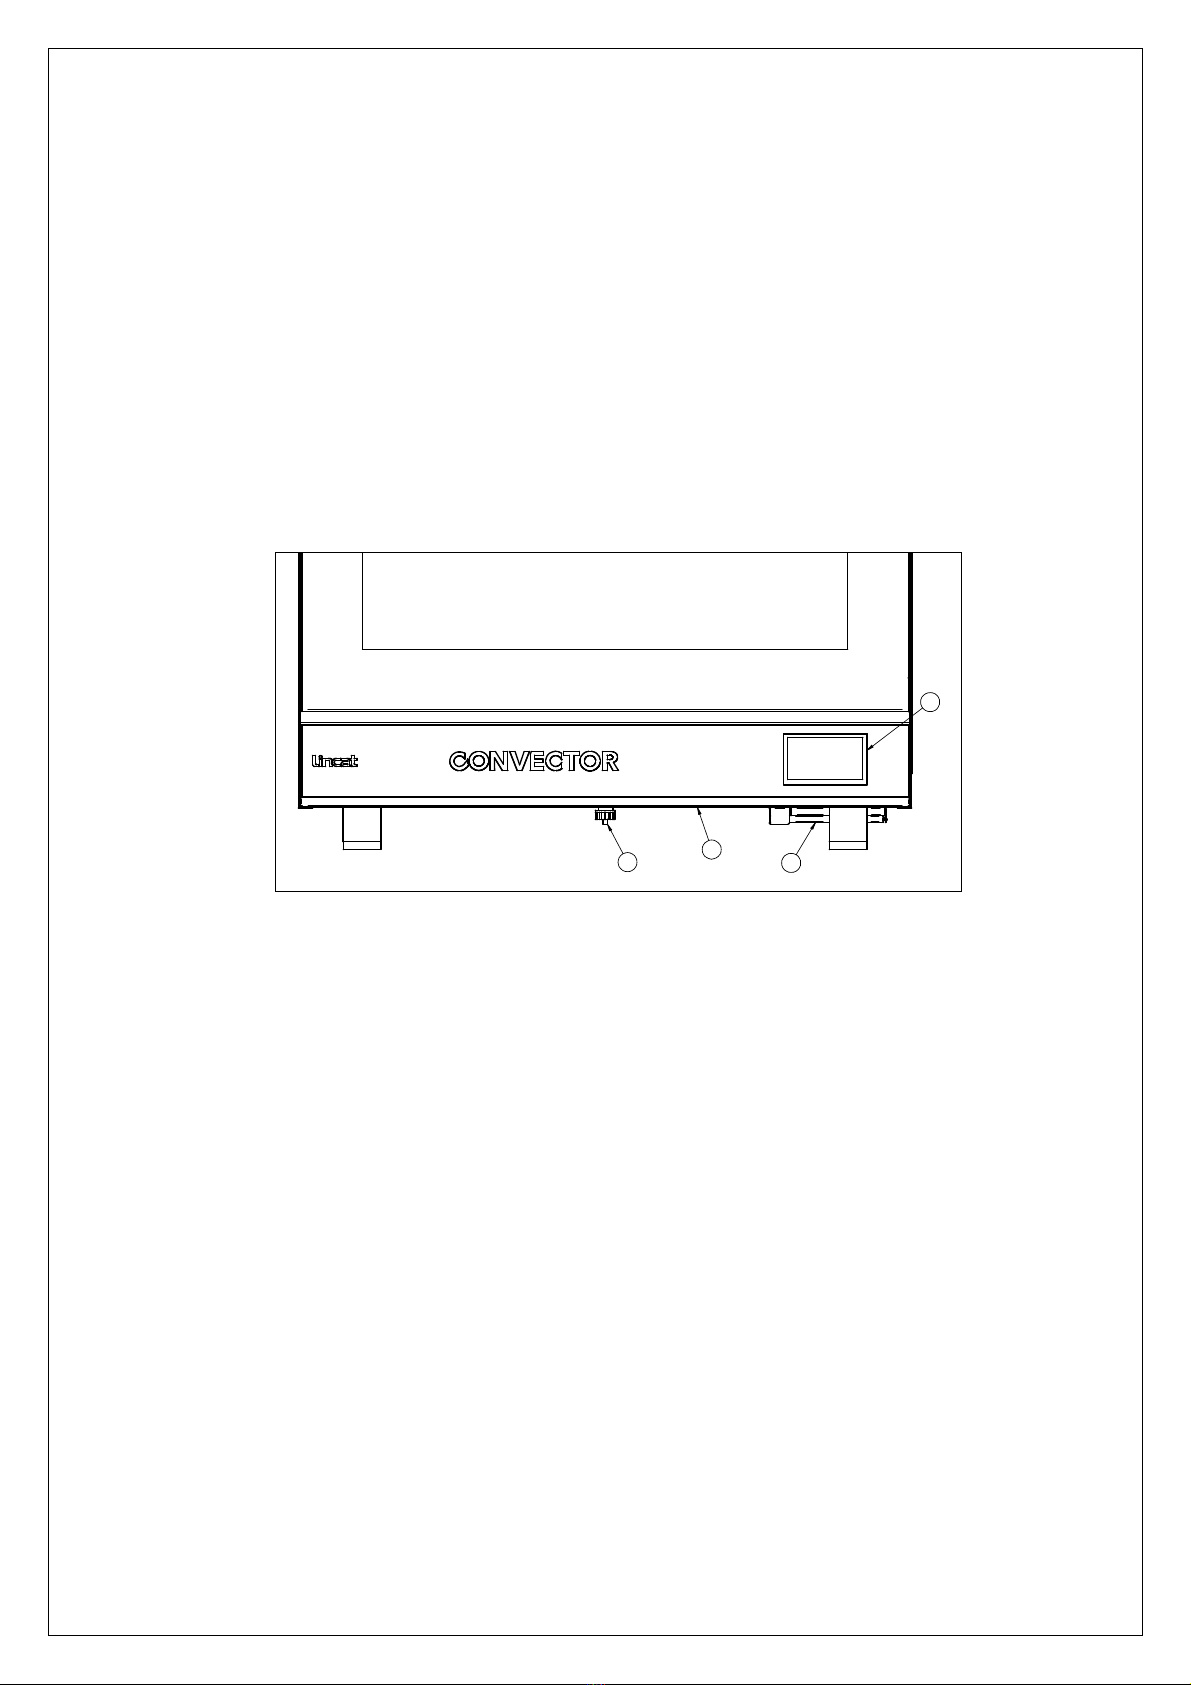
CHECK LIST OF ENCLOSURES
Instructions Manual
Shelves (2 off CO223M, CO223T).
Shelves (3 off CO133M, CO133T, CO235M, CO235T).
Water connection hose (CO133T, CO223T, CO235T).
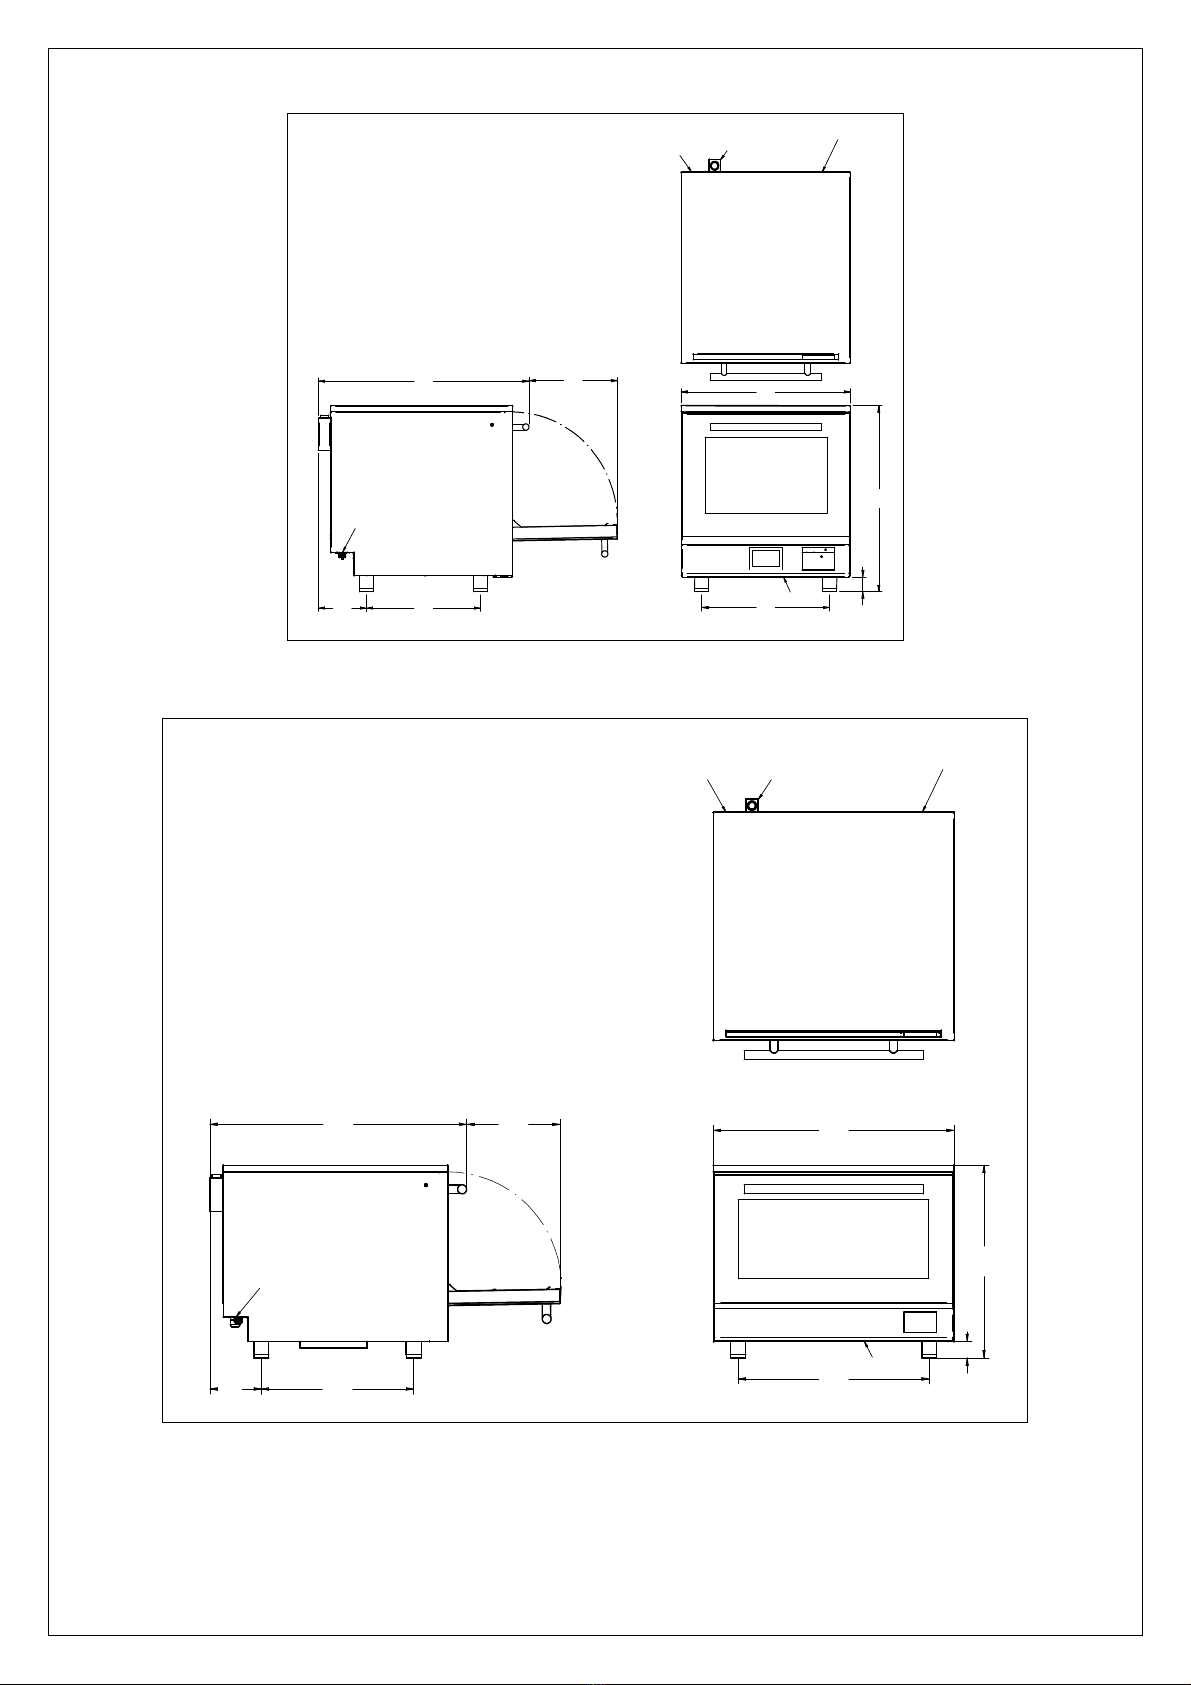
TECHNICAL DATA
Model Supply Rating Capacity Tray
Spacing
Weight
(kg)
CO133M 1P+N+ , 50-60 HZ 3.0kW
3 x 2/3GN
3 x 400x300
3 x 460 x 330
80 55
CO133T 1P+N+ , 50-60 HZ 3.0kW
3 x 2/3GN
3 x 400x300
3 x 460 x 330
80 55
CO223M 1P+N+ , 50-60 HZ 3.0kW
2 x 1/1GN
2 x 660x460
2 x 600 x 400
110 70
CO223T 1P+N+ , 50-60 HZ 3.0kW
2 x 1/1GN
2 x 660x460
2 x 600 x 400
110 70
CO235M
1P+N+ , 50-60 HZ
3P+N+ , 50-60 HZ
4.8kW
3 x 1/1GN
3 x 660x460
3 x 600 x 400
90 70.5
CO235T
1P+N+ , 50-60 HZ
3P+N+ , 50-60 HZ
4.8kW
3 x 1/1GN
3 x 660x460
3 x 600 x 400
90 70.5

IS 731 ECN 4421 Page 4 of 15
610
645
460
170 410
VENT
ELECTRICAL
CONNECTION
WATER
CONNECTION
750 320
WATER, ELECTRICAL
CONNECTIONS
55
RESET
CO1xx V RSIONS
850 320
170 510 640
645
810
WATER, ELECTRICAL
CONNECTIONS
WATER
CONNECTION
ELECTRICAL
CONNECTION
VENT
55
RESET
CO2xx V RSIONS

IS 731 ECN 4421 Page 5 of 15
INSTALLATION AND COMMISSIONING
This appliance must be earthed.
An equipotential bonding terminal is provided to allow cross bonding with other
equipment.
If replacing the plug connect the terminals as follows:
Green and Yellow wire Earth E
Blue wire Neutral N
Brown wire Live L
Means of isolation with at least 3mm contact separation in all poles must be
incorporated into the fixed wiring of the CO235M and CO235T. These units must be
connected by a qualified electrician (see power ratings).
The fixed wiring insulation must be protected by insulated sleeving having a
temperature rating of 60 Deg C.
Supply cords shall be oil resistant, sheathed flexible cable not lighter than ordinary
polychloroprene or equivalent elastomer sheathed cord (code 60245 IEC 57)
Install this appliance on a level surface ensuring all vents are unobstructed. Any
partitions, walls or furniture must be of non-combustible material. Minimum
distances A 200mm B 1000mm – see Fig 1. Leave 100mm for services.
An air filter will need occasional access. (See Fig 3 for position).
The water supply pressure must be from 2 - 6 bar (200kPa-600kPa).
Lincat recommend that a water filter should be installed.
Refer to Lincat’s website for the recommended option
Fig 2

IS 731 ECN 4421 Page 6 of 15
OPERATING INSTRUCTIONS
Only qualified or trained personnel should use this appliance.
MODELS CO133M, CO223M and CO235M
A- On/Off E- Fan Speed
B- Power supply indicator F- 120 minute timer
C- Oven heating indicator G- Reset
D- Temperature control knob H- Filter
B
A
D
C
F
E
H
G
Fig 3
Connect the appliance to the electricity supply. The green neon (A) illuminates
indicating power to the appliance. Select the On/Off switch, the switch will illuminate
and the fan will start rotating.
Select the desired fan speed, slow or fast.
Set the thermostat to the desired temperature, the amber neon will indicate that the
unit is heating.
When at the set temperature the amber light will turn off and will alternate on or off
to maintain the set temperature.
Load products onto the shelves and if required set the timer.
When the set time expires the buzzer/lights will sound/flash.
Carefully open the door and remove the cooked products. Opening the door will
cancel the buzzer and flashing lights.

IS 731 ECN 4421 Page 7 of 15
Note: When the door is opened, if the fan is set to fast speed, the fan will switch
from fast to slow speed and return to fast speed when the door is closed.
To turn the unit off set the temperature control knob to the off position and switch off
at the mains.
MODELS: CO133T, CO223T and CO235T
A- Touch Screen
C- USB
B- Reset D- Filter
A
CB
D
Fig 4
Only qualified or trained personnel should use this appliance.
Connect the appliance to the electricity supply. The unit will beep once and will
self-test the elements and fans. The screen will show the CONVECTOR logo and
then go to the home screen.
Refer to the Programming guide for the user interface operation and programming.
To use the unit simply select the correct program. The unit will Pre-heat to the set
temperature and beep when ready to be loaded with product.
Place the food in the oven and press cook. The oven will cook the food and when
the set time expires the buzzer/lights will sound/flash. On screen timers will also
indicate the timer has expired.
Press done and remove the food from the oven.
To adjust the clock settings go to the home screen, click on the clock in the top right
corner, select the hours or minutes to change, adjust and save.

IS 731 ECN 4421 Page 8 of 15
How to programme your Touch screen Convector
(COxxxT models).
Home screen
This is where you run recipes from (just press the recipe you want). You can
switch into the oven mode from here. Pressing recipe manager takes you
into the programming area
Recipe Manager
This lets you select a recipe to edit (just press the recipe). Here you can also
reassign the order recipes are presented in, access further oven settings and
run updates
Move
to
next page
Home
Oven mode
Recipe
Manager
Standby
Machine
settings
Move and
reorder your
recipes
Select recipe
to edit

IS 731 ECN 4421 Page 9 of 15
Recipe summary and edit screen
This is where you view your recipe with changes highlighted in green. Press
on the steps to edit them. Press on the name bar to rename the recipe.
Attach or change an icon from the library. Click on to save to keep your
recipe. Or exit without saving.
Recipe summary and edit screen
This is where you adjust the times, temperature and set humidity injection
and fan speeds. The recipe summary button takes you back to the summary
screen so you can review changes and save.
Return to
home
Change icon
Return to recipe
manager
Save
Steps
-
touch to
add or edit
recipe steps
Humidity
Injection settings
Fan speed
settings
Adjust the fan s
peed and humidity injection.
The humidity injection occurs at the start of
each stage
Home
Return to recipe
summary
Tap the end of the bar for small increments,
swipe for large increments
Move between steps
If you are ready to
review the changes
press the recipe
summary button and
save or exit
Touch time or
temp then
adjust with
the slider

IS 731 ECN 4421 Page 10 of 15
Timer screen
In oven mode you can change the temperature and run up to 4 count down
timers. Alternatively don’t enter a time and it will maintain the set temperature
indefinitely.
The fan speed can be increased or decreased. A humidity injection level can
be set (this then operates in 30 second steps at the beginning of the
programmed cycle).
Humidity can be added by pressing the humidity injection setting. In oven mode
humidity is added on demand. In program mode it is injected at the start of each
step.
Higher levels of humidity can be achieved by incorporating additional steps in the
cooking program and adding humidity within these steps.
Humidity injection levels can be set from 1 – 5.
This appliance is fitted with a safety thermostat, which will cut power to the
appliance under fault conditions. If when turning the unit on it fails to operate firstly
check the power supply to the unit then the reset before contacting Lincat service.
To re-set the safety thermostat, firmly push the red button which is recessed under
the front edge of the unit see (Fig 3 – 4). This re-set cannot be activated until the
appliance is cool. If this continues to happen please call our service department.
Please refer to the Service Help Desk number on the final page of this manual.
FAULT FINDING
Return to
home
Tap to see actual
temperature
Touch to
enter time
Temperature
setting
Fan speed
Humidity injection
level settings
Single or 4
shelf timer
mode

IS 731 ECN 4421 Page 11 of 15
CLEANING
Your product has a manufacturer’s warranty. This requires you maintain and care for
your product and follow maintenance instructions. If you fail to maintain your unit or
damage components Lincat may charge you for a warranty repair. Please check the
website for terms and conditions.
Do not use a water jet or steam cleaner, and do not immerse this appliance.
Clean all panels with warm water and mild detergent, do not use abrasive materials.
Dry with a soft cloth.
Please refer to the Lincat website for the recommended cleaning products.
Avoid damaging the thermostat bulbs inside the oven when cleaning.
To assist cleaning remove shelf supports – see Servicing.
SERVICING, MAINTENANCE AND
COMPONENT REPLACEMENT
All servicing, maintenance and component replacement on this appliance should be
carried out by one of our recommended service engineers.
Regularly check the filter, see Fig 3 or 4, on the right hand side of the unit. It may be
cleaned in a dishwasher. Allow to fully dry before re-fitting.
Do not use the unit without the filter.
The door seal and bulbs are considered consumable parts and are not covered by
the warranty. The door seal on all units and the bulbs on the COxxxM units are
customer replaceable part. COxxxT bulbs require a screwdriver and disassembly of
the light housing to replace. Lincat recommend a qualified person undertakes this
operation.

IS 731 ECN 4421 Page 12 of 15
Door inner glass removal and refitting
With the door open, hold the lower edge of the inner glass and one of the metal
tabs at the top. Carefully pull the glass towards you whilst lifting the metal tab. With
the glass now free at the top, lift the glass panel clear.
To refit, position onto the locating pins on the lower edge and close against the
upper locating pins.
Pull the tabs towards you until the glass drops onto the upper locating pins then
push to engage.
Light bulb replacement
Mechanical units.
Carefully remove the glass cover and using a flat bladed screwdriver. Remove the
bulb. Fit new bulb and replace cover.
Touch units.
Remove four screws holding the cover plate, carefully remove the cover plate,
gasket and glass lens. Remove the bulb. Fit new bulb and re-assemble.
Shelf racks removal and refitting
See Fig 5 (Door removed for clarity).
TURN TO UNDO
TURN TO UNDO
LIFT TO REMOVE
Fig 5

IS 731 ECN 4421 Page 13 of 15
You can search for your spare parts on Lincat.co.uk using your products serial number.
Part Number
Description
Used on
CA208 Run Capacitor All Models
CO215 Contactor CO235M, CO235T
EL332 3.0 Kw Element CO133M, CO133T, CO223M, CO223T
EL330 4.5 Kw element CO235M, CO235T
GL705/S Inner glass CO133M, CO133T
GL703/S Inner glass CO223M, CO223T, CO235M, CO235T
HI189 RH Door Hinge All Models
HI190 LH Door Hinge All Models
HI191 Door Hinge Roller All Models
IMP02 Impellor All Models
LE85 Adjustable Leg All Models
MO31 Bi-Directional Motor All Models
KN526 Control Knob CO133M, CO223M, CO235M
KN527 120 minute timer knob CO133M, CO223M, CO235M
NE46 Green neon CO133M, CO223M, CO235M
NE47 Amber neon CO133M, CO223M, CO235M
PI12 Inlet connection hose CO133T, CO223T, CO235T
PL306 Plug and lead CO133M, CO133T, CO223M, CO223T
SE92 Door seal CO133M, CO133T
SE93 Door seal CO223M, CO223T, CO235M, CO235T
SH137 Shelf CO223M, CO223T, CO235M, CO235T
SH138 Shelf CO133M, CO133T
SO23 Solenoid valve CO133T, CO223T, CO235T
SW34 Fan speed switch CO133M, CO223M, CO235M
X54900 Door switch All Models
SW97 On/Off switch CO133M, CO223M, CO235M
TC47 Thermocouple CO133T, CO223T, CO235T
TH46 Thermostat CO133M, CO223M, CO235M
TH203 Safety Cut out All Models
TI56 120 minute timer CO133M, CO223M, CO235M
TS04 Thumb screw All Models
FAS250 Knob clip CO133M, CO223M, CO235M
BU227 Oven light bulb All Models
SPARE PARTS LIST

IS 731 ECN 4421 Page 14 of 15
Part
Number
Descripti
on
Used on
CO100/FS Floor stand
6 runners
2/3 GN,
400 x 300 Baking Sheets
460 x 330 Baking Sheets
CO133M,
CO133T
CO200/FS Floor stand
6 runners
1/1 GN,
600 x 400 Baking Sheets
660 x 460 Baking Sheets
CO223M,
CO223T,
CO235M,
CO235T
CO100/LFSK
Low floor stand
and stacking kit
Stand and oven vent kit CO133M,
CO133T
CO200/LFSK
Low floor stand
and stacking kit
Stand and oven vent kit CO223M,
CO223T,
CO235M,
CO235T
ACIK03 Compact filter kit, 300 litre life. Suitable for most
installations.
CO133T,
CO223T,
CO235T
ACIK04 Standard filter kit, 1500 litre life CO133T,
CO223T,
CO235T
For help with the installation, maintenance and use of your Lincat equipment,
please contact our service department:
ACCESSORIES
SERVICE INFORMATION

IS 731 ECN 4421 Page 15 of 15
UK: 01522 875520
For non-UK customers, please contact your local Lincat dealer
All service work, other than routine cleaning should be carried out by one of our
authorised service agents. We cannot accept responsibility for work carried out by
other persons.
To ensure your service enquiry is handled as efficiently as possible, please tell us:
•Brief details of the problem
•
Product code
All available on serial plate
•
Type number
•
Serial number
Lincat reserve the right to carry out any work under warranty, given reasonable
access to the appliance, during normal working hours, Monday to Friday, 08:30 to
17:00.
GUARANTEE
This unit carries a comprehensive UK mainland 2 year warranty. The guarantee is
in addition to, and does not diminish your statutory or legal rights.
The guarantee does not cover:
•Accidental damage, misuse or use not in accordance with the manufacturer’s
instructions
•Consumable items (such as filters, glass, bulbs, slot toaster elements and door
seals.)
•Damage due to incorrect installation, modification, unauthorised service work or
damage due to scale, food debris build-up, etc.
The manufacturer disclaims any liability for incidental, or consequential damages.
Attendance is based on reasonable access to the appliance to allow the authorised
technician to carry out the warranty work.
Service calls to equipment under warranty will be carried out in accordance with the
conditions of sale. Unless otherwise specified, a maximum of 15 minutes of
administrative time, not spent directly carrying out servicing work, is provided for
within the warranty. Any requirement for staff attending the call to spend greater
timethan 15 minutes due to administrative requirements, such as on health and
safety risk assessments, will be chargeable at the prevailing rate.
This manual suits for next models
5
Table of contents
Other Lincat Oven manuals

Lincat
Lincat PO425 Operating instructions

Lincat
Lincat LYNX 400 LCO Service manual

Lincat
Lincat LMO9 Manual

Lincat
Lincat PO69X Operating manual

Lincat
Lincat V6 Operating instructions

Lincat
Lincat OE8008 Owner's manual

Lincat
Lincat CIBO User manual

Lincat
Lincat Silverlink 600 Owner's manual

Lincat
Lincat SLR6 User guide

Lincat
Lincat Lynx 400 Owner's manual