Lince Cerroko 7930RSA User manual

www.lince.com
MANUAL DE INSTALACIÓN
GUIDE DE MONTAGE
INSTALLATION MANUAL

Cerrojo
Verrou
Lock
Cerrador
Gâche
Strike
Carcasa Cerrador
Boîtier Gâche
Strike Case
Tornillo M4x8 (4) TX10
Vis M4x8 (4)TX10
Screw M4x8 (4) TX10
Carcasa Cerrojo
BoîtierVerrou
Lock Case
Embellecedor
Enjoliveur
Trim Ring
Tirafondo 5x35 (4) TX25
Vis 5x35 (4)TX25
Lag screw 5x35 (4) TX25
Tirafondo 5x35 (4) TX25
Vis 5x35 (4)TX25
Lag screw 5x35 (4) TX25
Tirafondo 5x60 (4) TX25
Vis 5x60 (4)TX25
Lag screw 5x60 (4) TX25
A
B
C
D
E
F
G
H
I
A E
F
G
H
I
B
C
D
Despiece cerrojo
Pièces du verrou
Lock parts breakdown
(4) M4x8

Paso /Étape / Step 1
Paso /Étape / Step 2
30 max
45 MAX
6 x MAX Ø 4 mm
Ø 34 mm
Plantilla instalación 7930 RSA

2x 2x
Paso /Étape / Step 3
Paso /Étape / Step 4
2 x
4 x
D
F
Derecha / Droite / RightIzquierda /Gauche / Left
1O
2O2O
2O
1O
1O
Esquema /Schéma /Scheme
7930RSA

Paso /Étape / Step 5
Esquema /Schéma /Scheme
7930RSA
2 x
Quitar la protección del adhesivo
Retirer la protection adhésive
Remove the adhesive protection
C
F
E

Descripción de la alarma
Description de l’alarme
Alarm description
Secuencia de la alarma
Séquence de l’alarme
Alarm sequence
12
3
4
LED, Indicativo de carga y descarga (verde/rojo)
LED,Voyant de chargement et de déchargement (vert/rouge)
LED, Charge and discharge indicator (green/red)
Alimentación externa 5V (conector microUSB)
Alimentation externe 5V (connecteur micro USB)
External 5V power supply (micro USB connector)
INTERRUPTOR, encendido y apagado (ON/OFF)
INTERRUPTEUR, marche/arrêt (ON/OFF)
SWITCH, (ON/OFF)
MÓDULO ALARMA, tornillo para sujeción al
cerrojo (posibilidad de sujeción por ambos lados)
MODULE ALARME, vis pour fixation au verrou
(fixation possible des deux côtés)
ALARM MODULE, fixing screw to the lock
(possibility of fixing on both sides)
Activación
alarma
Activation alarme
Alarm activation
Sensor alarma
activado
Capteur alarme activé
Alarm sensor
activated
Vibración
detectada
Vibration détectée
Vibration detected
Alarma
20 segundos
Alarme 20 secondes
20 second alarm
Apagado
de alarma
Arrêt de l’alarme
Alarm shut-off
1
2
3
4
OFF
ON
Desplazamos el interruptor a “on”, es-
cucharemos 6 pitidos durante 30 segun-
dos antes de que se active la alarma.
En mettant l’interrupteur sur «on»,nous enten-
drons 6 bips pendant 30 secondes avant que
s’active l’alarme.
Place the switch in the “on” position and 6
beeps will sound during a 30 second period
before the alarm turns off.
Escucharemos 6 pitidos durante 30 se-
gundos antes de que salte la alarma.
Nous entendrons 6 bips pendant 30 secondes
avant que l’alarme se mette en marche.
6 beeps will sound during a 30 second
period before the alarm turns on.
Para desconectar la alar-
ma, desplazaremos el in-
terruptor a “off”.
Pour déconnecter l’alarme,
mettre l’interrupteur sur
«off».
To disconnect the alarm,
place the switch in the “off”
position.
231

Alimentación externa 5V (conector microUSB)
Alimentation externe 5V (connecteur micro USB)
External 5V power supply (micro USB connector)
REQUISITOS Y MODO PARA
REALIZAR LA CARGA DE LA BA-
TERÍA A TRAVÉS DE USB
El módulo de la alarma contiene una
batería recargable. ATENCIÓN: debe
cargarse completamente en el mo-
mento de la instalación del cerrojo.
Este módulo de la alarma contiene un
puerto micro-USB para su carga. Co-
nectar a la corriente a través de un
cable micro-USB estándar (no sumi-
nistrado) y su cargador de móvil.
También puede cargar la batería co-
nectándolo directamente a una ba-
tería externa (powerbank).
Los dos modos de carga anteriores
pueden llevarse a cabo con el cerro-
jo instalado y sin necesidad de ma-
nipular el mismo.
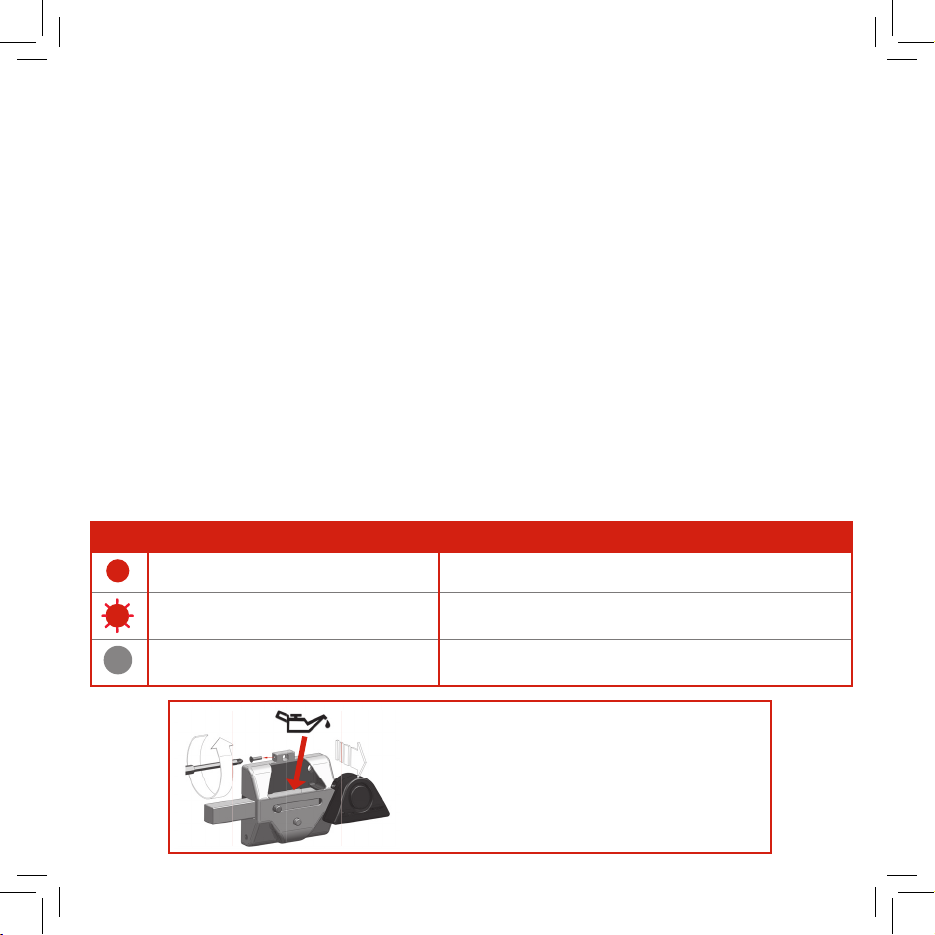
Hay otro modo de carga de la batería
que implica la extracción del módulo
alarma para su carga, igualmente a
través del puerto micro-USB, en otro
lugar alejado del propio cerrojo. En
este caso también es posible la cone-
xión a través de un puerto USB de un
PC, ordenador portátil, smart TV...
Si tiene problema con la carga del
“modulo alarma” haga la prueba a uti-
lizar otro cable y comprobar si el pilo-
to led rojo parpadea en señal de carga.
CONDITIONS ET MODE DE CHARGE-
MENT DE LA BATTERIE AVEC LE PORT
USB.
Le module de l’alarme contient une bat-
terie rechargeable. ATTENTION: elle doit
être complétement chargée lors de l’in-
stallation du verrou.
Ce module de l’alarme contient un port
micro-USB pour son chargement.
Brancher à la prise de courant à l’aide
d’un câble micro-USB standard (non
fourni) et votre chargeur de téléphone
portable.
Vous pouvez également charger la batte-
rie en la branchant directement à une
batterie externe (powerbank).
Les deux modes de chargement décrits
peuvent être réalisés avec le verrou in-
stallé, sans besoin de le manipuler.
Il existe un autre mode de chargement
de la batterie qui implique l’extraction du
module alarme, également au travers du
port micro-USB, dans un lieu éloigné du
verrou. Dans ce cas, la connexion est
également possible à l’aide d’un port
USB d’un PC, ordinateur portable, smart
TV...
Si vous avez un problème avec la
charge du “module alarme”, essayez
d´utiliser un autre câble et vérifiez si le
LED rouge clignote en signe de charge.
REQUIREMENTS AND PROCEDURES
FOR CHARGING THE BATTERY USING
THE USB PORT
The alarm module incorporates a re-
chargeable battery. WARNING: the
battery should be fully charged before
installing the lock.
This alarm module includes a mi-
cro-USB port for charging. Connect
the power supply using a standard
micro-USB cable (not supplied) and
your mobile charger.
You can also charge the battery by
connecting it directly to an external
battery (powerbank).
The two charge methods mentioned
above may be carried out with the lock
installed and without needing to carry
out any action on the lock.
There is another way to charge the
battery by extracting the alarm mod-
ule. This method also uses the mi-
cro-USB port but it allows the
charge in another location far away
from the lock. In this case, connec-
tion is also possible using the USB
port of a PC, laptop, smart TV, etc.
If the alarm unit does not charge,
try a different cable and adapter
and verify if the red-light flickers
as a sign of charge.
Carga de batería
Charge de la batterie
Battery charge
1 2

Lors de la connexion, un voyant rouge
s’allumera (le chargement complet de
la batterie nécessite plusieurs heures).
Le voyant s’allumera en vert lorsque la
batterie sera chargée et prête à être
utilisée.
Remarques
◗ Attention, si vous n’avez pas utilisé
l’alarme depuis longtemps, la batte-
rie peut être déchargée.
◗ Si vous allez vous absenter durant
une longue période, réalisez préala-
blement un chargement complet.
◗ Si la durée de la batterie se réduit
de moitié par rapport à la durée
normale, vous devrez remplacer le
module alarme.
◗ Évitez l’exposition aux tempéra-
tures extrêmes, à la lumière solaire
directe, à l’humidité, au sable, à la
poussière et aux coups méca-
niques.
Once connected, the red LED in-
dicator light will illuminate (fully
charging the battery takes several
hours). Once charged, the LED in-
dicator will turn green and the
battery will be ready to be used.
Notes
◗ Warning, if the alarm has not
been used for some time, the
battery may be discharged.
◗ If you plan to be away from
home for a long period of time,
fully charge the battery before
you leave.
◗ The alarm module shall be re-
placed when the battery charge
time is reduced to half its nor-
mal duration.
◗ Avoid exposing the battery to
extreme temperatures, direct
sunlight, sand, dust or mechani-
cal blows.
OBSERVACIONES /OBSERVATIONS / REMARKS
LED ESTADO /ÉTAT / S TATE
Batería baja /Batterie faible / Low batteryRojo fijo /Fixe rouge / Fixed red
Verde fijo /Fixe vert / Fixed green
Rojo intermitente /Rouge clignotant / Flashing red Batería baja, cargando /Batterie faible, en charge /Low battery, charging
Batería 100% cargada / Batterie chargée à 100% / 100% charged battery
Una vez conectado se encenderá
el indicador led en color rojo (la
carga completa de la batería tar-
da varias horas). Acabada la carga,
el indicador led será de color ver-
de y la batería estará dispuesta
para ser utilizada.
Notas
◗ Atención, si hace tiempo que no
se ha utilizado la alarma, la bate-
ría podría estar descargada.
◗ Si planea ausentarse de casa
durante un largo periodo de
tiempo realice una carga com-
pleta previamente.
◗ Si la duración de la batería se
reduce a la mitad de la dura-
ción normal, debería reempla-
zar el módulo alarma.
◗ Evite la exposición a tempera-
turas extremas, luz solar direc-
ta, humedad, arena, polvo o
golpes mecánicos.
MANTENIMIENTO ANUAL DEL CERROJO
MAINTENANCE ANNUELLE DUVERROU
ANNUAL MAINTENANCE OFTHE DEADLOCK
1 2
Table of contents
Other Lince Safety Equipment manuals
Popular Safety Equipment manuals by other brands

Kentek
Kentek XVT KXL-6005 instructions

Carl Stahl Kromer
Carl Stahl Kromer 7200 operating instructions

DELTA PLUS
DELTA PLUS LV201 installation instructions

Otto Bock
Otto Bock Paexo Shoulder 16ES100-2 Original instructions

KSB
KSB Surpress Feu SFE.3 Installation & operating manual

Petzl
Petzl FIXE Specific information