manuals.online logo
Brands
  1. Home
  2. •
  3. Brands
  4. •
  5. Lince
  6. •
  7. Safety Equipment
  8. •
  9. Lince 9593-GOLD-AP-T User manual

Lince 9593-GOLD-AP-T User manual

IT TASTO ANTI-PANICO
Manuale di programmazione e uso
TASTO ANTI-PANICO
PANIC BUTTON
LINCE ITALIA S.r.l.
Via Variante di Cancelliera, snc
00072 Ariccia (Roma)
Tel. +39 06 9301801
Fax +39 06 930180232
[email protected] www.lince.net
MADE IN ITALY La dichiarazione CE del presente articolo è reperibile su sito www.lince.net.
The CE declaration of this item is available on www.lince.net website.
ART.:
9593-GOLD-AP-T
1. INTRODUZIONE
Il 9593-GOLD-AP-T è un dispositivo per la trasmissione dell'evento
di panico compatibile con le centrali serie GOLD 869. Con un solo
pulsante ben visibile, permette l'invio alla centrale di un segnale
di panico in caso di difcoltà o di coercizione. All'interno della
confezione sono presenti anche due strisce bi-adesive utile per
installarlo, ad esempio, sotto il bancone di vendita di un negozio.
1.2 CONTENUTO DELLA CONFEZIONE
Tabella 1
Part. Identicazione
APulsante
BManuale
CStrisce bi-adesive e batteria
Fig. 1
001530/01008AA Rev0
EN PANIC BUTTON
Programming and operating manual
- Istruzioni originali - - Translation of the original instructions (original instructions in Italian) -
1.2 CONTENUTO DELLA CONFEZIONE / PACKAGING CONTENT
B
A
1.1 CARATTERISTICHE TECNICHE / TECHNICAL FEATURES
9593-GOLD-AP-T
Alimentazione Batteria al litio 3 V CR2450 / CR2450 3 V lithium battery
Frequenze di trasmissione / Operating frequency 869,40 MHz-869,65 MHz 1 canale
869,40 MHz-869,65 MHz 1 channel
Time Division Multiple Access
Advanced Encryption Standard
Portata / Range no a 800 m in aria libera / up to 800 m in open air
Immunità alla radiofrequenza / Radiofrequency immunity EN50130-4:2011
Temperatura di esercizio / Working temperature -10°C ÷ +40°C
Dimensioni / Dimensions Φ70 mm, h 20 mm
L’installazione dei prodotti riportati nel presente manuale deve essere eseguita da personale specializzato in possesso delle dovute conoscenze
tecniche; i prodotti sono stati progettati per utilizzo in contesti domestici e civili.
The installation of the products listed in this manual must be performed by specialized personnel with the necessary technical knowledge; the
products have been designed for use in domestic and civil contexts.
C
1. DESCRIPTION
The 9593-GOLD-AP-T is a device for the transmission of the panic
event compatible with the GOLD 869 series control panels. With a
single clearly visible button, it allows to send a panic signal to the
control panel in case of difculty or coercion. Inside the package
there is also two double sided adhesive strips useful for installing it,
for example, under the sales counter of a shop.
Table 1
Part. Description
AButton
BProduct Manual
CDouble-sided adhesive strips and battery
3. MEMORIZZAZIONE
Per procedere alla memorizzazione, dopo aver inserito la pila, è necessario
tenere premuti contemporaneamente i tasti Aed Fquando richiesto dalla
centrale e attendere l’ingresso nella modalita di memorizzazione segnalata
dall'accensione del LED rosso. Per premere il tasto Fè possibile munirsi di
un oggetto particolarmente ne (tipo attache) che sia possibile inserire nel
piccolo foro presente direttamente sul fondo del pulsante.
2. INSERIMENTO E SOSTITUZIONE PILA
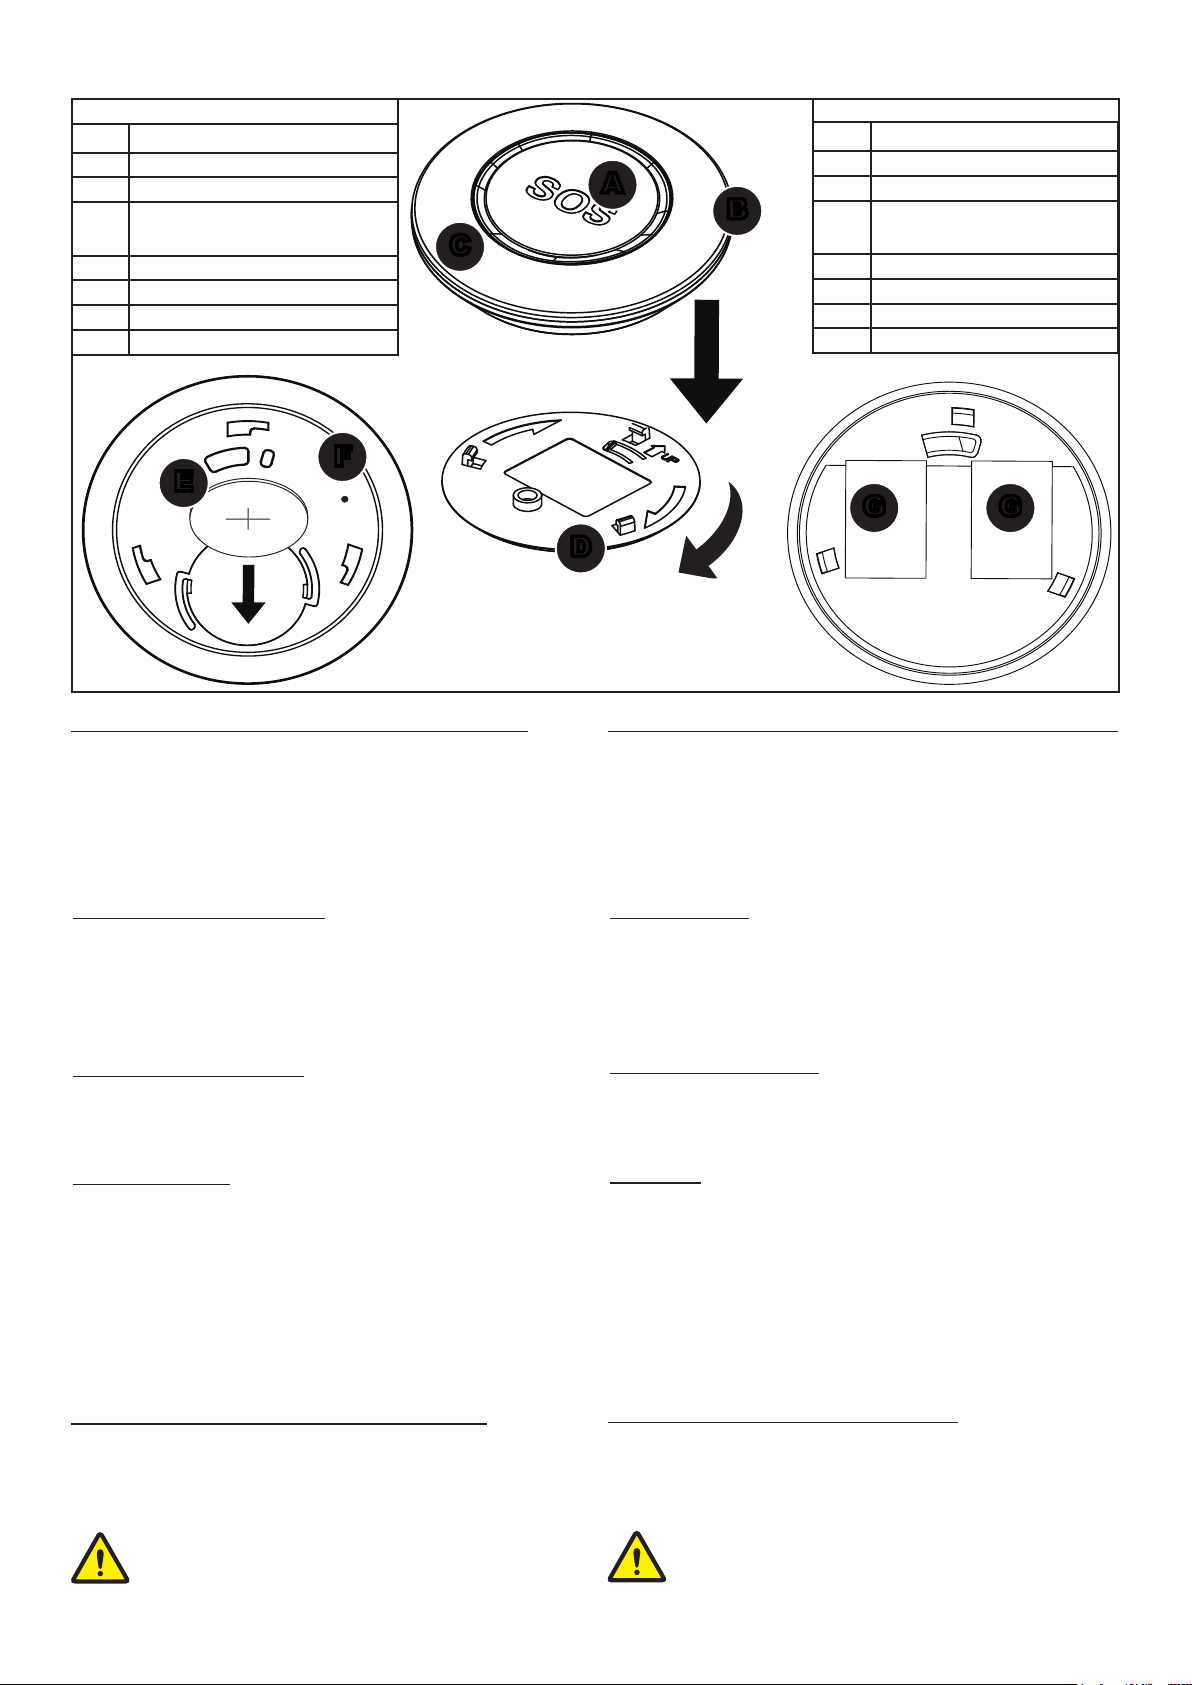
• Ruotare e slare il fondo D dal resto del corpo del pulsante;
• rimuovere l’eventuale pila esaurita e ripristinarla con una nuova dello
stesso modello CR2450 (E) avendo l'accortezza di piazzarla con il polo
positivo verso l'alto tra le due lamelle metalliche, inserendola come in
gura;
• memorizzare il pulsante facendo riferimento al paragrafo successivo;
• montare nuovamente la base Din modo da chiudere la sede della
batteria ed evitare che fuoriesca dalla propria sede.
1.3 IDENTIFICAZIONE DELLE PARTI / PARTS IDENTIFICATION
7. SMALTIMENTO E ROTTAMAZIONE
1. Svitare il fondo, rimuovere la pila e tutte le parti del prodotto quali
scheda e contenitore plastico;
2. Dividere le parti in base alla loro tipologia e smaltirle in accordo con
le leggi vigenti.
ATTENZIONE!
Non disperdere nell’ambiente i componenti ed ogni altro
materiale del prodotto. Rivolgersi a consorzi abilitati allo
smaltimento ed al riciclaggio dei materiali.
7. DISPOSAL AND SCRAPPING
1. Unscrew the bottom, remove the battery and all parts of the product
such as the board and plastic case;
2. Divide the parts by type and dispose of them in accordance with ap
plicable laws.
IMPORTANT!
Do not dispose of the components or any other product
material in the environment. Seek the assistance of com-
panies authorised to dispose of and recycle waste materials.
Tabella 2
Part. DESCRIZIONE
ATasto principale
BCorpo del pulsante
C
LED di segnalazione
(dentro al contentenitore ma visibili dall'esterno
in caso di accensione)
DFondo ad incastro
EPila CR2450
FTasto memorizzazione
GStrisce bi-adesive
Fig. 2
B
D
A
Table 2
Part. DESCRIPTION
AMain Button
BButton body
C
Signaling LED
(inside the case but visible from the outside
in case of lighting)
DInterlocking bottom
ECR2450 battery
FPairing button
GDouble sided adhesive strips
2. INSERTING AND REPLACING THE BATTERY
• Rotate and remove the bottom Dfrom the rest of the button body;
• remove any exhausted battery and restore it with a new one of the same
CR2450 (E) model making sure to place it with the positive pole facing
upwards between the two metal blades, inserting it as shown in the
gure;
• memorize the button referring to the next paragraph;
• reassemble the base Din order to close the battery seat and prevent it
from coming out of its seat.
3. PAIRING
To proceed with storage, after inserting the battery, it is necessary to hold
down keys Aand Fat the same time when requested by the control panel and
wait for entry into the storage mode signaled by the red LED lighting up. To
press the F key it is possible to have a particularly ne object (such as paper
clip) that can be inserted into the small hole present directly on the bottom of
the button.
E
G
G
4. INSTALLAZIONE
Nel caso sia necessario ssarlo su di una supercie, come ad esempio
sotto il bancone di un negozio, è possibile ssarlo utilizzando le due
strisce bi-adesive Gin dotazione.
5. INSTALLATION
If it is necessary to x it on a surface, such as under the counter of
a shop, it can be xed using the two double sided adhesive strips G
supplied.
C
F
6. UTILIZZO
Il tasto (A), se premuto, invia il segnale di antipanico alla centrale, Il
lampeggio alternato dei LED (visibili nella corona circolare intorno al
tasto A) indica la conferma del comando. Il lampeggio contemporaneo
e veloce dei LED indica, invece, la non corretta trasmissione. Il
comando viene inviato dopo una singola pressione del tasto. In seguito
alla pressione, in centrale può avvenire una segnalazione di panico
(sirena+SMS) o panico silenzioso (solo SMS). E' possibile associare
al tasto Auna delle seguenti funzioni speciali: ronda, elettroserratura,
allarme silenzioso; fare comunque riferimento al manuale della centrale
in uso per ulteriori dettagli.
6. USE
When pressed, button (A) sends the panic signal to the control panel.
The alternating ashing of the LEDs (visible in the circular ring around
button A) indicates conrmation of the command. The simultaneous
and fast ashing of the LEDs, on the other hand, indicates incorrect
transmission. The command comes after a single key press. Following
the pressure, a panic (siren + SMS) or silent panic (SMS only) signal
can occur in the control panel. Key Acan be associated with one of the
following special functions: patrol, electric lock, silent alarm; In any case,
refer to the manual of the control panel in use for further informations..

Other Lince Safety Equipment manuals

Lince Cerroko 7930RSA User manual

Lince

Lince Cerroko 7930RSA User manual

Lince 9593-GOLD-AP-T User manual

Lince

Lince 9593-GOLD-AP-T User manual

Lince 1878-SN-DTA User manual

Lince

Lince 1878-SN-DTA User manual

Popular Safety Equipment manuals by other brands

Kentek XVT KUP-5801 instructions

Kentek

Kentek XVT KUP-5801 instructions

U-Line H-2589 quick start guide

U-Line

U-Line H-2589 quick start guide

SafeWaze FS-EX310-1 instruction manual

SafeWaze

SafeWaze FS-EX310-1 instruction manual

Sordin left/RIGHT Active FM Pro Product description

Sordin

Sordin left/RIGHT Active FM Pro Product description

3M DBI SALA 3101207 instruction manual

3M

3M DBI SALA 3101207 instruction manual

Protekt TROLLEY ST012 quick start guide

Protekt

Protekt TROLLEY ST012 quick start guide

Jippie's 83683 quick start guide

Jippie's

Jippie's 83683 quick start guide

Mustang Survival MD3070 owner's manual

Mustang Survival

Mustang Survival MD3070 owner's manual

Uponor AquaSAFE installation guide

Uponor

Uponor AquaSAFE installation guide

ProMobility M27 user guide

ProMobility

ProMobility M27 user guide

SICK deTem4 Core A/P operating instructions

SICK

SICK deTem4 Core A/P operating instructions

Tractel skysafe MP 03 Assembly and operating manual

Tractel

Tractel skysafe MP 03 Assembly and operating manual

SICK deTec2 Core operating instructions

SICK

SICK deTec2 Core operating instructions

Evacusafe Standard Training manual

Evacusafe

Evacusafe Standard Training manual

BGD Oops Reserve owner's manual

BGD

BGD Oops Reserve owner's manual

Safety Solutions HUTCHENS DEVICE installation manual

Safety Solutions

Safety Solutions HUTCHENS DEVICE installation manual

Knauf SHAFTLINER MOULDSTOP Installation

Knauf

Knauf SHAFTLINER MOULDSTOP Installation

schmersal TV8S 521 operating instructions

schmersal

schmersal TV8S 521 operating instructions

manuals.online logo
manuals.online logoBrands
  • About & Mission
  • Contact us
  • Privacy Policy
  • Terms and Conditions

Copyright 2025 Manuals.Online. All Rights Reserved.