Uponor AquaSAFE User manual

Uponor AquaSAFE™ System
Installation Guide

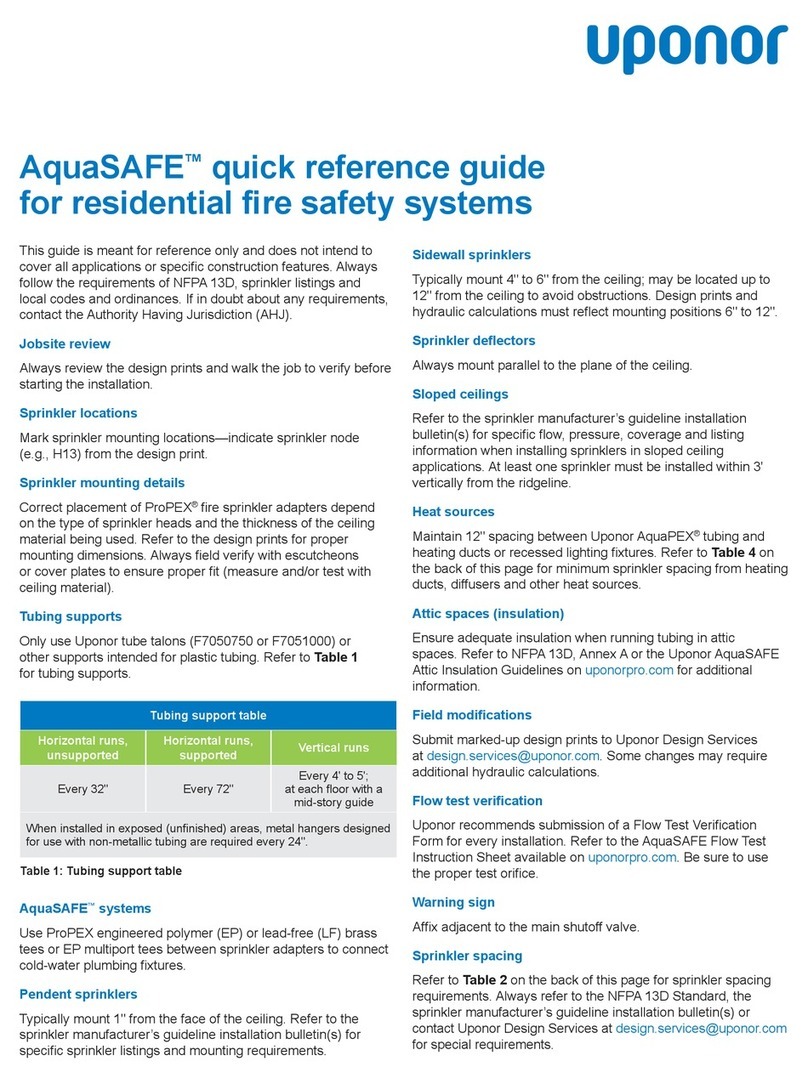
Uponor AquaSAFE™ System Installation Guide
is published by
Uponor Inc.
5925 148th Street West
Apple Valley, MN 55124
T800.321.4739
F 952.891.2008
uponor-usa.com
Uponor Ltd.
6510 Kennedy Road
Mississauga, ON L5T 2X4
T 888.594.7726
F 800.638.9517
uponor.ca
© 2021 Uponor
All rights reserved
First edition May 2016
Fifth printing July 2021
Printed in the United States of America
ii l Uponor AquaSAFE System Installation Guide

The Uponor AquaSAFE™ system installation guide is a manual
published for architects, engineers, building ofcials, plumbing
and re safety professionals, and authorities having jurisdiction
(AHJs). This guide describes the recommendations for installing
the Uponor AquaSAFE residential re sprinkler system in
one- and two-family dwellings and manufactured homes,
as specied in NFPA 13D.
Always refer to the NFPA 13D standard, and/or any other
applicable codes, standards, or ordinances for nal
determination of installation requirements.
Uponor has taken reasonable efforts in collecting, preparing,
and providing quality information and material in this
document. However, system enhancements may result in
modication of features or specications without notice.
For the most current technical information, go to the Uponor
website at uponor-usa.com or uponor.ca.
Uponor is not liable for installation practices that deviate from
this document or are not acceptable practices within the
mechanical trades.
Note: Some of the information provided in this installation guide
may be pending formal documentation from listing agencies.
Please direct any questions regarding an application
or a specic design to Uponor Construction Services at
uponor-usa.com | uponor.ca l iii

Table of contents
Chapter 1: General Information . . . . . . . . . . . . . . . . . . . . . 1
Model code approvals, certifications, ratings, and
material standards . . . . . . . . . . . . . . . . . . . . . . . . . . . . . 1
AquaSAFE exposed listing . . . . . . . . . . . . . . . . . . . . . . . . . 2
Installation requirements . . . . . . . . . . . . . . . . . . . . . . 2
Exposed wood joist ceiling assemblies. . . . . . . . . . . . . . 2
Exposed finished ceiling assemblies . . . . . . . . . . . . . . . 3
Handling and storing Uponor AquaPEX® piping and
components . . . . . . . . . . . . . . . . . . . . . . . . . . . . . . . . . 4
Uponor AquaSAFE multipurpose fire sprinkler
system overview. . . . . . . . . . . . . . . . . . . . . . . . . . . . . . .5
Features and benefits . . . . . . . . . . . . . . . . . . . . . . . . . . . 6
Standalone sprinkler system overview . . . . . . . . . . . . . . . . 7
Backflow prevention requirements . . . . . . . . . . . . . . . . . . . 7
AquaSAFE system components . . . . . . . . . . . . . . . . . . . . . 7
Uponor AquaPEX piping . . . . . . . . . . . . . . . . . . . . . . . 7
ProPEX sprinkler adapters and fittings . . . . . . . . . . . . . . 8
Equivalent piping lengths . . . . . . . . . . . . . . . . . . . . . . 8
Residential sprinklers . . . . . . . . . . . . . . . . . . . . . . . . . . .10
Concealed sprinklers . . . . . . . . . . . . . . . . . . . . . . . . .11
Recessed pendent sprinklers . . . . . . . . . . . . . . . . . . . .11
Flat concealed horizontal sidewall sprinklers . . . . . . . . . .11
Recessed horizontal sidewall sprinklers . . . . . . . . . . . . .12
Recessed escutcheons . . . . . . . . . . . . . . . . . . . . . . . .12
Chapter 2: Design . . . . . . . . . . . . . . . . . . . . . . . . . . . . . 13
Sprinkler plans . . . . . . . . . . . . . . . . . . . . . . . . . . . . . . .13
Design information . . . . . . . . . . . . . . . . . . . . . . . . . . . . . 13
Layout example. . . . . . . . . . . . . . . . . . . . . . . . . . . . 14
Chapter 3: Installation overview. . . . . . . . . . . . . . . . . . . . 15
Recommended tools . . . . . . . . . . . . . . . . . . . . . . . . . . . 15
Product verification . . . . . . . . . . . . . . . . . . . . . . . . . . . . 15
Job-site verification . . . . . . . . . . . . . . . . . . . . . . . . . . . 16
iv l Uponor AquaSAFE System Installation Guide

Locating sprinkler and connection locations . . . . . . . . . . . 16
Spacing from continuous obstructions . . . . . . . . . . . . . . . 16
Minimum distances from heat sources . . . . . . . . . . . . . . . 17
Floor-to-floor connection locations . . . . . . . . . . . . . . . . . 17
Plumbing connection locations . . . . . . . . . . . . . . . . . . . . 17
Dead-end and arm-over connections . . . . . . . . . . . . . . . 18
What to do if changes are required . . . . . . . . . . . . . . . . . 18
Chapter 4: Installing sprinkler adapters . . . . . . . . . . . . . . 19
Chapter 5: Installing sprinklers . . . . . . . . . . . . . . . . . . . . 23
Chapter 6: Installing piping . . . . . . . . . . . . . . . . . . . . . . . 25
More than the recommended number of expansions
are needed to make a connection . . . . . . . . . . . . . . . . . . 25
Cold-weather expansions. . . . . . . . . . . . . . . . . . . . . . . . 25
Bend radius and piping support . . . . . . . . . . . . . . . . . . . 25
Bending PEX . . . . . . . . . . . . . . . . . . . . . . . . . . . . . . 25
Piping support and pipe talon guidelines . . . . . . . . . . . . . . 25
Piping support spacing . . . . . . . . . . . . . . . . . . . . . . . . . 26
Reforming kinked piping. . . . . . . . . . . . . . . . . . . . . . . . . 27
Piping uncoilers . . . . . . . . . . . . . . . . . . . . . . . . . . . . . . 28
Extreme temperature installations . . . . . . . . . . . . . . . . . . 29
Chapter 7: Making ProPEX connections . . . . . . . . . . . . . . . 31
Distance between fittngs . . . . . . . . . . . . . . . . . . . . . . . . .31
General ProPEX connection tips . . . . . . . . . . . . . . . . . . . . .31
Making ProPEX connections with Milwaukee® ProPEX
expansion tools . . . . . . . . . . . . . . . . . . . . . . . . . . . . . . 33
With auto rotation (standard Milwaukee heads) . . . . . . 34
Without auto rotation (standard Uponor heads) . . . . . . 34
Making ProPEX connections with Milwaukee M18 FORCE LOGIC
ProPEX expansion tools. . . . . . . . . . . . . . . . . . . . . . . . . . 36
FORCE LOGIC expansion head installation. . . . . . . . . . . 36
Making a ProPEX connection . . . . . . . . . . . . . . . . . . . 37
Making ProPEX connections with ProPEX 201 corded
expander tools . . . . . . . . . . . . . . . . . . . . . . . . . . . . . . . 38
uponor-usa.com | uponor.ca l v

Making 33
⁄88" ProPEX connections. . . . . . . . . . . . . . . . . . . . . 42
Proper expander tool and head maintenance . . . . . . . . . . 43
Disconnecting a ProPEX brass fitting . . . . . . . . . . . . . . . . . 44
Troubleshooting ProPEX connections . . . . . . . . . . . . . . . . 46
Fittings won’t seal . . . . . . . . . . . . . . . . . . . . . . . . . . 46
Expansion is difficult . . . . . . . . . . . . . . . . . . . . . . . . . 46
Expansion head slips out of piping when
making expansions . . . . . . . . . . . . . . . . . . . . . . . . . 46
ProPEX ring slides down piping during expansion . . . . . . 46
More than the recommended number of expansions
are needed to make a connection . . . . . . . . . . . . . . . 47
Cold-weather expansions . . . . . . . . . . . . . . . . . . . . 47
Chapter 8: Connecting plumbing runs . . . . . . . . . . . . . . .49
Chapter 9: Domestic water bypass. . . . . . . . . . . . . . . . . . 51
Bypass components . . . . . . . . . . . . . . . . . . . . . . . . . . . .51
Installation guidelines . . . . . . . . . . . . . . . . . . . . . . . . . . 52
Troubleshooting . . . . . . . . . . . . . . . . . . . . . . . . . . . . . . 53
Hard or unfiltered water issues . . . . . . . . . . . . . . . . . . 53
Flow test failure . . . . . . . . . . . . . . . . . . . . . . . . . . . . 54
Chapter 10: Pressure testing . . . . . . . . . . . . . . . . . . . . . .55
Chapter 11: Flow testing. . . . . . . . . . . . . . . . . . . . . . . . . . 57
Flow test setup . . . . . . . . . . . . . . . . . . . . . . . . . . . . . . . 58
Flow test assembly . . . . . . . . . . . . . . . . . . . . . . . . . . . . 58
Performing the test . . . . . . . . . . . . . . . . . . . . . . . . . . . . 59
Troubleshooting . . . . . . . . . . . . . . . . . . . . . . . . . . . . . . 60
Potential system supply problems . . . . . . . . . . . . . . . . . . 60
Potential system piping problems . . . . . . . . . . . . . . . . . . .61
Potential flow test procedure or equipment problems . . . . . .61
Chapter 12 : Homeowner information . . . . . . . . . . . . . . . .63
Sprinkler cabinet . . . . . . . . . . . . . . . . . . . . . . . . . . . . . 63
Warning sign . . . . . . . . . . . . . . . . . . . . . . . . . . . . . . . . 64
Warranty information . . . . . . . . . . . . . . . . . . . . . . . . . . 64
vi l Uponor AquaSAFE System Installation Guide

Chapter 1
General information
Model code approvals, certications, ratings,
and material standards
Uponor AquaPEX®piping and ProPEX® ttings have achieved
the following regulatory compliance (model code approvals,
standards, and certications).
• UL • NSF • UPC • CSA • IPC
Uponor AquaPEX piping and ProPEX ttings are listed for re
sprinkler systems of residential occupancies as dened in
National Fire Protection Association (NFPA) 13D: Standard
for Installation of Sprinkler Systems in One- and Two-family
Dwellings and Manufactured Homes.
Use only the materials specically identied on the sprinkler
plans and material lists to ensure compliance with re
protection listings.
Uponor AquaPEX piping is manufactured in compliance with
ASTM F876, ASTM F877, ASTM F1960, and ASTM F2023 as certied
by NSF International.
Uponor AquaPEX piping carries the following maximum pressure
and temperature ratings.
• 80 psi at 200°F (5.5 bar at 93.3°C)
• 100 psi at 180°F (6.9 bar at 82.2°C)
• 130 psi at 120°F (8.9 bar at 48.9°C)*
• 160 psi at 73°F (11 bar at 23°C)
* This applies to ¾", 1", and 1¼" Uponor AquaPEX white piping, in compliance with UL 1821.
The piping and ttings for systems that are not equipped
with a re department connection are designed to have a
working pressure of up to 130 psi (8.9 bar) at a temperature
of 120°F (49°C).
Water supplies for standalone systems must be maintained
at less than 80 psi (5.5 bar) in accordance with NFPA 13D
requirements.
uponor-usa.com | uponor.ca l 1

Uponor AquaPEX piping carries a standard grade rating
recommended by the Plastics Pipe Institute (PPI).
Uponor AquaPEX piping is listed to NSF International Standard 14,
which denes requirements for ingredients, materials, products,
quality assurance, and marking.
Uponor AquaPEX piping and Uponor sprinkler adapters are
listed to NSF International Standard 61, which denes
requirements for health effects.
Uponor AquaPEX piping and ProPEX ttings are certied
compliant with the Canadian Standards Association,
CAN/CSA B137.5: Standard for Crosslinked Polyethylene (PEX)
Piping Systems for Pressure Applications.
AquaSAFE exposed listing
Uponor AquaSAFE systems are listed for use in exposed
installations (basements) when installed in accordance with NFPA
13D, the QAI listing to UL 1821, Thermoplastic Sprinkler Pipe and
Fittings for Fire Protection Service, and the following guidelines.
Installation requirements
Uponor AquaPEX white piping and ProPEX ttings listed to
UL 1821 may be installed without protection (exposed) in the
following assemblies.
Exposed wood joist ceiling assemblies
• The ceiling shall be horizontal and constructed using
dimensional lumber (solid wood), engineered wood, or
engineered wood I-joists.
• Joist depth must be between 6" and 16" deep with on-center
spacing between 12" and 24".
• Joists may remain exposed after installation.
• Listed residential sprinklers with an activation temperature of
155°F (68.3°C) and 4.9 minimum K-factor shall be used in the
exposed portion of the sprinkler system. Sprinkler spacing shall
be no larger than 16 ft. Per NFPA 13D, sprinklers shall be installed
with deectors no more than 1¾" below the bottom of the joist
to account for future nished ceilings.
2 l Uponor AquaSAFE System Installation Guide

• Uponor AquaPEX piping shall not be installed in locations with
direct exposure to sunlight.
• Piping shall be supported every 24" with metal pipe hangers
designed for use with non-metallic pipe/piping. Follow
minimum bend radius limitations as detailed on page 26 of
this installation guide. Drilling through joists is an acceptable
method of support if allowed by the AHJ, joist manufacturer,
and applicable building codes.
Exposed nished ceiling assemblies
• Ceiling shall be horizontal and must be nished with minimum
33⁄88"-thickness gypsum wallboard, a suspended membrane
ceiling with lay-in panels or tiles having a minimum weight
of 0.35 lf/ft2 installed with metallic support grids, or ½"-thick,
code-complying plywood or solid sheathing.
• Piping shall be supported every 24" with metal supports
designed for use with non-metallic pipe/piping. Follow
minimum bend radius limitations as detailed on page 26 of
this installation guide. Drilling through joists is an acceptable
method of support if allowed by the AHJ, joist manufacturer,
and applicable building codes.
• Listed residential sprinklers with an activation temperature of
155°F (68.3°C) and 4.9 minimum K-factor shall be used in the
exposed portion of the sprinkler system. Sprinkler spacing shall
be no larger than 16 ft. Per NFPA 13D, sprinklers shall be installed
with deectors no more than 1¾" below the bottom of the joist
to account for future nished ceilings.
uponor-usa.com | uponor.ca l 3

Handling and storing Uponor AquaPEX piping
and components
Although not comprehensive, the following highlights the
most
common guidelines and listing requirements when
handling Uponor AquaPEX piping and Uponor AquaSAFE
system components:
• Install Uponor systems according to the installation instructions
of the manufacturer. Failure to follow the instructions and
installation guidelines can result in system function failure.
• Do not store sprinkler assemblies or cover plates in areas that
may exceed 100°F (37.8°C).
• Uponor PEX piping is listed for re protection systems that do
not exceed 130 psi (8.9 bar) 120°F (48.9°C).
• Do not use PEX piping where temperatures and pressures
exceed ratings.
• Store Uponor PEX piping in its packaging under cover to avoid
dirt accumulation and exposure to direct sunlight. Do not
expose PEX piping to direct sunlight for more than 30 days.
Do not use piping that has been exposed to direct sunlight for
more than 30 days.
• Do not install PEX piping in direct view of uorescent lighting.
Do not use piping that has been exposed to direct uorescent
lighting for more than 30 days.
• Do not weld, glue or use adhesives or adhesive tape on
PEX piping.
Note: You may temporarily afx adhesive tape to Uponor PEX
piping during installation. However, to protect the integrity of
the system, the tape should not be permanent. Remove the
tape and residual adhesive after completing the installation.
• Do not apply open ame to PEX piping.
• Do not install PEX piping within 6" of any gas appliance vents,
with the exception of double-wall B-vents or plastic vents,
which have a minimum clearance of 1".
• Do not install PEX piping within the rst 18" of a connection to
a water heater, unless otherwise allowed by code. Follow your
local code requirements.
• Do not install PEX within 12" of any recessed light xtures, unless
the PEX piping is protected with suitable insulation.
4 l Uponor AquaSAFE System Installation Guide

• Do not solder within 18" of any PEX piping in the same water
line. Make all sweat connections prior to making the tting
connection.
• Do not install PEX piping between the tub/shower valve and
tub spout.
• Do not use PEX piping for an electrical ground.
• Do not spray on or allow any organic chemicals, pesticides,
strong acids or strong bases to be exposed to PEX piping.
• Do not use petroleum or solvent-based paints on PEX piping.
• Use only approved and appropriate restop materials with
PEX piping. Verify restop compatibility with the restop
manufacturer.
• Although PEX piping does not attract rodents, pests, and other
insects, these uninvited guests can have detrimental effects on
PEX system integrity as well as duct systems, electrical systems,
and other integrated systems in a home. Property owners should
take steps to eliminate pests.
• Do not subject PEX piping to impact.
• During remodeling or ceiling repair, take appropriate
precautions to protect the piping and sprinklers from damage.
• Do not install PEX piping and ProPEX ttings in combustible,
concealed spaces where sprinklers are required by NFPA 13D
standard and the National Building Code of Canada
(as applicable).
Uponor AquaSAFE multipurpose re sprinkler
system overview
The AquaSAFE system is a cost-effective way to provide reliable
and safe home re protection. This progressive technology
combines the plumbing and re sprinkler systems into an
efcient, cost-effective, multipurpose system featuring
dependable Uponor AquaPEX piping.
Uponor AquaSAFE systems are available in various system
layouts. Figure 2-1 on page 14 depicts a looped system
conguration.
uponor-usa.com | uponor.ca l 5

In a multipurpose system, individually heat-activated re
sprinklers attach to Uponor sprinkler adapter ttings. Flexible
Uponor AquaPEX piping supplies water to each sprinkler, as well
as cold-water plumbing xtures. Because the plumbing and
the re sprinkler systems are merged into one system, water
availability to the sprinklers is veried each time a plumbing
xture is used.
Installation of the AquaSAFE system must comply with the
following requirements.
• NFPA 13D Standard for the Installation of Sprinkler Systems in
One- and Two-Family Dwellings and Manufactured Homes
• National Building Code of Canada (as applicable)
• Other recognized or adopted installation criteria deemed
acceptable to the AHJ
The Uponor AquaSAFE system uses sprinkler adapter ttings
with a ½" NPT outlet to attach the re sprinkler. Refer to the
Uponor Product Catalog for all adapter ttings.
ProPEX tees and multiport tees supply the cold-water xtures.
Hot water is supplied directly to necessary plumbing xtures
throughout the house in a separate system.
Features and benets
• 25-year warranty on Uponor AquaPEX piping and ProPEX ttings
when used together*
• Easily integrates into the plumbing system
• Improves water pressure at all xtures
• Quickly installed using ProPEX tting connections
• Veries fresh water is available to the sprinklers each
time an occupant uses a cold-water plumbing xture
* Must be installed by an Uponor-trained, licensed contractor.
Refer to the Uponor warranty on uponor-usa.com or uponor.ca for details.
6 l Uponor AquaSAFE System Installation Guide

Standalone sprinkler system overview
Uponor AquaSAFE products may also be installed as a
standalone sprinkler system as allowed by NFPA 13D. Standalone
re sprinkler systems utilize the same individually heat-
activated re sprinklers as in multipurpose systems, but they
are supplied by completely separate piping serving only the
re sprinklers. Standalone sprinkler systems typically require
backow prevention because the water in the sprinkler piping
is stagnant. NFPA 13D requires the water supply for PEX-based
standalone systems to be limited to 80 psi (5.5 bar) or less. If
the maximum static pressure of the water supply is more than
80 psi (5.5 bar), a pressure-reducing valve may be employed
to limit the pressure but an automatic means of pressure relief
must be installed on the sprinkler system piping.
As with multipurpose systems, Uponor PEX and ProPEX ttings
may not be used on standalone systems with a re department
connection.
Backow prevention requirements
With non-stagnant multipurpose re sprinkler and plumbing
systems, backow prevention devices are not typically required.
Check local code for any applicable backow requirements.
Backow prevention may be required with standalone systems.
AquaSAFE system components
Uponor AquaPEX piping
Uponor AquaPEX piping is an installation-friendly construction
product. The exibility of Uponor AquaPEX allows the installer
to eliminate many of the joints normally required with a
rigid piping system—saving installation time and expense.
Uponor recommends the procedures outlined in this section
to simplify installation.
uponor-usa.com | uponor.ca l 7

ProPEX sprinkler adapters and ttings
Uponor offers sprinkler adapter ttings specically designed for
the AquaSAFE system. These ttings feature ProPEX connections
and a standard ½" NPT outlet for connecting re sprinklers.
Tables 1-1 and 1-2 show the required piping lengths needed to
approximate the equivalent pressure resistance of the different
types of Uponor ProPEX ttings.
Equivalent piping lengths
Reduced fittings Flow Equiv. length
EP reducing coupling (1" x ¾") Through 3
EP reducing coupling (1¼" x ¾") Through 4
EP reducing coupling (1¼" x 1") Through 3
EP reducing tee (¾" x ¾" x 1") Through 2
Branch 6
EP reducing tee (1" x ¾" x ¾") Through 3
Branch 17
EP reducing tee (1" x ¾" x 1") Through 3
Branch 16
EP reducing tee (1" x 1" x ¾") Through 2
Branch 7
EP reducing tee (1¼" x 1" x ¾") Through 4
Branch 6
EP reducing tee (1¼" x 1" x 1") Through 11
Branch 23
EP reducing tee (1¼" x 1¼" x ¾") Through 3
Branch 6
EP reducing tee (1¼" x 1¼" x 1") Through 5
Branch 7
Table 1-1: Equivalent piping lengths of Uponor reduced ttings
8 l Uponor AquaSAFE System Installation Guide

Equivalent piping lengths
Standard fittingsw Pipe dimension (in)
Flow ¾" 1" 1¼"
EP coupling Through 1 1 1
Brass coupling Through 1 1 –
EP elbow Through 11 12 11
Brass elbow Through 5 6 –
EP tee Through 2 2 4
Branch 17 14 9
Brass tee Through 1 1 –
Branch 6 6 –
Brass sweat adapter Through 3 3 4
Brass male threaded adapter Through 3 4 5
Brass female threaded adapter Through 3 4 5
Table 1-2: Equivalent piping lengths of Uponor standard ttings
uponor-usa.com | uponor.ca l 9

Figure 1-1: ProPEX tee with
concealed sprinkler head
Figure 1-2: ProPEX tee with horizontal
sidewall sprinkler
Figure 1-3: Uponor PEX piping,
ProPEX ring, and ProPEX EP tee
Uponor ProPEX ttings, used with Uponor AquaPEX piping, are
manufactured according to the ASTM F1960 standard. Uponor
offers a complete line of NSF 61-listed ProPEX ttings. ProPEX
ttings are made from engineered polymer (EP) or lead-free (LF)
brass for various connection needs.
Connections are made by sliding a ProPEX ring over the PEX
piping and expanding them simultaneously. The expanded
piping and ProPEX ring then slide over the tting. The connection
is made as the PEX piping shrinks over the tting due to the
unique shape memory of Uponor AquaPEX piping.
Refer to the Uponor Product Catalog for a current listing of all
ProPEX ttings listed for use in re protection systems.
Residential sprinklers
Only NSF-listed residential re sprinklers are compatible with
AquaSAFE multipurpose re safety systems. Other residential
sprinklers not shown in the Uponor Product Catalog may be used
with standalone systems.
For more information, email Uponor Construction Services at
Note: Ensure all sprinklers
are installed within their
listing limitations. Sprinklers
shown here and in the
Uponor Product Catalog
are compliant with the NFPA
13D standard. Do not store
sprinklers in areas that
may exceed 100°F (37.8°C).
10 l Uponor AquaSAFE System Installation Guide

Figure 1-4: Concealed
sprinkler
Figure 1-5: Concealed
sprinkler cover plate
Figure 1-6: Recessed
pendent sprinkler
Figure 1-7:
Flat concealed
sidewall sprinkler
Concealed sprinklers
Concealed sprinklers feature a plate that
drops away from the sprinkler when the
temperature reaches between 135°F (57°C)
and 140°F (60°C). The sprinkler activates
when the temperature reaches between
162°F (72°C) and 165°F (74°C). In areas
where ambient ceiling temperatures
exceed 100°F (38°C), intermediate-
temperature sprinklers are required.
Caution: Do not paint cover plates.
Paint coverage may interfere with
the heat sensitivity of the sprinkler.
Recessed pendent sprinklers
Recessed pendent sprinklers are visible
in the ceiling and do not use a cover
plate. Recessed sprinklers activate when
temperatures exceed 155°F (68°C). In
areas where ambient ceiling temperatures
exceed 100°F (38°C), intermediate
temperature sprinklers are required.
Flat concealed horizontal
sidewall sprinklers
Flat concealed horizontal sidewall
sprinklers are installed in the wall and
concealed by a special at cover plate
that releases prior to sprinkler operation
at 165°F (74°C).
uponor-usa.com | uponor.ca l 11

Recessed horizontal sidewall sprinklers
protrude through the wall of the
room, typically between 4" and 6"
below the ceiling.
The sidewall sprinkler activates when
temperatures exceed 155°F (68°C).
Intermediate temperature sprinklers
are required where ambient ceiling
temperatures exceed 100°F (38°C).
Recessed escutcheons
Recessed escutcheons include a tension
collar, and are available in white or
bronze to provide a nished appearance
for sprinklers.
Caution: Do not paint over the
sprinklers and cover plates.
Paint may interfere with the
heat sensitivity of the sprinkler, and
disturbances may damage the sprinkler.
Figure 1-8:
Recessed horizontal
sidewall sprinkler
Figure 1-9: Recessed
escutcheon
12 l Uponor AquaSAFE System Installation Guide
Chapter 2
Design
Sprinkler plans
Uponor can provide a sprinkler layout design plan and engineer-
stamped drawings. Uponor designers use hydraulic calculation
software to create system layouts that provide reliable re
sprinkler protection. This software species the proper sprinkler
locations, necessary ow rates and pressures. The resulting
designs comply with nationally recognized re codes and
standards and meet the requirements of the NFPA 13D standard
and the National Building Code of Canada (as applicable).
For information about integrating Uponor AquaSAFE
details into existing sprinkler design software, certied
designers can contact Uponor Construction Services at
Design information
Uponor’s design provides the following information:
• Model — Type of sprinkler used
• Nominal orice size — Size of the orice on the sprinkler
• Temperature rating — Temperature the sprinkler will activate
• K factor — A number that describes the size of the hole
available for water ow through the sprinkler
• Maximum sprinkler spacing — Maximum spacing between
the sprinklers (determined by the designer and indicated for
each sprinkler on the layout)
• Maximum distance to wall — The maximum distance the
sprinkler may be placed from the wall (equal to half the
maximum sprinkler spacing designated on the layout)
• Single sprinkler — When performing a single-sprinkler ow
verication test, the pressure and ow requirements for
that sprinkler at various spacing
• Two or more sprinklers — When performing a ow verication
test for two or more sprinklers, the pressure and ow
requirements for those sprinklers at the selected spacing
uponor-usa.com | uponor.ca l 13

Layout example
H.# Sprinkler ID
Sprinkler node number Type of sprinkler and its maximum spacing
Figure 2-1: Layout example
Colonial 1st Floor
RC-RES-16
H.17
RC-RES-16
H.18
RC-RES-16
H.23
RC-RES-16
H.14
RC-RES-16
H.12
RC-RES-16
H.3
RC-RES-16
H.2
RC-RES-16
H.1
RC-RES-16
H.9
RC-RES-16
H.24
Supply up to 2nd Floor
Up
Family room
Sun room
KitchenDining room
Laundry Garage (no A.S.)
Study
Open to
above
Living room
Bath
14 l Uponor AquaSAFE System Installation Guide
Other manuals for AquaSAFE
1
Table of contents
Other Uponor Safety Equipment manuals