3. MEMORIZZAZIONE
Per procedere alla memorizzazione fare riferimento al manuale della
centrale serie GOLD; dopo aver inserito la pila, è necessario tenere premuti
contemporaneamente i tasti Aed Fquando richiesto dalla centrale e attendere
l’ingresso nella modalita di memorizzazione segnalata dall'accensione
del LED rosso. Per premere il tasto Fè possibile munirsi di un oggetto
particolarmente ne (tipo attache) che sia possibile inserire nel piccolo foro
2. INSERIMENTO E SOSTITUZIONE PILA
• Ruotare e slare il fondo Ddal resto del corpo del pulsante;
• rimuovere l’eventuale pila esaurita e ripristinarla con una nuova dello
stesso modello CR2450 (E) avendo l’accortezza di piazzarla con il polo
positivo verso l’alto ed inserendola come in gura; poggiarla lateralmente
sulla lamella metallica laterale e premere verso il basso in modo che la
pila venga bloccata dai fermi in plastica. L’installazione è corretta se i
fermi in plastica risultano visibili al di sopra della batteria (vedi gura H);
• memorizzare il pulsante facendo riferimento al paragrafo successivo;
• montare nuovamente la base Din modo da chiudere la sede della
batteria.
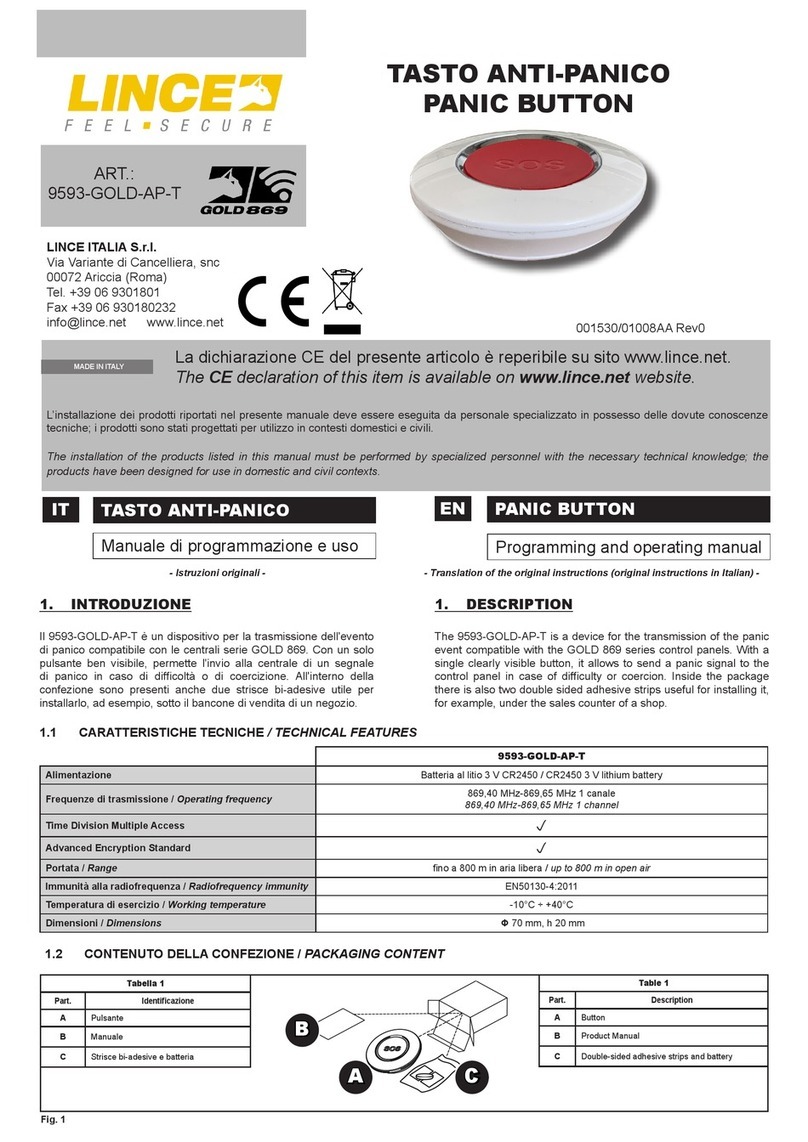
1.3 IDENTIFICAZIONE DELLE PARTI / PARTS IDENTIFICATION
7. SMALTIMENTO E ROTTAMAZIONE
7.1 SMALTIMENTO IMBALLAGGIO
Smaltire il materiale di imballo secondo i codici identicativi riportati sul
materiale stesso:
• PAP 20 / PAP 21 – raccolta differenziata carta;
• PVC 3 / LDPE 4 / O 7 – raccolta differenziata plastica.
Vericare il sistema di raccolta del proprio comune.
7.2 SMALTIMENTO PRODOTTO E ROTTAMAZIONE
1. Svitare il fondo, rimuovere la pila e tutte le parti del prodotto quali scheda
e contenitore plastico;
2. Dividere le parti in base alla loro tipologia e smaltirle in accordo con le
leggi vigenti.
ATTENZIONE!
Non disperdere nell’ambiente i componenti ed ogni altro ma-
teriale del prodotto. Rivolgersi a consorzi abilitati allo smalti-
mento ed al riciclaggio dei materiali.
7. DISPOSAL AND SCRAPPING
7.1 DISPOSAL OF PACKAGING
Dispose of the packaging material according to the identication codes shown
on the material itself:
• PAP 20 / PAP 21 - separate paper collection;
• PVC 3 / LDPE 4 / O 7 - plastic separate collection.
Check your municipality's collection system.
7.2 PRODUCT DISPOSAL AND SCRAPPING
1. Unscrew the bottom, remove the battery and all parts of the product such
as the board and plastic case;
2. Divide the parts by type and dispose of them in accordance with applicable
laws.
IMPORTANT!
Do not dispose of the components or any other product ma-
terial in the environment. Seek the assistance of companies
authorised to dispose of and recycle waste materials.
Tabella 2
Part. DESCRIZIONE
ATasto principale
BCorpo del pulsante
C
LED di segnalazione
(dentro al contentenitore ma visibili dall'esterno
in caso di accensione)
DFondo ad incastro
EPila CR2450
FTasto memorizzazione
GStrisce bi-adesive
Fig. 2
Table 2
Part. DESCRIPTION
AMain Button
BButton body
C
Signaling LED
(inside the case but visible from the outside
in case of lighting)
DInterlocking bottom
ECR2450 battery
FPairing button
GDouble sided adhesive strips
2. INSERTING AND REPLACING THE BATTERY
• Rotate and remove the bottom Dfrom the rest of the button body;
• remove any exhausted battery and restore it with a new one of the same
CR2450 model (E) making sure to place it with the positive pole upwards
and inserting it as shown in the gure; place it sideways on the lateral
metal plate and press down so that the battery is blocked by the plastic
clips. The installation is correct if the plastic clips are visible above the
battery (see gure H);
• pair the button referring to the next paragraph;
• reassemble the base Din order to close the battery seat.
3. PAIRING
To proceed with the pairing refer to the GOLD series control panel manual;
after inserting the battery, it is necessary to hold down keys Aand Fat the
same time when requested by the control panel and wait for entry into the
storage mode signaled by the red LED lighting up. To press the F key it is
possible to have a particularly ne object (such as paper clip) that can be
inserted into the small hole present directly on the bottom of the button.
G
G
4. INSTALLAZIONE
Nel caso sia necessario ssarlo su di una supercie, come ad esempio sotto
il bancone di un negozio, è possibile ssarlo utilizzando le due strisce bi-
adesive Gin dotazione.
5. INSTALLATION
If it is necessary to x it on a surface, such as under the counter of a shop, it
can be xed using the two double sided adhesive strips G supplied.
B
D
A
C
E
F
6. UTILIZZO
Il tasto (A), se premuto, invia il segnale di antipanico alla centrale, Il lampeggio
alternato dei LED (visibili nella corona circolare intorno al tasto A) indica la
conferma del comando. Il lampeggio contemporaneo e veloce dei LED indica,
invece, la non corretta trasmissione. Il comando viene inviato dopo una
singola pressione del tasto. In seguito alla pressione, in centrale può avvenire
una segnalazione di panico (sirena+SMS) o panico silenzioso (solo SMS).
E' possibile associare al tasto Auna delle seguenti funzioni speciali: ronda,
elettroserratura, allarme silenzioso; fare comunque riferimento al manuale
della centrale in uso per ulteriori dettagli.
6. USE
When pressed, button (A) sends the panic signal to the control panel. The
alternating ashing of the LEDs (visible in the circular ring around button A)
indicates conrmation of the command. The simultaneous and fast ashing of
the LEDs, on the other hand, indicates incorrect transmission. The command
comes after a single key press. Following the pressure, a panic (siren + SMS)
or silent panic (SMS only) signal can occur in the control panel. Key Acan
be associated with one of the following special functions: patrol, electric lock,
silent alarm; In any case, refer to the manual of the control panel in use for
further informations.
H


