Lindinger 500 SIZE SCALE FUSELAGE UH-1 User manual

500 SIZE SCALE FUSELAGE UH-1
Modellbau Lindinger GmbH

Thank you for buying Decent Devil Products. 500 scale fuselage is designed as an easy to use. Please
read the manual. Carefully before assembling the model,and follow all precautions and
recommendations located within the manual. e sure to retain the manual for future
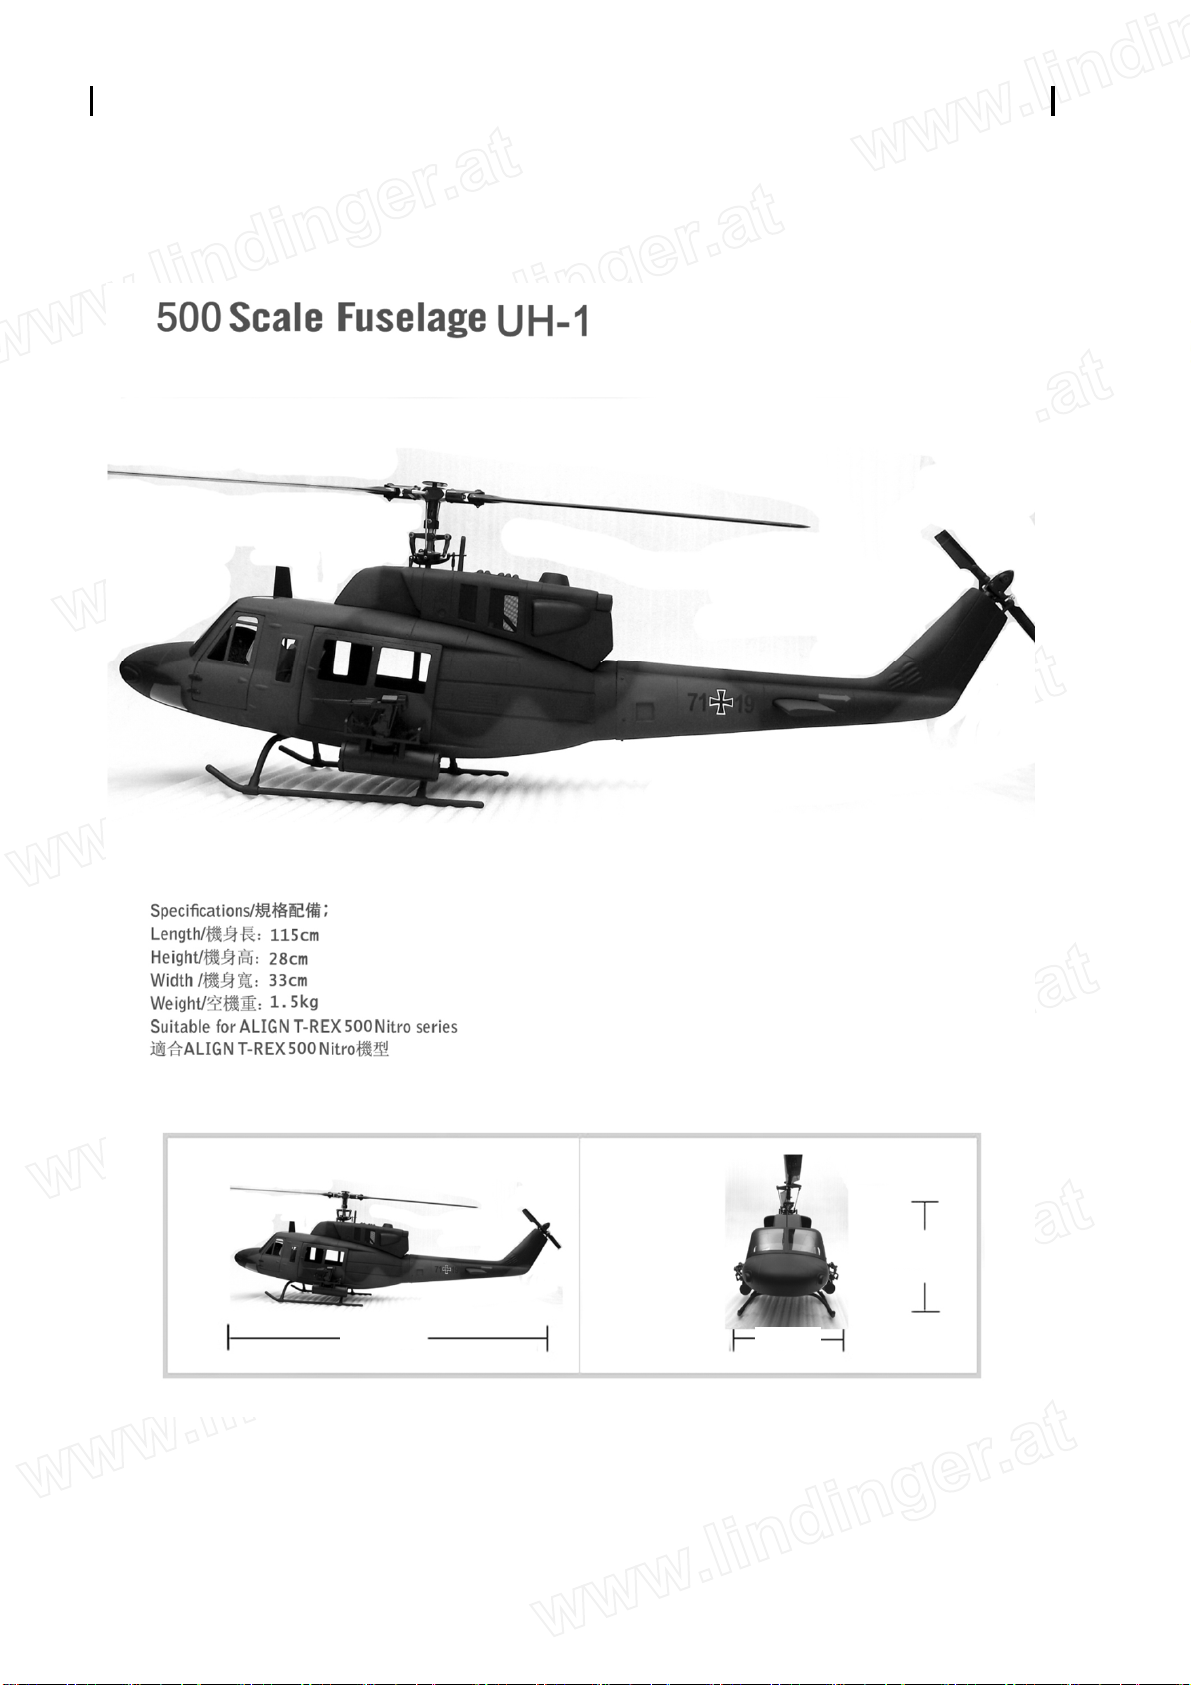
reference,routine maintenance,and tuning.The scale fuselage is designed for T-REX 500 Helicopter
series use.you can easily put it on your T-REX 500 for new clothing.
Vielen Dank, dass sie sich für den Kauf einer Decent Devil Produkts entschieden haben. Der 500er Scale
Rumpf ist einfach u montieren, bitte lesen sie unbedingt alle Anweisungen für den Einbau durch. Bitte
bewahren sie die Anleitung auf. Dieser Rumpf ist für den Einbau einer TREX 500 Mechanik bestimmt.
IMPORTANT NOTES
R/C helicopters are not toys.R/C helicopter utilize various high-tech products and technologies to
provide superior performance.lmproper use of this product can result in serious injury or even
death.Please read this manual carefully before using and make sure to be conscious of your own
personal safety and the safety kf others and your environment when operating all Decent Devil
products.
Manufac turer and seller assume no liability for the operation or the use kf this product.lntended for
use only by adults with experience flying remote control helicopters at alegal flying field.After the
sale of this product we cannot maintain any control over its operation or usage.
After assembling the scale fuselage,the weight will increase and the structure will more complex,so
we recommmend not flying 3D to avoid any accident and damage.
R/C products require a certain degree of skill to opeate,and is a consumer item.Any damage or
dissatisfaction as a result of accidents or modifications are not covered by any warrantee and cannot
be returned for repair or experience problems during op eration or maintenance.
Fly only safe areas,away from other people.Do not operate R/C aircraft within the vicinity of homes or
crowds of people.R/C aircraft are prone to accidents,failures,and crashes due to a variet of reasone
including,lack of maintenance,pilot error,and radio interference.pilots are responsible for their
actions and damage or injury occurring during the operation or as of a result of R/C aircraft models.
Fliegen sie nur an sicheren Orten an denen sich keine Personen aufhalten. etreiben sie kein R/C
Flugzeug in der Näche von Siedlungen oder Menschenansammlungen. R/C Flugzeuge können
Fehlfunktionen, Unfälle und Abstürze erleiden, auf Grund mehrer Möglichkeiten wie unsachgemäße
Wartung, Pilotenfehler und Funksignalstörungen. Piloten sind für ihre Handlungen verantwortlich und
der daraus möglicherweise resultierenden Schäden und/oder Verletzungen. itte verwenden sie für
diesen Rumpf einen 1600KV-1900KV Motor, ein 12T Zahnrad sowie einen 60A-80A ESC
Modellbau Lindinger GmbH

500scale fuselge, suitable for T-REX500 Helicopter
500scale fuselge, suitable for T-REX500 Helicopter500scale fuselge, suitable for T-REX500 Helicopter
500scale fuselge, suitable for T-REX500 Helicopter
500 Scalerumpf, geeinget für T-REX 500
BEFORE ASSEMBLING Vor dem Zusammenbau
1:Check for all the psrts in the list come with the manual.
2:Some basic tools are needed to help the assembly.
1:Prüfen sie den Bausatz auf Vollständigkeit.
2:Legen sie sich die notwendigen Werkzeuge zurecht.
TOOL enötigtes Werkzeug
1:Cutter knife. 2:Hexagon screw driver
3:Phillips screw driver. 4:File.5:Diagonal
cutting pliers.6:Silicone 7:CA glue. 8:A glue
9:Fine sandpaper.10:Scissors.
1:Cutter 2: Inbusschlüssel 3:
Kreuzschlitzschraubendreher 4: Feile,
5:Seiten-schneider 6:Silicon 7:
Sekundenkleber 8:Epoxydkleber
9:Sandpapier fein 10:Schere
1:Landekufen x2 2:Fahrwerksstreben x2 3:8mm T-Stück x2 4:Zahnrad x1
5: Gehäuse x1 6:Gestänge x1 7:Alurohr x1
8:Gestänge x1
9:Welle x1 10: Heckrohr x1 11:Heckgestänge x1 12:Grundplatte x1
13:Haltering x1 14:Querverbinder x3 15:Welle x1
16:Umlenkhebel x2
17:Gestänge x2 18:Gestänge x2 90mm 19:Gestänge x1 179mm 20:Gestänge x1 425mm
21: Halterung x4 22: Kugelkopf x6 23:Reeliing x2 24:Griffe x2
25: Spoiler x1 26: MG x2 27: Fenster x2 28:Raketenwerfer x2
29: Leitwerk x2 30: Hauptrahmen x2 31:Schraube ¢2.0x5mm x5 32:Schraube ¢2.5x10mm x12
33: Schraube 2x 14mm x4 34:Schraube ¢2.0x8mm x 6 35: Beilagscheibe ¢5.0x¢2.0x0.5mm x6
36: Beilagscheibe ¢6.0x¢4.0x1mm x2 37: Mutter ¢2.0mm x4
11
1111
11
12
1212
12
13
1313
13
14
1414
14
15
1515
15
16
1616
16
17
1717
17
18
1818
18
9
99
9
19
1919
19
20
2020
20
1
11
1
21
2121
21
26
2626
26
25
2525
25
22
2222
22
23
2323
23
24
2424
24
6
66
6
10
1010
10
2
22
2
3
33
3
4
44
4
5
55
5
8
88
8
7
77
7
36
3636
36
27
2727
27
28
2828
28
29
2929
29
31
3131
31
32
3232
32
35
3535
35
34
3434
34
33
3333
33
30
3030
30
37
3737
37
Modellbau Lindinger GmbH

Montieren sie die Kufen
Montieren sie die T-Stücke
Montieren sie die Streben mit Schraube
¢2.0x14mm
Montieren sie die Mechanik.
2
22
2
3
33
3
1
11
1
4
44
4
5
55
5
Montieren sie den Heckstrebenhalter.
6
66
6
Montieren sie den Heckrahmen.
7
77
7
8
88
8
Stellen sie die Mechanik ein.
Entfernen sie die Heckpartie, um die Mechanik
einbauen zu können.
Modellbau Lindinger GmbH

Schließen sie die Abdeckung
Öffnen sie die Abdeckung.
Befestigen sie die Mechanik mit Schraube ¢3.0x10mm
Führen sie das Heck ein und montieren sie es.
Montieren sie das Heck.
Führen sie die Mechanik ein.
9
99
9
1
1
1
10
00
0
11
1111
11
12
1212
12
13
1313
13
14
1414
14
15
1515
15
16
1616
16
Bohren sie 5 1.5mm Löcher. Kleben sie auf der
Innenseite der Bohrung die Holzplättchen fest und
befestigen sie das Heck mit Schraube ¢2.0x5mm
Kleben sie die Finne mit Epoxydkleber fest.
Modellbau Lindinger GmbH

Demontieren sie die Türen. Kleben sie die Teile wie abgebildet ein
Montieren sie das Grundteil mit Epoxydkleber
17
1717
17
Montieren sie die Leitwerke mit Epoxydkleber
18
1818
18
21
21
21
21
Montieren sie das Frontpanel mit Epoxydkleber
Montieren sie die Piloten mit Epoxydkleber.
19
1919
19
20
2020
20
22
2222
22
23
23
23
23
24
2424
24
Montieren sie die Leisten mit Epoxydkleber
Montieren sie die Griffe mit Epoxydkleber
Modellbau Lindinger GmbH

115cm
115cm115cm
115cm
33cm
33cm33cm
33cm
28cm
28cm28cm
28cm
Modellbau Lindinger GmbH
This manual suits for next models
1
Table of contents
Other Lindinger Toy manuals
Popular Toy manuals by other brands

The Wings Maker
The Wings Maker ZERO FIGHTER 60 instruction manual

Fisher-Price
Fisher-Price Kid Tough Video Camera instructions

Eduard
Eduard Yak-9T quick start guide

Esport
Esport Phoenix instruction manual

Tabletop Scenics
Tabletop Scenics Fantasy Bowl Stadium Tribune Construction guide

goliath
goliath DINO MEAL quick start guide