Lindy 20941 User manual

© LINDY ELECTRONICS LIMITED & LINDY-ELEKTRONIK GMBH - FIRST EDITION (March 2016)
Dual M.2 SSD RAID Adapter, SATA 2,5”
User Manual English
Benutzerhandbuch Deutsch
Manuel utilisateur Français
Manuale Italiano
No. 20941
www.lindy.com
Tested to Comply with
FCC Standards
For Home and Office Use!


User Manual English
Introduction
We are glad that you have chosen a LINDY product and thank you for having placed your trust in us.
You can rely on our products and our good service at any time.
This Dual M.2 SATA RAID Adapter allows you to install two M.2 SSDs into a 2.5” bay to create high-
performance storage with configurable RAID.
Package Contents
•Dual M.2 SSD RAID Adapter, SATA 2.5”
•Screws for enclosure and SSD mounting
•This Manual
Features
•Dual SATA based M.2 SSD to SATA Adapter, 2.5” (9.5mm)
•Supports RAID 0, RAID 1, Spanning or JBOD
•ASM1092R processor
•For 30/42/60/80mm SATA based M.2 SSDs
•Supports NGFF Key B or Key B + M
•Compliant with SATA 3.2
•22pin Standard SATA connector
•PCI Express Mini Card Specification 1.2
•PCI-E Card Specification 1.1
•Temperature range: 0-70°C (operating), -40-85°C (storage)
Installation & Operation
Open the enclosure and install the M.2 SSD(s) in accordance with the height of your M.2 SSD (30/42/60
or 80mm). For 80mm SSDs you may need to move the preinstalled drive mount hardware.

User Manual English
RAID Configuration:
This Dual M.2 SATA RAID Adapter supports RAID modes as well as non-RAID operation (JBOD) when
paired with a port-multiplying SATA controller.
Please note that changing the RAID configuration will erase the data on your existing drives. Back up the
data before you proceed.
RAID mode setting:
RAID 0 (Striping – improves system performance)
RAID 1 (Mirror – creates a redundant drive on the second drive for security)
SPAN (creates a large single drive volume, consisting of both drives)
JBOD (Just a bunch of disks – allows access to both drives individually)
1. Set the RAID switches to “1” or “on”, depending on the desired configuration.
2. Connect the adapter to your SATA host device (for details you may consult the documentation of
your SATA host device)
3. Power up the adapter.
4. Press the RAID set button on the adapter.
Note: In order to configure RAID 0, 1 your SSD must be clean and pre-formatted.
LED Indicators:
The product includes a status LED for each of the two drives. If the LED is illuminated and not blinking, a
drive error is indicated. If the LED is blinking, the drive is being rebuilt. If the LED is blinking and then
stops, the drive has finished being rebuilt.
J4 J5 J6
ON ON 1
ON 1 ON
ON ON ON
ON 1 1

Manuel Utilisateur Français
Einführung
Wir freuen uns, dass Ihre Wahl auf ein LINDY-Produkt gefallen ist und danken Ihnen für Ihr Vertrauen.
Sie können sich jederzeit auf unsere Produkte und einen guten Service verlassen.
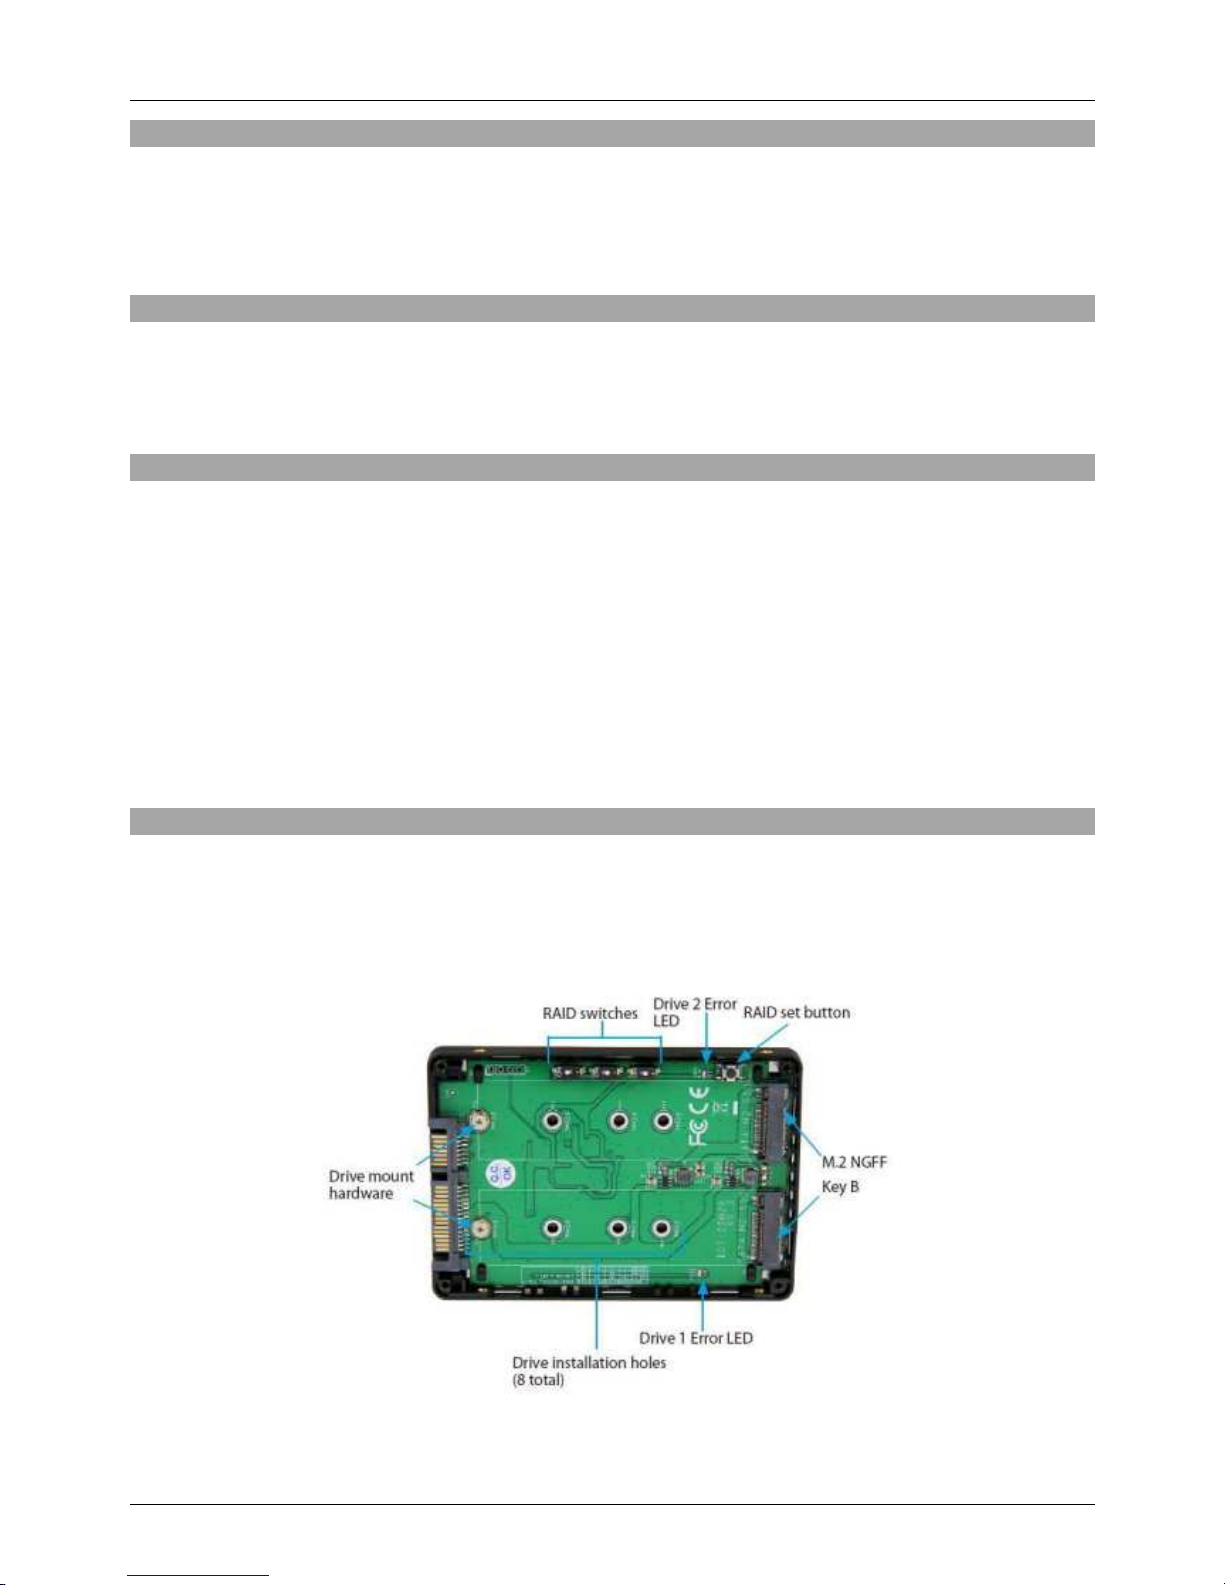
Dieser Dual M.2 SATA RAID Adapter ermöglicht die Installation zweier M.2 SSDs in einem 2,5” Schacht.
Sie erhalten so einen Speicher mit hoher Leistung und konfigurierbarem RAID.
Lieferumfang
•Dual M.2 SSD RAID Adapter, SATA 2,5”
•Schrauben für das Gehäuse und zum Befestigen der SSDs
•Dieses Handbuch
Eigenschaften
•Dual M.2 SSD Adapter, SATA 2,5” (9.5mm)
•Unterstützt RAID 0, RAID 1, Spanning oder JBOD
•ASM1092R Prozessor
•Für 30/42/60/80mm SATA-basierte M.2 SSDs
•Unterstützt NGFF Key B oder Key B + M
•Kompatibel mit SATA 3.2
•22pin SATA-Standard-Anschluss
•PCI Express Mini Card Spezifikation 1.2
•PCI-E Card Spezifikation 1.1
•Temperaturbereich: 0-70°C (im Betrieb), -40-85°C (bei Lagerung)
Installation & Betrieb
Öffnen Sie das Gehäuse und installieren dann die M.2 SSD(s), indem Sie diese – je nach Länge der
SSD (30/42/60 oder 80mm) entsprechend verschrauben. Bei 80mm SSDs müssen Sie hierfür die
möglicherweise vorinstallierten Schrauben („drive mount hardware“) vorher entfernen.

Manuel Utilisateur Français
RAID-Konfiguration:
Dieser Dual M.2 SATA RAID Adapter unterstützt sowohl RAID-Modi als auch Betrieb ohne RAID
(JBOD), sofern er mit einem SATA-Controller mit Port-Multiplier-Funktion verwendet wird.
Bedenken Sie bitte bevor Sie die RAID-Konfiguration ändern, dass dadurch Daten auf Ihren Laufwerken
gelöscht werden. Sichern Sie deshalb vorab Ihre Daten.
RAID-Einstellung:
RAID 0 (Striping – verbessert Systemleistung)
RAID 1 (Mirror – erstellt eine redundante 2. SSD zur Sicherung)
SPAN (schafft eine große, zusammenhängende Festplatte)
JBOD (Just a bunch of disks – individueller Zugriff auf beide SSDs)
1. Setzen Sie den RAID-Schalter auf “1” oder “on” – je nach gewünschter Konfiguration.
2. Verbinden Sie nun den Adapter mit einem SATA Host (Details lesen Sie bitte im Handbuch Ihres
SATA Host-Gerätes nach)
3. Schalten Sie den Adapter ein.
4. Drücken Sie den “RAID set button” auf dem Adapter.
Beachten Sie bitte, dass zum Konfigurieren von RAID 0 oder 1 Ihre SSD gereinigt und vorformatiert sein
muss.
LED-Anzeige:
Es gibt je eine Status-LED für beide Laufwerke. Wenn die LED leuchtet (aber nicht blinkt) wird ein
Laufwerksfehler angezeigt. Wenn die LED blinkt, wird das Laufwerk wiederhergestellt. Sobald sie aufhört
zu blinken, ist die Wiederherstellung beendet.
J4 J5 J6
ON ON 1
ON 1 ON
ON ON ON
ON 1 1

Manuel Utilisateur Français
Introduction
Merci d’avoir choisi un produit LINDY.
Cet adaptateur Dual M.2 SATA RAID vous permet d’installer deux SSDs M.2 dans une baie 2.5” pour
créer un centre de stockage haute performance avec RAID configurable.
Contenu
•Adaptateur Dual M.2 SSD RAID, SATA 2.5”
•Vis pour le boîtier et le montage du SSD
•Ce manuel
Caractéristiques
•Adaptateur Dual SATA M.2 SSD vers SATA, 2.5” (9.5mm d’épaisseur)
•Supporte RAID 0, RAID 1, Spanning ou JBOD
•Processeur ASM1092R
•Pour SSDs 30/42/60/80mm M.2 SATA
•Supporte les slots NGFF Key B ou Key B + M
•Supporte SATA 3.2
•Connecteur standard SATA 22pins
•Spécifications PCI Express Mini Card 1.2
•Spécifications PCI-E 1.1
•Température supportée: 0-70°C (en fonctionnement), -40-85°C (en stockage)
Installation & utilisation
Ouvrez le boîtier et installez le(s) SSD M.2(s) suivant la hauteur de votre SSD M.2 (30/42/60 ou 80mm).
Pour les SSDs de 80mm, vous aurez besoin de retirer les 2 vis de maintien (indiquées en bas sous le
nom “ Drive mount hardware”).

Manuel Utilisateur Français
Configuration RAID:
Cet adaptateur Dual M.2 SATA RAID supporte les modes RAID et non-RAID (JBOD) une fois connecté
à un contrôleur SATA avec function port-multiplying.
Merci de noter que le changement de configuration RAID effacera les données sur le(s) disque(s)
existant(s). Sauvegardez les données avant de changer la configuration RAID.
Modes RAID:
RAID0 (Striping–améliore laperformancesystème)
RAID1(Mirror:créeunecopie d’undisquesur unautre, pourla sécurité desdonnées)
SPAN (créeunseullecteur,regroupant2disques)
JBOD (Justabunchofdisks: permetunaccèsindividuelauxdeuxdisques)
1. Positionnez les switchs RAID sur “1” ou “ON”, dépendant de la configuration RAID désirée.
2. Connectez l’adaptateur au disque SATA
3. Allumez l’adaptateur.
4. Press le bouton RAID sur l’adaptateur.
Note: pour configurer les modes RAID 0, 1 : votre disque SSD doit être vierge et pré-formaté.
LEDs d’indications :
Ce produit inclut une LED de statut pour chacun des deux disques. Si la LED est allumée et non
clignotante, une erreur de disque est alors indiquée. Si la LED est clignotante, le disque est en cours de
construction RAID (rebuild). Si la LED est clignotante puis stoppe, le disque a fini d’être construit en
RAID.
J4 J5 J6
ON ON 1
ON 1 ON
ON ON ON
ON 1 1

Manuale Italiano
Introduzione
Grazie per aver scelto LINDY.
Questo adattatore Dual M.2 SATA RAID consente di installare due SSD M.2 in un alloggiamento da 2.5”
e di poterli configurare in modalità RAID.
Contenuto della confezione
•Adattatore Dual M.2 SSD RAID, SATA 2.5”
•Viti per alloggiamento e per il montaggio degli SSD
•Questo manuale
Caratteristiche
•Adattaore Dual SATA based M.2 SSD a SATA, 2.5” (9.5mm)
•Supporto RAID 0, RAID 1, Spanning o JBOD
•Processore ASM1092R
•Per SSD da 30/42/60/80mm SATA based M.2
•Supporto NGFF Key B o Key B + M
•Compatibile con lo standard SATA 3.2
•Connettore SATA da 22pin
•PCI Express Mini Card Spec. 1.2
•PCI-E Card Spec. 1.1
•Temperatura operativa 0-70°C, di stoccaggio -40-85°C
Installazione & Utilizzo
Aprite l’alloggiamento ed installate gli SSD M.2 facendo attenzione all’altezza degli SSD stessi (30/42/60
o 80mm). Con SSD da 80mm potrebbe essere necessario rimuovere le viti preinstallate.

Manuale Italiano
Configurazione RAID:
Questo adattatore Dual M.2 SATA RAID supporta modalità RAID e non-RAID (JBOD) se collegato ad un
controller SATA port-multiplying.
Considerate che la modifica delle configurazioni RAID cancella i dati presenti sui vostri drive. Effettuate
un back up prima di procedere.
Impostazioni RAID:
RAID 0 (Striping – migliora le performance di sistema)
RAID 1 (Mirror – crea un drive ridondante sul secondo disco per sicurezza)
SPAN (crea un unico drive unendo entrambi i dischi)
JBOD (Just a bunch of disks – accesso a entrambi i drive singolarmente)
1. Imposta i selettori RAID su “1” o “on” a seconda della configurazione desiderata.
2. Connetti l’adattatore al dispositivo SATA (per ulteriori dettagli consultatele istruzioni del Vostro
dispositivo)
3. Alimentate l’adattatore.
4. Premete il tasto RAID.
N.B.: per una configurazione RAID 0, 1 i vostri SSD devono essere pre-formattati.
Indicatori LED:
LED di stato per entrambi i drive. Se il LED rimane accesso senza lampeggiare, indica un errore del
drive. Se il LED lampeggia, il drive è in fase di ricostruzione. Se il LED cessa di lampeggiare, il drive ha
terminato la ricostruzione.
J4 J5 J6
ON ON 1
ON 1 ON
ON ON ON
ON 1 1

CE/FCC Statement
CE Certification
This equipment complies with the requirements relating to Electromagnetic Compatibility Standards
EN55022/EN55024 and the further standards cited therein. It must be used with shielded cables only.
It has been manufactured under the scope of RoHS compliance.
CE Konformitätserklärung
Dieses Produkt entspricht den einschlägigen EMV Richtlinien der EU für IT-Equipment und darf nur
zusammen mit abgeschirmten Kabeln verwendet werden.
Diese Geräte wurden unter Berücksichtigung der RoHS Vorgaben hergestellt.
Die formelle Konformitätserklärung können wir Ihnen auf Anforderung zur Verfügung stellen
FCC Certification
This equipment has been tested and found to comply with the limits for a Class B digital device, pursuant
to part 15 of the FCC Rules. These limits are designed to provide reasonable protection against harmful
interference in a residential installation.
You are cautioned that changes or modification not expressly approved by the party responsible for
compliance could void your authority to operate the equipment.
This device complies with part 15 of the FCC Rules.
Operation is subject to the following two conditions:
1. This device may not cause harmful interference, and
2. This device must accept any interference received, including interference that may cause undesired
operation.
LINDY Herstellergarantie – Hinweis für Kunden in Deutschland
LINDY gewährt für dieses Produkt über die gesetzliche Regelung in Deutschland hinaus eine zweijährige
Herstellergarantie ab Kaufdatum. Die detaillierten Bedingungen dieser Garantie finden Sie auf der LINDY Website
aufgelistet bei den AGBs.
Hersteller / Manufacturer (EU):
LINDY Electronics Ltd.
LINDY-Elektronik GmbH Sadler Forster Way
Markircher Str. 20 Teesside Industrial Estate, Thornaby
68229 Mannheim Stockton-on-Tees, TS17 9JY
GERMANY United Kingdom
Email: info@lindy.com , T: +49 (0)621 470050 postmaster@lindy.co.uk , T: +44 (0)1642 754000

Recycling Information
WEEE (Waste of Electrical and Electronic Equipment),
Recycling of Electronic Products
Europe, United Kingdom
In 2006 the European Union introduced regulations (WEEE) for the collection and recycling of all waste electrical
and electronic equipment. It is no longer allowable to simply throw away electrical and electronic equipment.
Instead, these products must enter the recycling process.
Each individual EU member state has implemented the WEEE regulations into national law in slightly different
ways. Please follow your national law when you want to dispose of any electrical or electronic products. More
details can be obtained from your national WEEE recycling agency.
Germany / Deutschland
Die Europäische Union hat mit der WEEE Direktive Regelungen für die Verschrottung und das Recycling von
Elektro- und Elektronikprodukten geschaffen. Diese wurden im Elektro- und Elektronikgerätegesetz – ElektroG in
deutsches Recht umgesetzt. Dieses Gesetz verbietet das Entsorgen von entsprechenden, auch alten, Elektro- und
Elektronikgeräten über die Hausmülltonne! Diese Geräte müssen den lokalen Sammelsystemen bzw. örtlichen
Sammelstellen zugeführt werden! Dort werden sie kostenlos entgegen genommen. Die Kosten für den weiteren
Recyclingprozess übernimmt die Gesamtheit der Gerätehersteller.
France
En 2006, l'union Européenne a introduit la nouvelle réglementation (DEEE) pour le recyclage de tout équipement
électrique et électronique.
Chaque Etat membre de l’ Union Européenne a mis en application la nouvelle réglementation DEEE de manières
légèrement différentes. Veuillez suivre le décret d’application correspondant à l’élimination des déchets électriques
ou électroniques de votre pays.
Italy
Nel 2006 l’unione europea ha introdotto regolamentazioni (WEEE) per la raccolta e il riciclo di apparecchi elettrici
ed elettronici. Non è più consentito semplicemente gettare queste apparecchiature, devono essere riciclate. Ogni
stato membro dell’ EU ha tramutato le direttive WEEE in leggi statali in varie misure. Fare riferimento alle leggi del
proprio Stato quando si dispone di un apparecchio elettrico o elettronico.
Per ulteriori dettagli fare riferimento alla direttiva WEEE sul riciclaggio del proprio Stato.
1
st
Edition, March 2016
www.lindy.com
Tested to Comply with
FCC Standards
For Home
and Office Use!
Table of contents
Languages:
Other Lindy Adapter manuals