LINE SITE LSL-205 User manual

Operating Manual

WARNING AND CAUTION
•While the instrument is operating, be careful not to expose your eyes to the
emitting laser be am. Exposure to a laser beam for a long time may be
hazardous to your eyes (laser beam: equivalent to Laser Class 2 Standard).
•Do not try to dismantle the instrument. Have it repaired by your dealer or
supplie r.
Se lf-Dismantling may worse n the proble m.
•When attaching the instrument to a tripod, make sure the instrument is
securely fixed to the tripod and the tripod leg clamps should be securely
fastened. If not securely fastened or tightened, the main unit could fall off
or the tripod could fall over.
•When setting the tripod, be aware of the tripod shoes which are sharp.
These sharp p oints allow trip od to be securely pos itione d on the ground.
Operate this laser product with the height of laser avoiding that of eyes of
vehicle drivers or pedes trians. Avoid putting the laser on a hig hly re flective
material such as mirror. When disposing of this instrument, take a measure by
removing the batteries so that the laser will not be emitted.

Introduction
Congratulations on the purchase of your Linesite LSL 205 Series Laser.
Although simple to use, we recommend that you read this manual before
operating the laser.
Description
The Linesite LSL205 is ideal for general construction, site preparation,
foundation building in medium working range. It automatically self-levels in
horizontal condition.
Functions
This instrument is equipped with the red semiconductor diode with
wavelength of 635nm. The laser module will rotate 360 degree and hence
form one laser surface for leveling and alignment applications.
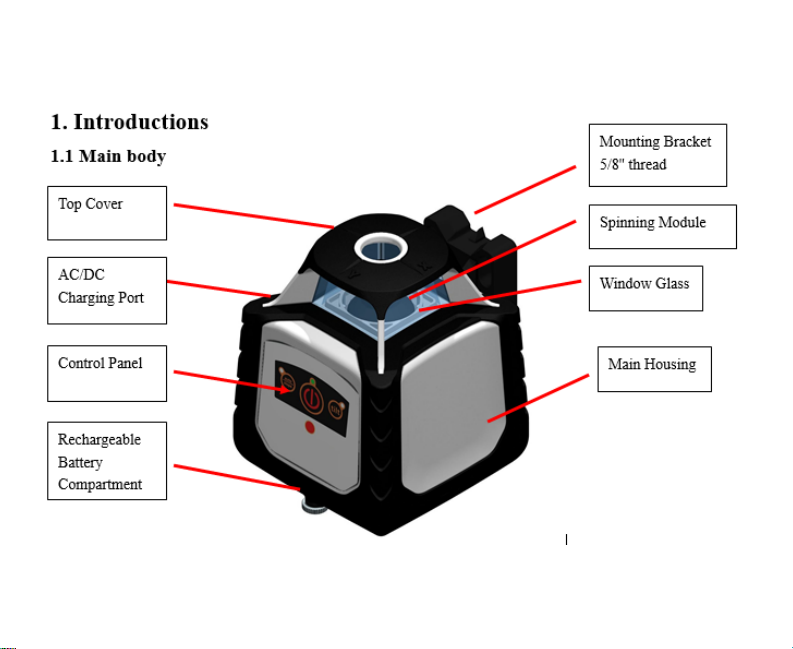


1.3 Main Panel Explanation
(1) ON/OFF: Controlling the state of power.
(2) Power indicator: Power indicator: When on, the instrument is starting up.
Otherwise it is shutting down.
(3) Mode indicator: When on, the instrument is leveling manually. When it
blinks, it stays in alarm. (The slope of the instrument is out of range).
(4) Anti-shocking mode button: Press to enter anti-shocking alert mode.
Under this mode, the laser will stop spinning if the unit is bumped or
disturbed. Then users need to reset the laser unit.
(5) Anti-shocking Alert indicator: When the light is blinking slowly, it is in
Automatic Drift System model. When the light is blinking quickly, the laser
will not level.

2. Directions:
2.1 Instrument Placement
2.1.1 Horizontal Leveling
Lay the instrument on the tripod or stable flat surface, or even hang it on the
wall. Set upright the instrument and keep the slope of instrument within the
range from -5°to +5°.
3. Operations
3.3.1 Power
Press the Key ON/OFF to bring automatic leveling into function when the
power indicator lights.
When Power indicator lights, it shows the voltage of the batteries is
insufficient. Then the rechargeable batteries need to be charged.
Press the Key ON/OFF again to switch off the instrument and power indicator
will go out.

3.3.2 Leveling
Press the Key ON/OFF to bring automatic leveling into function when the
laser beam begins to wink. After automatic leveling, the laser module will
rotate at the speed of 600r.p.m.
If the instrument is placed improperly, or the slope of instrument exceeds
the range of ±5°, at that moment mode indicator and the laser beam will
wink together. Then place the instrument into correct position.

4. Power
When the voltage indicator lights, the batteries need to be charged
immediately. Connecting the charger with AC, insert the plug of charger
into the plughole at the bottom of the instrument (As depicted above).
If the red indicator of charger lights, it shows the batteries are being
charged.
If the green indicator of charger lights, it shows the course of recharging
has finished.

Notices:
(1) Using included rechargeable battery pack of the instrument,
recharging will be finished within 7 hours.
(2) Power required for the charger: Frequency: 50-60HZ; Voltage: 100-
240VAC
(3) Charging and using of the instrument can progress simultaneously.
(4) If keeping the instrument in storage (or Leave the instrument unused
for a long time), the batteries (dry battery or rechargeable battery)
need to be taken out.
(5) Make sure to charge the laser unit every 3 months if the laser is not
operated frequently.

5. Horizontal Accuracy Checking
(1) Place the instrument at the point of 50m in front of wall (or set a scale
plate at the point of 50m away from the instrument), and then adjust
the level of the base approximately to aim the X1 to the wall (or scale
plate), as depicted below.
(2) After switching on the power, use the laser detector measuring the h1
of X1-beam on the wall or scale plate.
(3) Loose the screw of the tripod, turn around the instrument for 180°
to measure the h2 of X2-beam on the wall or scale- plate. The method
should be the same with h1.
(4) Check the Y-beam in the same way.

6. Specifications
Leveling Accuracy (H) ±1.5mm at 10m
Leveling Range ±5º
Working Range with Receiver
(Diameter) depending on
working environment
Diameter:350m
Visible Working Range
depending on working
environment
25m
Light Source Laser Diode, Class 2 (IEC60825-1,2014)
wavelength: 635-650nm
Working Temperature -5
℃
-- +50
℃
Storage Temperature
-15
℃
- to +60
℃
RL Power Supply
DC 4.8-6V (NI-MH rechargeable battery
pack)
RL Charging Time
No less than 7hrs (Do not use Alkaline
batteries)

6. Specifications - Continued
Hours in continuous use
Approximately 20 hours
(Rechargeable)
RL IP IP 55
Dimension 160mm x 120mm x 120mm
Weight 2.1kg
Laser Detector Precision
Rough Band: 3mm/ Precise Band:
1mm
Laser Detector IP IP55
Laser Detector Power Supply 9V

7. Item Checklist
Item LSL-205
Rotary Laser level *
Hard carry case *
Rechargeable battery pack (Installed) *
Laser receiver with clamp *
Laser target *
Visibility glass *
Charger *
User manual *

Table of contents


