LINGDU LD02 User manual

User Manual
LD02
Apple logo & App Store are trademarks of Apple Inc., Google logo and Google Play
are trademarks of Google Inc.
Product
Manufacturer
Address
Product Warranty
Customer Support
V20230307
Car Dashcam
Dong Guan KAKA Electronic Technology Co., Ltd.
No.395,HuanshiEast Road Shitanpu Tangxia Town
Dongguan CN. 518000
One-Year Limited Warranty
service@lingdu.us
www.lingdu.us
service@lingdu.us
Response in just 12 hours
LD02
FCC ID: 2ASWVLD02

... ... ... ... ... ... ... .... ... ... ... ... ... ... ... ... .... ... ... ... ... ... .
1.English 01
Table of Contents
Index
Defective or damaged item?
Inaccurate description?
Missing parts or accessories?
Performance or quality not adequate?
Wrong item was sent?
service@lingdu.us
Response in just 12 hours
Contact us before returning the item.
We will help you resolve any issue asap.
1. Customer Service
Note:
1. A 64GB microSD card is provided with the LINGDU dashcam
when you purchase the product. Be sure to format your microSD
card with your dash cam for the first time use. Formatting the
microSD card may take around 10-30 seconds.
2. Please ALWAYS connect with power when using. As it is built in
Super Capacitor (Only has a 1mAh Lithium Metal Battery used to
memorize time).
1. Customer Service. . . . . . . . . . . . . . . . . . . . . . . . . . . . . . . . . . . . . . 2
2. Important Safety Information . . . . . . . . . . . . . . . . . . . . . . . . . 3
3. In The Box. . . . . . . . . . . . . . . . . . . . . . . . . . . . . . . . . . . . . . . . . . . . . 5
4. Specification . . . . . . . . . . . . . . . . . . . . . . . . . . . . . . . . . . . . . . . . . . 6
5. Product Diagram . . . . . . . . . . . . . . . . . . . . . . . . . . . . . . . . . . . . . . 7
6. Getting Started . . . . . . . . . . . . . . . . . . . . . . . . . . . . . . . . . . . . . . . 9
7. Installation . . . . . . . . . . . . . . . . . . . . . . . . . . . . . . . . . . . . . . . . . . . 11
8. Playing Video Files Using Your Smartphone . . . . . . . . . . . 14
9. Menu . . . . . . . . . . . . . . . . . . . . . . . . . . . . . . . . . . . . . . . . . . . . . . . . 24
10. Playing Video Files Using Your Computer. . . . . . . . . . . . . 31
11. Firmware Update. . . . . . . . . . . . . . . . . . . . . . . . . . . . . . . . . . . . 33
12. FAQ. . . . . . . . . . . . . . . . . . . . . . . . . . . . . . . . . . . . . . . . . . . . . . . . . 35
13. Notice . . . . . . . . . . . . . . . . . . . . . . . . . . . . . . . . . . . . . . . . . . . . . . 37
EN-01 EN-02

Thank you for purchasing this LINGDU dashcam.
This instruction manual contains information on how to
operate your dashcam.
Before using your dashcam, we recommend that you read
through this manual to ensure correct usage.
To improve the performance of the product, the contents of
this manual are subject to change without prior notice.
·Do not disassemble, repair, or modify the product
yourself.
Doing so may cause fire, electric shock, or malfunction. For
internal inspection and repair, contact the service center.
·If any foreign matter gets inside the product, detach
the power cord immediately.
Contact the service center for repair.
·Do not adjust the product while driving.
Doing so may cause an accident. Stop or park your car in a
safe place before installing and setting up the product.
·Do not install the product in a location where the
product can interfere with the driver's field of vision.
Doing so may cause an accident.
·Do not use a damaged or modified power cord. Only
use the cords provided by the manufacturer.
Damaged or modified power cords may cause an explosion,
fire, or malfunction.
EN-03 EN-04
2.ImportantSafetyInformation ·Do not operate the product with wet hands.
Doing so may cause electric shock.
·Do not install the product in an environment with high
humidity, or combustible gases or liquids.
Doing so may cause an explosion and/or fire.
·Do not leave the product near infants, children, or pets.
There is a risk of them swallowing small components, and/or
their saliva may get into the product, causing an explosion
due to a short circuit.
·Do not spray water or wax directly onto the product
while cleaning the inside of the car.
Doing so may cause fire, electric shock, or malfunction.
·If smoke or an unusual smell is emitted from the power
cord, detach the power cord immediately.
Contact the service center or your distributor.
·Keep the terminals of the power cord clean.
Failure to do so may cause excessive heat and fire.
·Use the correct input voltage.
Failure to do so may cause explosion, fire, or malfunction.
·Plug in the power cord firmly so that it cannot easily be
disconnected.
Failure to do so may cause fire.
·Do not cover the product with any material.
Doing so may cause external deformation of the product or fire.
Use the product and peripherals in a well-ventilated location.
EN-05 EN-06
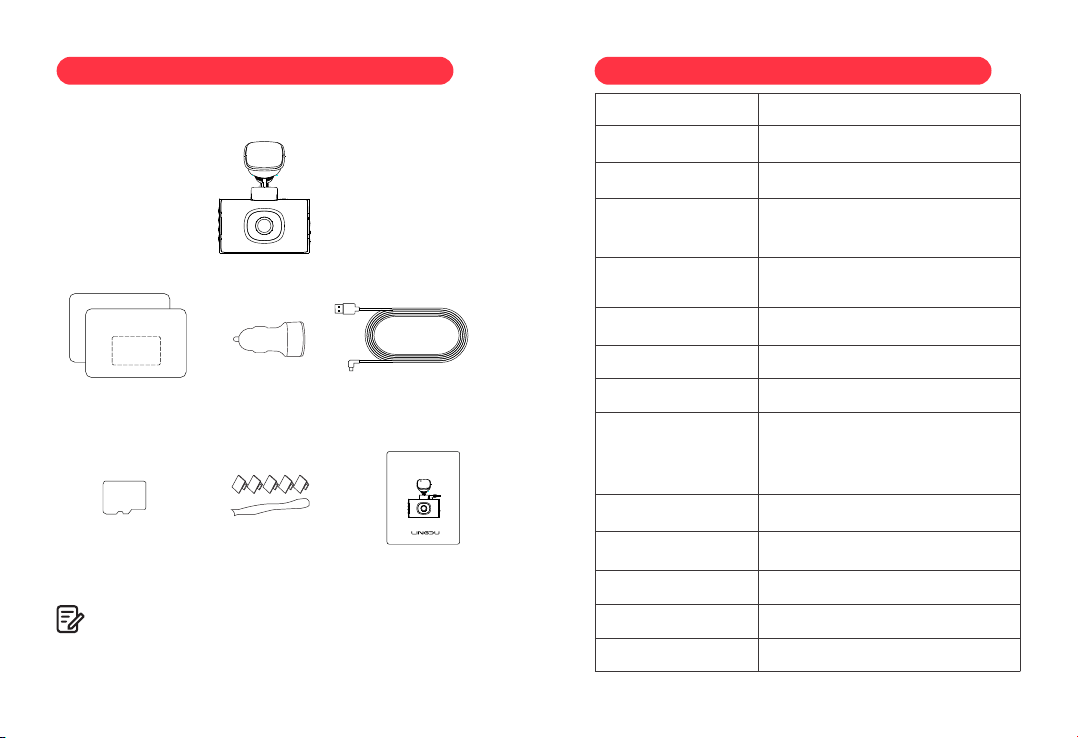
3. In The Box
Check the box for each of the following items before installing
the dash cam.
1. To improve the performance of the product, the contents of
this manual are subject to change without prior notice.
Note:
Dash camera ×1
Pry tool x 1
Storage card x1
Car charger ×1
Electrostatic films x2
Cable clips x 5
Type-C USB Power
cable (3.5M/12ft)×1
User manual x 1
64GB
LD02
F=1.8
Black
English / 日本語 / Deutsch / Français /
Español / Italiano / Русскии
Max support 128GB (U3 Speed, only
one 64GB microSD in the dash cam)
H.264 / H.265
JPG
MP4
-5K / 5160x2160 @25fps
-4K / 3840x2160 @25fps
-2K / 2560x1440 @25fps
-1080P / 1920x1080 @60fps
Built-in, LINGDU GPS Player
Built-in (2.4GHz / 5GHz Dual band)
4. Specif ication
Model
Aperture
Color
Language
Memory
Video Code
Photo Format
Video Format
Video Resolution
GPS Track
WiFi
Built-in Super Capacitor
5V/2.5A
-20°C to 70°C (-4°F to 158°F)
Battery
Power Interface
Operation Temperature
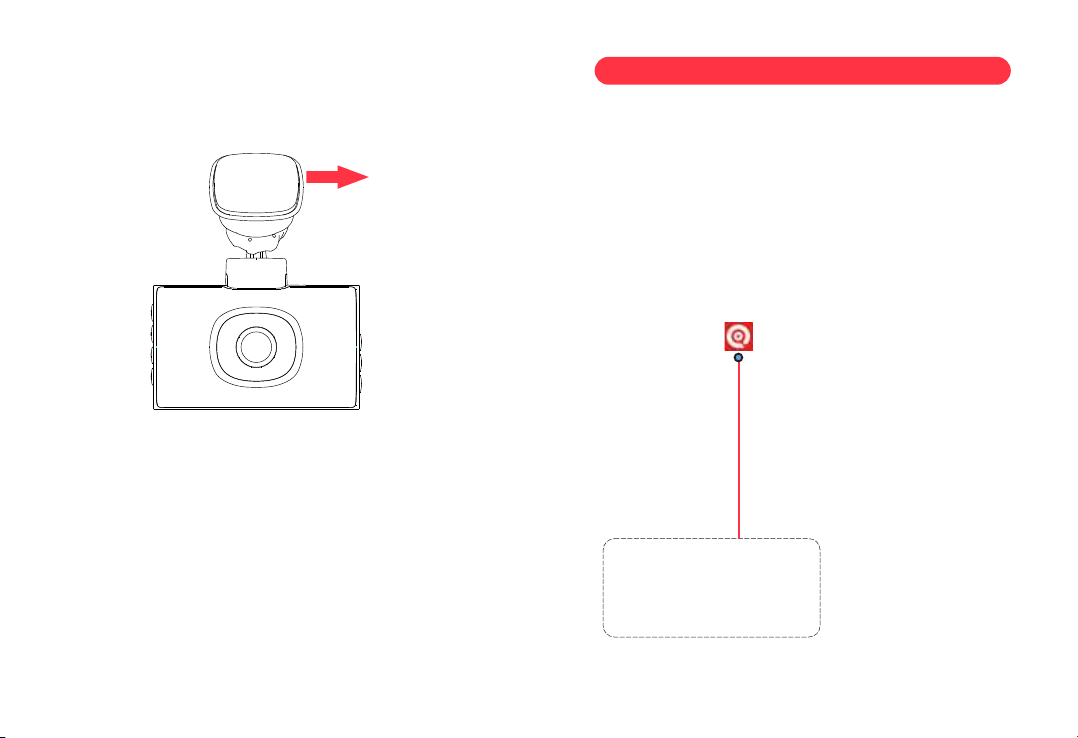
WarmP rompt
1.Pleasepastetheelectrostaticfilmnearthetopofthefron
2.PleaseinserttheSDcardandUSBPowercable
3.Pleaseslickthedeviceintothedottedbox
WarmP rompt
1.Pleasepastetheelectrostaticfilmnearthetopofthefron
2.PleaseinserttheSDcardandUSBPowercable
3.Pleaseslickthedeviceintothedottedbox
User Manual
LD0 2

EN-07 EN-08
①
②
③
④
⑦
⑧
⑨
⑩
⑪
⑫
5. Product Diagram
⑤
⑥
Operation and Function
1.Select function options in setup mode.
2.Long press once to switch 2.4GHz/5GHz.
3.Select previous video in playback mode.
Press once to enter menu setting.
1.Select function options in menu mode.
2.Press once to turn off/on Mic.
3.Select next video in playback mode.
1.In recording mode, press once to start recording,
press one more time to stop recording.
2.Long press once to shoot photos when recording.
3.Press once to confirm your setting in settings mode.
1.Press once to shift between Video / Video
playback mode.
2.Press once to return to previous page in playback
mode.
In recording mode, press once to lock the video as
an emergency one.
1.Press once to turn on the device
2.Press once to turn off/on the screen
3.Press and hold to turn off the device
Reboot the device and restore default settings
Button
R
①Sticker Mount ② Lens ③Type-C USB Charging Port
④Bracket ⑤TF Card Slot ⑥Up Button
⑦Menu Button ⑧Down Button ⑨Screen
⑩OK/Record Button ⑪Mode Button
⑫Lock Button ⑬Power Button ⑭Reset Button
⑮Recording LED Indicator
⑬
⑭
⑮
⑯ Power Indicator
⑯

EN-09 EN-10
6. Getting Started
The camera is designed to power up and record automatically
when it receives power. Then saves the video record and turns off
automatically when the car shuts off.
1. Auto Power ON/OFF:
Plug car charger to cigarette lighter socket. When the car engine is
on, dash cam will turn ON and start recording automatically.
When the car key is turned to LOCK position, dash cam
automatically saves the recording and turns OFF.
2. Manual Power ON/OFF
Manually Turn ON: Press the power button once.
Manually Turn OFF: Press and hold the power button for at least 2
seconds.
2. Please ALWAYS connect with power when using. As it is built in
Super Capacitor (Only has a 1mAh Lithium Metal Battery used to
memorize time).
3. Setting Date & Time: Please calibrate the date/time based on
your location under the TIME ZONE SETTING by going to APP
system settings menu, please refer to page EN-23.
5. Some trucks/cars’s 12V cigarette outlet is always HOT, which
means it provides constant power even when the car is turned
off and locked. If this is the case for your vehicle, then the auto
Note:
ON/OFF feature will not work. And if you leave the camera
continuously recording when the car is turned off, then it will
drain your car/truck’s battery and you might not have enough
power to start your car for next time. To remedy this situation,
you can do one of the two options:
①Hardwire your dash cam to your car’s fuse box with 3-Lead Auto
Trigger Hardwire Kit.
②Change the connection in the fuse box for your 12V outlet to
socket which only supplies power when car key is turned to ACC
or ON position.
1. A 64GB microSD card is provided with the LINGDU dashcam
when you purchase the product. Be sure to format your microSD
card with your dash cam for the first time use.

Install the front camera behind the rear view mirror. Remove
any foreign matter and clean and dry the windshield before
installation.
1. Turn off the engine, gently push the card into the slot until it
locks into place.(Please using class 10 or above high-speed U3
micro-SD card)
2. Find a suitable place on windshield where don’t obstruct the
driver’s field of vision and remove any foreign matter and
clean and dry the windshield before installation.Tear off the
protective layer of the electrostatic sticker and adhere the
electrostatic sticker to the windshield to prevent mark/glue
on your windshield after removing it.
3. Peel off the protective film from the double-sided tape and
attach the front camera to the electrostatic sticker.Adjust the
angle of the lens by adjusting the bracket of the front camera.
4. Plug the cigarette lighter power cable into the cigarette
lighter socket and the front camera.Use the pry tool to lift the
edges of the windshield trim/molding and tuck in the power
cord.
EN-11 EN-12
7. Installation
USB charging cable
ConnecttoCarCharger
5. Turn on the engine. The dashcam will power up and start
recording. Video files are stored on the microSD card.Turn off
the engine. The dashcam will automatically stop recording
and power down.
EN-13 EN-14
Detachable cover
Search for the LINGDU
app in the Google Play Store
or Apple App Store and install
it on your smartphone.
1
8. Playing Video Files Using Your Smartphone
8.1 Check real-time video using your smartphone

EN-15 EN-16
Go to Phone's Settings >
WiFi > Select WiFi of the dash
cam. After it's connected to the
WiFi, it will say ‘No lnternet
Connection’ which was normal.
Because dash cam WiFi is ONLY
for video/photo transfer function,
NOT made to broadcast footage
over the cloud or internet,
please ignore the prompt.
WiFi Name SSID: LD02_*******
Default PASSWORD: 12345678
There will show dash
cam model LD02
when connect
successfully. Press
“Check Real-time Video”
to live video preview
interface.
23
PleaseSTOPrecording
first,thenressthe‘ Device
Album’togetPhoto,Video,
Emergencyfiles.
Now you can view the
video currently being recorded
real-time by connecting
your smartphone to the
dashcam via Wi-Fi Direct.
4 Please STOP recording
first, then press the ‘Device
Album’ to get Photo, Video,
Emergency files.
5
LD02_5G
LD02_5G

8.2 Download the video files into your smartphone
PleaseSTOPrecording
first,thenressthe‘ Device
Album’togetPhoto,Video,
Emergencyfiles.
Go to Dashcam Preview
interface. Please STOP
recording first, then press the
‘Device Album’ to get Photo,
Video, Emergency files.
1Select the video
files to download into
your smartphone.
2Then you can find
these downloaded video
files in APP original
interface menu named
‘Local Video’.
4
Press the icon to
download the video files.
However, it will take a bit
of time to download one
video file.
3
EN-17 EN-18
LD02_5G

The app won t show the live video on your phone. It '
only shows a picture of the beach?
The cellular data will cause the live video not to be viewed. If
the APP won't show the live video, please disable the
‘LINGDU’ cellular data of your phone. Sure that the Local
Network of the ‘LINGDU’ is turned on.
1. For Latest iOS System: Setting→LINGDU→Click ‘Wireless
Data’→Select ‘WLAN’ .
2. For Older iOS System: Setting→LINGDU→Disable the
‘Cellular Data’.
Can I watch the videos around my car remotely?
NO. LINGDU LD02 dash cam is NOT made to broadcast
footage over the cloud or internet. It is NOT a cloud or an IP
camera and it is NOT meant to do that. You can get live video
and footage on LINGDU dash cam’s APP as long as you stay
within the 10FT range from the dashcam.
What is the WiFi Range?
The WiFi signal range is about 10FT when there are NO
obstructions in the middle. Please NOTE that just like your
home WiFi network, you don't have WiFi signal outside your
home, the same way, WiFi range is 10FT from this small device.
What is a WiFi Feature?
The WiFi feature has been designed so you can pair your dash
camera wirelessly with your smartphone and access your
recording instantly from the dash cam. Here you can view,
download and share your videos easily with your friends and
family. Just like how you would connect your Bluetooth
speaker to your smartphone for wireless music play, the
same way dash cameras use WiFi signal (instead of a
Bluetooth) to pair your smartphone with LINGDU LD02.
Note:
1. WiFi Direct lets you directly connect your smartphone to
your dash cam via WiFi within a range of 10FT.
2. Once it is connected to the LINGDU APP it will automatically
update the date/time.
3. The LINGDU is available for devices running Android 5.0
and higher, or iOS 9.0 and higher.
EN-19 EN-20

Touchhereassoonasyou
seethisnotification
Onceyouenterthedefault
passwordforLINGDUWiFiandhit
connect,youwillseethispop-upin
fewseconds.
Touch here to check this box.
Then touch “ YES” to stay
connected to this WiFi and
save this preference
For Android phones:
When installing the LINGDU APP, it will have two pop-up
prompts, select ‘While using the APP’ to allow LINGDU to
access this device's location, and select ‘Allow’ to allow
LINGDU to access photos and media on your device.
There is one extra step you will have to take for the first time.
Once you connect to the WiFi of LD02, it will say ‘No
Internet’. Which is fine. Wait about 10-15 seconds until you
see the below pop up or notification. You just have to tap on
the pop up notification that will show up in few seconds to
select that you still want to stay connected even though
there is NO Internet. Once you select this OK, you are set to
go.
For iPhone:
If you get this pop up for your iPhone while using WiFi
feature, make sure to tap on ‘Keep Trying WiFi’. Otherwise
the camera will get disconnected from the WiFi and then
you will have to forget the LINGDU WiFi and then start to
pair again to make it work again.
EN-21 EN-22
LINGDU
LD02

USA Time Zones
When Daylight
Savi-ngs Ends
Nov - March
When Daylight
Savi-ngs Begins
March - Nov
Hawaii
Alaska
Pacific Time
Zone
Mountain Time
Zone
Central Time
Zone
Eastern Time
Zone
GMT (-10:00)
GMT (-9:00)
GMT (-8:00)
GMT (-7:00)
GMT (-6:00)
GMT (-5:00)
GMT (-8:00)
GMT (-7:00)
GMT (-6:00)
GMT (-5:00)
GMT (-4:00)
EN-23 EN-24
9. Menu
8.3 Calibrate Date/Time
LINGDU LD02 is built-in GPS, need to set Timezone first in
menu of the dash cam or APP so that the video date/time
stamp will be correct Timezone.
UK Time Zones British Summer Time British Winter Time
GMT/UTC +1 GMT/UTC ±0
Video Resolution
Allow to choose the desired video resolution and fps(frames
per second). Higher resolution and fps videos result in
smoother videos, but also take more storage space.
-5K / 5160x2160P @25fps(Default)
-4K / 3840x2160P @25fps
-2K / 2560x1440P @25fps
-1080P / 1920x1080P @60fps
Loop Video Clip Time — 1min/ 3mins(Default)/ 5mins
Here select the length(1/3/5 min) of each video clip for the
loop recording. This function allows the dash cam to
continuously record.
Please notice: The dash cam will keep deleting the oldest files
automatically when memory card gets full so that it can keep
recording over and over.
Video Codec Format — H.264(Default)/H.265
You have the option to choose between two video encoding
formats: H.264 (default) or H.265. H.265, also known as
HEVC, is a more advanced format that allows for even smaller
file sizes than H.264. However, it's important to note that
H.265 may not be compatible with older PCs or Macs, which
could cause lagging or playback issues. If your computer is
not a recent purchase from 2019 onwards, it's best to stick
with H.264 encoding to ensure smooth playback.
Audio Recording — On(Default)/Off
The dashcam has built-in microphone to record audio with
video. You can choose to record mute video by choosing OFF.

EN-25 EN-26
2. Custom-designed Type-C 3-Lead Hardwire Kit is required to use
this new feature. Not included in the packaging, on Amazon
search: Type-C 3-Lead Hardwire Kit for LD02 Dash Cam
Note:
1. Time-Lapse Parking Mode and Collision Detection Parking Mode
will ONLY work when 3-Lead Hardwire Kit is installed properly, the
output current of Hardwire Kit needs to reach 2.5A.
Time-Lapse Parking Mode
1. When you turn OFF the car's engine and turn the key to the lock
position. Then the camera will STOP the continuous video recording
and it will go into the timelapse 1fps recording mode automatically.
2. Now while this timelapse is being recorded, if someone hits your
car and if the impact reaches the set G-Sensor level, then the
camera will start to record 1-min continuous video, save & lock that
video in Event folder > then return to the timelapse 1fps recording.
3. Now when you start your car for the next time, the camera will
automatically STOP the timelapse parking mode. Then it will go
into normal video mode automatically to start the continuous video
recording.
G-Sensor — Off/ Low/ MID(Default)/ High
G-sensor is a 3-axis impact gravitational accelerometer,
designed to detect physical and gravitational forces on the
dash cam. Once G-sensor has been triggered due to physical
or gravitational impact force on the camera, the current
video file will be locked as an emergency file so it won't be
deleted by loop cycle function. The higher the G-Sensor
sensitivity is, the less force will be needed to trigger
automatic file protection.
Exposure
To adjust video exposure setting for either brighter or darker
video according to your preference.
Date/Time Format
Thie feature allows you to select the date format.
Collision Detection Parking Mode
1. When you turn OFF the car's engine and turn the key to the lock
position. Then the camera will STOP the continuous video recording
and it will go into the impact detection mode and the camera will
turn OFF.
2. Now while the camera stays in impact detection mode, if
someone hits your car and if the impact reaches the set G-Sensor
level, then the camera will turne ON > then it will start to record
1-min continuous video, save & lock that video in Event folder >
then the camera will turn OFF.
3. Now when you start your car for the next time, the camera will
automatically go back into normal video mode automatically to
start the continuous video recording.
Time-Lapse Parking Mode Working Time
This setting allows you to choose the Working Time of
Time-Lapse Parking Mode.

EN-27 EN-28
Voice Control — On(Default)/ Off
ONLY support English: turn on WiFi, take picture, turn off
recording, turn off WiFi, open recording, lock the video
Volume
This feature allows you to set the volume level for the boot
sound volume, prompt volume through camera’s internal
built-in speaker.
WiFi— Off/5GHz(default )/2.4GHz
Turn On/Off the WiFi of the dash cam.
WiFi Name SSID: LINGDU-LD02__******_5G
Default PASSWORD: 12345678
If your phone can’t search LD02 WiFi, it meas your phone
ONLY support 2.4GHz band, You can choose 2.4GHz band or
Press and hold the up button to shift to 2.4GHz.
•To start recording, say Open recording
Turn off recording•To stop recording, say
Lock the video•To lock the current video files, say
•To show front camera, say Show front camera
Show rear camera•To show rear camera, say
Open screen•To turn on screen, say
Turn off display•To turn off screen, say
Key tone — On(default )/Off
To switch on/ off the key tone.
Video Stamps
Turn On/Off the Date/Time / Live-speed / GPS Coordinates /
LINGDU logo Stamp shown on recorded files.
Frequency — 50HZ/ 60HZ(Default)
Here you should choose the frequency accordingly to your
power supply specification used in your country based on your
geographical location.
Language — Multilingual, English(Default)
Allow to choose your desired language for dash-cam system.
Rear Mirror
This feature works only on the rear camera image.
On: The image of the rear camera is as same as in the rear
mirror, what’s on the left in reality-> it’s on the right of the
dash cam screen.
Off: The rear camera image is as same as what you see,
what’s on the left in reality- it’s on the left of the dash cam
screen.
Screen Saver — Off(Default)/ 1min/3min/5min
Off: It will make the screen always stay ON.
1/3/5 Minutes: It will shut down the screen after 1/3/5
minutes without any interaction. With the screen off,
recording will continue as normal. Press the button to re-open
the screen.
Voice Command
Say a command, but ONLY support English
•To turn on WiFi, say Turn on WiFi
Turn off WiFi•To turn off WiFi, say
•To take a picture, say Take picture

EN-29 EN-30
Time Zone Selection
-UTC/GMT -7:00 (Default)
-UTC/GMT -12:00 to UTC/GMT +12:00
Here you can choose your desired or local time zone setting
based on UTC/ GMT value. Please make sure to adjust time
zone setting, please refer to page EN-23
Go to to find out https://www.timeanddate.com/time/map/
your Correct GMT (Greenwich Mean Time) value.
Firmware Version
Here you can check the current firmware version installed on
your camera. You will need this information in the future to
check if newer version of firmware is available.
Speed Unit — km/h(Default)/MPH
You can choose desired speed option stamp to be displayed
and recorded on video stamp based on your selection.
Date / Time Settings
Adjust the time & date as required.
Note: Time and date settings will be overwritten upon
satellite connection.
Time Scale
You can choose to set the time format to either the 12-hour or
the 24-hour clock.
Data Format — mm/dd/yyyy(Default), dd/mm/yyyy,
yyyy/mm/dd
Allows you to set the format of the date finally displayed.
Format SD Card
The formatting process will make sure that the card's file
system format is optimized for the camera.
Note: For stable performance, it is recommended that you
format the memory card every 1-2 months.
SD Card Information
Storage information of memory card can be found here.
Default Settings
Reset the Dash Cam to default settings. Your recordings will
not be affected.
Manual QR code
Scan this QR code to download the manual of the dash cam.
GPS Status
Check the satellite number / Longitude / Latitude / Speed.
To use this feature, a custom-designed rear camera is required,
which is not included in the packaging. You can search for
" " on Amazon.Rear Camera for LD02 Dash Cam
Note:

EN-31 EN-32
1. Remove the microSD card from the dashcam.
2. Insert the card into the microSD card reader and connect it to a
computer.
10. Playing Video Files Using Your Computer
. 3 Download LINGDU GPS Player from www.lingdu.us >
Support > Downloads and install it on your computer.
4. Install the LINGDU GPS Player on your computer. Note: Please (
close or ignore the prompt of the anti-virus software, we confirm
that it will not bring any security impact to your computer.)
. ‘ ’5 You can click the Open Files button to browse and select the
Movie or Lock folder of the microSD card on the LINGDU GPS
Player. It will show all files in the Video or Event or Photo folder.
Or you can also drag the video files directly to the launcher screen.
6. There are two ways to play video.
A, Click File-Open icon to choose the folder which you want to play,
click to start play.
(Note that you can ONLY select one folder to play and see no
video files)
B, Select from My Computer and find the memory card disk, ‘ ’
choose the video file you want to play, you can drag and drop
the file directly to the player. You can get the GPS information
on the player.

EN-33 EN-34
11.FirmwareUpdate
1. Format your microSD card with your dash cam at first.
Formatting the TF card may take around 10-30 seconds.
2. Remove the microSD card from the dashcam.
3. Insert the card into the microSD card reader and connect it to a
computer.
4 Download the latest LD02 Firmware from . www.lingdu.us
> Support > Downloads on your computer.
5. Unzip the downloaded firmware (Zip file) and copy the
firmware file “SigmastarUpgradeSD bin” to the root directory of .
microSD card.
6. Connect the camera to the car charger to start the firmware
update process. You should see the upgrade progress bar and red
light will be solid which means your LD02 dash camera is updating
the new firmware.
Please NOTE:
The firmware update may take up to about 1mins. So please be
patient. Make sure the POWER does NOT get disconnected while
the firmware is being updated. Once the firmware is updated, the
camera will turn ON automatically. Format your microSD card with
your dash cam again.
7. You check the latest firmware version by going into the menu >
Firmware Version.

EN-35 EN-36
12. FAQ
Q2: Video Image is blurred?
Remove the protective lens film, clean the lens, make sure the
windshield is clean and clear of grease, dirt, and debris.
Q3: Camera gets HOT?
It is normal for your camera to run slightly hot. Due to video
being recorded at high speed, the dash cam may be hot
during using. (No more than 158°F/70ºC).
Q1: Camera turns ON / OFF automatically?
Ensure that the output current can reach 5V/2.5A and use our
car charger. And ensure that the rear camera are connected
correctly. It is to improve stability that the dashcam reboots
automatically once if it detects that there are different
cameras connected.
Q4: No power to my Dash Cam but it works upon my
computer?
The cigarette power cable is not working. Inspect the fuse in
the Car Power Cable plug. If the fuse is found to be blown,
inspect the power cable for damage which may have caused
the fuse to blow.
Q5: The sound is not synchronised with video during
playback?
The Codecs upon your PC may not be compatible or the latest
standard. Download the latest LINGDU GPS Player from
www.lingdu.us > Support > Downloads.
Q6: Video Files cannot be played on my computer?
The video files from the Dash Cam are in MP4 format and may
not be compatible with your PC if suitable playback software
is not installed.
Q7: Video has no sound?
Q8: Video is blurred?
The Dash Cam has a minimum focal range of around 2 meters.
Objects closer than this are likely to become blurred.
Ensure that ‘Record Audio’ setting is turned ON. Ensure that
‘Timelapse Record’ setting is turned OFF within the APP Menu.
Q9: Voice prompt Memory Error?
Using unqualified SD or third party cards can affect dashcam's
performance and in some cases, force the dashcam to reboot
randomly during recording. If it still can not work normally, it
should be that the TF card is unqualified and can not meet the
recording requirements of the dash cam. Please contact us to
get a new memory card.
Table of contents
Other LINGDU Dashcam manuals


