HP F900 User manual

f900
Car Camcorder
User Manual

1
Contents
About this Guide ........................................................................... 3
FCC Statement .............................................................................. 3
WEEE otice .................................................................................. 4
CE Regulatory otice .................................................................... 4
otes on Installation .................................................................... 4
Caution ......................................................................................... 5
1 Introduction ................................................................... 6
1.1 Features ............................................................................ 6
1.2 Package Contents ............................................................. 6
1.3 Product Overview .............................................................. 7
2 Getting Started .............................................................. 8
2.1 Storage Media ................................................................... 8
2.1.1 Insert the Memory Card ........................................ 8
2.1.2 Remove the Memory Card ..................................... 8
2.2 Installing in Vehicles ......................................................... 9
2.2.1 Mount the Camcorder to Windshield ..................... 9
2.2.2 Adjust the Camcorder ..........................................10
2.3 Connecting to Power .......................................................11
2.4 LED Indicator ...................................................................11
2.5 Powering the Camcorder On / Off ...................................12
2.5.1 Auto Power On/Off ..............................................12
2.5.2 Manual Power On/Off ..........................................12
2.5.3 Reset ...................................................................12
2.6 Initial Settings .................................................................13
2.6.1 Set the Date / Time .............................................13
3 Using the Car Camcorder ............................................... 14
3.1 Automatic Record ...........................................................14
3.1.1 The Recording Screen..........................................15

2
3.1.2 Emergency Recording .........................................16
3.2 Picture in Video ...............................................................17
3.3 Driver Fatigue Alert .........................................................18
3.4 Parking Mode ..................................................................19
3.4.1 Park Recording ....................................................19
3.4.2 Motion and Collision Detection ...........................20
3.4.3 Timelapse ...........................................................20
3.5 Collision Detection ..........................................................21
3.6 File Playback ...................................................................22
3.6.1 Playback Screen ..................................................22
3.7 Deleting Files ..................................................................24
4 Adjusting the Settings .................................................. 25
4.1 Using the Menu ...............................................................25
4.2 Menu Items .....................................................................25
5 Speci ications .............................................................. 28

3
About this Guide
The content in this document is for information purpose and is subject to
change without prior notice. We have made every effort to ensure that
this User Guide is accurate and complete.
However, no liability is assumed for any errors or omissions that may
have occurred.
The manufacturer reserves the right to change the technical
specifications without prior notice.
FCC Statement
This equipment has been tested and found to comply with the limits for a
Class B digital device, pursuant to Part 15 of the FCC Rules. These limits
are designed to provide reasonable protection against harmful
interference in a residential installation. This equipment generate, uses
and can radiate radio frequency energy and, if not installed and used in
accordance with the instructions, may cause harmful interference to
radio communications. However, there is no guarantee that interference
will not occur in a particular installation. If this equipment does cause
harmful interference to radio or television reception, which can be
determined by turning the equipment off and on, the user is encouraged
to try to correct the interference by one or more of the following
measures:
•Reorient or relocate the receiving antenna.
•Increase the separation between the equipment and receiver.
•Connect the equipment into an outlet on a circuit different from that
to which the receiver is connected.
•Consult the dealer or an experienced radio/TV technician for help.
This device complies with Part 15 of the FCC Rules. Operation is subject
to the following two conditions: (1) This device may not cause harmful
interference, and (2) this device must accept any interference received,
including interference that may cause undesired operation.
FCC Caution: Any changes or modifications not expressly approved by the
party responsible for compliance could void the user's authority to
operate this equipment.

4
WEEE Notice
Disposal o Waste Electrical and Electronic Equipment and/or Battery
by users in private households in the European Union
This symbol on the product or on the packaging indicates
that this cannot be disposed of as a household waste. You
must dispose of your waste equipment and/or battery by
handling it over to the applicable take-back scheme for the
recycling of electrical and electronic equipment and/or
battery. For more information about recycling of this
equipment and/or battery, please contact your city office,
the shop where you purchased the equipment or your
household waste disposal service. The recycling of
materials will help to conserve natural resources and ensure
that it is recycled in a manner that protects human health
and environment.
CE Regulatory Notice
The product herewith complies with the requirements of the Low Voltage
Directive 2014/35/EU, the EMC Directive 2014/30/EU and the RoHS
Directive 2011/65/EU.
Notes on Installation
1. Please measure the front windshield viewing area, make sure not to
block driver's front view, install the camcorder below the rearview
mirror (the central, higher right position of the front windshield). And
we recommend that the sky and the land occupied by the screen
50%, fix the car holder and then adjust the camcorder so that the
lane is aligned with the screen.
2. Make sure that the lens is within the wiping range of the windscreen
wiper to ensure a clear view even when it rains.
3. Do not touch the lens with your fingers. Finger grease may be left on
the lens and will result in unclear videos or pictures. Clean the lens
on a regular basis.
4. Do not install the camcorder on a tinted window. Doing so may
damage the tint film.

5
5. Make sure that the installation position is not hindered by the tinted
window.
6. This product is suitable for light windshield or light color
heat-resistant film windows , it will affect video quality if install it on
the dark windows or dark heat-resistant film windows.
7. Use the products of the attached power charger only, please do not
use other brand power charger.
8. The camcorder is built-in super capacitor. After start the car engine,
please wait a few seconds for charging the camcorder, and then the
camcorder will automatically power on and start recording.
Caution
Due to local laws and vehicles safety considerations, do not
operate the camcorder while driving.
Set up time and date accurately before you use this camcorder.
The firmware function in the camcorder is for reference only,
drivers are advised to exercise discretion based on actual road
conditions.
This product is used only for non-commercial use, within the
maximum limits permitted by applicable law. We do not take any
responsibilities for the loss of use of the product.
This camcorder gets warm when in use; this is normal.
Improper use or operation of the product may result in damage of
the product or its accessories and void the warranty.
HP Inc. is OT responsible for the loss of any data/content during
operation.
Be ore you start using the product, it is assumed that you agree to
the above statement.

6
1Introduction
Thank you for purchasing this advanced Car Camcorder. This product is
specifically designed for real time video recording when driving.
1.1 Features
•Full HD recording videos (1920x1080P@30fps)
•1.3" TFT-LCD color screen
•Wide angle lens
•Collision Detection, when a collision is detected, the camcorder will
automatically trigger the emergency recording
•Parking Mode
•Support SDHC class 10 and micro SD memory storage 16GB or
above (support up to 32GB)
•Built-in super capacitor
•Delicate LED design
1.2 Package Contents
The package contains the following items. In case there is any missing or
damaged item, contact your dealer immediately.
Car Camcorder Electrostatic Sticker
CD-ROM
Quick Start Guide Car Adapter

7
1.3 Product Overview
No. Item
No. Item
1 Bracket
8 Emergency Recording / Confirm
Button ( /
OK
)
2 Power
9 Speaker
3 Memory Card Slot
10 Wide Angle Lens
4 USB / Power Connector
11 Microphone
5 Menu / Back Button
( / )
12 LED Indicator
6 Playback / Up Button
( / )
13 LCD Panel
7 Snapshot / Down Button
( / )
14 Knob

8
2Getting Started
2.1 Storage Media
2.1.1 Insert the Memory Card
Insert memory card with the pins facing forward and the screen of the
camcorder facing forward too, see the picture as below:
2.1.2 Remove the Memory Card
If the camcorder is power on, please power off first and wait for the
procedure of switching off the camcorder completed before removing
the memory card.
ote:
1 Do not remove or insert the memory card when the camcorder is turned on. This may damage the
memory card.
2. Support SDHC class 10 and memory storage 16GB or above (support up to 32GB).
3. Please format the micro SD cards before the initial use. The formatted file type for this camcorder
is FAT32 file.
4. Periodically format the microSD card (recommended period: once a month)
5. Please use this camcorder to format memory card greater than 64GB.
9
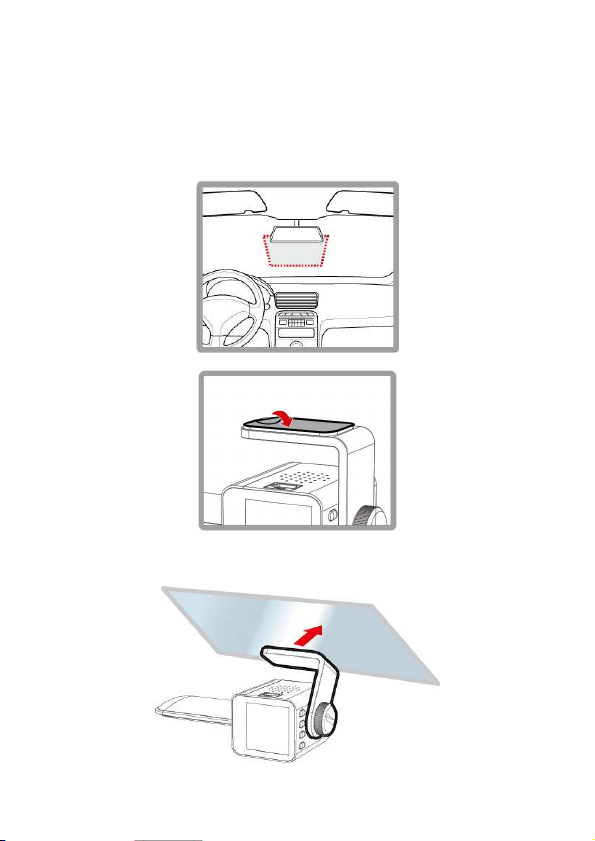
2.2 Installing in Vehicles
2.2.1 Mount the Camcorder to Windshield
1. Put the electrostatic sticker onto the suggested area on the
windshield. Before putting the sticker, please wipe and clean the
windshield. During the installation, please make sure the bubbles
in between the sticker and the window are all gone.
2. Peel off the protective plastic sheet from the adhesive pad.
3. Place and press the bracket firmly onto the electrostatic sticker on
the windshield window. Make sure the base is securely locked in
place.
Other HP Dashcam manuals


