Android Reviw Miro GPS Recorder User manual

5
Android Review Mirror GPS Recorder
User manual
1. Product packaging........................................................................................................................... 2
1.1 Product Appearance ............................................................................................................... 2
1.2 Installation ..............................................................................................................................2
2. Beginning Use .......................................................................................................................2
2.1 Charge the battery................................................................................................................. 2
2.2 Use the storage card.............................................................................................................. 2
2.3 Hot plug of storage card........................................................................................................2
2.4 Memory space....................................................................................................................... 3
2.5 Power on/off..........................................................................................................................3
2.6 Connect to wireless networks............................................................................................... 3
2.7 Bluetooth headset.................................................................................................................. 3
3. Home Screen................................................................................................................................... 5
3.1 Status and notifications......................................................................................................... 5
3.2 Shortcuts to Add widgets...................................................................................................... 7
3.3 Finger gestures...................................................................................................................... 7
3.4 Coping files to and from the storage card.............................................................................8
3.5 Searching the device and the web.........................................................................................9
4. Personalizing................................................................................................................................. 10
4.1 Change the Notification ringtone........................................................................................10
4.2 Change your wallpaper....................................................................................................... 10
4.3 Personalize your Home screen with widgets...................................................................... 11
4.4 Rearrange or remove widgets and icons on your Home screen......................................... 12
5. Web browsing................................................................................................................................13
6 Manage Applications......................................................................................................................14
7. Typical applications introduction..................................................................................................15
7.1 GPS Info..............................................................................................................................15
7.2 FM Transmitter....................................................................................................................15
7.3 Car DVR Introduction.........................................................................................................16
7.4 Music Player........................................................................................................................20
7.5 Video Player........................................................................................................................ 22
7.6 Gallery.................................................................................................................................23
7.7 File Manager....................................................................................................................... 25
7.8 Instant Messaging tools.......................................................................................................26
7.9 Emails..................................................................................................................................26
8. Settings.......................................................................................................................................... 27
8.1 Wireless & networks........................................................................................................... 27

6
8.2 Sound...................................................................................................................................27
8.3 Display.................................................................................................................................28
8.4 Storage.................................................................................................................................29
8.5 Apps.....................................................................................................................................30
8.6 Accounts& Sync..................................................................................................................30
8.7 Location service.................................................................................................................. 31
8.8 Security settings.................................................................................................................. 31
8.9 Language & Keyboard setting............................................................................................ 32
8.10 Backup &reset...................................................................................................................32
8.11Date & Time setting........................................................................................................... 32
8.12Accessibility.......................................................................................................................33
8.13Developer options.............................................................................................................. 33
8.14About Device......................................................................................................................34
9. Troubleshooting.............................................................................................................................35
9.1 Force shutdown................................................................................................................... 35
9.2 Restore default settings....................................................................................................... 35
9.3 System updating.................................................................................................................. 35
9.4 Reset.................................................................................................................................... 35
10. FAQ............................................................................................................................................. 35
1. Product packaging
1 host
2 Bluetooth headset (optional)
3 power line
4 MINI USB connection line
5 manual
The above listed articles refer to the actual product.
1.1 Product Appearance
The structure of the product is shown as follows:
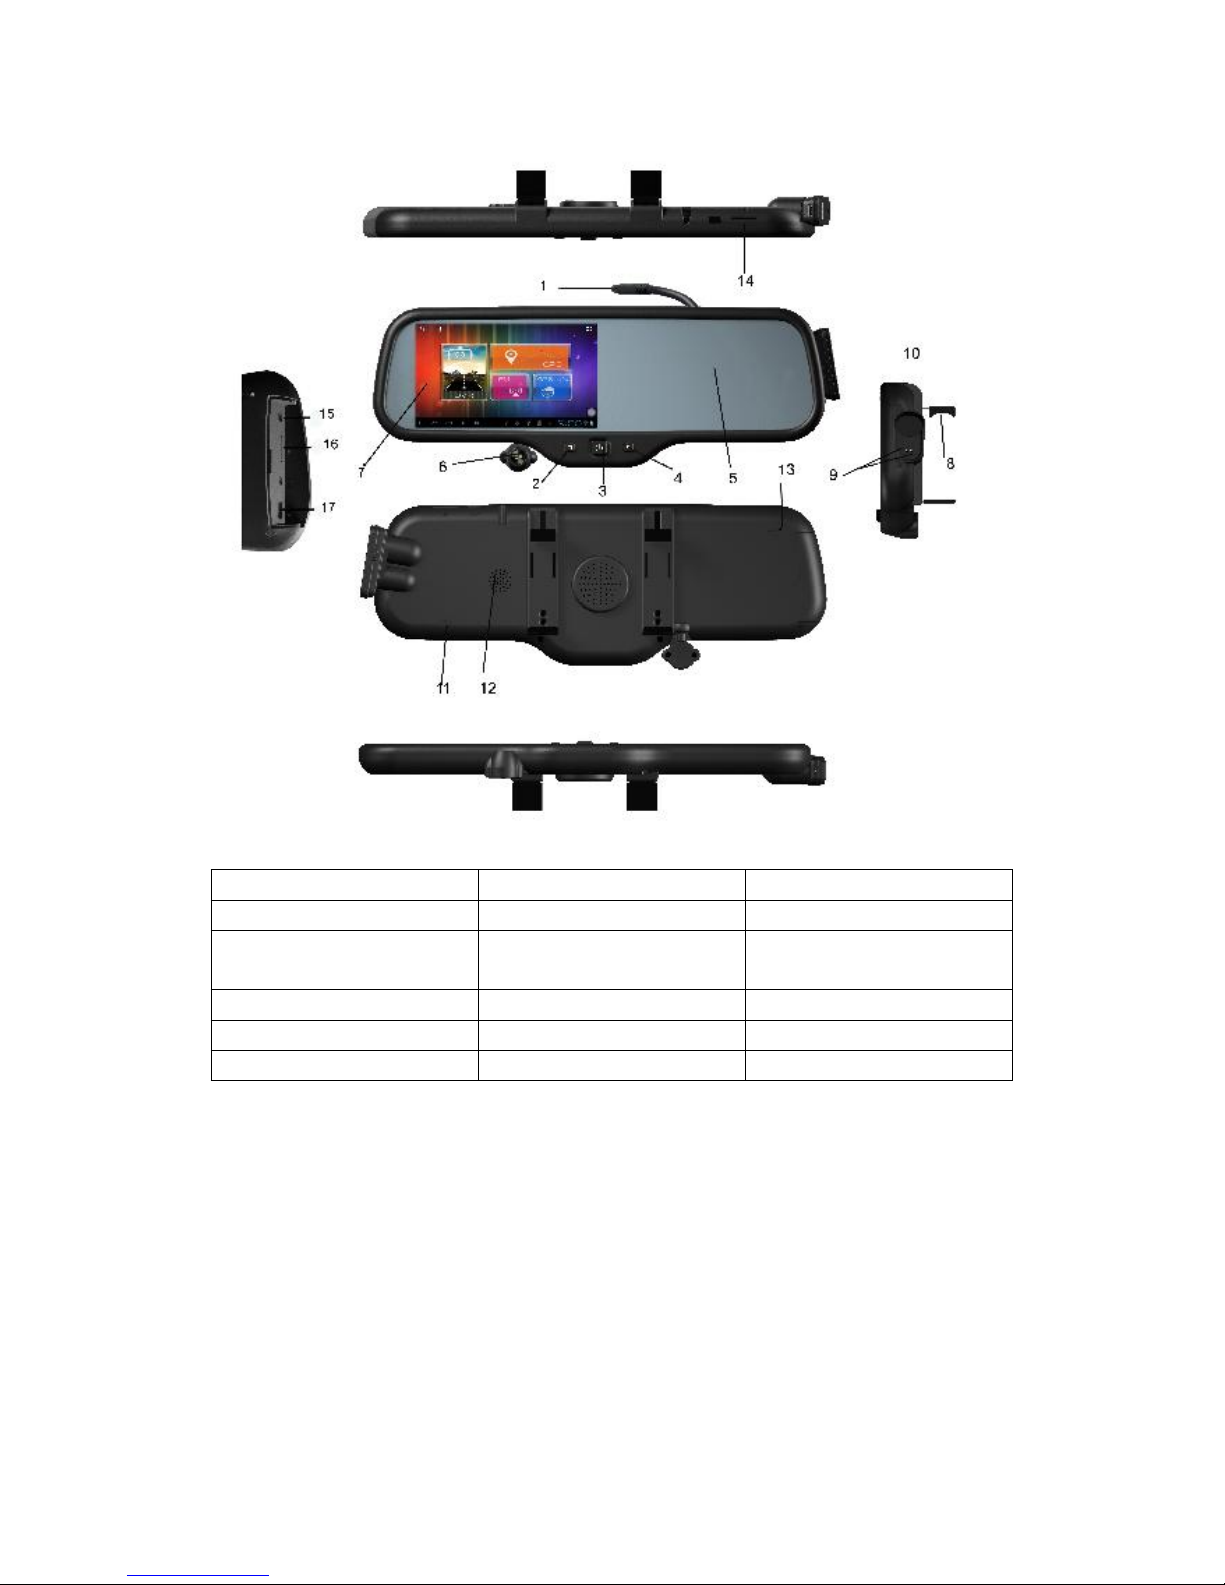
7
1、BMW power connector 2、turn on/off screen 3,、power key
4、recorder file locking button 5、anti-glare rearview mirror 6、camera
7、display screen 8、tensioning clamp
9、Bluetooth headset Charging
port
10、Bluetooth headset 11、MIC 12、speaker
13、Reset 14、GSM slot 15、earphone jack
16、TF slot 17、USB interface
1.2 Installation
1.2.1 1Installation method I
1. Test all function before you install, confirm that no further problems.
【Warming】Please use the higher class TF card (Class6 above), the capacity of the card
is not less than 512 MB and maximum capacity is 64GB.
2. Fixed the recorder in the rearview mirror of the car. Connect graph 0 with graph 26,then
follow with graph 58,
When connect Visual extension, please connect graph 32 with graph 36 and connect
graph 31 with graph 30.
8
Connect graph 28 with positive of reversing lamp, then connect car charger graph 34 with
graph 42. Insert the car charger to the car cigarette lighter turn on graph 33.
【Warming】The charging extension cord can be run up along the edge of the windscreen.
【Warming】our review mirror power on will power on and cut off will shut down.
【Warming】When the machine is installed correctly, the recorder enter into recording
state, please check if the display screen is normal, such as display images of inverted image,
please do not hesitate to contact us.
1.2.2 Installation method II
Cut off graph 35 ACC yellow line then connect with car ACC+, cut off graph 39 GND black line
to connect with car power negative, then cut off graph 38 red line connect with battery
positive .the follow will same with method I
【Warming】Not be charged in the installation process
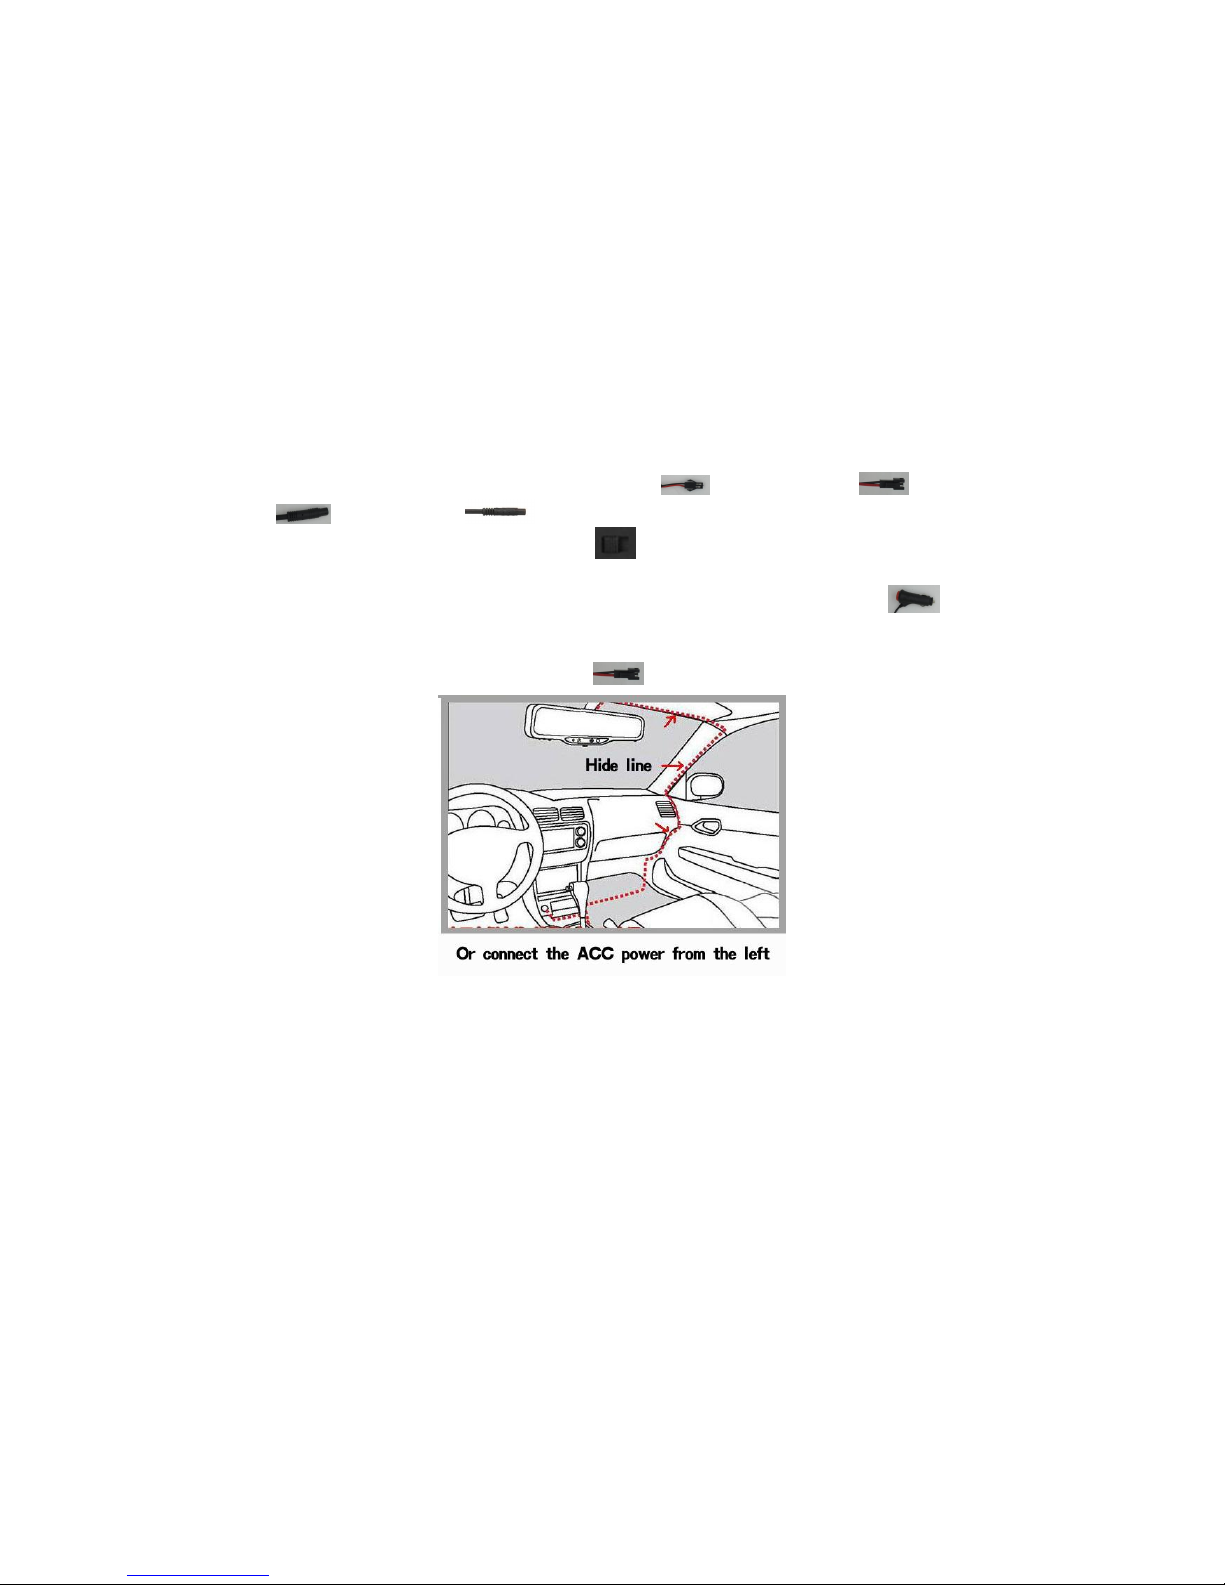
First test as below :Put Car charger interface connect with , then put
power connect with , put car charger into your car cigarette lighter socket
and turn on, turn left the host Power switch .
Firstly, clamp device on the rearview mirror of the car, adjust to the best position; the
power line through the visor wiring, hidden line to the bridge. Put car charger .
The product can also be through the left A column wiring connected ACC power,
cut power adapter lines, The red thread is connected to the positive electrode, the black
head is connected with the negative pole. .
Statement: The software updates sporadically since we continuously devote to product
quality improvements. When operation for the product(s) your purchased
differs from that described in this manual, please follow your product(s).
2.Beginning Use
2.1 Charge the battery
It comes with a built-in polymer rechargeable battery and is designed to use only
manufacture-specified original batteries and accessories. When the battery is low,
please charge it timely.
Charge by Charger
Plug one terminal of the charger into the power adapter socket, and the other to
the power jack of the device to charge it.

9
2.2 Use the storage card
Insert the storage card
The storage card slot is on the panel side, just insert the TF Flash card with its
gold contacts facing down and push it in until it licks into place.
Browse files in the storage card
To browser the files in the storage card, do one of the following:
●run “File Manager to view files in the storage card
●you can also install and run any other third party file browser applications
Remove the storage card
Simply push the storage card in to eject it from its slot.
To avoid data loss or damage, please stop using files/ programs in the storage
card before remove the T-Flash card, and then tap Settings>Storage>Unmount
shared storage to remove it safely.
[Note]:
1. Make sure the location and direction of the storage card is correct when
inserting, otherwise it is easy to cause damage/destroy to the storage card.
2. To avoid incompatibility or unrecognized of the storage card, major
brands of storage card are recommended.
2.3 Hot plug of storage card
Please do not hot plug the storage card when using or browsing its files.
For example, when you are running the Music/Video Player/ Gallery, the storage
card may damage if you push out the storage card directly and the running program
will stop automatically to protect the device. As for details of inserting/removing
storage card, see
2.2 Use the storage card
.
2.4 Memory space
The device contains 2 memory spaces: local storage & extended storage card.
Local storage appears as “Local” and extended storage card as “EXTSD” in the
device. The capacity of built-in flash varies from 8GB and 16GB because of different
model of the PE11 series. The built-in flash capacity of your device depends on the
model your purchased. PE11 series support extended storage card of capacity
maximum 32GB.
2.5 Power on/off
Power on: press down the Power Button and hold for a while to turn on the device

10
when the battery is full enough
Power off: press down the Power Button to prompt a check box, select OK to turn off
the device
Screen Lock:press down the Power Button to shutdown the screen to save battery
life. Press down the Power Button again to activate the locked Home Screen. After
unlocking, the device will resume the screen before locking the screen.
2.6 Connect to wireless networks
To connect to a wireless network, you should follow: tap Settings on the Home
screen;
1. tap Wi-Fi;
2. select ON;
3. the network names and security settings of detected Wi-Fi networks are
displayed in the Wi-Fi networks section;
4. tap a Wi-Fi network to connect. If you selected an open network, you will be
automatically connected to the network. If you selected a network that is secured with
WEP, enter the key and then tap Connect.
Depending on the network type and its security settings, you may also need to enter
more information or choose a security certificate.
2.2 after successful connection, the Wi-Fi connected icon will
appears on the status bar.
Bluetooth headset
Power key indicating lamp
Bluetooth headset with Bluetooth mobile phone connection, particularly convenient
for incoming and outgoing calls. Before using this function, please turn Bluetooth on.
Long press the Bluetooth headset power key 6-8 seconds, the indicating lamp on the
headset in the red and blue flashing alternately, searching through mobile phone
Bluetooth, name: GPS518. password 0000 pairs can be completed using the. After
use, placed in the right headphone adsorption and charge.

11
3. Home Screen
The Home screen is your starting point to access all the features on you device. It
displays application icons, widgets, shortcuts, and other features. You can customer
the Home screen with different wallpaper& widgets and display items you want. See
the
Personalizing
chapter.
When you sign in, the Home screen opens.
Sleep mode
Sleep mode suspends your device to a low power state while the display is off in
order to save battery power. You will still be able to receive messages and calls while
the device is in Sleep mode.
[Note]: If the device in sleep mode more than 30 minutes, the device will
automatically turn off to save electricity.
Switch to sleep mode
Simply press down the Power Button; and the device will automatically
shutdown the display screen when there is no operation on the screen for a period
of time.
Wake up from sleep mode
To wake up your device manually, press the Power Button. You will then see that
the device has locked the screen.
Unlocking the screen
Press the bar on the lock screen and then slide your finger upwards to unlock the
screen.
Browse Home Screen
You can go to the extended Home screen by sliding your finger horizontally
across the screen to go to the left or right side of the Home screen. Tap the icon
to view all applications on your device.
3.1 Status and notifications
Status and Notification Icons may appear
The status bar presents media volume, networks condition, battery condition, time and
12
so on. When an application is running, corresponding notification icon will appear in
the notification area. Icons you may often see are listed as follows:
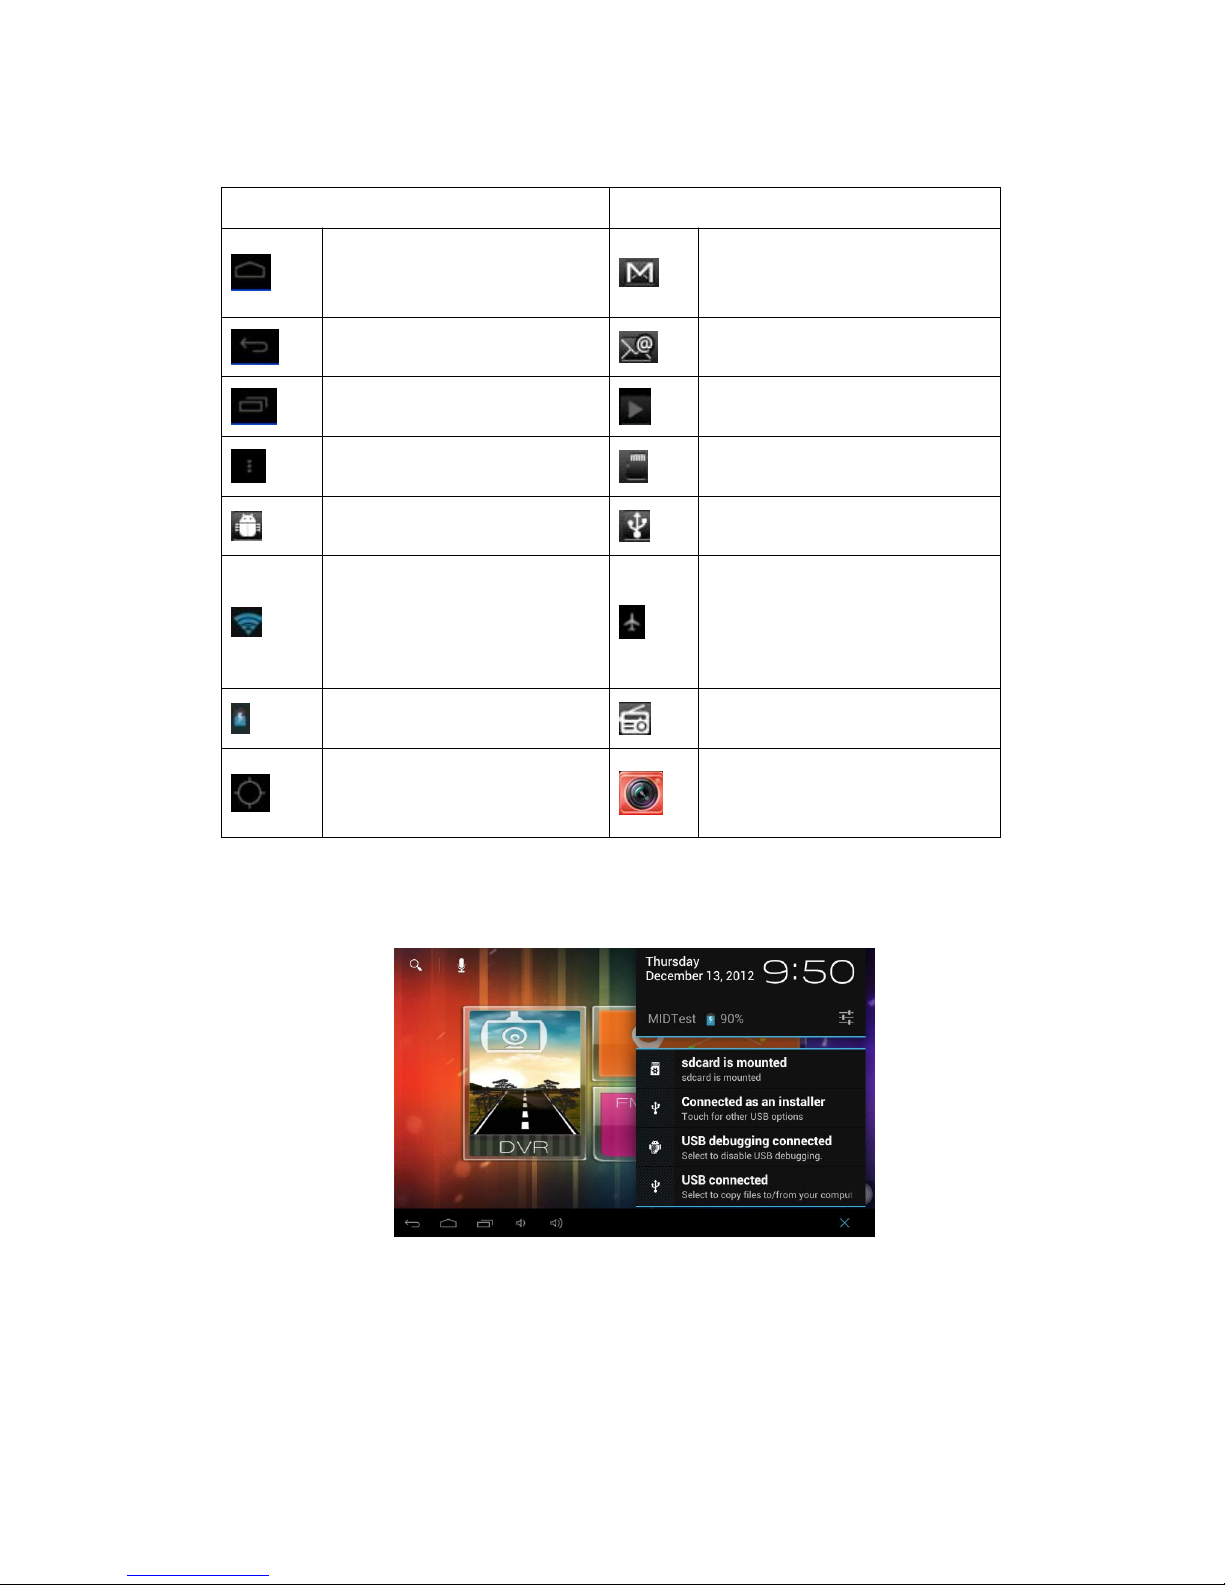
Status icons and its meanings Notification icons its meanings
Tap to go to the Home screen
New Gmail/Google Mail
message
Back New Email message
Recently viewed Music player is ongoing
Menu icon SD card is mounted
Notification USB Connected
Connected to a Wi-Fi
network and display the
signal strength
Airplane mode
Battery is charging FM is on
Search satellite is going on
Video recording is running in
the background
Open notification panel
When new notification icon displays in the status bar, press and hold the status
bar, then slide your finger downward to open the Notifications panel as follows:
If you have several notifications, you can scroll down the screen to view more
notifications.
[Tip]: You can also open the Notifications panel on the Home screen by pressing
Menu icon on the panel and then tapping Notifications.
In the popping notification panel, there are shortcut buttons for turning on/off Wi-Fi,

13
airplane mode, auto-rotate screen and for adjusting screen brightness.
Close the Notifications panel
Simply press the Back button on the device panel.
3.2 Shortcuts to Add widgets
To add widgets to Home screen, you can
1. tap on the home screen to enter into all apps interface as follows
2. tap
3. select one item.
Slide your finger horizontally on the home screen to check widgets that can be
added to the home screen. Widgets selectable are as follows:
3.3 Finger gestures
Tap: When you want to type using the keyboard, select items onscreen such as
application and settings icons, or press onscreen buttons, simply tap them with your
finger.
14
Press and hold: To open the available option for an item (e.g. contact or link in a web
page), simply press and hold the item.
Swipe or slide: To swipe or slide means to drag your finger vertically or horizontally
across the screen.
Drag: Press and hold your finger with some pressure before you start to drag. While
dragging, do not release your finger until you have reached the target position.
Rotate: For most screens, you can automatically change the screen orientation from
portrait to landscape by turning the device sideways. When entering text, you can turn
the device sideways to bring up a bigger keyboard. Refer to Settings chapter for more
details.
3.4 Coping files to and from the storage card
You can copy music, photos/pictures and others to your device to personalize your
device.
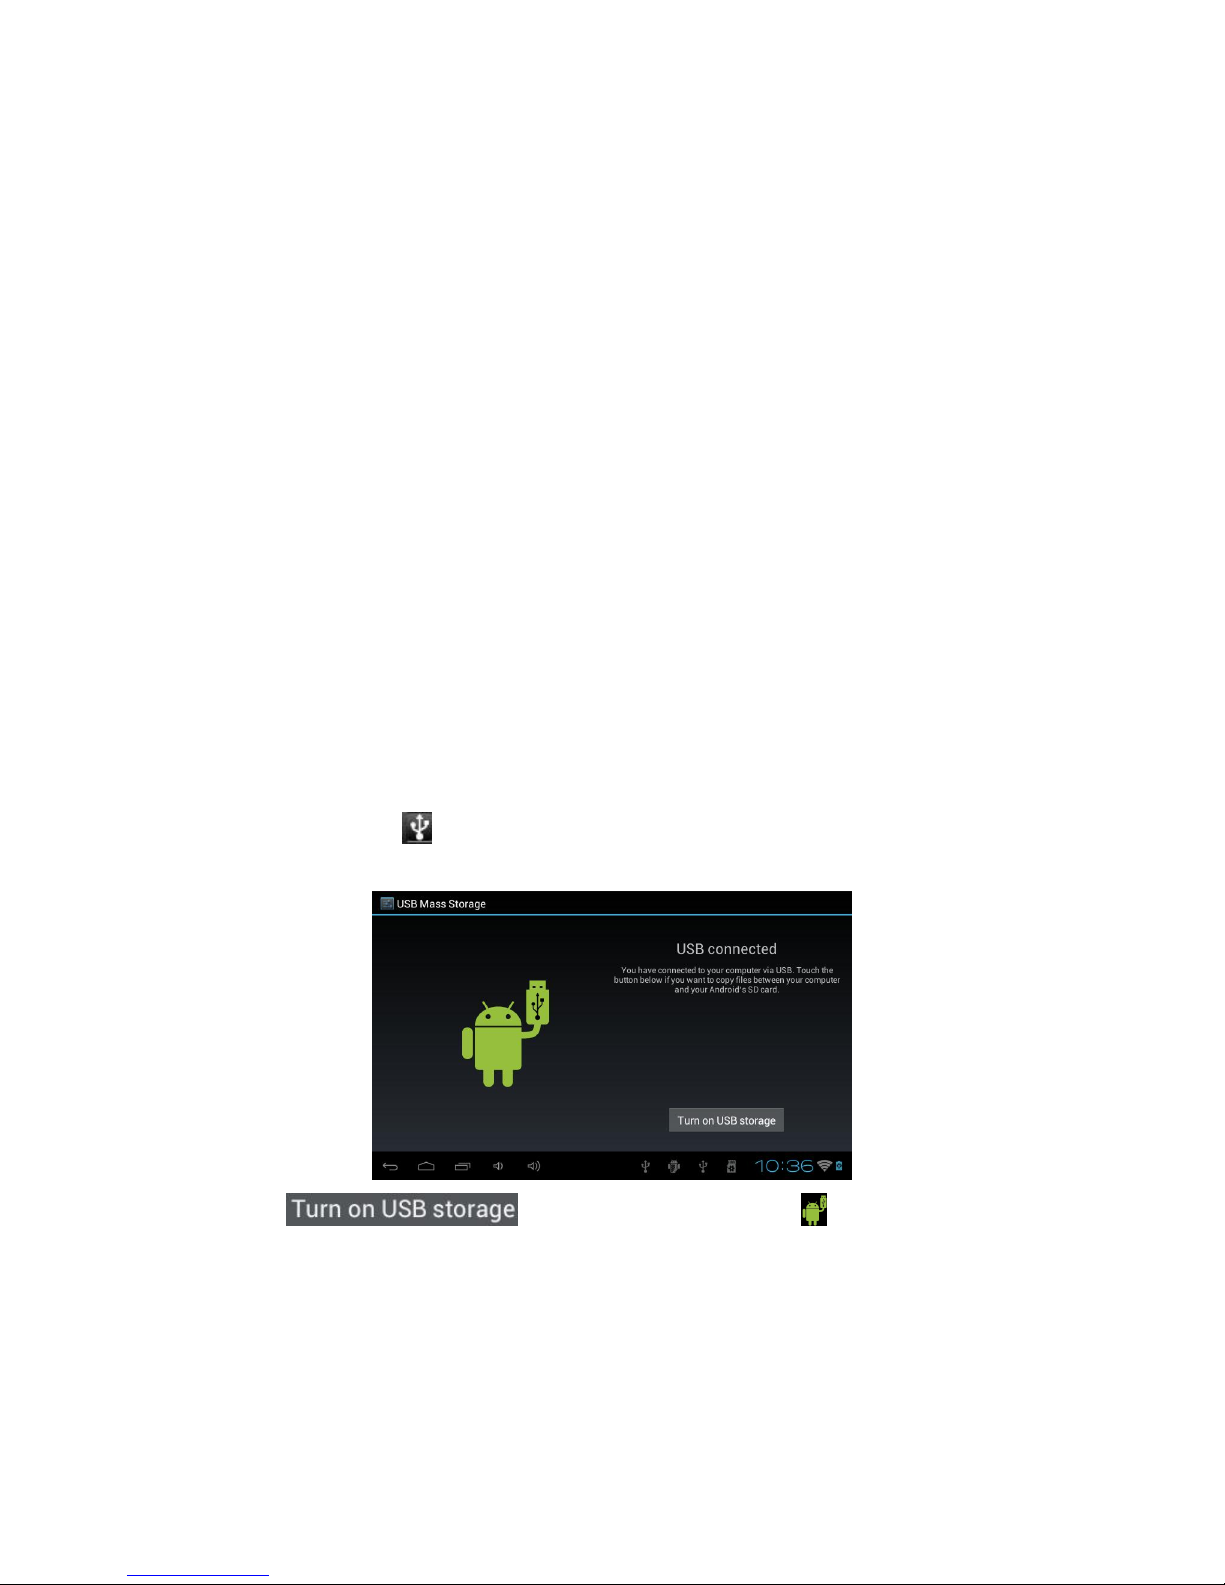
1. Use the USB cable that came with your device to connect it to a USB port on your
computer.
2. when the icon appears in the notification area, open the notification panel
and tap USB Connected to popup the following screen:
3. tap , when the notification icon turns yellow, the
computer will recognize your device as a removable disk;
4. find the removable disk and open it. Do one of the followings:
Copy the files from the computer to the storage card’s root folder.
Copy the files from the storage card to a folder in your computer or computer
desktop.

15
5. after copying the files, unmount the removable disk (that is, your device) as
required by your computer’s operating system to safely remove your device.
6. disconnect your device from the computer.
If your want your device remain connecting to the computer and enable reading its
storage card, you can open the Notifications panel and tap
.
[Note]: you can also realize communication between the device and the computer by
tapping Settings> Developer options>USB Debugging.
3.5 Searching the device and the web
You can search for information on your device and on the Web by using the Quick
Search Box.
1. press on the home screen to enter into all apps interface;
2. tap Search and then enter the search item in the Quick Search Box
As you type, matching items on your device and suggestions from Google web search
are shown as a list. The suggested items that appear will depend on the options that
you have selected in the search settings.
3. Do one of the following:
If what you’re searching for is in the list of suggestions, tap it in the list. The
item opens in the appropriate application.
If what you’re searching for is not in the list, tap to open the search
option menu. Tap Web and then tap to search the Web. The web
browser opens, displaying results of a Google search on the Web

16
4. Personalizing
4.1 Change the Notification ringtone
Choose from the available selections of notification ringtones on your device. You can
also download or copy notification ringtones or songs to your device' storage card and
choose one to use as your notification ringtone. To find out how you can copy files to
your storage card, see “Coping files to and from the storage card”.
1. In the Home screen, tap Settings > Sound > Default notification.
2. Tap the notification ringtone you want to use. The notification ringtone briefly
plays when selected.
3. Tap OK.
4.2 Change your wallpaper
Personalizing your Home screen wallpaper with your favorite photo is a quick and
easy way to change the feel of your device and give it a fresh look. Browse the
collection of wallpapers included in your device or choose from photos that you have
taken with the camera.
To change your Home screen or lock screen wallpaper, you can:
1. tap Settings>Display
2. and then tap Wallpaper.
【Note 】: you can also tap the menu icon on the home screen and then select
Wallpaper.
3. choose source of wallpaper
you can do one of the following:
Tap Super-HD Player to select a photo/picture that you have taken using the
camera or copied to your storage card. Tap Crop to crop the photo/picture
and set the cropped picture as wallpaper.

17
Tap Wallpapers gallery to choose from preset wallpapers and then tap Set
wallpaper.
Tap Live Wallpapers gallery to choose from preset wallpapers and then tap
Set wallpaper.
4.3 Personalize your Home screen with widgets
Widgets put at-a-glance important information and media content up front on your
Home screen. Some widgets are already added to your Home screen for your
convenience. You can add more from the available selections of widgets, or download
more widgets.
①adding a widget to your Home screen
For details on how to add a widget to your Home screen, please refer to section
3.2
Shortcuts to Add widgets
.
[Note]: To remove a widget, press and hold the widget until the icon appears,
drag the widget onto it and release your finger.
②Adding folders on your Home screen
Use folders to group related applications and other shortcuts to keep your Home
screen tidy and organized.
Press and hold the application shortcut and stack it onto another shortcut to create a
folder for the applications you want to file together, and then release your finger to
finish creating a folder. You can drag any other application shortcut into the new
folder.
To rename a folder:
1. Tap the folder to open it.
2. Tap Unnamed Folder to prompt the keyboard.
3. Enter a new folder name and then tap OK.

18
4.4 Rearrange or remove widgets and icons on your Home screen
Rearrange the widgets and icons on your Home screen to give room for adding more
items to the Home screen. You can also remove widgets and icons that you don’t
frequently use.
①Moving a widget or icon
1. Press and hold the widget or icon you want to move.
You’ll see a yellow box around the widget or icon. Don’t release your finger.
2. Drag the widget or icon to a new location on the screen.
Pause at the left or right edge of the screen to drag the widget or icon onto another
Home screen panel.
3. When the widget or icon is where you want it, release your finger.
If you’ve released your finger but a message shows that there’s no space to place
the widget or icon, drag it right or left again to another Home screen panel.
②Removing a widget or icon
1. Press and hold the widget or icon you want to remove. You’ll see a yellow box
around the widget or icon. Don’t release your finger.
2. Drag the widget onto the cross icon on the screen.
3. When the widget or icon also turns red, release your finger.

19
5. Web browsing
User can connect to the network via the browser.
Tap the browser icon on the Home screen to open it as follows:

20
6 Manage Applications
You can personalize and enrich your PE11 by installing a wide variety of free
and paid apps ranging from productivity apps, entertainment, to games. When you
find a program you want, you can easily download and install it on your PE11with
just a few steps as follows:
How to install Android third-party programs
1. download the programs you want from web sites and store them into your
storage card or local memory. You can also copy programs downloaded on
your computer into your storage card or local memory;
2. run the application File manager
3. find the third-party program you want, and then use functions of File manager
to install it to your device.
How to uninstall Android third-party programs
To dismount the program, you can also use functions of File manager and you
can also by tapping Settings >Apps>Downloaded to uninstall a third-party
application.

21
7. Typical applications introduction
7.1 GPS Info
Tap in the Home screen and the tap the GPS Info icon to enter the
following interface:
[Note]: you can enter the above screen by tapping Navi> GPS Info.
To reset the GPS satellite receiver, you can tap and a dialog box will
popup as follows:
Tap “Yes” to finish reset and tap “No” to exit.
7.2 FM Transmitter
FM Transmitter lets you listen to FM radio station on your PE11.
[Note]: To use the FM function, you need to insert power supply as an FM
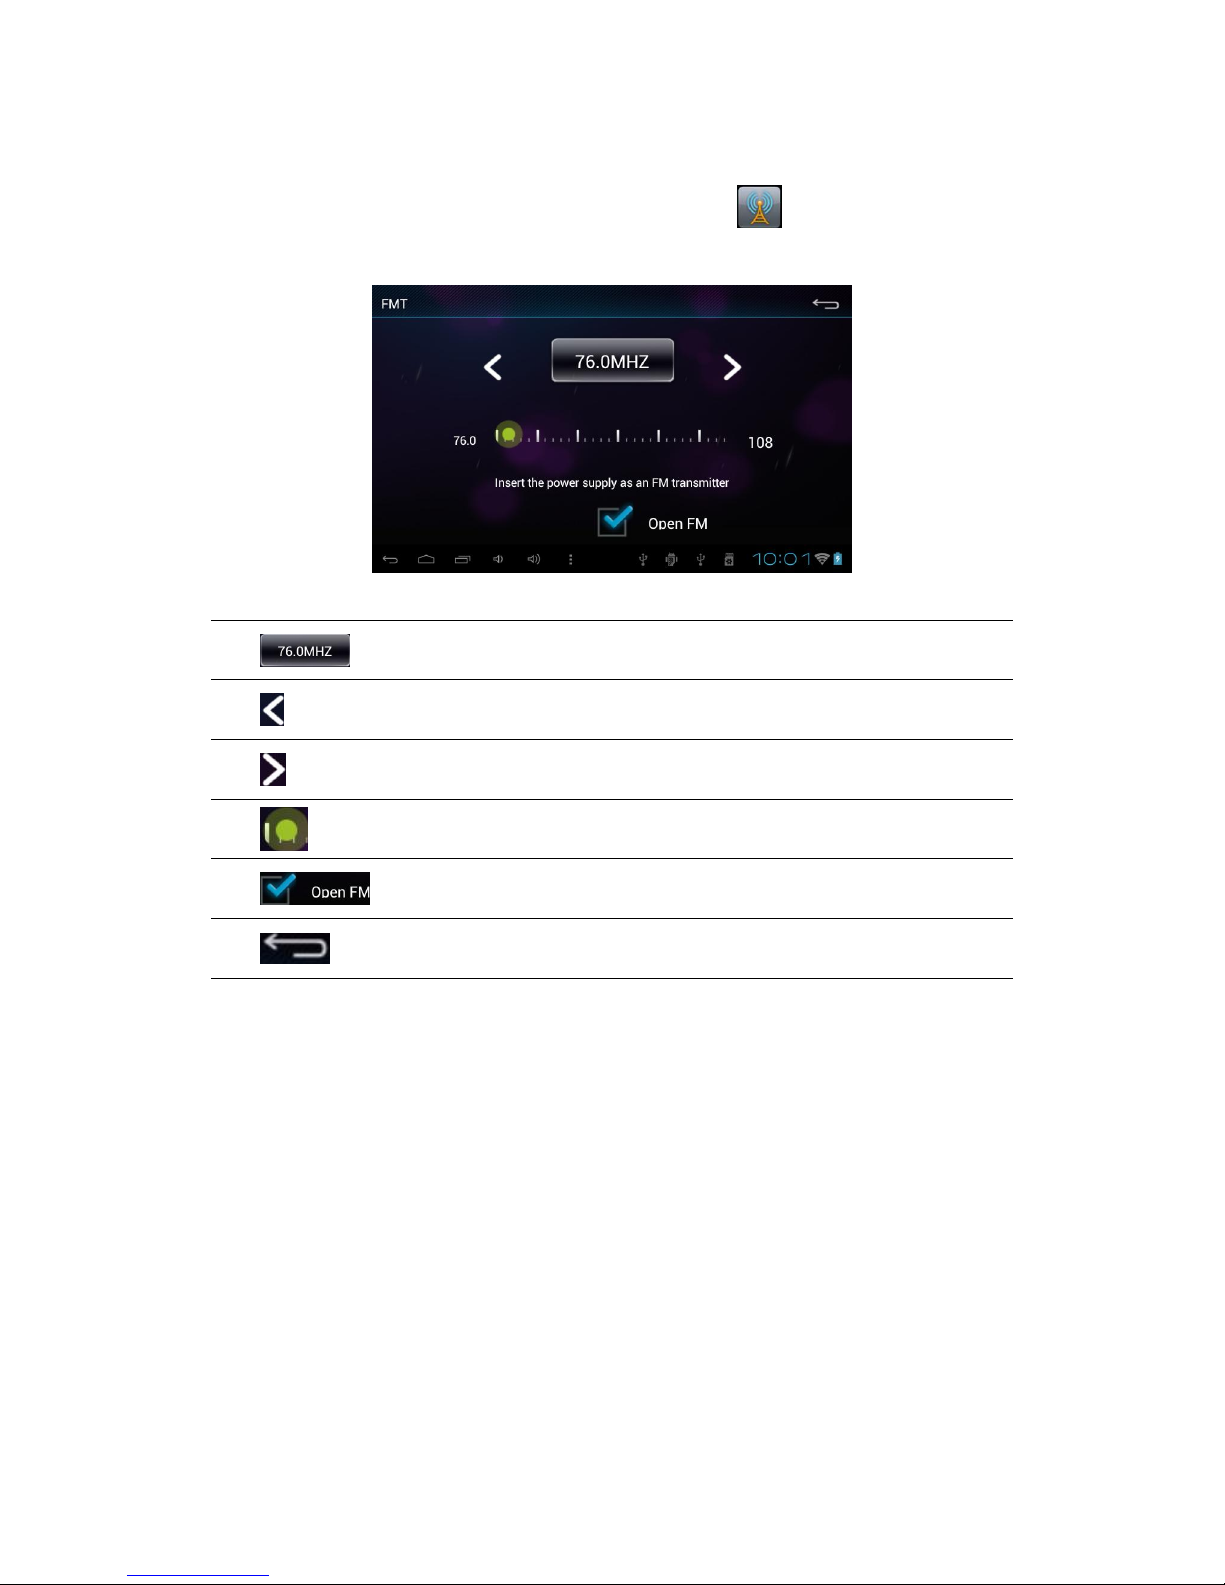
22
transmitter.
To listen to an FM station, you should, tap the icon in the Home screen to
go to the FM Transmitter interface as follows
Definition of icons is listed as follows:
FM radio frequency
Tap to fine tune the radio frequency by-0.1 MHz.
Tap to fine tune the radio frequency by +0.1 MHz.
Drag to tune in to a frequency on the FM band.
Turn off or on FM radio.
Tap to exit
7.3 Car DVR Introduction
[Note]: please insert TF card properly into the device before running the car DVR.
Operation
Tap the DVR icon on the home screen to open it as follows:
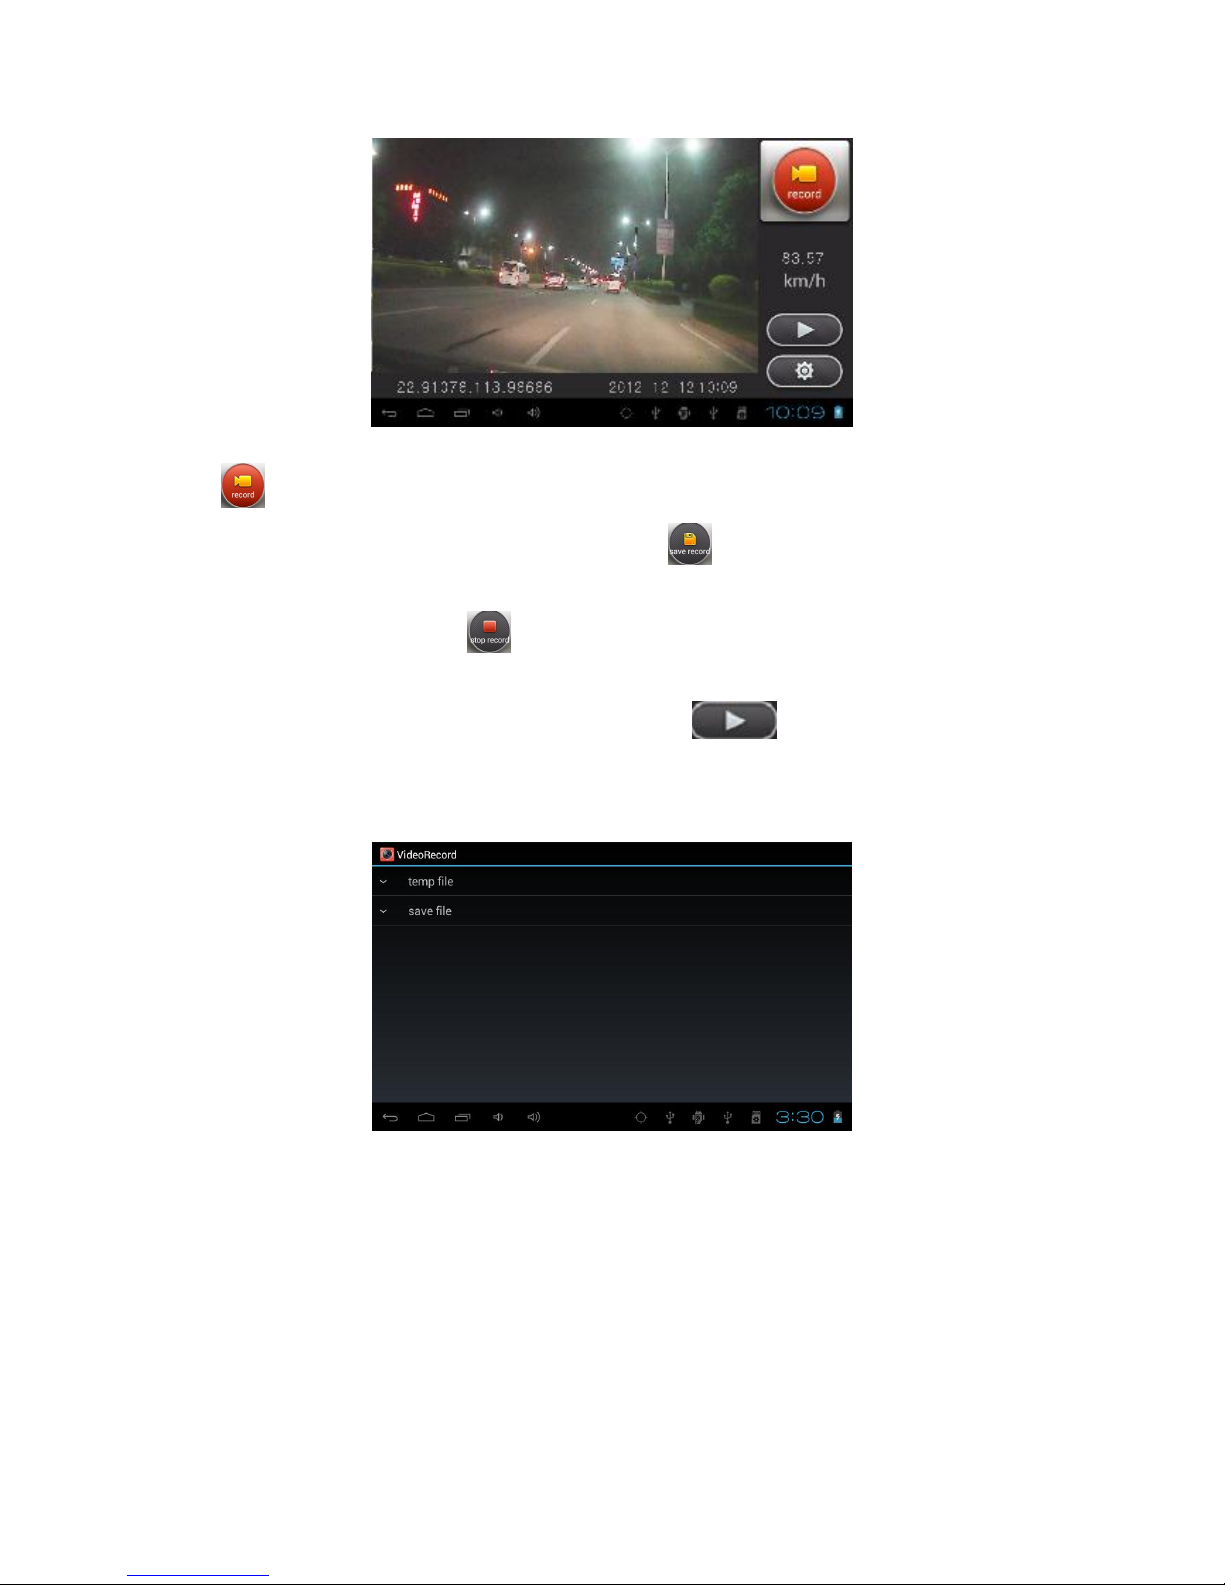
23
In the DVR function interface, you can view current date & time, and car speed. tap the icon
to start recording.
To protect the current video file, you can tap the icon to save it under the directory Save
File in case of overwriting of the video file when the memory capacity is in lack. To stop
recording, simply tap the icon in the recording interface.
2. Playback
To check and view the video recorded, tap the icon to enter the VideoRecord
interface as follows:
[Note]: during recording, video files under the directory Temp File will be overwritten if the
memory capacity is in lack. So please backup important videos under the Save File.
To delete unnecessary videos, just press and hold on the video unwanted until a dialog box prompt
and then click as required to confirm deleting.
Play back temp file
Tap Temp File in the above the interface to check and view all video files under the directory,
select one video and tap on it to play back and the playback interface is as follows:

24
When playback, tap to stop/resume playing the video, tap / to select playing the
previous/next video under this directory, or drag the icon leftward/rightward to view the
video clip you want. Tap the icon to check the longitude and latitude when this video
recorded. Tap to save this video under the Save File directory.
Play back save file
Tap Save File in the above the interface to check and view all video files under the directory,
select one video and tap on it to play back and the playback interface is as follows:
When playback, tap to stop/resume playing the video, tap / to select playing the
previous/next video under this directory, or drag the icon leftward/rightward to view the
video clip you want. Tap the icon to check the longitude and latitude when this video
recorded. Tap to delete this video.
Table of contents
Popular Dashcam manuals by other brands


Velleman
Velleman CAMCOLVC3 user manual

Premier View
Premier View 20-CM-32AH instruction manual

iCheck 4x4 Accessories
iCheck 4x4 Accessories SmartCam DVR02 user manual

Edge Products
Edge Products Back-up camera installation instructions

Brigade
Brigade Backeye 360 Select Quick user guide

Gater
Gater GHDVR355 quick start guide


