Linhai Crossfire E5 2022 User manual

SERVICE MANUAL 19.1
LH50DU
WARNING
The parts of different types/ variants/ versions maybe un-interchangeable, even some parts
have almost same appearance. Always refer to Parts Manual of each ATV model for spare
parts information and service.
※General Information
※Maintenance
※Electrical
※Chassis
※Final Drive
※Brakes

LH50DU SERVICE MANUAL 19.1
LH50DU 维修手册欧标英文 版本 19.1
NOTICE
This manual was produced by the Linhai Group primarily for use by Linhai dealers
and their qualified mechanics. It is not possible to include all the knowledge of a
mechanic in one manual, so it is assumed that anyone who uses this book to perform
maintenance and repairs on Linhai vehicle has a basic understanding of the
mechanical ideas and the procedures of vehicle repair. Repairs attempted by anyone
without this knowledge are likely to render the vehicle unsafe and unfit for use.
Linhai Group is continually striving to improve all its models. Modifications and sig-
nificant changes in specifications or procedures will be forwarded to all authorized
Linhai dealers and will appear in future editions of this manual where applicable.
NOTE:
Designs and specifications are subject to change without notice.
IMPORTANT INFORMATION
Particularly important information is distinguished in this manual by the following
notations.
The Safety Alert Symbol means ATTENTION! BECOME
ALERT! YOUR SAFETY IS INVOLVED!
Failure to follow WARNING instructions could result in
severe injury or death to the vehicle operator, passenger,
a bystander, or a person checking or repairing the vehicle.
CAUTION: A CAUTION indicates special precautions that must be taken to
avoid damage to the vehicle.
NOTE: A NOTE provides key information to make procedures easier or
clearer.

CONTENTS
CHAPTER1 ……………………………………………………….General Information
CHAPTER2 ………………………………………….……………………Maintenance
CHAPTER3…………………………………………..…………………………Chassis
CHAPTER4………………………………………………….……………….Final Drive
CHAPTER5………………………………………………………………………Brakes
CHAPTER6………………………………………………….….……………..Electrical

Battery electrolyte is poisonous. It contains sulfuric acid. Serious burns can result
from contact with skin, eyes or clothing. Always keep alert and wear protection.
Crate of the UTV and parts in the UTV maybe have sharp edge, always pay attention
and wear protection.

CHAPTER 1 GENERALINFORMATION LH50DU SERVICE MANUAL 19.1
CHAPTER 1 GENERAL PAGE. 1-
1
CHAPTER 1 GENERAL INFORMATION
The parts of different types/ variants/ versions maybe un-interchangeable, even some parts have
almost same appearance. Always refer to Parts Manual of each CUV model for spare parts
information and service.
1.1 IMPORTANT INFORMATION
1.2 V.I.N NUMBER
1.3 VEHICLE DIMENSIONS
CHAPTER 1 GENERALINFORMATION LH50DU SERVICE MANUAL 19.1
CHAPTER 1 GENERAL PAGE. 1-
2
1.1 IMPORTANT INFORMATION
PREPARATION FOR REMOVAL PROCEDURES
1. Remove all dirt, mud, dust and foreign material before removal and disassembly.
2. Use proper tools and cleaning equipment.
3. When disassembling the machine, always keep mated parts together. This includes gears and
other parts that have been ”mated ”through normal wear. Mated part must always be reused or
replaced as an assembly.
4. During machine disassembly, clean all parts and place them in trays in the order of disassembly.
This will speed up assembly and allow for the correct installation of all parts.
5. Keep all parts away from any source of fire.
REPLACEMENT PARTS
Use only genuine parts for all replacements. Use recommended oil and grease for all lubrication
jobs. Other brands may be similar in function and appearance, but inferior in quality.
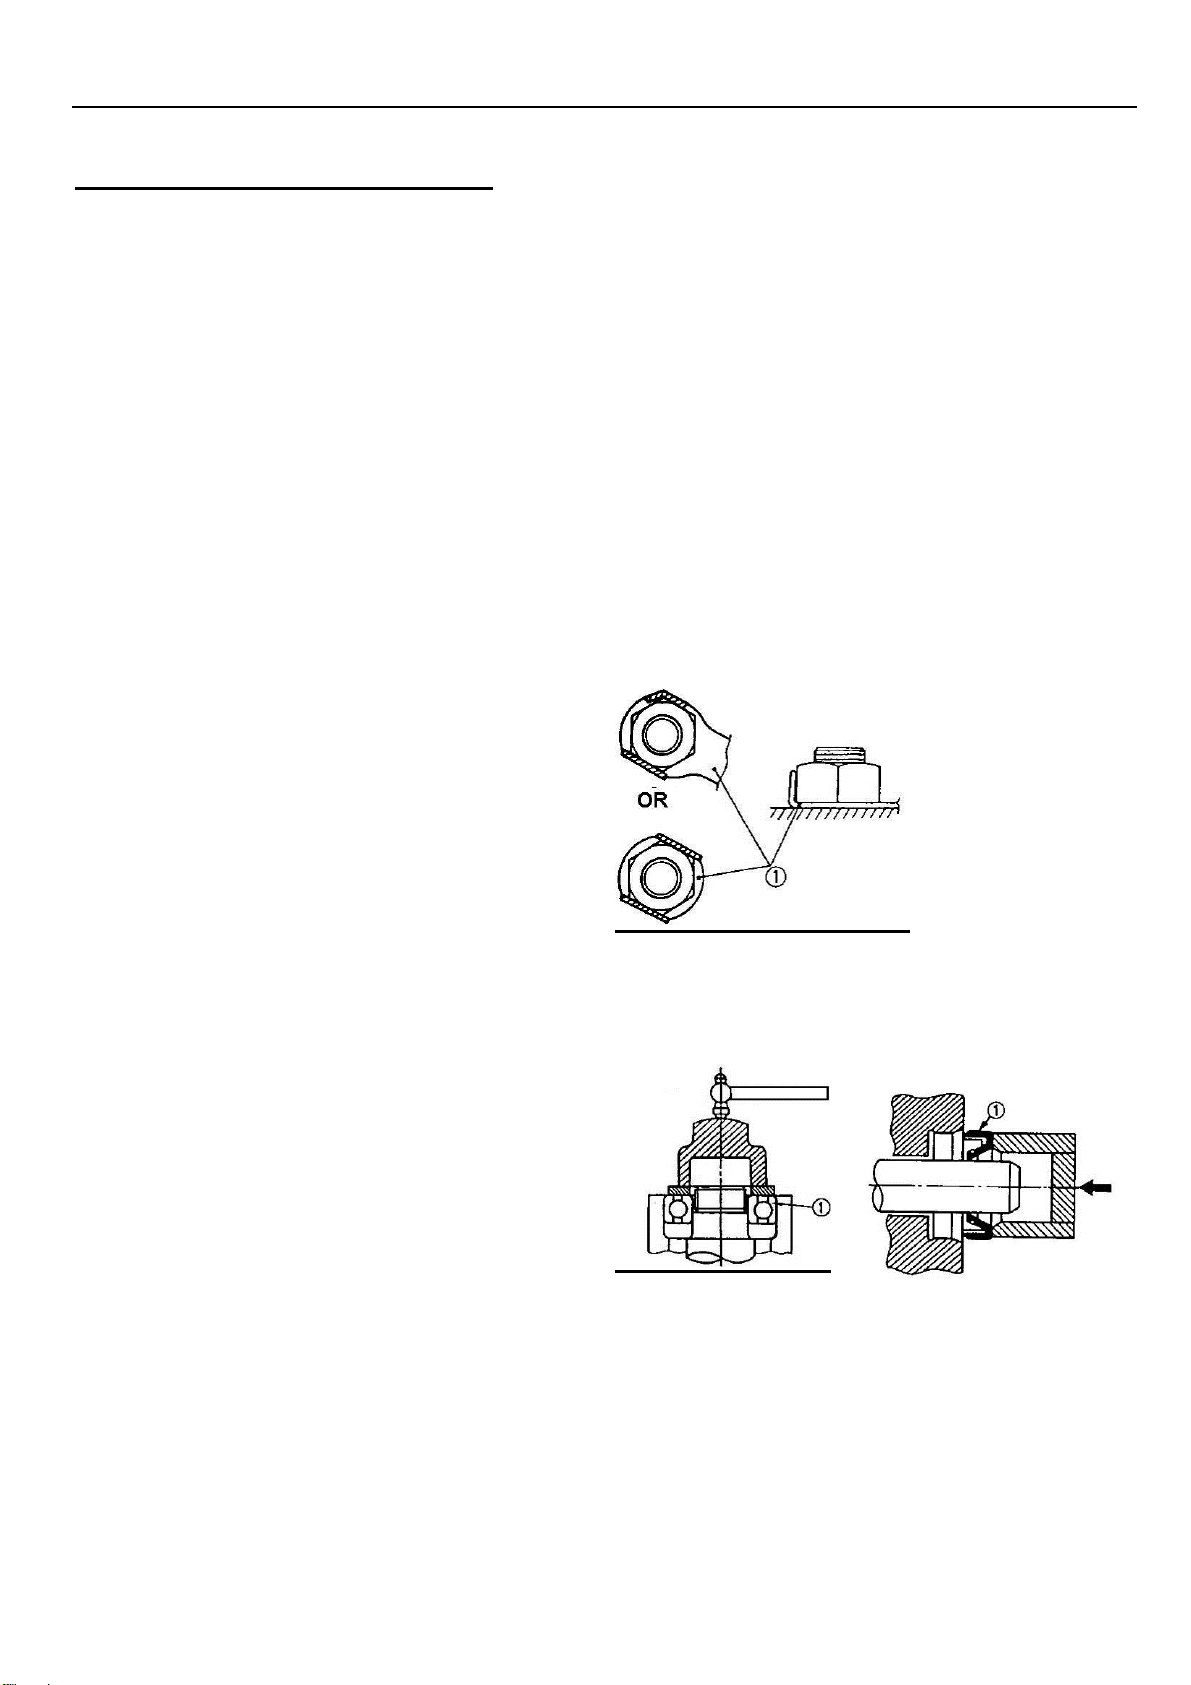
LOCK WASHERS/PLATES AND COTTER PINS
Replace all lock washers/plates and cotter pins
after removal. Bend lock tabs along the bolt or
nut flats after the bolt or nut has been tightened
to specification.
BEARINGS AND OIL SEALS
Install bearings and oil seals so that the
manufacturer’s marks or numbers are visible.
When installing oil seals, apply a light coating of
lightweight lithium base grease to the seal lips.
Oil bearings liberally when installing, if
appropriate.
①oil seal
CAUTION:
Do not use compressed air to spin the bearings
dry. This will damage the bearing surfaces.
①Bearing
CIRCLIPS
1. Check all circlips carefully before reassembly.
Always replace piston pin clips after one use.
Replace distorted circlips. When installing a
circlip ①, make sure that the sharp-edged
corner ②is positioned opposite the thrust
③it receives. See sectional view.
④Shaft

CHAPTER 1 GENERALINFORMATION LH50DU SERVICE MANUAL 19.1
CHAPTER 1 GENERAL PAGE. 1-
3
CHECKING OF CONNECTIONS
Dealing with stains, rust, moisture, etc. on the
connector.
1. Disconnect:
Connector
2. Dry each terminal with an air blower.
3. Connect and disconnect the connector two or
three.
4. Pull the lead to check that it will not come off.
5. If the terminal comes off, bend up the pin ①
and reinset the terminal into the connector.
6. Connect:
Connector
NOTE:
The two connectors ” click ” together.
7. Check for continuity with a tester.
NOTE:
If there is no continuity, clean the terminals.
Be sure to perform the steps 1 to 7 listed
above when checking the wire harness.
Use the tester on the connector as shown.
Battery electrolyte is poisonous. It contains sulfuric acid. Serious burns can result from contact with
skin, eyes or clothing. Always keep alert and wear protection..
Crate of the CUV and parts in the CUV maybe have sharp edge, always pay attention and wear
protection.

CHAPTER 1 GENERALINFORMATION LH50DU SERVICE MANUAL 19.1
CHAPTER 1 GENERAL PAGE. 1-
4
CONVERSION TABLE
How to use the CONVERSION TABLE
Use this table to convert METRIC unit data to IMPERIAL unit data.
Ex.
METRIC MULIPLIER IMP
**mm x 0. 3937 = **in
**cm x 0.03937 = **in
CONVERSION TABLE
METRIC TO IMP
Known
Multiplier
Result
Torque
m·kg
m·kg
cm·kg
cm·kg
7.233
86.794
0.0723
0.8679
ft·lb
In·lb
ft·lb
In·lb
Weight
kg
g
2.205
0.03527
lb
oz
Distance
km/h
km
m
m
cm
mm
0.6214
0.6214
3.281
1.094
0.3927
0.03927
mph
mi
ft
yd
in
in
Volume/
Capacity
cc(cm3)
cc(cm3)
lit(liter)
lit(liter)
0.03527
0.06102
0.8799
0.2199
oz(IMP liq.)
cu·in
qt (IMP liq.)
gal(IMP liq.)
Miscellaneous
kg/mm
kg/cm2
Centigrade
55.997
14.2234
9/5(℃)+32
lb/in
psi(lb/in2 )
Fahrenheit(°F)
CHAPTER 1 GENERALINFORMATION LH50DU SERVICE MANUAL 19.1
CHAPTER 1 GENERAL PAGE. 1-
5
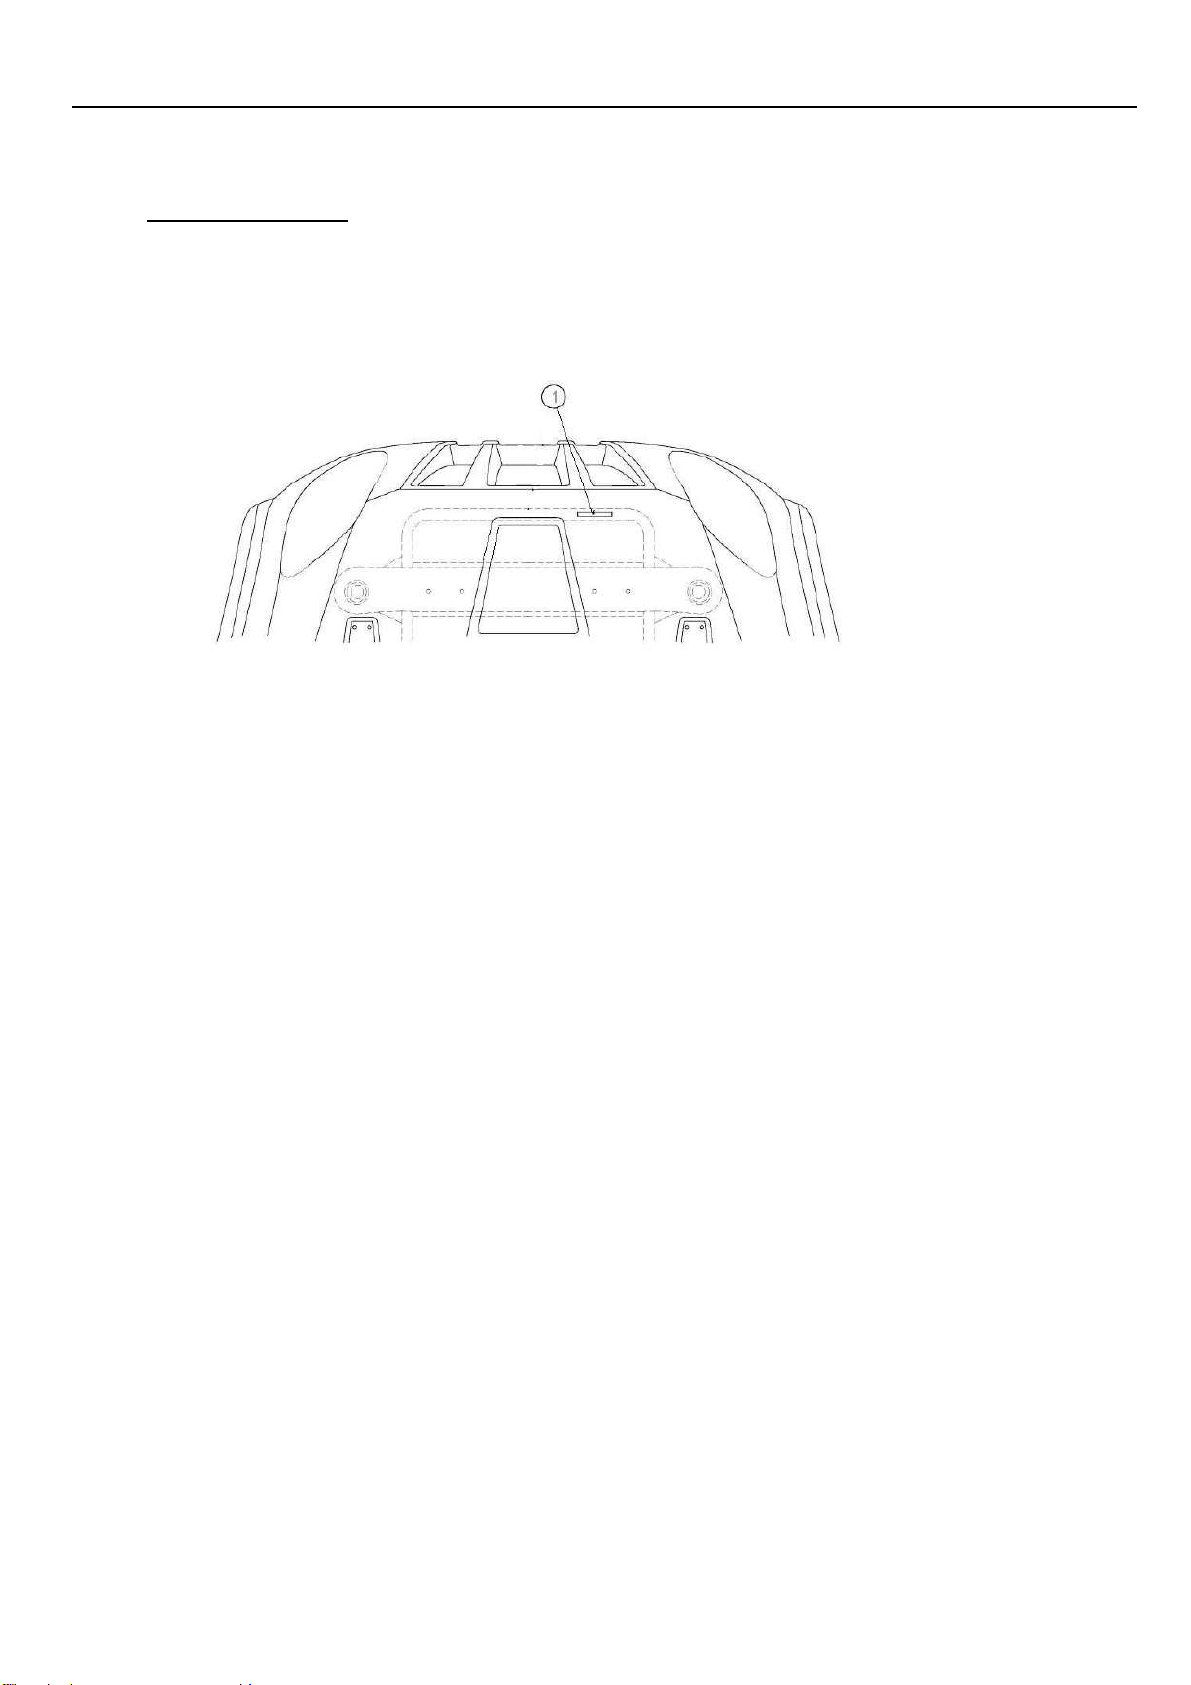
1.2 V.I.N NUMBER
The vehicle identification number is stamped
○
1
into the front of the frame tube.

CHAPTER 1 GENERALINFORMATION LH50DU SERVICE MANUAL 19.1
CHAPTER 1 GENERAL PAGE. 1-
6
1.3 VEHICLE DIMENSIONS

CHAPTER 1 GENERALINFORMATION LH50DU SERVICE MANUAL 19.1
CHAPTER 1 GENERAL PAGE. 1-
7
NOTES

CHAPTER 2 MAINTENANCE LH50DU SERVICE MANUAL 19.1
CHAPTER 2 MAINTENANCE PAGE. 2-
1
CHAPTER 2 MAINTENANCE
The parts of different types/ variants/ versions maybe un-interchangeable, even some parts
have almost same appearance. Always refer to Parts Manual of each CUV model for spare
parts information and service.
2.1 PERIODIC MAINTENANCE
2.2 THROTTLE PEDAL INSPECTION
2.3 CHOKE ADJUSTMETN
2.4 TOE ALIGNMENT
2.5 BRAKING SYSTEM INSPECTION
2.6 SUSPENSION SPRING RPELOAD ADJUSTMENT
2.7 WHEELS
2.8 TIRE PRESSURE
2.9 FRAME, NUTS, BOLTS, FASTENERS

CHAPTER 2 MAINTENANCE LH50DU SERVICE MANUAL 19.1
CHAPTER 2 MAINTENANCE PAGE. 2-
2
2.1 PERIODIC MAINTENANCE
GENARAL
CAUTION
Mark on the following chart
DL :Due to the nature of the adjustments marked with a DL on the following chart, it is
recommended that service be performed by an authorized dealer.
▲:Service/Inspect more frequently when operating in adverse conditions.
PERIODIC MAINTENANCE SCHEDULE
Careful periodic maintenance will help keep your vehicle in the safest, most reliable condition.
Inspection, adjustment and lubrication intervals of important components are explained in the
following chart on the following pages.
Maintenance intervals are based upon average riding conditions and an average vehicle
speed of approximately 16km/h (10 miles per hour). Vehicles subjected to severe use, such
as operation in wet or dusty areas, should be inspected and serviced more frequently.
Inspect, clean, lubricate, adjust or replace parts as necessary.
NOTE: Inspection may reveal the need for replacement parts. Always use genuine parts
available from your dealer.
Service and adjustments are critical. If you are not familiar with safe service and adjustment
procedures, have a qualified dealer perform these operations.
A = Adjust I = Inspect
C = Clean L = Lubricate
D = Drain R = Replace
T =Tighten to Correct Torque
Item
Hours
When
Remarks
Service (Main) Brake System
/
Pre-ride
I
Parking Brake
/
Pre-ride
I
Tires
/
Pre-ride
I
Wheels
/
Pre-ride
I
Frame nuts, bolts fasteners
/
Pre-ride
I
CHAPTER 2 MAINTENANCE LH50DU SERVICE MANUAL 19.1
CHAPTER 2 MAINTENANCE PAGE. 2-
3
Headlamp Inspection
/
Daily
C
apply dielectric grease to connector
when replaced
Tail lamp inspection
/
Daily
C
apply dielectric grease to socket when
replaced
▲
Transmission Oil Level
10
Monthly
I
change annually
Battery Terminals
10
Monthly
I C
Battery fluid level
10
Monthly
I
DL
Brake pad wear
10
Monthly
I
10
Monthly
C
▲
Gear case Oil
150
annually
R
▲
General Lubrication
all fittings, pivots, cables, etc.
25
3 months
L
Shift linkage
50 hrs
6 months
I A R if necessary
DL
Transmission belt
50 hrs
6 months
I
R if necessary
▲
Steering
50 hrs
6 months
I L T if necessary
▲
Front Suspension
50 hrs
6 months
I L
T if necessary
▲
Rear Suspension
50 hrs
6 months
I
T if necessary
DL
Brake fluid Level
/
Pre-ride
I
Brake fluid
200 hrs
24 months
Change every two years
Idle Speed
/
As Required
A
DL
Toe adjustment
/
As Required
Periodic inspection, adjust when parts
are replaced
Headlight Aim
/
As Required
Adjust if necessary

CHAPTER 2 MAINTENANCE LH50DU SERVICE MANUAL 19.1
CHAPTER 2 MAINTENANCE PAGE. 2-
4
▲
DL
Ball joint (A arm- strut)
10 hrs
monthly
I, (for damage, wear, and play)
R. Replace if necessary
LUBRICANT AND FLUID
Item
Lube Rec
Method
Frequency
1. brake pedal
Grease
Grease, inspect
Monthly or 20
hours
2.Brake Fluid
DOT 3 Only
Maintain level
Between fill lines. See
“7.CONTROL”
As require;
change
every two years
or 200 hours
3.Rear Gear case
oil
SAE
GL-4 85W/90
See “16.MAI-
NTENANCE/ Rear
Gear Case Lubrication”
Change annually
or
at 100 hours
4.Rear Axle
Bearing(on swing
arm model)
Grease
Locate fittings
and grease
Every 3 months
or 50 hours
5.Steering system
Grease
Lubricate the pivoting
and sliding parts
Every 3 months
or 50 hours
6.Tie rods
Grease
Grease
Semi-annually
7.Shift
Linkages
Grease
Locate fittings
and Grease
Semi-annually
8.Front Wheel
bearings
Inspect
Inspect and replace
bearings if
necessary
Semi-annually
9.Ball joints
Grease
Inspect, Locate fittings
and Grease, or replace it
if necessary
Semi-annually
10.Prop Shaft &
Shaft Yoke, Spline
Joint
Grease
Locate fitting and Grease
Semi-annually
11. Front/Rear
A-arm
pivot Shaft
Grease
Locate fitting on pivot
shaft and grease with
grease gun
Every 3 months
or 50 hours

CHAPTER 2 MAINTENANCE LH50DU SERVICE MANUAL 19.1
CHAPTER 2 MAINTENANCE PAGE. 2-
5

CHAPTER 2 MAINTENANCE LH50DU SERVICE MANUAL 19.1
CHAPTER 2 MAINTENANCE PAGE. 2-
6
LUBRICATION RECOMMENDATIONS
NOTE:
1.More often under severe use, such as wet or dusty conditions.
2.Grease: Light weight lithium-soap grease.
3.Grease M:Molybdenum disulfide (MoS2 ) grease (water resistant).
4.When suspension action becomes stiff or after washing.
5.Hours are based on 10 mph(16Km/h) average.
2.2 THROTTLE PEDAL INSPECTION
THROTTLE FREEPLAY
If the throttle pedal has excessive play due to cable
stretch or cable misadjustment, it will cause a delay
in throttle speed. Also, the throttle may not open fully.
If the throttle pedal has no play, the throttle may be
hard to control, and the idle speed may be erratic.
Check the throttle pedal play periodically in
accordance with the Periodic Maintenance Chart
and adjust the play if necessary.
THROTTLE FREEPLAY INSPECTION
1. Apply the parking brake.
2. Put the gear shift lever in the N(Neutral) position.
3. Start the engine, and warm it up thoroughly.
4. Measure the distance the throttle pedal moves
before the engine begins to pick up speed. Free
play should be 1.5 – 3 mm.
Adjustment
1. Slide the boot off inline cable adjuster sleeve.
Loosen adjuster locknut.
2. Turn adjuster until 1.5 to 3 mm, freeplay is
achieved pedal. NOTE: While adjusting freeplay,
it is important you flip the throttle lever back and
forth.
3. Tighten locknut.

CHAPTER 2 MAINTENANCE LH50DU SERVICE MANUAL 19.1
CHAPTER 2 MAINTENANCE PAGE. 2-
7
2.3 CHOKE ADJUSTMENT
If the choke knob does not stay out when pulled,
adjust the choke tension by tightening (clockwise)
the chock cable boot until the choke slider freely but
stays out when pulled.
If smooth choke operation is not obtainable, inspect
choke cable for kinks or sharp bends in routing
2.4 TOE ALIGNMENT
METHOD: STRAIGHTEDGE OR STRING
Be sure the steering wheel in a straight ahead
position.
NOTE: String should just touch side surface of rear
tire on each side of the CUV.
Measure from string to rim at front and rear of rim.
Rear rim measurement (A) should be 1/8" to 1/4" (3
to 6 mm) more than front rim measurement (B).
Always pay attention to tie rods assembly, Both ends
must screw in same and enough threads length.

CHAPTER 2 MAINTENANCE LH50DU SERVICE MANUAL 19.1
CHAPTER 2 MAINTENANCE PAGE. 2-
8
2.5 BRAKING SYSTEM INSPECTION
The following checks are recommended to keep the
braking system in good operating condition. Service
life of braking system components depends on
operating conditions. Inspect brakes in accordance
with the maintenance schedule and before each ride
Keep fluid level in the master cylinder reservoir to
the indicated level on reservoir.
Use DOT 3 brake fluid.
NOTE: Use new brake fluid or brake fluid from a
sealed container to avoid contamination to system.
Check brake system for fluid leaks.
Check brake for excessive travel or spongy feel.
Check friction pads for wear, damage and looseness.
Check surface condition of the disc.
BRAKE PAD INSPECTION
Pads should be changed when friction material is
worn to 3/64" (1mm).
HOSE/FITTING INSPECTION
Check braking system hoses and fittings for cracks,
deterioration, abrasion, and leaks. Tighten any loose
fittings and replace any worn or damaged parts.
ADJUSTING THE BRAKE PEDAL
Check the brake pedal free play. Free play should be
8 – 12mm. Out of specification →Adjust.
1. Loosen the locknut
2. Turn brake rod in or out until the correct free play
is obtained.
Turning in: Free play is increased.
Turning out: Free play is decreased.
3. Tighten the locknut
ADJUSTING THE PARKING BRAKE
Although the parking brake has been adjusted at the
factory, the brake should be checked for proper operation.
The mechanical brake must be maintained to be full
functional.
1. With the engine off, apply the parking brake lever
and attempt to move the CUV.
This manual suits for next models
1
Other Linhai Utility Vehicle manuals


