LINKRICH TSP520B User manual

- 1 -
TSP520B
Thanks for choosing LINKRICH products:
We mainly produce food processing equipment, baking equipment, professional kitchen
equipment, steel kitchen ware, commercial refrigeration equipment and ice cream machine, more than
6 series, 127 kinds of products for you to choose. They are environment-friendly with excellent designs.
High technique to save power, complete functions, easy to operate, LINKRICH products are more
competitive than those of the same line in the international market.
ATTENTION
New user or repairing this product must be performed by the experts or qualified person or those
who have gotten the license of installation, or those who are authorized by the manufacturer.
When installation or maintenance, please obey the following instructions carefully to ensure the
safety use of this appliance.
Please keep this instruction Manual for future reference, or hand it to next user.
Put off the package to make sure none of the parts is missing or damaged. If there is any doubt
about the product, please do not use it, and consult it to the experts.
Keep the packing material out of reach of the children to avoid accident( Especially the plastic bag,
screw etc)
This appliance could be only operated by the person who is familiar with the unit.
When not using the appliance or the operator is absent, please turn off the unit to avoid any
accidental injury or damage.
When it needs to be repaired, please ask for expert, and use the original fitted spare part. It will be
dangerous if not following the above requirements.
This appliance is just for commercial using, not for any other use, otherwise, it may be dangerous.
Do not rinse the equipment with water directly.
Clean the surface of stainless steel periodically with appropriate method to prevent any damage
brought by oxidization or any other chemical interference.
Installation
This is a new machine at a level and long table, dry place , ordinary temperature environment.
Pull conveyor straight, put down table and then both safety guards
Start level or pedal switch, press left-hand side, the conveyors move left, press right-hand side, the
conveyors move right .if the movement is opposite, change any two wires of the power supply and
re-lest the machine
Please look this machine remark about electrical before you operate this machine
Operation
- 2 -
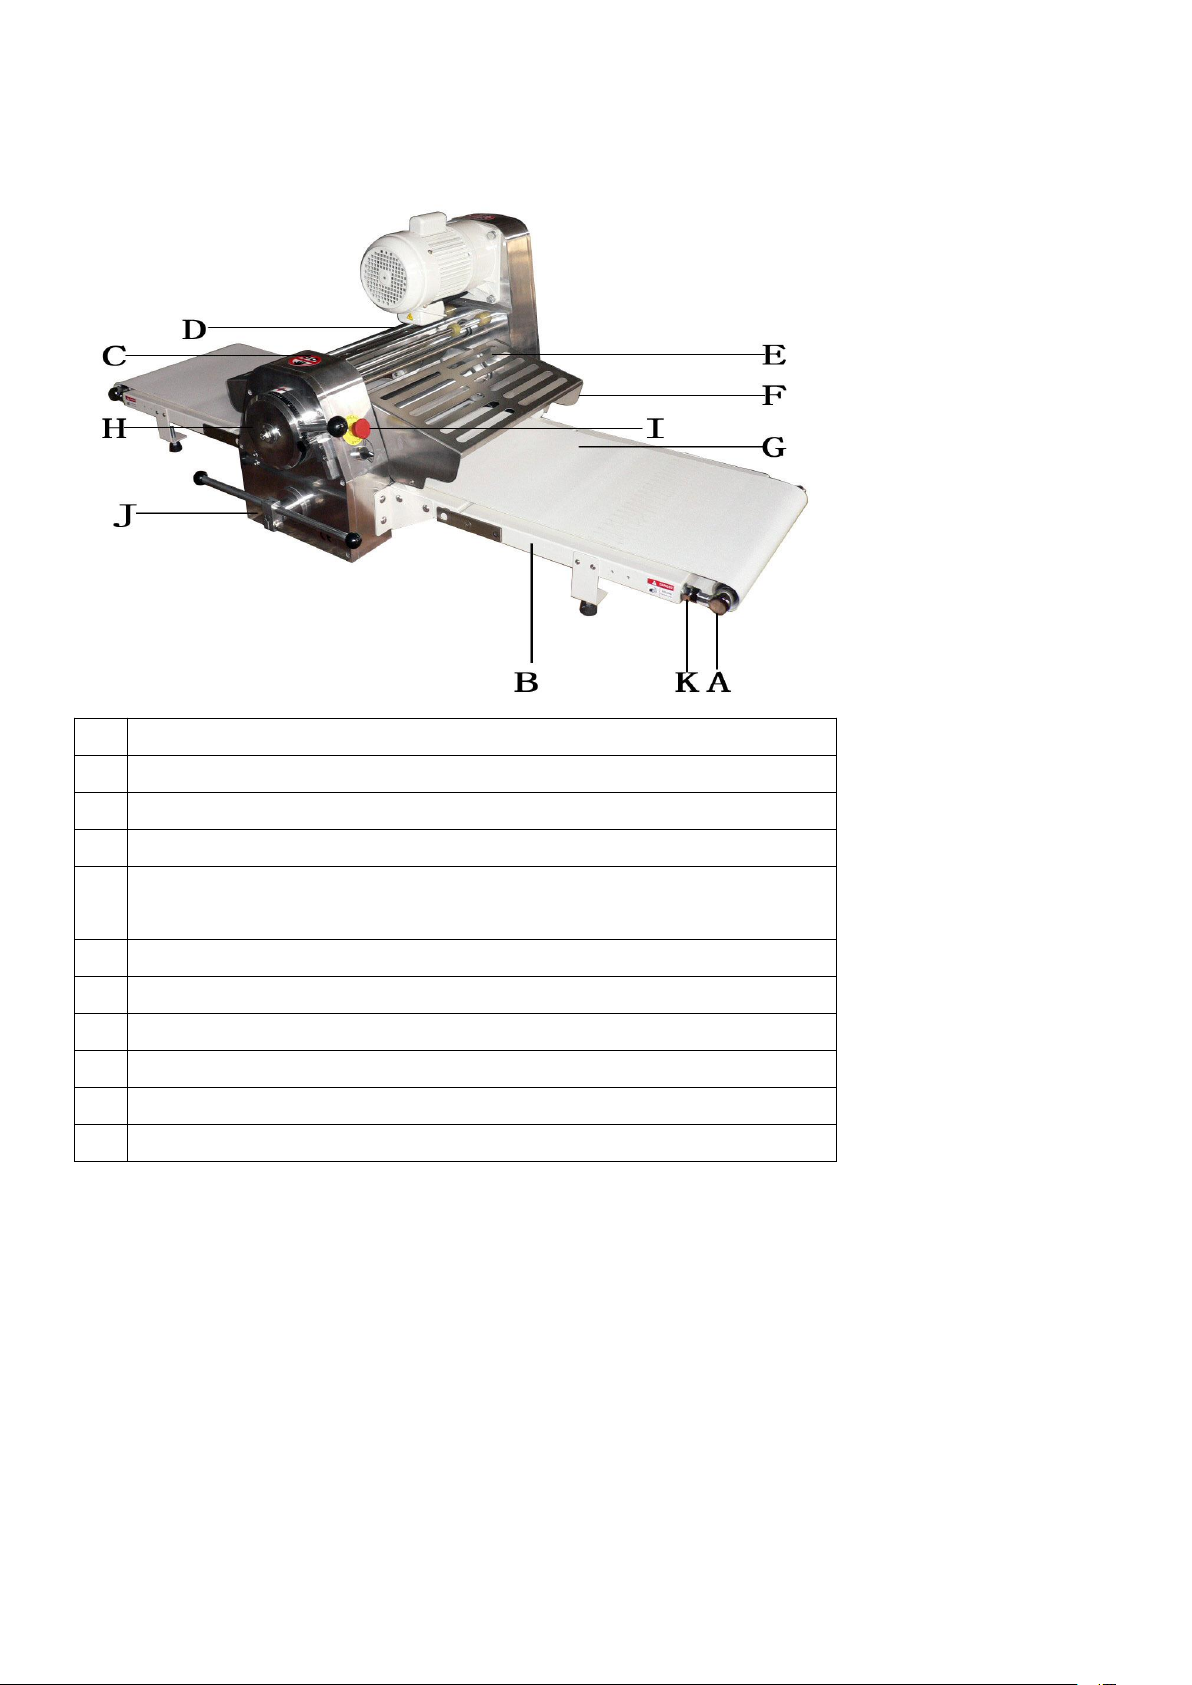
A
Roller(Active X2,Passive X2)
B
Table(Small X2.Big X2)
C
Upper Machine Body
D
Flour Tray
E
Upper pressing Roller ,Upper scraper X2
Lower pressing Roller ,Upper scraper X2
F
Safety Guard:Left&Right
G
Conveyor:2pcs
H
Thickness Handle
I
Power switch
J
Start Level
K
Conveyor Adjusting Nut:4pcs
1. When using machine, set up the thickness handle ( H ) to the most left position.
2. Note : do not put hands into safety guard.
3. Switch off power when cleaning.
4. Lift up safety guards ( F ) after operation and then turn off power switch (I ).
Safety guards
All the safety devices must be checked before operation .Maintenance should be made immediately
when defects or malfunction found.

- 3 -
1. Check the warning sings on the machine.
2. Clean up the water, oil and resin on the machine and its foundation immediately. it avoid slide and
injury.
3. Keep your body away from any moving part of the machine.
4. Beware of foreign objects fall into the machine while operating.
5. Do not climb onto the machine while it is running.
6. In case any fault occurs in the process of operation, press Emergency Stop button
Trouble shooting
1. Machine can not work :
a. power supply is on ?
b. power switch is on ?
c. Safety guard ( F ) has put down ?
d. Lift safety guard if hear click from limit switch.
e. Lift up safety guard, start level ( J ) and check if hear click from limit switch.
2. Electrical cabinet vibrates continuously:
a. Belt loose ?
b. Wires do not connect well ?
c. Something inside the electrical cabinet ?
3. Machine only works in one side :
a. Breaker failed ?
b. The wiring of Level ( J ) or limit switch failed ?
c. The wiring of motor is not good ?
d. Electricity is not three phase ?
4. Conveyor one side works, the other
side stop :
a. The gear wore out .
b. Conveyor belt ( G ) is not tight enough .
5. Thickness handle ( h ) can not fix and
slip downward :
If machine words smoothly when toward right-hand side but jump when toward
Left-hand side , it means the chain inside rear machine body is too loose, set the
handle at scale 15-20 ,and use screw driver to open cover. Apply spanner

- 4 -
to adjust motor plate to tighten chain. Check handle ( H ) if it can be operated smoothly.
6. Conveyor ( g ) moves toward one side
during production :
Adjusting nuts ( K ) to let the belt move straight for example , if belt moves toward rear
Side, loose the front nut, when adjusting nuts, make sure that the speed of belt is the same
as roller and no slip between roller and belt.
7. Noise from roller :
a. Bearing wore out.
b. If noise comes from pressing roller & scraper and conveyor .it means something sticks on
active roller. To clean the active roller simple lift table
can break down. Refer to assembly drawing for active roller and passive roller .
8. Conveyor ( g ) too tight :
Machine locates at a humid place may cause conveyor becomes shorter. If conveyors arc too tight,
loose nuts ( K ) during regular inspection.
If conveyors ( G ) are too tight, it may.
a. Has not sufficient horse power.
b. Damage bearing & shaft of active roller and passive roller .
c. Over load and damage driving gear .
Maintenance
1. Change gear :
Switch off power, applying screw driver to dismantle side plate of lower machine body disconnect 3
electrical wires on the connecting box. Lift up safety guards and switch off
Power switch off, then set the thickness handle to scale “o” apply alan-key M5 to open cover take
out gear housing ,then replace the gears, after replacement, reverse the procedures and set the
thickness handle to scale “ o “.
2. REPLACE DRIVING ROLLER AND BEARING :
Switch off power , lift up safety guards and switch off power switch off. Then apply alan-key
To open cover, loose the nuts of bearing , use a cress type screw driver to move bearing through the
joint or roller and bearing ,replace the roller and assembly by
Reversing procedures.
3. Charge conveyors :
a. Remove the roller by following the procedures mentioned above.
b. Apply spanner M 12 to take the belts on roller and remove product tray .
c. Apply spanner M 23 to loose the nuts of roller.
d. Use spanner M 19 to loose the belts of support and separate the table.
- 5 -
e. Use spanner M 14 to take away the belts of table holder and separate them.
f. Dismantle the table and belts for replacement .
g. Assembly by reversing the processes .
h. The tightness of belts should be properly , when machine is running , press the belts slightly
and check if slip happened between belts and roller.
4. Cleaning:
Wash the conveyor belt by clean water when working is finished everytime.the machine can not use
until the conveyor belt become dry.
5. Daily maintenance:
Pls fill with oil when working is over everyday.
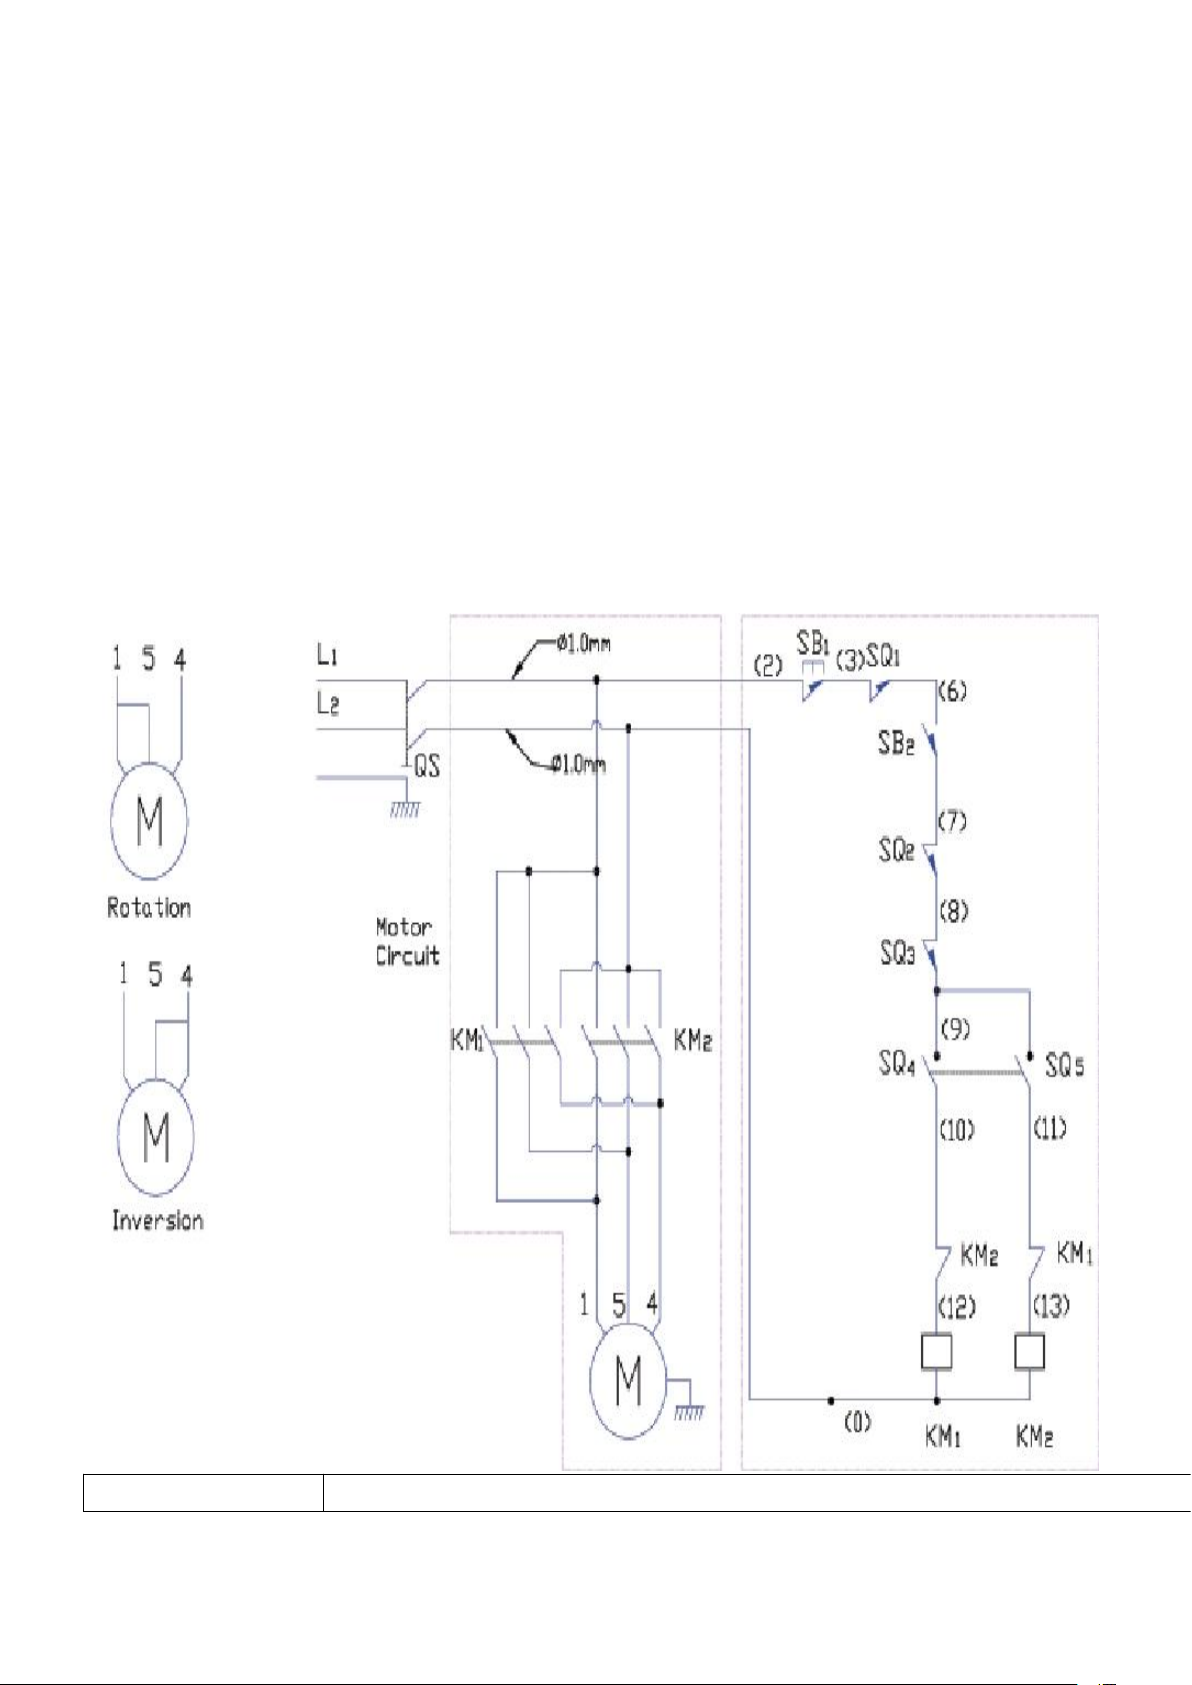
Sybol
Part name

- 6 -
SB1
Emergency Stop
SB2
Green Rotary Switch
SQ1
Stop Button
SQ2、SQ3
Protect Cap Travel Switch
SQ4、SQ5
Postive Inversion Travel Switch
KM1、KM2
Contactor
M
Slow Speed Motor
P
Indlcated Light
Parameter of Motor
HP
HZ
P
Speed
Pole Number
Insulation
Class
PH
V
I
Wire Diameter
1
50
0.75
1660
4
F
1
220
3.8
4x1.0
1
50/60
0.75
1380/1680
4
F
1
110/220
12/6
4x1.5
Machine Illustration
Part list
1. JDR520350 Plastic ball
2. JDR520340 Adjusting lever
3. 6205 ZZ Bearing
4. JDR520050 Adjusting plate
5. JDR520330 Washer
6. M 10X20L Screw
7. JDR520400 Fixed lever
8. JDR520900 Plastic screw
9. JDR520390 Permanent seat
10. M 6X18L Screw
11. JDR520060 Fixed plate
12. M 10X12L Screw
13. M 6X20L Screw
14. JDR520140 Shaft
15. JDR520070 Permanent seat
16. M 8X12L Screw
17. 16X30X1.5t Washer
18. S 16 O ring for shaft use

- 7 -
19. M 6X6L Screw
20. JDR520360 Adjusting seat
21. M10 Soft hat
22. M10X40L Screw
23. JDR520370 Adjusting lever
24. JDR520380 Plastic ball
25. JDR520200 Gear(M2 27T)
26. 6X6X12 Pin
27. 6X6X14 Pin
28. JDR520030 Cover
29. M6X13.1LX7L Screw
30. JDR520910 Spring
31. 5X5X12 Pin
32. JDR520190 Gear(M2 21T)
33. S 22 O ring for shaft use
34. JDR520180 Gear shaft
35. S 25 O ring for shaft use
36. JDR520170 Gear
37. JDR520780 Washer
38. JDR520160 Gear rack
39. JDR520920 Spring
40. JDR520150 Gear rack
41. M 6X40L Screw
42. JDR520080 Adjusting sheet
43. JDR520770 Washer
44. JDR520210 Eccentric mounting
45. JDR520100 Roller adjusting block
46. Ø6 Washer
47. 6205 ZZ Bearing
48. M 8X 8L Screw
49. M 6X12L Screw
50. S 13 O ring for shaft use
51. JDR520250 Gear(M3 15T)
52. JDR520230 Upper plastic gear shaft

- 8 -
53. JDR520090 Adjusting block
54. Ø10 Lockwasher
55. M 10 Nut
56. 6005 ZZ Bearing
57. R 47 O ring for hole use
58. 10X30X1.5t Washer
59. M 10X 20L Screw
60. JDR520300 Washer
61. 51108 (TP1) Bearing
62. JDR520280 Gear(M3 27T)
63. JDR520290 Gear(M3 15T)
64. 8X22X2.0t Washer
65. M 8X18L Screw
66. JDR520270 Gear(M3 24T)
67. JDR520260 Gear(M3 10T)
68. JDR520240 Lower plastic gear shaft
69. JDR520710 Fixed lever
70. JDR520720 Rubber sleeve
71. Ø12 Lockwasher
72. M 12 Nut
73. 6X6X18 Pin
74. JDR520450 Shaft
75. 6X6X30 Pin
76. JDR520110 Roller adjusting block
77. JDR520500 Gear(12T)
78. R 52 O ring for hole use
79. JDR520490 Washer
80. JDR520480 Washer
81. JDR450020 Base
82. JDR520700 Screw
83. M6X15L Screw
84. JDR520440 Upper roller
85. 6206 ZZ Bearing
86. 6X6X25 Pin

- 9 -
87. JDR520430 Lower roller
88. 6X6X35 Pin
89. JDR520470 Screw
90. 6203 ZZ Bearing
91. JDR520420 Conveyor roller
92. 30203 Bearing
93. JDR520410 Bearing sleeve
94. JDR520310 Shaft
95. 6004 ZZ Bearing
96. JDR520320 Bearing sleeve
97. 5X5X30 Pin
98. JDR520540 Bracket support plate
99. JDR520010 Base
100. Ø10 Lockwasher
101. M10X15L Screw
102. M8X15L Screw
103. JDR520560 Link block
104. JDR450960 Holder
105. M16 Nut
106. JDR520580 Adjusting lever
107. S20 O ring for shaft use
108. JDR520510 Gear (18T)
109. JDR520520 Gear (24T)
110. Motor
111. M12X35L Screw
112. JDR450040 Cover
113. M6X20L Screw
114. M24X10H Nut
115. Ø24 Washer
116. Ø24XØ62X3.0t Washer
117. JDR520730 Flour tray
118. JDR520740 Safety guard
119. JDR520760 Microswitch sleeve
120. JDR520750 Safety guard rubber roller

- 10 -
121. M6 Soft hat
122. M5X12L Screw
123. JDR520650 Upper knife sleeve
124. JDR520660 Knife sleeve pin
125. JDR520670 Upper knife
126. JDR520680 Lower knife sleeve
127. JDR520690 Lower knife
128. JDR520550 Shaft
129. JDR520570 Bracket board
130. JDR520600 Conveyor roller
131. JDR520610 Active shaft
132. Spring
133. 8X22X2 Washer
134. M8 Nut
135. Ø8 Washer
136. M8X70 Screw
137. JDR520530 Fixed plate
ONE YEAR PARTS WARRANTY
LINKRICH warrants to the original purchaser of every new LINKRICH product, under normal and proper
use and maintenance service as specified by LINKRICH and upon proper installation and start-up in
accordance with the instruction packet supplied with each LINKRICH unit. LINKRICH’s obligation under
this warranty is limited to a period of one (1) year from the date of original installation.
WARRANTY CLAIMS
All claims for parts must be made directly through LINKRICH. All claims should include:
Personal Details: Products Details:
Your name Model number
Your company Serial number of the product
Address Date of purchase
Email Proof of purchase
Phone
Pertinent information supporting the existence of the alleged defect.(Such as picture etc.)
Our warranty departments will according to the actual situation and reply you within
24hours.
What is not conered by this Warranty
Linkrich’s sole obligation under this warranty is limited to replacement of parts, Subject to the additional

- 11 -
limitations below.
This warranty neither assumes nor authorizes any person to assume obligations other than those
expressly covered by this warranty.This warranty is limited to replacement of parts, and the shipment
charge is not included.
No consequential damages. Linkrich is not responsible for Economic loss; or special, indirect, or
consequential damages, including without limiyayion, losses or damages arising from food or product
spoilage claims whether or not account of refrigeration failure.
Warranty is not transferable. This warranty is not assignable and applies only in favor the original
purchaser/user to whom delivered. Any such assignment or transfer shall vold the warranties herein
made and shall vold all waanties, express or implied, including any warranty of merchantability or fitness
for a particular purpose.
Improper usage. Linkrich assumes no liability for parts or labor coverage for component failure or other
damages resulting from improper usage or installation or failure to clean and/or maintain peoduct as set
forth in the warranty packet provided with the unit.
Residential applications: linkrich assumes no liability for parts or labor coverage for component failure or
other damages resulting from installation in non-commercial or residential applications.
Alteration, neglect, buse, isuse, accident, damage during transit or installation, fire, flood, acts of god.
Linkrich is not responsible for the repair or replacement of any parts that linkrich determines have been
subjected after the date of manufacture to alteration, neglect, abuse, accident, damage during transit or
installation, fire, flood, or act of god.
Improper electrical connections. Linkrich is not responsible for the repair or erplacement of failed or
damaged components resulting from electrical power failure, the use of extension cords, low voltage, or
voltage drops to the unit.
No implied warranty of merchantability or fitness for a particular purpose: there are no otner warranties,
expressed, implied or statutory, except the one (1) year parts warranty as described above. These
warranties are exclusive and in lieu of all other warranties, including implied warranty and
merchantability or fitness for a particular purpose. These are no warranty which extend beyond the
description on the face hereof.

- 12 -
Table of contents
Other LINKRICH Commercial Food Equipment manuals


Popular Commercial Food Equipment manuals by other brands


Diamond
Diamond AL1TB/H2-R2 Installation, Operating and Maintenance Instruction

Salva
Salva IVERPAN FC-18 User instructions

Allure
Allure Melanger JR6t Operator's manual

saro
saro FKT 935 operating instructions

Hussmann
Hussmann Rear Roll-in Dairy Installation & operation manual

Cornelius
Cornelius IDC PRO 255 Service manual

Moduline
Moduline HSH E Series Service manual

MINERVA OMEGA
MINERVA OMEGA DERBY 270 operating instructions

Diamond
Diamond OPTIMA 700 Installation, use and maintenance instructions

Diamond
Diamond G9/PLCA4 operating instructions

Cuppone
Cuppone BERNINI BRN 280 Installation

Arneg
Arneg Atlanta Direction for Installation and Use