LINX-LIFT LINX-LIFT PZ Series User manual

USER MANUAL
PZ SERIES
LEVER HOIST
(BS EN 13157)
This equipment should not be installed, operated or maintained
by any person who has not read and understood all the contents
of this manual. Failure to read and comply with the contents of
this manual may result in serious bodily injury or death and/or
damage to property.
WARNING!
January 2021


1. DEFINITIONS 1
2. SAFETY RULES 1
2.1 General 1
2.2 Rules before use 1
2.3 Rules for operation 2
2.4 Rules after use 2
2.5 Inspection and maintenance 3
2.6 Other 3
3. MAIN SPECIFICATION 3
3.1 Operating conditions 3
3.2 Technical specifications 3
4. OPERATION 4
4.1 Introduction 4
4.2 Method of operation 4
4.3 Load operation 4
4.4 Overload device (if fitted) 4
5. INSPECTION 4
5.1 General 4
5.2 Daily inspection 4
5.3 Periodic inspection 5
6. MAINTENANCE 8
6.1 General 8
6.2 Lubrication 8
7. TROUBLESHOOTING 9
8. SPARE PARTS LIST 10
8.1 Exploded view Diagram 10
8.2 Parts list 10

1. DEFINITIONS
This PZ Series lever hoist has been designed for vertically lifting and lowering loads, by hand, under the
normal atmospheric conditions of the work place.
WARNING!
DANGER!
CAUTION!
Indicates an imminently hazardous situation which, if not avoided,
may result in death or serious injury.
Indicates an imminently hazardous situation which, if not avoided,
may result in death or serious injury.
Indicates a potentially hazardous situation which, if not avoided,
may result in minor or moderate injury.
2. SAFETY RULES
2.1 General
Failure to read and comply with the contents of this manual can result in serious bodily injury or
death and/or property damage. Although you may be familiar with this or similar equipment, it is strongly
recommended that you read this manual before installing, operating or maintaining the product.
Equipment described herein should not be used in conjunction with other equipment unless the
necessary and the required safety devices applicable to the system are used. The company shall have no
liability to the client for any loss, damage or other claims for compensation arising from this type of misuse.
Modifications to upgrade, re-rate, or otherwise alter this equipment should be authorized only by the original
equipment manufacturer.
DANGER!
1. NEVER use a hoist
for lifting, supporting or
transporting people.
2. NEVER use your foot to
apply pressure on the hoist.
3. NEVER use two or more hoists
together to lift load beyond the
rated capacity of hoist.
4. NEVER lift up load
beyond the rated
capacity of the hoist.
5. NEVER lift or
transport loads over or
near people.
2.2 Rules before use
Hoist operators are required to read this manual, the warnings contained
within it and follow safety instructions and warning labels on the hoist or lifting
systems. The operator is also required to familiarize themselves with the
hoist controls before being authorized to operate the hoist or lifting system.
CAUTION!
-1-

Do not use the hoist if there are deep nicks or gouges to the hook or load chain
or if the hook is stretched. Contact the distributor of the hoist and replace the
hook with new parts.
WARNING!
CAUTION!
1. Ensure that all information displayed on the name plate is clear and visible.
2. Check the hoist daily before use according to the Daily Inspection guidelines.
3. Check the weight of the load and choose a hoist of suitably rated capacity.
4. Ensure that hooks are not deformed and they rotate freely and smoothly.
5. Ensure that the function of the brake system is normal.
6. Lubricate load chain according to the recommendations of the manufacturer.
2.3 Rules for operation
WARNING!
2. NEVER use the hoist
chain as a sling.
1. NEVER use a twisted,
kinked, damaged or
stretched load chain.
3. NEVER use the hoist
as a support.
4. NEVER support a load on
the tip of the hook.
5. NEVER run the load chain
over sharp edges.
6. NEVER weld or cut a load
suspended by a hoist.
WARNING!
1. NEVER use a damaged hoist or one that is not working properly.
2. NEVER swing a suspended load.
3. NEVER use the hoist chain as a welding electrode.
4. NEVER operate a hoist so far that the bottom hook touches the hoist body.
5. NEVER operate a hoist so far that the load chain pulls the anchorage.
6. NEVER operate a hoist if excessive noise occurs.
7. NEVER allow your attention to be diverted when operating the hoist.
2.4 Rules after use
Put down the load slowly and safely after lifting.
NEVER suspend a load for an extended period of time.
CAUTION!
WARNING!
-2-

-3-
2.5 Inspection and maintenance
Ensure that only qualified service personnel inspect the hoist periodically.
Do not attempt repair of a hook by heat treating, bending or attaching anything
by welding. Such procedures will weaken the hook and may cause failure.
CAUTION!
WARNING!
2.6 OTHER
Always consult the manufacturer or your dealer if you plan to use a hoist in an
excessively corrosive environment (salt water, sea air and/or acid, explosive
environment or other corrosive compounds, etc.).
NEVER use a hoist which has been taken out of service until the hoist has been
properly repaired or replaced.
CAUTION!
WARNING!
3. MAIN SPECIFICATION
3.1 Operating conditions
Allowable ambient conditions:
Operation temperature: -10 ° C to +60 ° C
Operation humidity: IOO%RH or less. This product should not be used under water.
Non-asbestos material: Friction discs are made of asbestos free material.
3.2 Technical specifications
Model PZ-0.75T PZ-1.5T PZ-3T PZ-6T PZ-9T
Capacity t 0.75 1.5 3 6 9
Load chain mm 6x18 8x24 10x30 10x30 10x30
Number of load chain falls 1 1 1 2 3
Height of lift (standard) m 1.5 1.5 1.5 1.5 1.5
Height lifted with one complete rotation of handle mm 18.7 16 16.8 8.4 5.6
Effort required to lift rated load N 147 294 285 340 360
Running test load kN 9.2 18.4 36.8 73.5 110.3
Dimensions
(mm)
A 160 182 207.5 207.5 207.5
B 100 109 121.5 121.5 121.5
C 133 157 210 253 338
H min 320 365 465 583 690
L 290 290 420 420 420
D 38 48 58 65 85
K 28 36 43 44 54
NET weight kg 6.6 11.8 19.4 30.6 46
Additional weight per extra metre height of lift kg 0.81 1.4 2.2 4.4 6.6
0.75t, 1.5t, 3t 6t 9t

-4-
4. OPERATION
4.1 Introduction
This hoist has been designed for the vertical lifting and lowering of loads, by hand, under normal atmospheric
conditions of the work place. However, since dealing with heavy loads may involve unexpected danger, all of
the Safety Rules must be followed.
Working Environment Safety: the operator must be aware of the following points whilst using the hoist.
1. The operator must have a clear and unobstructed view of the entire travel area before operating the
hoist. When this is not possible, additional personnel must serve as scouts in the nearby area to assist.
2. The operator must check the entire travel area is safe and secure before operating the hoist.
5. INSPECTION
5.1 General
There are two types of inspection, the Daily Inspection performed by the operator before using the hoist,
and the more thorough Periodic Inspection performed by qualified service personnel who have the authority
to remove the hoist from service.
5.2 Daily inspection
Item Method Discard criteria Remedy
Name plate Check visually All information should be clear and visible. Replace the name
plate
4.2 Method of operation
1. Place the selector switch on the handle in the central position (N).
2. Adjust the load chain to a suitable length for connection to the load.
NEVER pull the load chain sharply whilst the selector switch is set in the central position
(N) as this may result in the brake engaging after which a reset will be required.
WARNING!
4.3 Load operation
Hoist operation Selector switch position Hand lever operation
Lift UP Clockwise
Lower DOWN Counterclockwise
4.4 Overload device (if fitted)
The optional overload protection device will come in to operation at between 1.3 to 1.8 times the WLL of the hoist.
9.1 Pressing block A
9.2 Snap ring
9.3 Safety pawl
9.4 Friction disc / Overload device
9.5 Brake cover
9.6 Reversing ratchet / Overload device
9.7 Disc spring
9.8 Pressing block B
9.9 Lock nut

-5-
Function
Turn the selector
switch to the
UP/DOWN
position, pull the
load chain on
the hook side,
and operate the
handle.
The clicking sound when operating the handle
indicates normal condition.
Repair or
replace parts as
necessary
Hook Check visually No wear, deformation or damage, and the
swivels should rotate freely. Replace
Hook latches Check visually No deformation or flaws. Replace the part
Load chain Check visually No obvious rust or corrosion.
Lubrication must be on surface.
Oil the load chain,
replace the load
chain
Other Check visually
No missing nuts and/or split pins.
No flaws or damage on the hoist surface.
No missing and/or twisted chain stopper.
Replace the parts
5.3 Periodic inspection
Periodic inspection shall be made at the interval shown below and should follow the given procedures.
NORMAL (Normal use): Six monthly inspection
HEAVY (Frequent use): Quarterly inspection
SEVERE (Excessively frequent use): Monthly inspection
Item Method Discard criteria Remedy
1. Hook
assembly
1.1 Stretch and
wear
Measure Replace
1.2 Flaw Check visually Should be free from significant rust, weld
splatter, deep nicks or gouges. Replace
1.3 Rotate Check visually
and function Should rotate freely with no roughness. Replace
1.4 Hook yoke Check visually
and function
Should not be slack or be missing rivets, nuts
or bolts. Replace
1.5 Hook latch Check visually Proper positioning and smooth operation. Replace
Capacity (t) A* (mm) B (mm) C (mm)
Normal Standard Discard Standard Discard
0.75 30.0 13.0 ≤12.4 21.5 ≤20.3
1.5 36.0 17.0 ≤16.2 28.8 ≤27.3
3 40.0 25.0 ≤23.8 43.8 ≤41.6
6 50.0 32.0 ≤30.4 52.5 ≤49.9
9 64.0 40.0 ≤38.0 60.4 ≤57.4
Measure dimension A when new
*These values are nominal since the dimension is not
controlled to a tolerance. The A dimension should be
measured when the hook is new. The A dimension should
not be greater than 1.05 times that measured and recorded
at the time of purchase.

-6-
Item Method Discard criteria Remedy
2. Load chain
2.1 Wear Measure
Measure
Replace
2.2 Flaws,
deformations Check visually Should be free from twists or flaws. Replace
2.3 Rust Check visually Should be free from obvious rust. Remove rust, oil
the chain
3. Bottom
hook pin
3.1 Twist,
deformations
Check visually,
measure
Replace the hook pin if there is obvious
deformation. The screw thread of the hook pin
should be free from flaws and deformation.
Measure
Replace
3.2 Rust Check visually Should be free from obvious rust. Remove rust, oil
the pin
4. Top / bottom
hook pin hole
4.1 Deformations Measure Replace hook
assembly
Capacity (t) L (mm) D (mm)
Standard Discard Standard Discard
0.75 90.0 ≤92.5 6.0 ≤5.4
1.5 120.0 ≤123.3 8.0 ≤7.2
3, 6, 9 150.0 ≤154.0 10.0 ≤9.0
Capacity (t) D (mm)
Standard Discard
0.75 7.5 ≤7.1
1.5 10.0 ≤9.5
3 14.5 ≤13.8
6 14.5 ≤13.8
9 14.5 ≤13.8
Capacity (t) Diameter (mm)
Bottom hook pin hole Top hook pin hole
0.75 7.5 ≤8.0 12.5 ≤13.1
1.5 10.5 ≤11.0 14.5 ≤15.2
3 15.0 ≤15.7 18.0 ≤18.9
6 15.0 ≤15.7 18.0 ≤18.9
9 15.0 ≤15.7 18.0 ≤18.9

Item Method Discard criteria Remedy
5. Brake system
5.1 Rust Check visually All parts should be free from rust.
Remove rust,
oil the parts or
replace
5.2 Flaw on
friction disc Check visually Should be free from flaws. Replace
5.3 Wear on
friction disc Measure
Retain uniform thickness and friction disc shall
not be worn more than 0.5mm.
Replace
5.4 Flatness of
friction disc
Check clearance
with gauge
Clearance should be uniform. Internal part
should not be thicker than external part. Replace
5.5 Pawl
Check visually Should be free from wear on the surface. Replace
5.6 Pawl spring Check visually Should be free from deformation. Replace
5.7 Ratchet disc
Measure
Measure the external diameter A of ratchet disc.
Replace
5.8 Clutch spring Measure
Measure the length
0.75t L≤31.5mm A≤15°
1.5t L≤31.5mm A≤15°
3~9t L≤34.2mm A≤40°
Replace
6. Lifting system
6.1 Load sheave
Check visually Should be free from wear and deformation. Replace
6.2 Gears Check visually Teeth should be free from excessive wear or
flaws. Replace
6.3 Gear box Check visually Should be free from wear or deformation. Replace
7. Lever handle
system
7.1 Hand lever,
feed ratchet,
spring pin
Check visually Should be free from wear or deformation. Replace
7.2 Torsional
spring
Measure
Measure the length
0.75t L≤59.4mm A≤165°
1.5t L≤59.4mm A≤165°
3~9t L≤63.9mm A≤165°
Replace
-7-
Capacity (t) Thickness of friction disc (H)
Standard Discard
0.75 ~ 9 3mm ≤2.5mm
Capacity (t) Diameter A (mm)
Standard Discard
0.75 74.5 ≤71.5
1.5 85.0 ≤83.0
3 94.0 ≤91.0
6 94.0 ≤91.0
9 94.0 ≤91.0

Item Method Discard criteria Remedy
8. Body
8.1 Top hook pin
hole on the side
plate
Measure dimension D.
Replace
8.2 Top hook pin
Measure
Measure the external
diameter of the top
hook pin. Replace
8.3 Guide plate Check visually Should be free from wear and deformation. Replace
8.4 Chain stopper
ring Check visually Should be free from wear and deformation. Replace
9. Function
9.1 Lifting and
lowering
Lift and lower a
light load No abnormal difficulty in lifting and lowering. Overhaul and
service
9.2 Brake Lift and lower a
light load
Confirm that none of the problems listed below
occur during lifting and lowering:
1. Lifting impossible.
2. Load slips down slowly.
3. Load falls when the operator releases the
hand lever.
Overhaul and
service
0.75t D≤9.5
1.5t D≤12.4
3t ~ 9t D≤16.1
Capacity (t) D1 (Standard) D (Discard)
0.75 10.2 ≤10.7
1.5 13.2 ≤13.7
3~9 17.2 ≤17.7
-8-

-9-
6. MAINTENANCE
6.1 General
Incorrect maintenance may result in serious bodily injury or death. Only trained and competent personnel
should maintain this equipment.
Always test the hoist using the information provided in this manual before
returning it to service following any maintenance work.
CAUTION!
WARNING!
1. Always take care to ensure that hands or clothes do not get caught in the chain, idle sheave or other
moving parts.
2. Never operate the hoist when it requires maintenance.
3. Always inspect all parts if abnormal difficulty in lifting and lowering occurs.
4. Never perform maintenance on the hoist whilst it is supporting a load.
5. Always wipe off dirt and water.
6. Always store the hoist in a dry and clean place.
6.2 Lubrication
Ensure that the load chain, hook latches, top/bottom hook pin and hook yoke, etc. are kept lubricated.
The load chain is one of the important parts of the hoist and should be lubricated well with machine oil.
CAUTION!
1. (1) Lubricate the load chain weekly, or more frequently, depending on severity of service.
2. (2) Lubricate the load chain more frequently than normal if used in a corrosive environment.

-10-
Problem Cause and explanation Remedy
The hoist will not lift
the load (no clicking
sound).
Pawl not engaging with ratchet disc; possible
contamination with dirt or foreign material.
Clean and lubricate the
pawls and ratchet disc
assembly.
Pawl spring is damaged. Replace pawl spring.
Ratchet spring is loose or damaged. Tighten or replace
ratchet spring.
Load slips or drifts
while being lowered.
Dirt or corrosion or foreign material in hoist
components.
Inspect and correct
problem. Keep hoist
clean and lubricated.
The brake is slipping. Friction discs are worn
from long term use, or are damaged from
overloading or misuse.
Replace friction disc. See
chapter 5. INSPECTION
for minimum allowable
thickness. Do not
overload the hoist.
The load drops the
instant lowering is
started.
The braking surface is dirty. During assembly, the
braking surface must be wiped clean of dirt.
Clean or replace the
brake assembly.
The braking surface is oily. The braking surface
must not be allowed to become soiled with
grease or machine oil because it is a dry type
brake.
Clean or replace the
brake assembly.
The hoist will not
lower the load.
The brake has caught. (Hoist was left under
loaded condition for an extended period, or was
shock loaded while in operation.)
Place selector lever in
DOWN position and pull
hard on the lever handle
to re-set the brake.
Resume operation.
Brake components are corroded or damaged.
Replace damaged
components; keep hoist
clean and lubricated.
The chain is tight
when lifting, even
without a load.
(A squeaking noise
can be heard at
times.)
Gear teeth are worn from long term use, or for
not being greased regularly.
Disassemble and replace
the load gear, gear case
and side plate.
7. Troubleshooting
Any maintenance or repair of the lever hoist should be performed by properly
trained personnel.
WARNING!

-11-
8. SPARE PARTS LIST
8.1 Exploded view diagram

No. Part name No. Part name No. Part name
1 Gear case assembly 14 Snap ring 27 Castle nut
2 Disc gear assembly 15 Splined gear 28 Split pin
3 Safety latch assembly 16 Top hook shaft 29 Chain ring
4 Top hook assembly 17 Chain guide cover 30 Load chain
5 Load sheave 18 Brake seat 31 Stripper
6 Brake side plate assembly 19 Brake steel bushing 32 Pawl spring
7 Gear side plate assembly 20 Spring washer 33 Pawl
8 Ratchet assembly 21 Hex head screw 34 Snap ring
9 Brake cover 22 Adjusting cam 35 Hex nut
10 Lever handle cover 23 Clutch spring 36 Reversing pawl
11 Bottom hook assembly 24 Hand wheel 37 Spring seat
12 Lock nut 25 Torsional spring 38 Spring
13 Drive shaft 26 Torsional spring cover
8.2 Parts list
-12-

This manual suits for next models
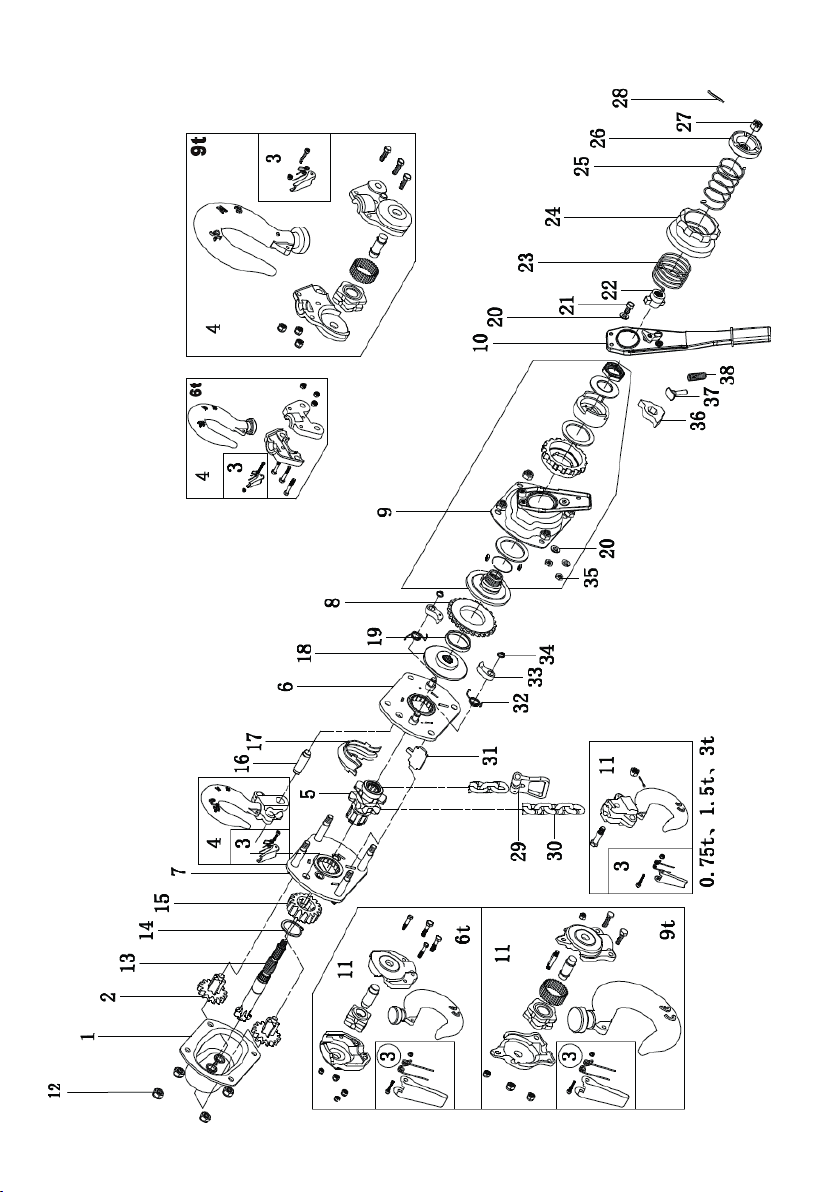
5
Table of contents
Other LINX-LIFT Chain Hoist manuals
Popular Chain Hoist manuals by other brands

LEVEX
LEVEX SPB025 User instructions

POWERTEX
POWERTEX PLH-S2 Series user manual

Surewerx
Surewerx JET MINI-MITE II Series Operator's manual

Columbus McKinnon
Columbus McKinnon Coffing Hoists LSB-C Series Operating, Maintenance & Parts Manual

Raider
Raider RD-EH04 user manual

Steinberg Systems
Steinberg Systems SBS-FZ-20000 user manual