LiteBee Wing EDU User manual

LiteBee Wing EDU Drone
Instruction Manual
www.litebee.com

Contents
Introduction
Installation
Functions
APP Operation
Programming
Extension function
FAQ
Disclaimer
1
2
6
13
15
16
20
21

Thank you for purchasing the Litebee Wing EDU Drone from Makerfire. Please read this instruction
manual carefully before use. The information contained in this manual is subject to change without
notice. Litebee Wing is designed for STEAM/STEM education, suitable for kids age over 8, best for
home, middle school, high school, college, and summer camp, etc. For purchasing a classroom
Sincerely
The Makerfire Team
Introduction
1

Installation
X8 X1 X4
X8 X4
1 2 3
2

Installation
3
X4 X2
4 5

X1 Finish
6 7
Installation
4

Arm Extension
Seven-hole arm extension
Nine-hole arm extension
Shape stretch arm extension
5

1. Optical Flow Camera
2. Front Camera
3. Propeller
4. Propeller Guard
5. Brushed Motor
6. Take off bracket
7. Extension Ports
8. Power Button
9. Extension Module Interface
10. Battery
11. Motor Connector
12. Antenna
Aircraft Overview
3
5
9
4
10 12118
67
On / Off: Long press 1 seconds Power Button to power on litebee Wing, long press 3 seconds to power off litebee Wing.
(Long press the Power Button 1 second to power on LiteBee Wing, and long press 3 seconds to power off)
1 2
6

L1 Off: Left throttle/ Mode 2
L1 Solid Green: Right throttle/Mode 1
L2 Off: Success to connect with aircraft
L2 Solid Red: Not connect with aircraft
L3 Off: Not in Binding Mode
L3 Solid Green: Binding Mode
L4 Off: Operation Mode
L4 Solid Green: Programming Mode
L5 Off: Battery of aircraft is fully charged
L5 Solid Red: Low battery of aircraft
L6 Solid Green: Battery of radio transmitter
is fully charged
L6 Solid Red: Low battery of radio transmitter
0: Programming Mode Switch
1/2 /3/4:Customized Programming Button
L1
L2 L3
L4
L5
1
2
4
0
3
On/off USB
Bounce Mode
Take off/Land
L6
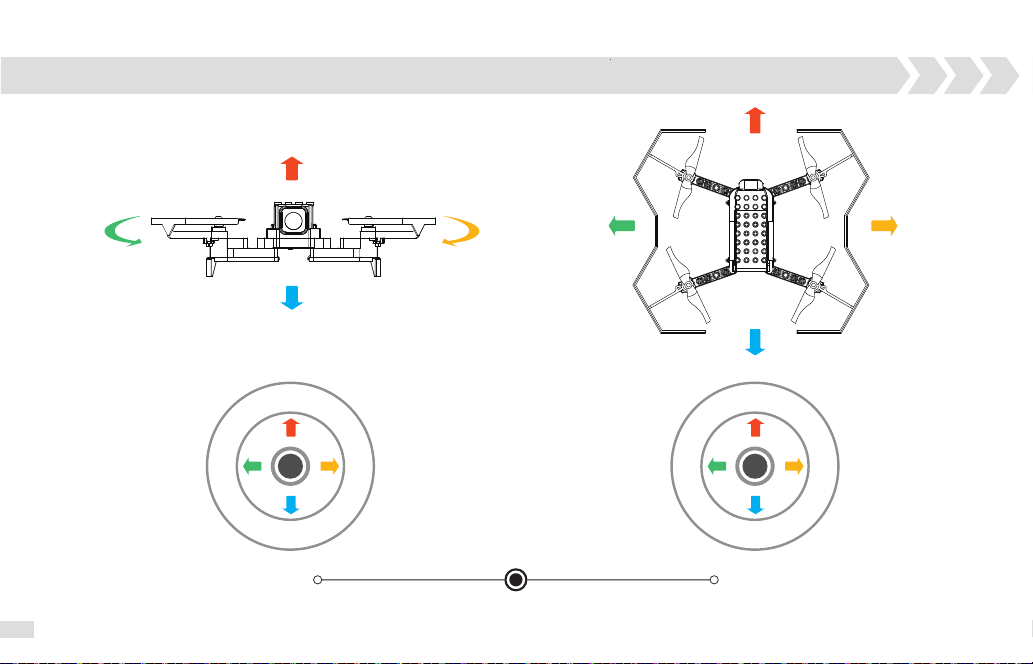
Remote Control Overview
360 Degree
Rotation
Calibration
LED Indications:
7

Operation Guide
Left stick
Towards Left
Right stick
Forwards
Backwards
Up
Down
Mode2:
Towards Right
Left rotate Right rotate
8

L4
1. Power on the radio transmitter;
2. Press the key K0 while pushing the right throttle to the top right at 45°, the L3 is solid green.
3. Power on the aircraft, L3 light will be off after calibrate. (L3 light off indicates bind successfully)
Binding
L1 L2 L3
L5 L6
9

Solid green light: Ready to take off (altitude hold and fixed-point)
Slow blinking green light: One-key to take-off/land (aircraft moving status: fixed-point moving)
Blinking blue light once: Photo-taking mode
Slow blinking blue light: Record mode (video recording)
Slow blinking red light: Fail to connect (fail to connect with a radio transmitter or APP, not binding, lost signal)
Fast blinking red light: Low voltage alarm, aircraft land automatically
Solid red light: System crash/system failure
Blinking red and green light alternately: Sensor abnormal or error (Gyroscope/ optical flow/barometer abnormal)
Blinking blue and green light alternately: Gyroscope calibration
Blinking red and blue light alternately: Aerobatics Mode (one key to 360° rotation mode, bounce mode)
Flight Controller Indications
10

Press the button"6”, aircraft rotate 360 °at the point slowly, then finish
rotating automatically. (The aircraft will rotate 360 °clockwise then quit
mode)
Aerobatics
One-key 360° rotation mode
Bounce Mode
Press the button"7" to enter bounce mode, aircraft bounce up and down
between 1-1.5m from the takeoff point, press button "7" again to finish.
11

Red light
Green light
Connector
USB
Charging
Put the battery into the battery holder, Use the micro USB cable
to charge (Max input 8.4V,600mAh)
The fully charged time is about 1 hour with a 5V/2A charger.
Note: Don’t charge the battery via the USB port on the aircraft.
Solid red light: in charging
Solid green light: full charged
1
2
12

1、Search "LiteBee" in Huawei, Baidu, Tencent, and 360 application market for Android system; Search "LiteBee"
in IOS APP store, download the APP.
2、Open the App and click "LiteBee Wing" to enter into the operation interface.
3、The App control is based on WIFI communication, which supports operating and image transmitting.
Connect WIFI: "LiteBee Wing_XXXX",
Password: 12345678.
APP Operation
Note: App requires IOS 9.0 or up and Android 4.4 or up versions.
13

APP Operation
Recording video
Taking photo
Return
Aircraft power capacity indication WiFi signal display
Aerobatics
Calibration
Setting
Left joystick
Right joystick
Lock/Unlock
Folder
Connection
Connection
Operation mode switch
Firmware Version
Firmware Version
About
Set up
Mode1 Mode2
14

Programming
Computer Programming: Connect the radio transmitter to the computer with a USB cable, find the corresponding port
on the computer, and then switch the radio transmitter to the programming mode.
Mobile phone programming: Search and connect with WIFI, and enter into the APP programming interface.
15

LiteBee Wing supports expansion modules like LED, buzzer etc. for programming.
Expansion modules
Bottom installation diagram for expansion moduleTop installation diagram for expansion module
16

17
1.Start the program by click (take 1 sec)
2.Calibrate the aircraft by 5 secs
3.Take off after finished calibration(take 3 secs)
4.Turn on the first LED to White(last 2 secs)
5.Turn on all LED to Red(last 2 secs)
6.Turn on all LED to Green(last 2 secs)
7.Turn on all LED to Blue(last 2 secs)
8.Turn off all LED, 2 secs later, land automatically
Case1-LED module

Musical Note: a symbol used to record
processing of different length notes. Most
common notes: Whole note, half note, quarter
note, one eighth note, and one sixteenth note.
Musical note consists of three components:
Head, Stem and Tail. It is also divided by beats,
such as: Whole Note is four beats; Half Note is
two beats, etc.
The number: 1, 2, 3, 4, 5, 6, 7 in musical
symbols is pronounced: do, re, mi, fa, sol, la, si,
Correspondence to: C, D, E, F, G, A, B.
Case 2-Buzzer module
18
This manual suits for next models
1
Table of contents
Other LiteBee Drone manuals