manuals.online logo
Brands
  1. Home
  2. •
  3. Brands
  4. •
  5. LITELOK
  6. •
  7. Bicycle Accessories
  8. •
  9. LITELOK GO FLEXI-O User manual

LITELOK GO FLEXI-O User manual

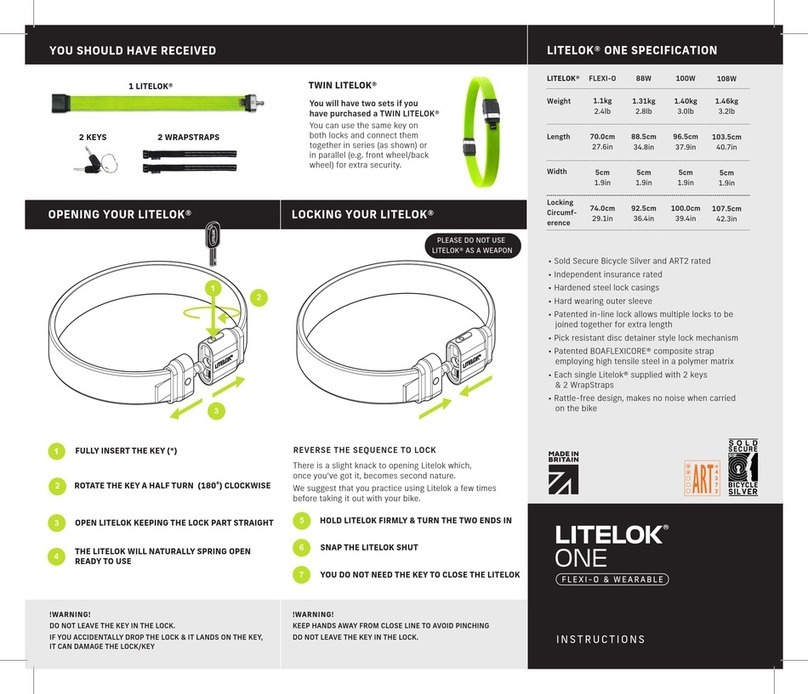
LITELOK GO has been designed to be quick and easy to use.
DO NOT FORCE the key if the lock jams.
ALWAYS push the key in fully before turning 180º clockwise.
When rotating the key you may experience a slightly damped
action – this is normal and is a feature of the high quality of
your LITELOK.
If you have trouble it might be that the internal discs may be
misaligned because the key was not fully inserted.
USING YOUR LITELOK® KEYS
Wiggle the key gently from side to side,
turn anticlockwise, remove and try again.
If any issue persists please contact the
place of purchase.
DO keep one key as a spare, register your
lock on litelok.com and note the key code
somewhere safe and separate from the keys
to enable you to order replacements at a later date.
YOU SHOULD HAVE RECEIVED
• Sold Secure Bicycle Silver & ART2 rated
• Hard wearing polymer coating
• Hardened steel lock casings
• Patent pending ‘downward line of sight’ lock allows
multiple locks to be joined together for extra length
• Pick resistant disc detainer style lock mechanism
• Patented BOAFLEXICORE® composite strap employing
high tensilesteel in a polymer matrix
• Each single LITELOK supplied with 2 keys
& 2 WrapStraps
• Rattle-free design, makes no noise when carried
on the bike
LITELOK® GO SPECIFICATION
INSTRUCTIONS
1 LITELOK®
We suggest practising a few times to get used to LITELOK
before taking it out & about. Failure to fully insert the small
end of your LITELOK in step 2 will result in an inability to lock
your LITELOK in step 3.
PLEASE DO NOT USE
LITELOK® AS A WEAPON
52 70 85
Weight
Locking
Circumference
Diameter
Width
641g
52cm
18cm
3.5cm
1.4lb
20.5in
7.1in
1.4in
750g
70cm
23.5cm
3.5cm
1.6lb
27.6in
9.3in
1.4in
843g
85cm
28cm
3.5cm
1.8lb
33.5in
11.0in
1.4in
GO FLEXI-O
USING YOUR LITELOK® GO FLEXI-O
TWIN LITELOK FLEXI-O
You will have two sets of the
shown if you have purchased
a TWIN LITELOK®
You can use the same key
on both locks* and connect
them together in series or in
parallel (eg front wheel/back
wheel) for extra security.
*not with a combo version.
2 KEYS
2 WRAPSTRAPS
WITH KEY FULLY TURNED SLIDE SMALL
END FULLY INTO CIRCULAR LOCKING
AREA
FULLY INSERT KEY & ROTATE A HALF TURN
CLOCKWISE (180°)
DO NOT FORCE THE KEY IF THE LOCK JAMS
REVERSE THE SEQUENCE TO UNLOCK
FINALLY, ROTATE KEY A HALF TURN
ANTICLOCKWISE (180°) & REMOVE
1
2
3
KEY CANNOT BE REMOVED UNLESS LOCK IS
IN LOCKED CONDITION
ALWAYS lock your bike to a fixed object through the
back wheel and frame and keep the lock off the ground.
IDEALLY use a LITELOK on the front wheel too.
Alternatively you can remove it and securely lock it along
with the back wheel.
Check out our video guide at www.litelok.com
ALWAYS check your lock before leaving your bike.
Zeal Innovation Ltd (Zeal) provides a warranty that
Litelok (the product) is free from manufacturing defects
in material and workmanship. This warranty is one year
from the date of purchase unless otherwise stipulated in
local law.
The warranty is void if the product is tampered with in
any way. Upon return of the defective product to Zeal or
its authorized distributor for inspection, free and clear of
all liens and encumbrances and accompanied by proof
of purchase and a statement of the defect/s, Zeal will
replace the product.
This limited warranty may not be assigned or otherwise
transferred in any way and may not be extended, altered
or varied. To the fullest extent allowable by the laws
applying hereto, this limited warranty is in lieu of any
other warranties, either express or implied, including but
not limited to any warranties of merchantability or
fitness for a particular purpose, all of which are
expressly excluded and disclaimed. Zeal Innovation Ltd
will not be liable for loss of profits, any special,
incidental, or consequential damages, which purchaser
may sustain, any damages for claims by any third party
or punitive damages, even in the event of notice of the
possibility of such damages.
Zeal reserves the right to change the specification and
design details of its products without notice in the
pursuit of excellence.
e&oe
All Patents, Trademarks & Copyright are property of Zeal Innovation Ltd
t/a Litelok, Unit 10, Technium 1, Swansea Waterfront, Swansea SA1 8PH, UK
CARRYING YOUR LITELOK® GO
WEARING YOUR LITELOK® GO FLEXI-O (IF WEARABLE KIT VERSION PURCHASED)
HOW TO LITELOK® YOUR BIKE WARRANTY INFORMATION
Carry your LITELOK SAFELY.
We recommend either putting it in a bag or attaching
it with BOTH of the two high visibility hook and loop
wrapstraps provided within your bike frame.
Please see www.litelok.com for examples.
This may not work for all frames in which case you need
to find another location which is SAFE and SECURE.
Failure to secure your LITELOK correctly may also result
in damage to your bike’s paintwork.
If you are unsure whether your LITELOK is secured safely
DO NOT SET OFF ON YOUR BIKE. Take time to adjust
or find another way to carry your LITELOK.
CARING FOR YOUR LITELOK® GO
www.litelok.com | [email protected]
Clean and lubricate your LITELOK regularly.
Wipe all surfaces with a soft cloth and if necessary use
a small amount of soapy water to clean them regularly
to remove road/traffic film and debris, before drying.
Take care not to introduce water into the locking
mechanism itself.
Do not immerse lock in water.
LITELOK has been designed to resist dirt and corrosion
but we recommend drying the product if it gets wet.
The locking mechanism can be lubricated with a small
amount of lubricant applied periodically through
the keyhole.
LITELOK GO is protected with integral high grade anti
corrosion coatings. These coatings use oxide layers which
over time may make your lock casing look slightly duller.
This is perfectly normal and indicates that the coating is
functioning. Careful cleaning and application of a special
wax will keep your lock looking pristine and factory fresh.
Please contact us for our recommendations.
WRAPSTRAPS
ATTACHED
TO FRAME
If you want to use a Wearable Kit please attach it as per
the instructions. You can slide the clips to adjust the size
and the single sided hook and loop webbing strap fits
through the buckle and attaches back to itself.
Please make sure that your LITELOK is SAFE and SECURE
before setting off.
FIT ‘O’ RING
OVER LOCK END CLIP ON
BUCKLE MOULDING
CLIP ON MOULDING
FEED STRAP
THROUGH ‘O’ RING
FEED STRAP THROUGH
BUCKLE & BACK ONTO
ITSELF USING HOOK
& LOOP FASTENING
STRAP MOULDING REFLECTIVE HOOK & LOOP STRAP BUCKLE MOULDING & BUCKLE ‘O’ RING

This manual suits for next models

3

Other LITELOK Bicycle Accessories manuals

LITELOK FLEXI-O User manual

LITELOK

LITELOK FLEXI-O User manual

LITELOK GO FLEXI-U User manual

LITELOK

LITELOK GO FLEXI-U User manual

Popular Bicycle Accessories manuals by other brands

TRIOBIKE MID DRIVE SYSTEM Setup manual

TRIOBIKE

TRIOBIKE MID DRIVE SYSTEM Setup manual

Busch & Müller USB-WERK instruction manual

Busch & Müller

Busch & Müller USB-WERK instruction manual

Topeak TT3020B user guide

Topeak

Topeak TT3020B user guide

Topeak JOURNEY TRAILER TX quick start guide

Topeak

Topeak JOURNEY TRAILER TX quick start guide

Crivit SP-91 owner's manual

Crivit

Crivit SP-91 owner's manual

Liteville 4-ONE Mk1 manual

Liteville

Liteville 4-ONE Mk1 manual

Rocky Mountain SLAYER RIDE-4 Setup guide

Rocky Mountain

Rocky Mountain SLAYER RIDE-4 Setup guide

Bryton Rider 15 user manual

Bryton

Bryton Rider 15 user manual

Chariot CHINOOK RAIN COVER manual

Chariot

Chariot CHINOOK RAIN COVER manual

Hamax Zenith Relax user manual

Hamax

Hamax Zenith Relax user manual

BAFANG BT C01.340.UART Customer's manual

BAFANG

BAFANG BT C01.340.UART Customer's manual

Cateye Rapid micro TL-LD620-R manual

Cateye

Cateye Rapid micro TL-LD620-R manual

Profile Design Vertex 80 installation instructions

Profile Design

Profile Design Vertex 80 installation instructions

Bell SMOOTH SAILER Series manual

Bell

Bell SMOOTH SAILER Series manual

Ascent 4LW manual

Ascent

Ascent 4LW manual

Saris Bones EX 803 Assembly instructions

Saris

Saris Bones EX 803 Assembly instructions

Cervélo ST029 Guide

Cervélo

Cervélo ST029 Guide

Pinion P-Line P1.18 owner's manual

Pinion

Pinion P-Line P1.18 owner's manual

manuals.online logo
manuals.online logoBrands
  • About & Mission
  • Contact us
  • Privacy Policy
  • Terms and Conditions

Copyright 2025 Manuals.Online. All Rights Reserved.