Littium BERLIN Instruction Manual

USER'S MANUAL
AND WARRANTY
BERLIN Model
READ THIS GUIDE BEFORE USING THE BIKE
WWW.LITTIUMBYKAOS.COM

1

2
Index of contents
Introduction__________________________________________________ 3
The structure of the Electric Bike_________________________________ 4
Main features________________________________________________ 5
Box content__________________________________________________ 6
Assembly____________________________________________________ 7
Use of the bike_______________________________________________ 10
Complete features_____________________________________________ 11
Precautions with the battery____________________________________ 12
DAO®System________________________________________________ 13
APP for Smartphones_________________________________________ 13
PAS Sensor__________________________________________________ 14
Maintenance_________________________________________________ 15
Height adjustment____________________________________________ 17
Accelerator assembly__________________________________________ 17
FAQ________________________________________________________ 18
Warranty____________________________________________________ 19

3
Introduction
We wish to say hello and thank you for choosing our brand Littium by Kaos.
We hope that your new Berlin will give you great satisfaction.
This "User's Manual" contains important and necessary information for the use and
maintenance. It has been made so that you can use this electric vehicle with safety
and reliability obtaining a maximum performance of your time.
It is very important to read the manual in its entirety, paying special attention to
safety warnings. In addition, we recommend you observe the traffic regulations and
use the helmet.
We thank you for the time spent reading this manual.
For more information visit our website www.littiumbykaos.com.
Recomendations
Check the brakes before using the bike every time you use it and remember that it
will not stop equally in wet or icy conditions as you would on a dry road.
Check the tire pressure frequently. It must be 60 psi or 4.1 bar. Low tire pressures
can damage them. If you take the wheels with little pressure, it generates more
friction and reduces the performance of the bicycle.
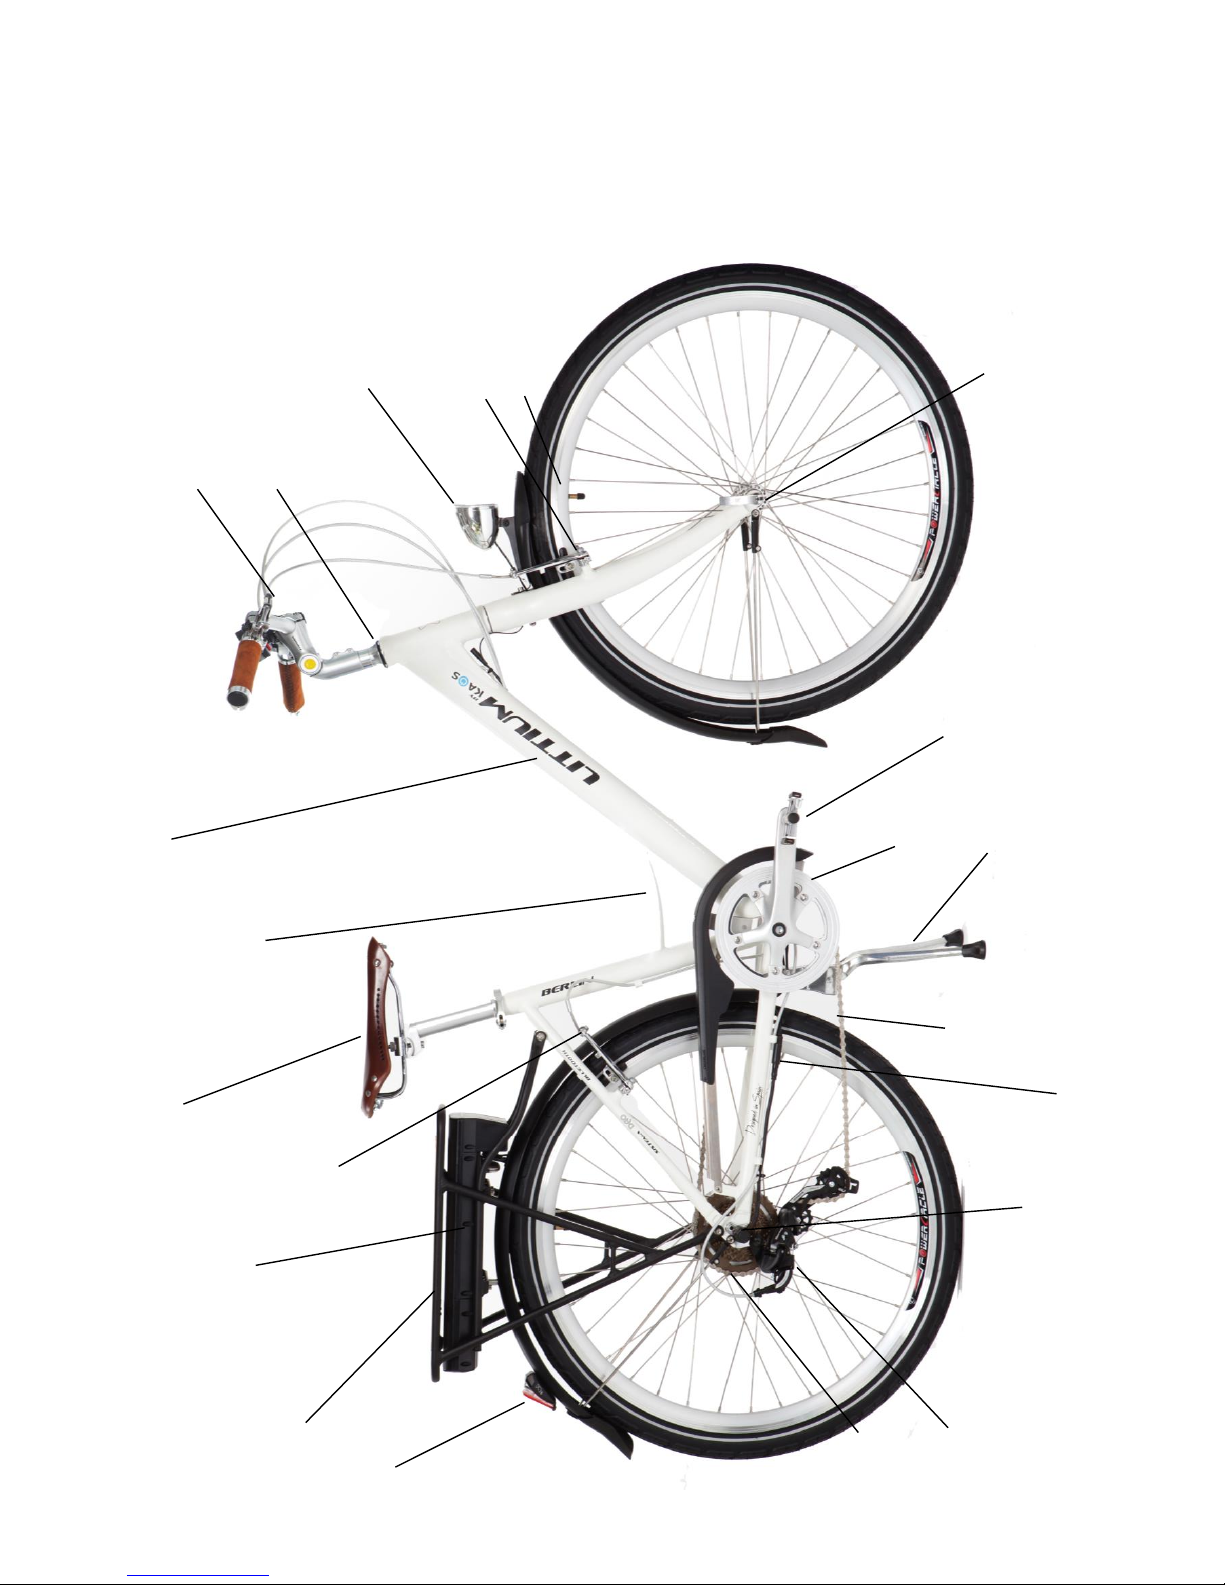
Before using the bicycle for the first time, make sure it is properly assembled. In
particular, you must make sure that the pedals, saddle and handlebars have been
installed correctly.
When you have to replace the battery, deposit the old one in a recycling point, send
it back to us or to the seller.
The shipment of the bicycle is made through a reinforced box measuring 90x38x72
cms. Please save the box for the transfer in case of warranty.
Remember that this is an urban bicycle.

4
The structure of the electric bycicle
HANDLEBAR (SEE NEXT
IMAGE)
TIJA
FRONT LED LIGHT
V-BRAKE
FRONT WHEEL
FRONT AXLE
FRAME
HANDLE
SHANK AND SEAT
PLATE
PEDAL
CHAIN
KICKSTAND
REMOVABLE
BATTERY
REAR CARRIER
V-BRAKE
REAR LED LIGHT
MOTOR
DIVERTER
AND GEAR
REAR AXLE
MOTOR
CONNECTION

5
Bycicle features
The BERLIN model has as outstanding features:
Incorporates the lithium-ion battery in the rear grill.
The engine is integrated in the rear wheel.
Lightweight aluminum frame.
7-speed gearbox with 34-tooth gear.
Wheels with reflective stripe.
Pas sensor and hidden brake sensor in the frame.
Wiring hidden in rear Fender.
Bluetooth system control APP available for IOS and Android.
DAO automatic power distribution system patented by Littium by Kaos.
Pack of rear suitcases, air pump, tool kit, extra leather saddle, support for
smartphone and lights included.
For the rest, it's a bicycle like any other.
LEFT HANDLE
LEFT BRAKE
HANDLEBAR ADJUSTMENT
MANILLAR
BELL
RIGHT HANDLE
SHIFT GEAR
RIGHT BRAKE
HANDLEBAR INCLINATION

6
Box content
•It contents the bycicle with the battery inside (do not pull or take out the battery
until you have read all the instructions).
•Handlebar, Fender and front Wheel disassembles.
•Box with 2A charger, Accelerator and tool kit.
•2 security keys for the battery.
•2 rear suitcases.
•Air pump.
•Extra leather saddle.
•Smartphone holder.
•User manual and warranty.
Charger and battery
ON BUTTON
CHARGE CONNECTION
BATTERY LED INDICATOR
SECURITY LOCK WITH KEY
BATTERY LEVEL
CONTROLLER

7
The charger has a red LED that turns on while the battery is charging. When the
battery completes the charge, the LED turns green and can be unplugged. While the
charger is connected to the network without charging, the LED will be green in
standby mode.
Assembly
Assembling the bycicle for the first time
If you do not have minimal mechanical knowledge, it is advisable to go to
a specialized center.
1. Before starting, make sure the battery is off.
2. Hold the bicycle on its kickstand.
3. Mount the handlebar centered. Once centered, adjust it with the upper part
using two Allen screws. Use the tool that is included in the box.
4. The adjustment of the steering stem is made by placing the handlebars well
aligned with the steering. Then tighten the two side screws of the base of the
steering stem.
SIDE SCREWS
HEIGHT REGULATION

8
5. Adjust the desired height and firmly fix the side Allen nut.
6. Mounting the fender. Place the fender in its position and fix the top bracket
to the Allen screw. The support must be placed on the front of the fork.
7. You will see that there are two rods that connect with the supports that are
near the axis of the front wheel. Once you insert the front wheel, adjust these
rods so that the mudguard is approximately 1cm away. Carefully tighten the
small Allen screws that you will see on the plastic brackets.
TOP SUPPORT

9
8. Connect the two jacks of the front light. These cables have polarity, so if,
when the battery is connected, the light is not activated, it disconnects the
battery again and inverts the position of the cables.
9. Place the front wheel. Before tightening the manual closing of the axle,
lower the bicycle from the stand so that the wheel is firmly fixed in position
with the full weight of the bicycle.
10. Connect the front brake.
11. Check that all other nuts, bolts, and fasteners are tight.
12. Check the motor connection.
13. Check the brakes and brake levers work correctly.
14. Check the pressure of the wheels are 60 psi / 4.1bar.
15. Make sure the battery is fully charged. It is 50% factory charged, it is
important to make a first load of 4-5 hours before using the bicycle.

10
16. 2 security keys are delivered with the battery, they are unique so we
recommend saving one in a safe place or making a copy. Without the security
key, the battery can not be removed as it has an anti-theft system.
Use of the bycicle
•The battery of the rear grill has a switch on its left side. Pressing this switch
activates the bicycle and lights.
•The battery has a charge indicator on its upper face. Using the button with the
battery on, the status of the load can be checked.
ON BUTTON
CHARGE CONNECTION
BATTERY LED INDICATOR
BATTERY LEVEL
CONTROLLER

11
•Once connected, use the bicycle normally.
•In steep climbs you will have to pedal harder, we remind you that it is a bicycle,
not a motorbike.
•Every time you stop using the bicycle remember to turn it off. Since it does not
disconnect alone and the lights are connected.
Complete features of the bycicle
Weight 22 Kg (Battery included) –Aluminum chassis.
Max. load 130 Kg
Recommended minimum height of use 1,60 mts.
Measures 185x61x88 cms. minimum.
Assisted speed up to 25 Km/h.
Scope based on weight and height difference, 70 Kms approx.
Maximum recommender slope ≤12°

12
Motor Characteristics
DC Brushless permanent magnet type
Noise ≤ 62db
Power 250w
Revolutions 235r / min
36V voltage
Efficiency 80%
Characteristics of the Charger
Input 100-240V - 1.8A
Output 42V - 2.0A (Ultra Fast)
Total cable length 2.80 meters.
Characteristics of the Battery
Samsung Li-ion cells
Nominal voltage 36V
Capacity 10.4A
Weight 2.5 kgs.
ATTENTION - Precautions with the battery
• You can charge the battery directly on the bicycle.
• If it is removed, avoid touching the contacts and keep it away from children.
• Never use a charger other than the one included. If you need another charger,
contact your local distributor.
• Do not attempt to open or repair the charger.
• Avoid liquids and blows on the charger, you could cause damage.
• Do not place any object on top of the charger during charging. It must be well
ventilated to allow the generated heat to dissipate.
• During charging, if there is a peculiar odor or the temperature is too high,
please stop charging immediately.
•To avoid premature wear of the battery and loss of warranty, you must charge
and download it at least once a month.
• Do not use the battery in a very low state of charge.
• It is normal for the capacity to be reduced as a result of low temperatures.
• Do not leave the charger connected to the battery for more than 10 hours.
•The lack of use of the batteries causes a deterioration in the lithium. It is
recommended that during prolonged periods of non-use it is kept at 50% load.

13
DAO® system
Automatic wave distributor for electric bicycles. System developed and
registered by LITTIUM BY KAOS.
The objective is to avoid excess wiring, simplify the use and optimize the
performance of the Bicycle. This is the main reason to develop a new bicycle
concept.
The DAO® technology allows to have all the power of a good electric bicycle but
the interface between the bicycle and the user has disappeared. Thanks to this
technology, the behavior of the bicycle is semi-automatic. We do not have to be
aware of engine management. This adapts to our driving. And in this way we avoid
cable, buttons and complications.
However, you have an App for iOS and Android that you can download directly
from the respective official stores.
App operation.
Once downloaded and installed, click on the button with the littium logo to
enter the main screen.

14
1. Turn on the bicycle.
2. Activate the smartphone bluetooth (It is activated automatically on some
models)
3. Select the bicycle and enter the password (0000) for the first time if
necessary.
PAS sensor
The Berlin model is equipped with a PAS sensor of 12 magnets. This device serves to
detect the movement of the pedals and thus send the signal to the controller to
activate the motor.
BATTERY INDICATOR
MANUAL SPEED ADJUSTMENT
SETTINGS
INDICADOR ERRORES
DISTANCE AND OBJECTIVE
SENSOR PAS OF 12 MAGNETS

15
Maintenance
1. IMPORTANT! Do not attempt to open the battery, motor, or controller covers, it
could be dangerous, and all warranties will be void. If you have any problems, contact
our technical service department or your distributor.
2. We are talking about an electric bicycle, avoid prolonged exposure to the weather
in periods of rain, could damage the electrical circuits.
3. The spokes of the wheels must be adjusted after the first 300 km of driving.
4. The saddle must not be used beyond the maximum indicated by a safety line
around the tubes.
5. The cranks of the pedals should be tightened after the first days of use.
6. Do not clean the bicycle with pressurized water as it may cause a short
circuit.
Repair a puncture.
You must disconnect the engine before removing the wheel.
SIGN AND STOP ARROWS
DISCONNECT ENGINE

16
ATTENTION: When reconnecting the plug, align the arrows and adjust
tightly to the stop signal. Check that the connectors are not bent before
making the connection. Any manipulation of this plug is out of warranty.
Once assembled the wheel pay attention to the placement of the same since the axis
has up and down. Look closely and you will see some washers with a thick one. This
has to be at the bottom.
V-BRAKE
The brakes are installed according to the standard format where the left one acts on
the front wheel and the right one on the rear, in reverse of a motorcycle. If you wish,
you can invest them under your responsibility.
The wear of the brake pads must be taken into account and revised
according to the use of the bicycle.

17
Seat Height adjustments
We can adjust the height of the seat and its inclination
Attention: Insert below the security line.
Recommended height of the saddle.
To get the most out of the minimum effort,
it is advisable to pedal with the leg completely
stretched, so we should sit on the saddle and be able to
stretch the leg completely supporting the heel on the pedal.
Accelerator assembly
1. We must first remove the left handle.
2. Loosen the silver screw on the left brake and remove the full brake from the
handlebar.
3. Insert the accelerator, brake and grip in this order. Set the brake and accelerator.
4. Connect the throttle to the connector on the back of the fork. Attention to the
position, it is a very delicate connectors.
*Align arrows as in motor cable.
ATTENTION: According to traffic regulations, the use of the accelerator is not
allowed on public roads. Its use is exclusively destined to the private way.
SEAT HEIGHT ADJUST
ACCELERATOR CONNECTOR
LOCATED UNDER THE FRAME
DETAIL OF THE ACCELERATOR
POSITION ONCE MOUNTED

18
FAQ
Problem
Solution
A. It has low power.
• Verify load status.
• If the battery has a lot of use or more than 4
years, maybe it should be replaced.
B. The battery life is very short.
• Check tire pressure.
• Verify that the charger is working correctly.
C. The battery life is very short,
it has not been used for a
few months.
• Has the battery been discharged or unused
for a long time? It may have deteriorated. Look
to use it intensively to see if it regains load
capacity.
D. The bicycle is connected to
the lights on, but it does not
work.
• Possible driver fault.
• Possible engine failure.
• Possible failure of the PAS sensor.
• Possible accelerator failure.
E. The bicycle only works with
accelerator and pedal
assistance does not work
• Possible damage to the control panel
• The Pas sensor is failing, it must be replaced.
F. The bicycle only works with
pedal assistance and the
accelerator does not work.
• Possible driver fault.
• Possible breakdown in the accelerator.
G. When connecting the
bicycle, the engine activates
itself.
• Check that the accelerator is not stuck and
returns to its resting position.
• If it is necessary to lubricate it, do not use oil,
use Vaseline.
H. Charging the bicycle shows
the green charger light
• The bacteria was already charged
• The charger is not connected to the power
outlet.
I. You hear a constant noise
like a soft tinkling.
• The spokes of the rear wheel are relaxed. Go
to a mechanic's workshop to have the radio
scanned.

19
WARRANTY
2 YEARS, s / Law 3/2014 of March 27, which modifies the revised text of the
General Law for the Defense of Consumers and Users and other complementary
laws, approved by Royal Legislative Decree 1/2007, of November 16, except for 1
YEAR for batteries and battery chargers.
This warranty covers the end user before normal use and manufacturing defects
Never for:
•parts modified, broken or repaired by third parties.
•poorly treated, subject to wear or damage.
•no original packaging (during the first 6 months) or purchase ticket.
•in cases of misuse and electrical damage, such as overloads due to use
•of not original chargers.
•Incidents due to vandalism.
•this warranty does not include normal wear (tires, brakes, etc.).
•This warranty does not cover parts damaged by an attempt to repair that has
not been made by an authorized dealer.
The warranty period begins on the date of acquisition. To exercise the right to it,
the original purchase invoice is required.
This guarantee covers the cost of parts, labor of repairs necessary to restore the
complete functioning of the product or its replacement, as well as the collection and
delivery of the product at your home or in an official service during the first 6
months. After this period, transportation costs to our facilities will be paid by the
client. Once the product is analyzed by the SAT, if the problem is a guarantee, we
will send the product freight prepaid and we will reimburse the shipping costs to our
facilities.
Littium by Kaos will have no obligation to repair or replace any product, until the
customer delivers the defective one. In case the product is not defective once
delivered, but the repair is due to misuse of the consumer may be passed on to it all
expenses that have Littium by Kaos.
Expenses derived from incorrect returns by the customer will be paid by the
customer.
Table of contents
Other Littium Bicycle manuals