manuals.online logo
Brands
  1. Home
  2. •
  3. Brands
  4. •
  5. LITTLE BEAVER
  6. •
  7. Lawn And Garden Equipment
  8. •
  9. LITTLE BEAVER Kwik-Trench KT1200B User manual

LITTLE BEAVER Kwik-Trench KT1200B User manual

Other LITTLE BEAVER Lawn And Garden Equipment manuals

LITTLE BEAVER KT2400B User manual

LITTLE BEAVER

LITTLE BEAVER KT2400B User manual

LITTLE BEAVER KT2400B User manual

LITTLE BEAVER

LITTLE BEAVER KT2400B User manual

LITTLE BEAVER KT100 User manual

LITTLE BEAVER

LITTLE BEAVER KT100 User manual

LITTLE BEAVER Kwik-Trench KT200B User manual

LITTLE BEAVER

LITTLE BEAVER Kwik-Trench KT200B User manual

Popular Lawn And Garden Equipment manuals by other brands

Sunforce SOLAR user manual

Sunforce

Sunforce SOLAR user manual

GARDEN OF EDEN 55627 user manual

GARDEN OF EDEN

GARDEN OF EDEN 55627 user manual

Goizper Group MATABI POLMINOR instruction manual

Goizper Group

Goizper Group MATABI POLMINOR instruction manual

Rain Bird 11000 Series Operation & maintenance manual

Rain Bird

Rain Bird 11000 Series Operation & maintenance manual

Cub Cadet BB 230 brochure

Cub Cadet

Cub Cadet BB 230 brochure

EXTOL PREMIUM 8891590 Translation of the original user manual

EXTOL PREMIUM

EXTOL PREMIUM 8891590 Translation of the original user manual

Snapper 690179 installation instructions

Snapper

Snapper 690179 installation instructions

Exmark SAR481KA30 Operator's manual

Exmark

Exmark SAR481KA30 Operator's manual

Yazoo/Kees Z12 Operator's manual

Yazoo/Kees

Yazoo/Kees Z12 Operator's manual

Makita EM408MP Original instruction manual

Makita

Makita EM408MP Original instruction manual

Exmark Quest Bagger Setup instructions

Exmark

Exmark Quest Bagger Setup instructions

Manitou Systems AS960 Operator's manual

Manitou Systems

Manitou Systems AS960 Operator's manual

Vertex 1/3 HP Maintenance instructions

Vertex

Vertex 1/3 HP Maintenance instructions

GHE AeroFlo 80 manual

GHE

GHE AeroFlo 80 manual

Land Pride Post Hole Diggers HD25 Operator's manual

Land Pride

Land Pride Post Hole Diggers HD25 Operator's manual

Yazoo/Kees Z9 Commercial Collection System Z9A Operator's & parts manual

Yazoo/Kees

Yazoo/Kees Z9 Commercial Collection System Z9A Operator's & parts manual

Premier designs WindGarden 26829 Assembly instructions

Premier designs

Premier designs WindGarden 26829 Assembly instructions

Snapper 1691351 installation instructions

Snapper

Snapper 1691351 installation instructions

manuals.online logo
manuals.online logoBrands
  • About & Mission
  • Contact us
  • Privacy Policy
  • Terms and Conditions

Copyright 2025 Manuals.Online. All Rights Reserved.

Kwik-Trench Mini-Trencher
OPERATORS MANUAL
WITH MAINTENANCE AND PARTS INFORMATION
P.O. Box 840, Livingston, TX 77351
Phone: 936.327.3121 Fax: 936.327.4025
[email protected]
MFG BY: Little Beaver, Inc. 0418
1.800.227.7515
LITTLEBEAVER.COM
KT1200B
CUSTOMERSERVICE
Ph: 800/227-7515 or 936/327-3121 or Fax 936/327-4025
ORDERS...
Placeyourordersbytelephone,fax,ormail.Whencalling,pleasehaveyourpartsmanual
handyforreference.Ourhoursare8:00am-4:30pm central time, Monday thru Friday. When
orderingbymail or fax, include adescriptionand KWIK TRENCH part numberforthe items
youareordering,yourreturnaddress,andpaymentoryourauthorizationforCODshipment.
All orders are shipped UPS where possible. Freight charges will be added to your invoice.
Someitems are oversize,resulting in ahigher shipping cost.Earth Saws areshipped via
motorfreightduetotheirweight.
PAYMENT TERMS...
COD,Cash in Advance, Visa, Mastercard, Discover, AmericanExpress or NET 30 with
approvedcredit. COD limit fornew accounts is $500.00.Personal or company checkson new
accountswillbehelduntiltheyclearthe bank.Toeliminatethisdelay,youmaypaybywire
transfer or send a certified or cashiers check. For a NET 30 open account, please call or write
for a credit application.
SERVICE AND REPAIR...
YourKWIKTRENCH Earth Saw has beendesignedforuserrepair with ordinary hand tools.
Nospecialtools are required. Consult theappropriatesection of the parts manualforinstruc-
tions.
Serviceortechnicalconsulationisavailable, free of charge, from the factoryinLivingston,
Texas. Wewillbepleasedtohelpyouwithanyproblemsor questions. Just write, fax, or call.
Ourhoursare8:00am-4:30pm central time, Monday thru Friday.
Factoryrepairisavailable.Ifyou return a part to the factory, pleaseincludethefollowinginfor-
mation:Yournameandreturn address, a description of the problemandpaymentorauthoriza-
tionto return the repaireditem COD for therepair and shipping charges.
RETURNS...
Pleasecallthefactoryforareturnauthorization.Thiswillhelptoensurethatyourpartsare
handledproperly. Include yournameandaddress,customeraccount#,invoice#underwhich
thereturnedparts were ordered, anda brief description oftheproblem with the partsorthe
reasonforreturningthem.Partstobeconsideredforwarrantymust be returned to the factory
forinspectionwithin 10 days afterreceipt of replacement parts.Besure to prepay theshipping
charges,we will not accept collector COD packages.
Ourmailingaddress...
LITTLE BEAVER, Inc.
2009SouthHouston
P. O. Box 840
Livingston,Texas77351
R0798
Page O-2
SAFETY ALERT SYMBOL
The symbol shown above is used to call your attention to instructions concerning your personal safety.
WATCH THIS SYMBOL — It points out important safety precautions.
Itmeans—ATTENTION! BECOMEALERT! YOUR PERSONALSAFETYIS INVOLVED!
Read the message that follows and be alert to the possibility of
Personal Injury or Death!
llllllllllllllllllllllllllllllllllllllllllllllllllllllllllllllllllllllllllllllllllllllllllllllllllllllllllllllllllllllllllllllllllllll
1 YEAR LIMITED WARRANTY
For1year frompurchase,LB EQUIPMENT,INC. will replace forthe original purchaser,
freeofcharge,any partorparts,found upon examinationbyany factory authorizedservice
center, or by the factory at Livingston, Texas, to be defective in material or workmanship or
both. If your equipment cannot be repaired, it will be replaced. All transportation charges on
partssubmitted for replacement under thiswarranty mustbe borneby purchaser.
Thereisnootherexpresswarranty.
Impliedwarranties,includingthoseofmerchantabilityandfitnessforaparticularpurpose,
are limited to 1 year from purchase and to the extent permitted by law. Any and all implied
warrantiesareexcluded. Thisis theexclusiveremedy andliability for consequentialdamages
under any and all warranties are excluded to the extent exclusion is permitted by law.
*Notice: Enginesarewarrantied bythe manufacturerofthe engine. Seeseparate engine
warranty enclosed.
llllllllllllllllllllllllllllllllllllllllllllllllllllllllllllllllllllllllllllllllllllllllllllllllllllllllllllllllllllllllllllllllllllll
MACHINESERIALNUMBER
Themachineserialnumber foryourKwik TrenchEarthSawis locatedonthe rear shroud. Foryourconvenience,
whenrequiringserviceofpartsinformation,refertothisnumberandyourmodelnumber. Recordthemodelnumber,
enginemake,machineserialnumberanddateofpurchaseinthespaceprovidedbelow:
0798
Page O-3
WARNING: The Engine Exhaust from this product contains chemicals known to
the State of California to cause cancer, birth defects or other reproductive harm.
R
MODEL NUMBER
MACHINE SERIAL NUMBER
ENGINE MAKE
DATE OF PURCHASE
R0798
Page O-4
TABLE OF CONTENTS
OPERATORS MANUAL
O-2 Customer ServiceInformation
O-3 Safety Alert,WarrantyandMachineInformation
O-4 Table of Contents
O-5 SafetyInstructions
O-6 Maintenance andLubrication,Clutch
O-7 MaintenanceandLubrication, V-Belt
O-8 Maintenanceand Lubrication, V-Belt, Cutter Hub, Bearing
O-9 Assembly
O-10 TrenchingInstructions
PARTS MANUAL
Page #
P-1 & 2 FrameAssembly
P-3 Clutch/CutterHubAssembly
P-4 CutterWheelAssembly
InsideBack Cover Torque InformationandConversionChart
Page #
SAFETY INSTRUCTIONS
DANGER: Failuretoobservesafetyinstructionsandreasonablesafetypracticescan
causePropertyDamage,SeriousBodilyInjuryand/orDeath. BECAREFUL!! WATCHOUTFOR
BYSTANDERS!!
DANGER: NEVERdigtrencheswherethereisapossibilityofundergroundpowercables
orotherhazards. The exactlocationof undergroundservices must bedetermined prior todrilling.
Inadvertentseveringoftelephone,fiberopticorCATVtransmissioncable,ordamagetosewerpipeis
costly;RUPTURINGOFGASORWATERLINESCANCAUSESERIOUSBODILYINJURYAND/OR
DEATH. COMINGINTOCONTACTWITHBURIEDPOWERLINESCANCAUSESERIOUSBODILY
INJURY,SEVEREBURNS,AND/ORELECTROCUTION. Calllocalutilitycompaniesoryourlocal"One-
Call"numberatleast48hoursbeforediggingandhaveundergroundutilitiesmarked.
DANGER: NEVERrunengineinsidebuildingorenclosedarea. Exhaustgasescontaincarbonmonoxide,
anodorlessanddeadlypoison.
DANGER: KEEP hands and feet away from rotating blades. Serious bodily injury will result.
CAUTION:
1.READ andunderstand this operator’s manualand the operator’s manual
for the engine. If one is not available, please call or write for a free replacement.
2.NEVER Transportwith engine running.
3. NEVER Trench on steep slopes. Trencher may overturn causing bodily injury.
4. NEVER Trench in solid rock or concrete.
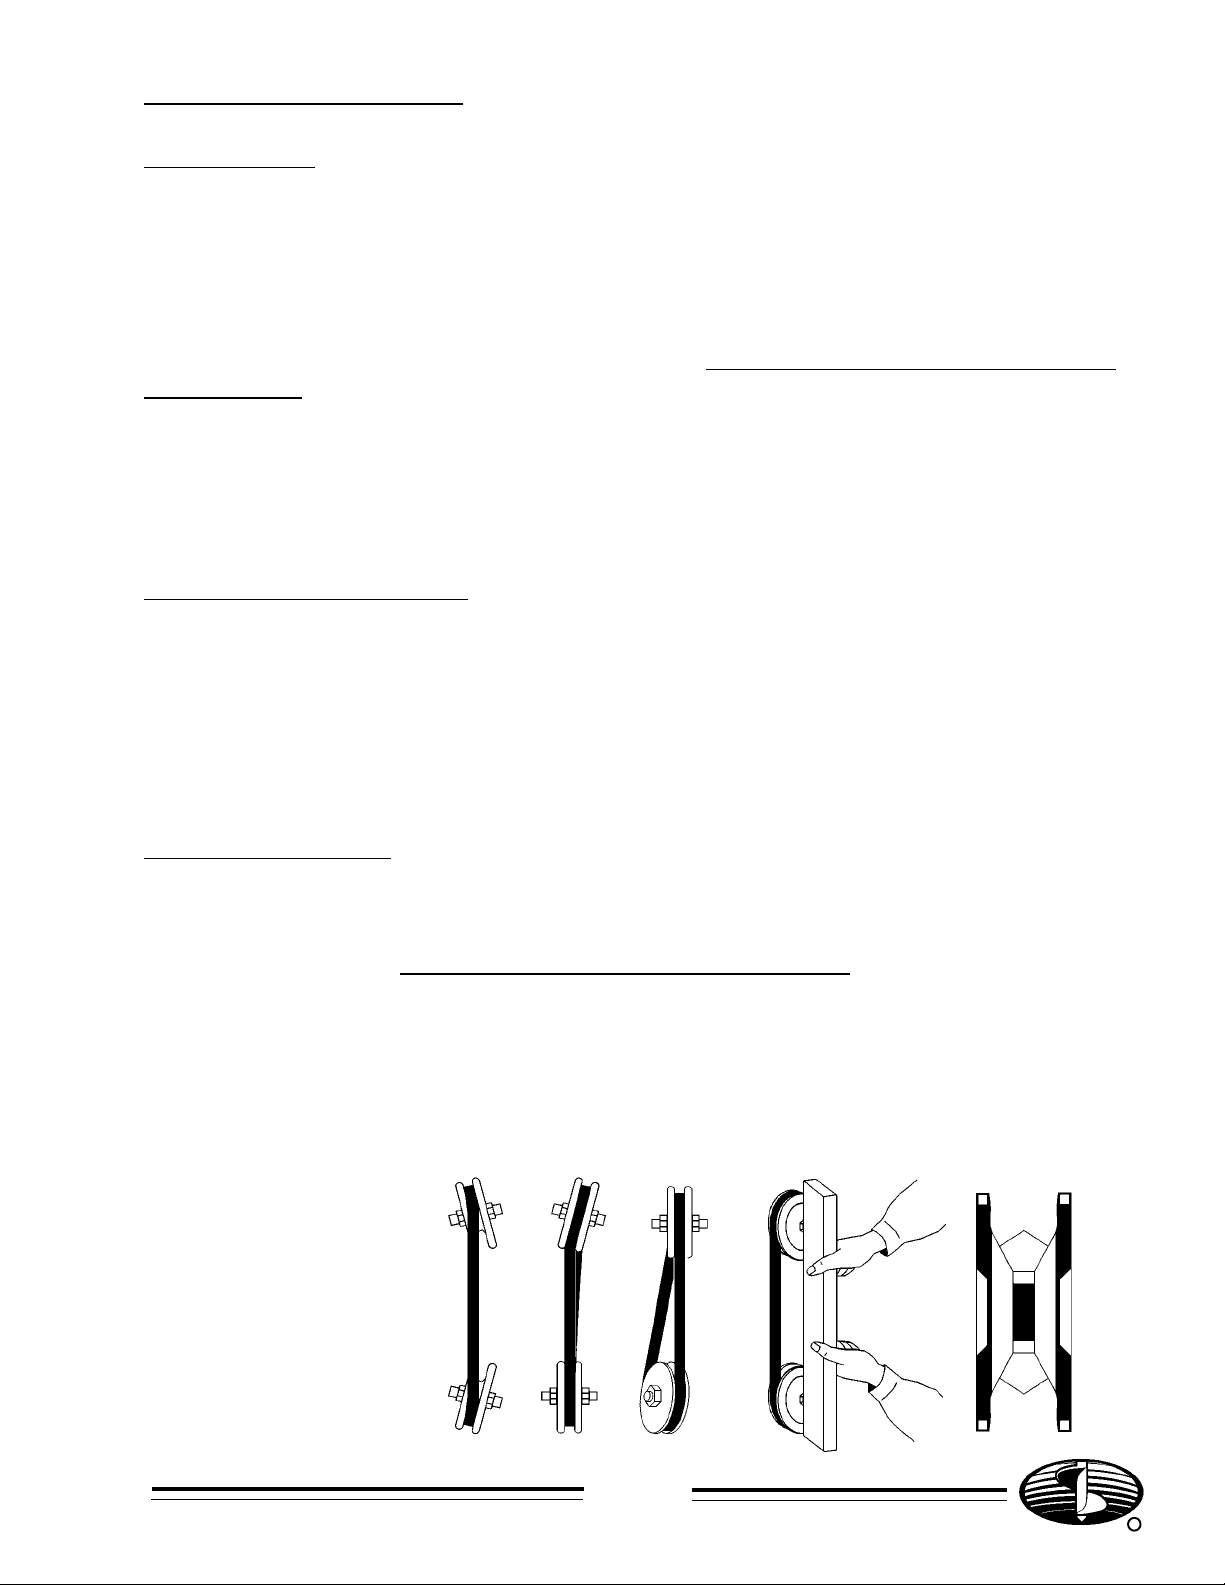
5. NEVER Operate with broken teeth, belts or other damaged or missing parts.
6. KEEP Hands, Feet and Clothing away from moving parts while engine is running.
7. KEEP All safety shields and devices in place.
8.MAKE Certaineveryone is clear beforeoperating the machine.
9. DO NOT Drop trencher off the back of a vehicle. Trencher's weight can exceed 350 lbs.
10. WEAR SAFETY GLASSES.
11. KEEP Bystanders at least 10 feet away from work area.
12. SHUT OFF Engine and disconnect spark plug wire to adjust, service, refuel or clean the machine.
Accidental engine starting is possible by rotating the cutter wheel.
13. AVOID The possibility of spilled fuel causing fire.
14.MAKESurewhentransportingtrencherinavehicleortrailer,itissafelysecuredwithstrapsorropes.
NOTICE
Itis theresponsibility ofthe contractor,owner anduser tomaintain andoperate theEarth Sawin compliancewith
operating instructions provided. Observe all listed safety instructions and other reasonable safety practices. LB
EQUIPMENT,INC.acceptsnoresponsibilityfordamagestothismachine,andotherpropertydamageand/orbodily
injuryduetocareless orimproperoperations.
LB EQUIPMENT, INC. does not recommend or condone use of replacement engines greater than eight (8)
horsepower.
LBEQUIPMENT,INC.doesnot recommendorcondoneanyunauthorized modificationstotheearth saw.
LBEQUIPMENT,INC.reservestherighttomakechangesindesignandchangesforimprovementsuponitsproduct
withoutimposing any obligationupon itself toinstall the same upon its products theretofore manufactured.
Youroperatorsmanualoffersrecommendationsforprolongedandsatisfactoryservice.
Precaution is the best insurance against an accident.
0798
Page O-5
R
MAINTENANCE and LUBRICATION
DANGER: NEVER run engine inside building or enclosed area. Exhaust gases contain
carbon monoxide, an odorless and deadly poison.
Engines are shipped without oil or gasoline. Refer to MANUFACTURER'S INSTRUCTIONS for
proper procedures and recommended fluids.
IMPORTANT DO NOT drop the machine off the back of a vehicle, this may cause damage
to the body and frame. Machines should always be lifted, ramped or transported by a trailer.
LUBRICATING INSTRUCTIONS:
CHECK crankcase and gearbox oil level before each use.
CHANGE crankcase and gearbox oil as recommended by the manufacturer's instructions.
ADD grease to the pillow block bearings after every 100 hours of use.
CLEAN vertical frame posts and sleeves frequently to prevent binding. Do not use oil base lubri-
cants or grease. Silicone is recommended.
SHUT OFF ENGINE and disconnect spark plug wire to adjust, service, refuel or clean the
machine. Accidental engine starting is possible by rotating the cutter wheel.
ALL nuts, fasteners and fittings must be kept properly torqued. After every 25 hours of use the
engine nuts and bolts should be checked and tightened, if necessary. Add lock-tight to bolt threads.
AIR FILTER:
The air filter needs to be cleaned every 10 hours. More often in dusty dry conditions: Check engine
owners manual for further instructions.
Attach a remote air filter with pre-cleaner in serious dusty conditions, this will add to the engine life
considerably.
CLUTCH:
The slip clutch facings should be changed if the thickness is worn to 1/16" or less, this will maintain
the fast digging speed this type of unit can perform. Check every 20-25 hours of use.
ADJUSTMENT: Shoulder bolts must be kept tight. If the clutch wears to the point where
stopping the blades will not stall the engine within a few revolutions, tension
should be increased by adding a washer under each shoulder bolt, or by
replacing the clutch facings.
R0798
Page O-6
0798
Page O-7
R
MAINTENANCE CONT...
V-BELT CARE:
V-belts may be the item most overlooked during equipment maintenance, but proper care and
maintenance of V-belts and their sheaves (pulleys) can yield great rewards. The nature of V-
beltsmakes preventive maintenancerelatively easy. V-belts andsheaves wear graduallyand
usuallygive advancewarningoffailure.
Nonetheless,it is important to recognizethewarnings. Allbeltsandsheaveswill wear as part of
theirlifescycle. Aswearoccurs, the belts will ride lower in the grooves. A worn belt is,in effect,
longerthan a newone.
V-belts grip by wedging in the pulley grooves. Belts that are too loose cause slippage, loss of
power, loss of speedand rapid wearto both thebelt and thesheave. A howl orsqueal indicates
thatthe belt istoo loose or theload is tooheavy.
ALIGNMENT AND TENSION:
Check to be sure sheaves are properly aligned because misalignment can cause excessive
wear to the belt sidewall. Unusual wear of the belt outer cover is an indication of more serious
mechanicaltrouble. V-beltsare designed to operate bymakingclean, dry surface contact with
thesidewallofthe sheaves. Inspect belts periodically toassurethattheyare not contaminated
withgreaseoroil. Don'tallowmud,rustorany otherforeignmattertobuildupinsheave grooves.
Cleansheaves carefully with a wire brush.
SIGNS OF TROUBLE:
Don't install new V-belts without carefully inspecting the sheaves. Focus special attention on
theseconditions:~worngroovesidewalls~ashinysheavegroove bottom ~ wobbling sheaves
or~ damaged sheaves. Sheave sidewallsmust be perfectly straightbecause the wedging ac-
tionof the V-beltisimpairedanditsgripping power isreducedwhenthewallsare worn ordished
out. Ashinysheave groove bottom is anindicationthat the belt, sheave orbothare badly worn
andthebeltisbottominginthegroove. Thiscondition mayfirstbeevidentonthesmallersheave.
Sheavewobblemaybecausedby~improperinstallationontheshaft~aworn/damagedbush-
ing~aworn/damagedsheavehuborby~abentshaft. Anyoftheseconditionswillcauseearly
failure. Thewobbling
sheavewhips the belt
from side to side,
subjectingthebeltto
lateralstrainandcausing
rapidwear to both the
sheaveandbelt. Vibration
isanotherindication of an
improperlyinstalledor
damagedsheave; however,
vibration can also be caused by a damaged belt.
R0798
Page O-8
V-BELT CARE CONT...
Checkthealignmentofthesheaves. Thedriveanddrivenshaftsshouldbeparallelbothhorizon-
tallyand vertically, and the centersofbothsheavesshouldbeina straight line. Although V-belts
cantolerateminormisalignment(About1/16inchper12inchesof shaft center distance), close-
to-perfectalignmentwillprolongbeltlife.
Set the belt take-up adjustment at its minimum position and place the new belt in the correct
positionbyhand. Neverprybeltsover the sheave with a screwdriver orotherhardobject.
AllV-belt drives must operate with correct belt tension to providetheoptimumwedgingactionof
the belt against the groove sidewalls. Allow a reasonable break in period of a few hours, and
thencheck forproperbelttension. Newbelts tendtoelongateslightlyuntil they areseatedinthe
sheave groove and initial stretch is removed from the belt. Be sure to reinstall all protective
guardsandshields.
CUTTER HUB:
REMOVING THE CUTTER HUB:
Shoulditeverbenecessaryto remove the cutter hub, remove thethree(3)cap
screwsand insert two(2) 1/4" - 20cap screws intothe threaded holes inthe
bushingflange. Tighten thecapscrewsalternatelyandevenlyso thepressagainst
theshoulder of the cutter hub, "jacking" the bushing from thehub.
INSTALLING THE CUTTER HUB:
Toinstallthecutterhub, assemble the bushing intothecutterhubsothatthethree
(3)counter-boredholesinthebushing line up with the three (3)threadedholesin
thecutterhub. Insertthethree(3)capscrewsthrough thecounter-boredholesinto
thethreadedholesandscrewtheminfingertight. Slidethecutterhubandbushing
ontheshaft over the key. Locate theassembly so the bladeswillclear the base
andtheguard. Tightenthecap screwsinsequence aroundthecircle. Repeat until
nofurthermovementcanbeobtained(approx.12ft.lbs.).
BEARINGS:
The nylon bearing (clear collar) must be inserted in the blade with a slight inward bulge. After
locating the bearing in the collar of the blade, press the bulge to conform to the contour of the
cutterhub.
0798
Page O-9
R
TRENCHER ASSEMBLY INSTRUCTIONS:
Removethe washers and pins that are on the front axles.Installtwo(2)fronttireswithvalve
stemfacingout.Re-installwashers&pins. Installreartirebyinserting axle bolt through wheel
bearingsandswivel. Installandtightenlocknut,leavingasmallamount of play in wheel bear-
ings. Tire pressure shouldbe 40 lbs. PSI.
Removetwo(2)boltsfromopenneckofframe. Insertthepush handle, re-install bolts.
Attachhandcrankand swivel end to manualactuator. Use hand cranktoraiseshroudand
engineall the way.
Follow enginemanufacturersstartupinstructions. Fillcrankcase with the recommended oil.
Add30 wt. oilto the 6:1gear reduction unittil it is1/3 full.
Follow diagrams on page P-1.2 & 3 to install wear parts and the "Super Blade Plus" or the
"Super Extra Rock Blade" on P-4.
Doublecheckallbolts and fasteners. Make sure thebladeisproperlyinstalled and the shoul-
derboltsare tightened.
BLADE/TEETH ASSEMBLY:
CAUTION: Whenremovingorinstallingtheblade or when making adjustments on the
trencher,the sparkplugmustbedisconnectedtoprevent accidental
startingoftheengine.
Whendetermining which teetharerighthandorleft hand, standintheoperatingposition(stand-
ingbehindthepushhandleandfacingthedirection oftravel). Theteeththatareontheright hand
sideof the bladearetheRIGHTTEETH. Theteeth that areonthelefthandside of thebladeare
theLEFTTEETH.
To install new teeth, remove the two (2) shoulderbolts, die springs,friction plate, clutchfacings,
andtheblade. Removetheold teethfromtheblade,installthenew teethintheproperorder,and
remountthe bladeonthecutterhub.
Thewidth of your trench isdeterminedbythecurvatureofthe tooth. You willhavestraight
teeth,curved in teeth(teeththatcurveintothe blade) andcurvedoutteeth(teeththat curve
awayfrom the blade).
Forthe KT200B Super Blade Plus(SBP)whichhastwelve(12)teeth, start placing your teethon
thebladeandkeep a clock in mind. Oneo'clock,Two o'clock,etc. Followthediagramon page
P-4for this model. Standard cut is 2 inches.
TheKT200BSuperXtra Rock Teeth(SXRT)only has four(4)"SuperXtraRock Teeth"
R0798
Page O-10
TRENCHER OPERATING INSTRUCTIONS:
Puttrencherinposition.
Turnfuelon. Usechokewhenstartingengineifnecessary.
Allowenginetowarmupfor2-3minutes,thenbringengine speed up with the throttle.
Standbehind the pushhandleandlowertrencherby turning thecrankhandlecounter-clock-
wisetorequired depth. Keep left hand onthehandle for stability.
Pushtrencher forwardtoendofyour trench.
Raisethebladebyturningcrank handle clockwise until cutting blade iscompletelyoutofthe
ground.
Stoptheengineandturnthefueloffbeforemovingthemachine.
DO NOT usedisc blade trenchers withmissingteeth. If you do, thiswillincrease the
possibilityofengine vibration.
NOTE: Ifin hard ground,roots and other problemareas. DO NOT try and force
machine. Let the cutting blade do the cutting. Over pushing may cause
the blade to bog-down.
INSTRUCT operator to back off immovable objects to eliminate early teeth breakage.