manuals.online logo
Brands
  1. Home
  2. •
  3. Brands
  4. •
  5. Living Heat
  6. •
  7. Thermostat
  8. •
  9. Living Heat T5 User manual

Living Heat T5 User manual

Touch Screen Heating Thermostat User Manual
Many thanks for your selection of our products and services, and also for your trust and support to us.
Technical Data
Displays & Buttons
Ti Setti
Advanced Setting
Under turn off state,long press
From 41 to AF, short press "" "" for 3-5 seconds to access advanced setting.
tochoosetheoption,andadjustdataby A,Y.Remainabout5secondsafterfinishsetting
will
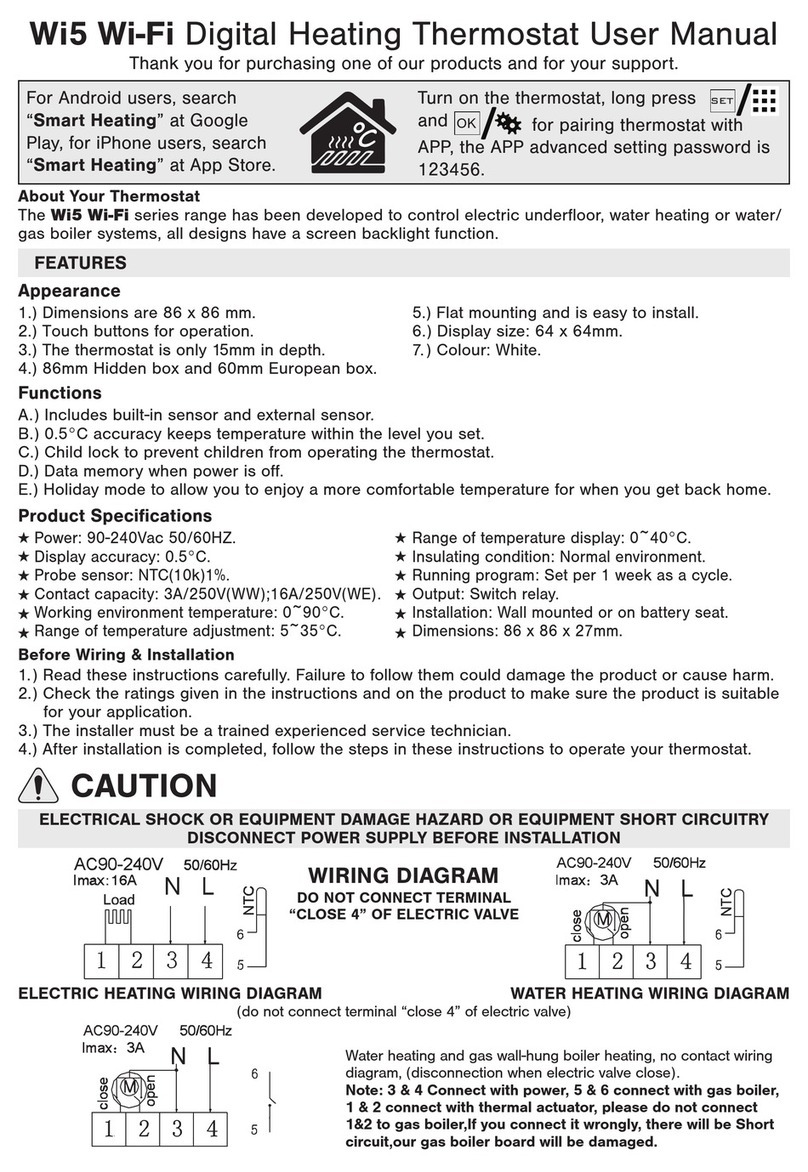
l.Power Supply: 230VAC 50/60H2 | 8.Range oftemperature display:0-40"C
2.Display accuracy:0.5"C I S.Output: Switch relay
3.Probe sensor:NTc(10k)1% | l0.lnsulating condition: Normal environment
4.Contact capacity: 3A/250V(WW);16A250V(WE); I lt.nunning program:Set per l week as a cycle
6.Working environment temperature:o-7OoC I l2.lnstallation:Wall mounted or on battery seat
T.Rangeoftemperatureadjustment:5-35oC I t3.Size(mm), g6*g6*27
o*toconfirm workingas holidaymode.Press "" tosetthedaysof holiday mode by A or V.Set
from 1 to 30 days(countdown from holiday beginning,after holiday ending will return to work
automatic mode),for example,set as 15 days,After press OK to setting temperature
window,pressAorYto adjust setting temperature,press OK again to confirm to work.
lf you want to manual revise the data of holiday mode ,short press "' to switch the setting of
days ortemperature. lf data of days is 0, press "*, then holiday mode is finished
Temporary manual
mode
Under automatic mode and unlock state,press A,V to set and adjust temperature.it will access
temporary manual mode,yn[ can set required temperature. lf it return to automatic mode or
manual mode,short press ttt to switch . Or P1 work to next period, it will return to automatic
mode automaticatly,P2 P3 work to next period, it will return to automatic mode automatically(for
example,Pl work with temporary manual mode at 6:00 and set temperature as 23'Cand it will
return to automatic mode automatically at 9:00(Press SET to exit temporary manual mode)
me
Short press o*;choose the setting data:Minute, hour and
week,data chose flashing Minutes flashing,set the data by A , V
confirm and enter into hour setting Press to
Hours flashing,set the data by A V Press"' to confirm and enter into week setting,week
flashing,set the data by A , Y,press "* to confirm and
window flash for 3 seconds then back to main window.
Children Lock Long press Vfor 5 seconds to lock screen, long press
Vfor 5 seconds to unlock
Turn ON/OFF:Short press to turn on/ turn off
l Short press to switch automatic mode and manual mode
for 3-5 seconds to enter into
L Confirm key: use it with SET key
2 Only short press it to set time
for 3-5seconds to set comfortable temperature and
1 Decrease key : short press to decrease the data of setting
2 Long press to lock /unlock
1 lncrease key: short press to increase the data ofsetting
2 Long press to track floor temperature
Short press "1', switch to automatic mode or manual mode
Under unlock state,set the temperature by.A.,'Y1.6",,,nt actual temperature via NTC sensor of
thermostat,by comparing with actual temperature and setting temperature,when actual
temperat!re lower then setting temperature,it will close heating contact and open cooling
contact(Adisplay),when actual tem.perature is higher than setting temperature,it will close cooling
Long press 11' to access setting window,and choose ""d-' ;66n (it will flashing when
.Press d*,enter into holiday moqe setting, and change "OFF" to "ON" by A61 iV,.prg55
Display
Sien Setting Options Data Setting Function Factory Default
A1 Measure Temperature
Calibration -9-+9C 0.5 C Accuracy
Ca I ibration
A2 Temperature control
return difference
setting
1-9c 2"c
A3 External sensors limit
temperature control
return difference
1-9c 2'c
A4 Children lock setting 0:half lock
1:full lock 0
A5 Limit value of high
temperature for
external sensor
3sc-70c 4sc
A5
Limit value of low
temperature for
external
sensor(anti-freeze
Drotection)
sc-10c 5L
A7 Setting temperature
lowest limit 1-10c s"c
A8 Setting temperature
hishest Limit 20-70"c 3sc
A9 Options of working
Drosra m 0=P1(DlY manual programmable )
1=P2 ( preinstall programmable )
P2
2=P3 ( oreinstall Drosrammable )
AA Descaling function
0:Close descaling function
1:Open descaling function (valve is continuously closed
over 100 hours, it will be opened for 3 minutes
automatically) 0close, l open
0:Close descaling
function
AB Power on memory
function 0:Power on memory function
1:No power on memory function 0:Power on
memory function
AC Options of
anti-freezing
function
0:Anti-freezing functionclose
1:Anti-freezing function open 0:Antifreeze on
closed
AD
Options of sensor
control N1:Built-in sensor (high temperature protection close)
N2:External sensor (high temperature protection close)
N3:Built-in sensor control temperature ,external sensor
limit temperature (external sensor detect the
temperature is higher than highest temperature of
external sensor, thermostat will disconnect relay,turn off
load)
N3:Built-in and
external sensor
AE Restore factory
defa ults Display A o, press OK key whole show
time.Press o"to accomplish setting Press "'again to access next setting of period setting. Repetitive operation
accordingly,fromMondaytoSunday.Press 9( tosaveandquit. lfwantquitduringsetting,pleasepress "l'.
Period Time Default of temperature
100:00-6:00 1sc
26:00 - 9:00 2L"C
9:00 12:00 lsc
412:00 14:00 27"c
514:00 17:30 1sc
617:3G-23:30 2L"C
123:30 23:59 lsc
AC230V 50/60H2
lmax, 3A N
a
g{M.:';E. :
?i - .o
tl
1',2:l
:----i,,. -:,- , 1
Water heating wiring diagram
(do not connect terminal "close 4" of electric valve)
Cautions on Installation and Use
1. To prevent the thermostat display from a high fluctuation, special treatment has been made to the program. Therefore
Returndifference:limitvalveofexternalsensoris45C forfabtorydefault(A4),valueofexternalsensorcontrolreturn
difference (A3) is 2.Relay stop working when temperature rise [o 4zC. lf temperature decline to 43Crelay continue to work
and heating (it can be operated ,only when indoor temperaturb ls lower than setting temperature )
Sensor fault display:please choose correct working way of built-in and external sensor, if choose wrongly or sensor fault
(breakdown), "E1" or "E2" will be displayed on the screen. Thermostat will stop heating until the fault is eliminated.
Programmable Mode Setting
4
o.
F]
2:i
i)'
2.
3.
4.
5.
6.
7.
it is normal that the thermostat cannot immediately display the sudden change of temperature.
The thermostat installed on 1.5m above the ground.
For the thermostat installed,please take care not to install it to the wall corner, door / window side or behind the door
or in such unheated area as exterior wall. Avoid hot / cold air duct, radiator, flue or thermal pipe.
lf you have any problem for the installed ,please contact our company hysen, we will make a demonstration for you
Only the professional technicians are permitted to open the transmitting and receiving box of the thermostat for
installation. When install the power supply, make sure that the power cable is well insulated.
The thermostat is unrepairable product. The user shall not open the internal circuit board.
Before installing the thermostat, make sure that the system is disconnected. The maximum voltage of the system shall
meet the requirements specified in the lnstruction Manual (Max. AC Voltage: 250V).
This heating thermostat has 3 kinds of program (P1.P2,P3) for you r choice.(Pl can be available for DIY)
Mode Setting
Warranty:
We offer the warranty of 18 months, from the sales day. The products of our company can have lifetime warranty ,if it is not
the quality problems, or beyond the warranty period, we will charge for the after-sale service.
Installation
Warning:please wiring right strictly according to the wiring diagram,do not make water,mud and other debris into the
thermostat,otherwise it will cause thermostat damage!
I
I-*i& i
--'3" ' I i
*ti i
Blt
R lt
',ll
'I
t:tI
I
,.1
.1.
.l ,
"-\)
FI ;
'!i J.
,r\. -, F
' t.,... -_./
r -il
' ,1
' ail
: :,
lii
, .:]
:i ..
Under turn off state,long press a(' for 3-5seconds to access advanced options. Short press-"' to switch A9 option,press
A or Y to choose.
P1: Work with manual programmable: 7 days per week, 6 periods programmable for 24hour, different time set different
temperature. P1 will not be displayed in lower temperature section and be displayed in high temperature section
P2'.7 days per week,from 22:00to 6:00 is energy-saving mode and temperature is 17C,from 6:00to 22:00 is comfortable
mode and temperature is 2lC,thetime and temperature isdefault (can't be revised)
P3: From 22:OO to 6:00 is energy-saving mode and temperature is 17C,from 6:00 to 22:00 is comfortable mode and
temperature is 21C,from 8:00 to 1.6:00 is energy-saving mode and temperature is 17C from 16:00 to 20:00 is
comfortable mode and temperature is 21C,the time and telTperature is default (can't be revised)
Working day:from Monday to Friday
Weekend:from 22:00 to 5:00 is energy-saving mode and temperature is 17'C,from 6:00 to 22:00 is comfortable mode and
temperature is 2L!,the time and temperature is default (can't be
Under turn on state,long press "'for 3-5 seconds to access setting windowshort press ""to switch P].,it will flashing if
chose.then press '"to DIY programmable. Setting order : week- hour- temperature.
Value default is 7 days and 6 time section ,
Default is 7 days,6 periods as following:
Explanation of section of 24 hours:setting temperature lower or equal to 17C.small cube doesn't display,setting
than 17C,then small cube
See picture at right,press A or Y to set the week,then press "' to set 6 time periods.and press Aior 'Y' to adjust
ture. Default of start time is 0:00 can't be adjusted, it will increase / decrease 15min for press o;i per
P1 Manual Programmable
Wiring
.t - -)
Diagrart : I : :: : :: : :: i: ;: :
AC230V 50/60H2
''*rlll N L gx
iL1U ; I =l
-Lrl .i,_L_ ,' !
l1i2 3i4 ; I
11'
Electric heating wiring diagram
''t- l
'l\ \:\
\-lI
*,&

Other Living Heat Thermostat manuals

Living Heat SmartLife User manual

Living Heat

Living Heat SmartLife User manual

Living Heat i8 User manual

Living Heat

Living Heat i8 User manual

Living Heat Wi5 Wi-Fi Series User manual

Living Heat

Living Heat Wi5 Wi-Fi Series User manual

Living Heat i8 User manual

Living Heat

Living Heat i8 User manual

Living Heat M100 User manual

Living Heat

Living Heat M100 User manual

Living Heat SmartLife CT1000 User manual

Living Heat

Living Heat SmartLife CT1000 User manual

Popular Thermostat manuals by other brands

GENERAL LIFE HT250S SET manual

GENERAL LIFE

GENERAL LIFE HT250S SET manual

Crestron CHV-TSTAT Operation and installation guide

Crestron

Crestron CHV-TSTAT Operation and installation guide

tempio HY607 quick start guide

tempio

tempio HY607 quick start guide

Trane XT500C Installer's guide

Trane

Trane XT500C Installer's guide

Emerson 1F75C-11NP user manual

Emerson

Emerson 1F75C-11NP user manual

Comcast RTCOA CT30S Battery Installation

Comcast

Comcast RTCOA CT30S Battery Installation

Lennox iComfort M30 Installation and setup guide

Lennox

Lennox iComfort M30 Installation and setup guide

Vimar 2911 Installer/User Quick Guide

Vimar

Vimar 2911 Installer/User Quick Guide

Honeywell FocusPro TH5320R operating manual

Honeywell

Honeywell FocusPro TH5320R operating manual

Salus RT510 installation manual

Salus

Salus RT510 installation manual

Daikin D2270C Owner's Manual & Installation Instructions

Daikin

Daikin D2270C Owner's Manual & Installation Instructions

Roma Heating RT5 instructions

Roma Heating

Roma Heating RT5 instructions

Young Regulator T-720 Series installation manual

Young Regulator

Young Regulator T-720 Series installation manual

Carrier Thermostat Installation, start-up, and operating instructions

Carrier

Carrier Thermostat Installation, start-up, and operating instructions

Siemens KNX RDF600KN manual

Siemens

Siemens KNX RDF600KN manual

HomeSeer RCS Z-WAVE installation guide

HomeSeer

HomeSeer RCS Z-WAVE installation guide

Daikin 910121748 Installation, operation & application guide

Daikin

Daikin 910121748 Installation, operation & application guide

Carrier CRC2 - NTC owner's manual

Carrier

Carrier CRC2 - NTC owner's manual

manuals.online logo
manuals.online logoBrands
  • About & Mission
  • Contact us
  • Privacy Policy
  • Terms and Conditions

Copyright 2025 Manuals.Online. All Rights Reserved.