livn 5901600 User manual

EN RADIATOR VENTILATOR
NL RADIATOR VENTILATOR
FR VENTILATEUR DE RADIATEUR
DE HEIZKÖRPERVENTILATOR
EN Instruction manual NL Handleiding FR Manuel d'instructions DE Bedienungsanleitung

EN INSTRUCTION MANUAL
Please read the instructions and user manual carefully before installing or using the device, and keep
them retained for future reference. This manual is part of the device and should be stored with it. If
sold to a third party, these user instructions should be supplied with the product. Liability will not be
accepted, and the warrant will not apply, in cases of improper use or failure to follow the safety
instructions. Should you encounter any problems, please contact a qualified technician for help. For
assistance or additional information, contact a qualified technician, the help desk, or the retail outlet.
SECTION 1: DESCRIPTION OF THE USER MANUAL
This installation manual is intended for the end-user, the general homeowner, who wants to install one
or more ventilator on the radiators in his home. The user does not need to be skilled, trained or certified
to install the ventilator.
SECTION 2: SAFETY WARNINGS
Read and understand this manual and its safety instructions before using this product.
Follow all the instructions. This will avoid fire, explosions, electric shocks or other hazards that may
result in damage to property and/or injuries.
The product shall only be used by persons who have fully read and understand the contents of this user
manual.
Ensure that each person who uses the product has read these warnings and instructions and follows
them.
Keep all safety information and instructions for future reference and pass them on to subsequent users
of the product.
The manufacturer is not liable for cases of material damage or personal injury caused by incorrect
handling or non-compliance with the safety instructions. In such cases, the warranty will be voided.

SECTION 3: SAFETY INSTRUCTIONS
Read and understand this manual and its safety instructions before using the
ventilator and matching components.
How to use the product safely
Safety information for vulnerable people
•Never leave children alone with packaging material. There is a risk of suffocation.
•Children should not play with the product. This product is not a toy.
•Do not install the product if you have reduced physical, sensory or mental capabilities.
•Do not allow installation of the product by persons (including children) with reduced physical,
sensory or mental capabilities.
Safety information related to the intended use
•Use this product only as a radiator ventilator by attaching it to a radiator. Follow the instructions in
this manual to do so.
Product limitations and restrictions
•Do not use any sharp objects near the fans.
•Keep the product away from open fire, soldering irons, or other hot tools as this could damage the
product.
Installation safety information
•Lift, handle and transport the product with great care.
•Pay attention and be careful when installing an electrical product. Do not install the product if you
are not able to concentrate properly, or if you may faint or if you are under the influence of
medication, alcohol or drugs.
•Before connecting the power adapter to the wall socket, ensure that the local voltage corresponds
to the value on the product. The maximum permissible voltage is 240 V.
•Connect the product to a properly installed and easily accessible wall socket. Make sure the product
can be disconnected from the power supply at any time.
Safety information regarding the use
•Never use the product outdoors. The product is intended for indoor use only.
•Check all components (including cables) for any damage before installing the product. Immediately
remove the power adapter from the wall socket in the event of visible damage, strong odour or
overheating of the components.
Maintenance safety information
•Never touch the product or power adapter with wet hands.
•Keep the product away from moisture. Take care when cleaning the product or radiator to which it
is attached. Make sure no water enters the product through the fans.
Service and repair safety information
•Do not attempt to open, modify or repair the product. Alterations or modifications of this product
are not permitted. This will void the warranty.
SECTION 4: MAIN COMPONENTS
D
F AA
A
B
C
D
E
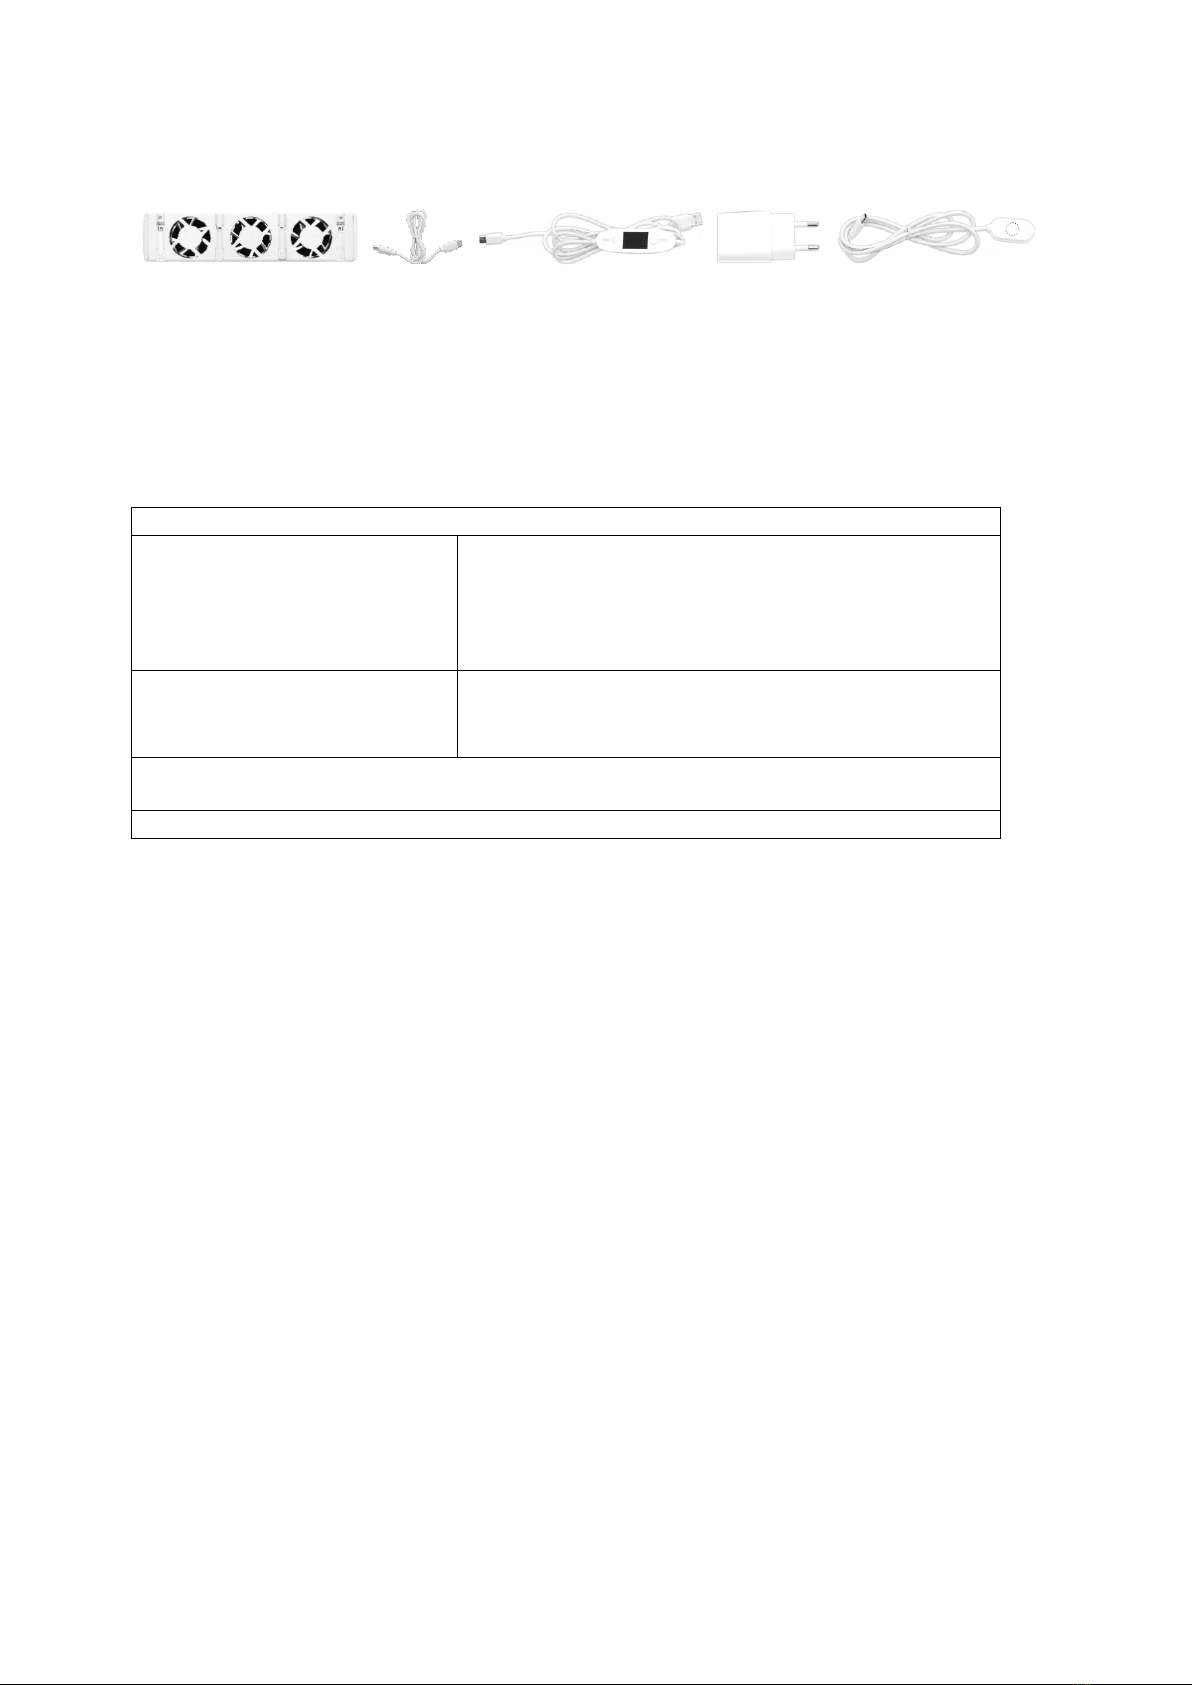
A. Radiator Ventilator
B. 50 cm extension cable with double Type C connectors
C. Thermostat with connector cable, each end 80 cm with Type C connector, total 170 cm
D. Power adapter
E. Temperature sensor
SPECIFICATION
Radiator Ventilator Set
(A+C+D+E)
(A+B+C+D+E)
(A+B+C+D+E)
Model: 5901600 (MXRV-01) - 8712757481743
Model: 5901620 (MXRV-02) - 8712757481767
Model: 5901630 (MXRV-03) - 8712757481774
Input Voltage: 100-240 V 50/60 HZ AC 350 MA
Single Radiator Ventilator for
Extension (A+B)
Model: 5901610 (MXRV-EXTENSION) - 8712757481750
Input Voltage: DC 5 V 0.2 A
Remark: The power adapter in the package can power up to 10 ventilators maximum.
Made in: China

SECTION 5: HOW TO USE
Type of radiators can be used for this ventilator:
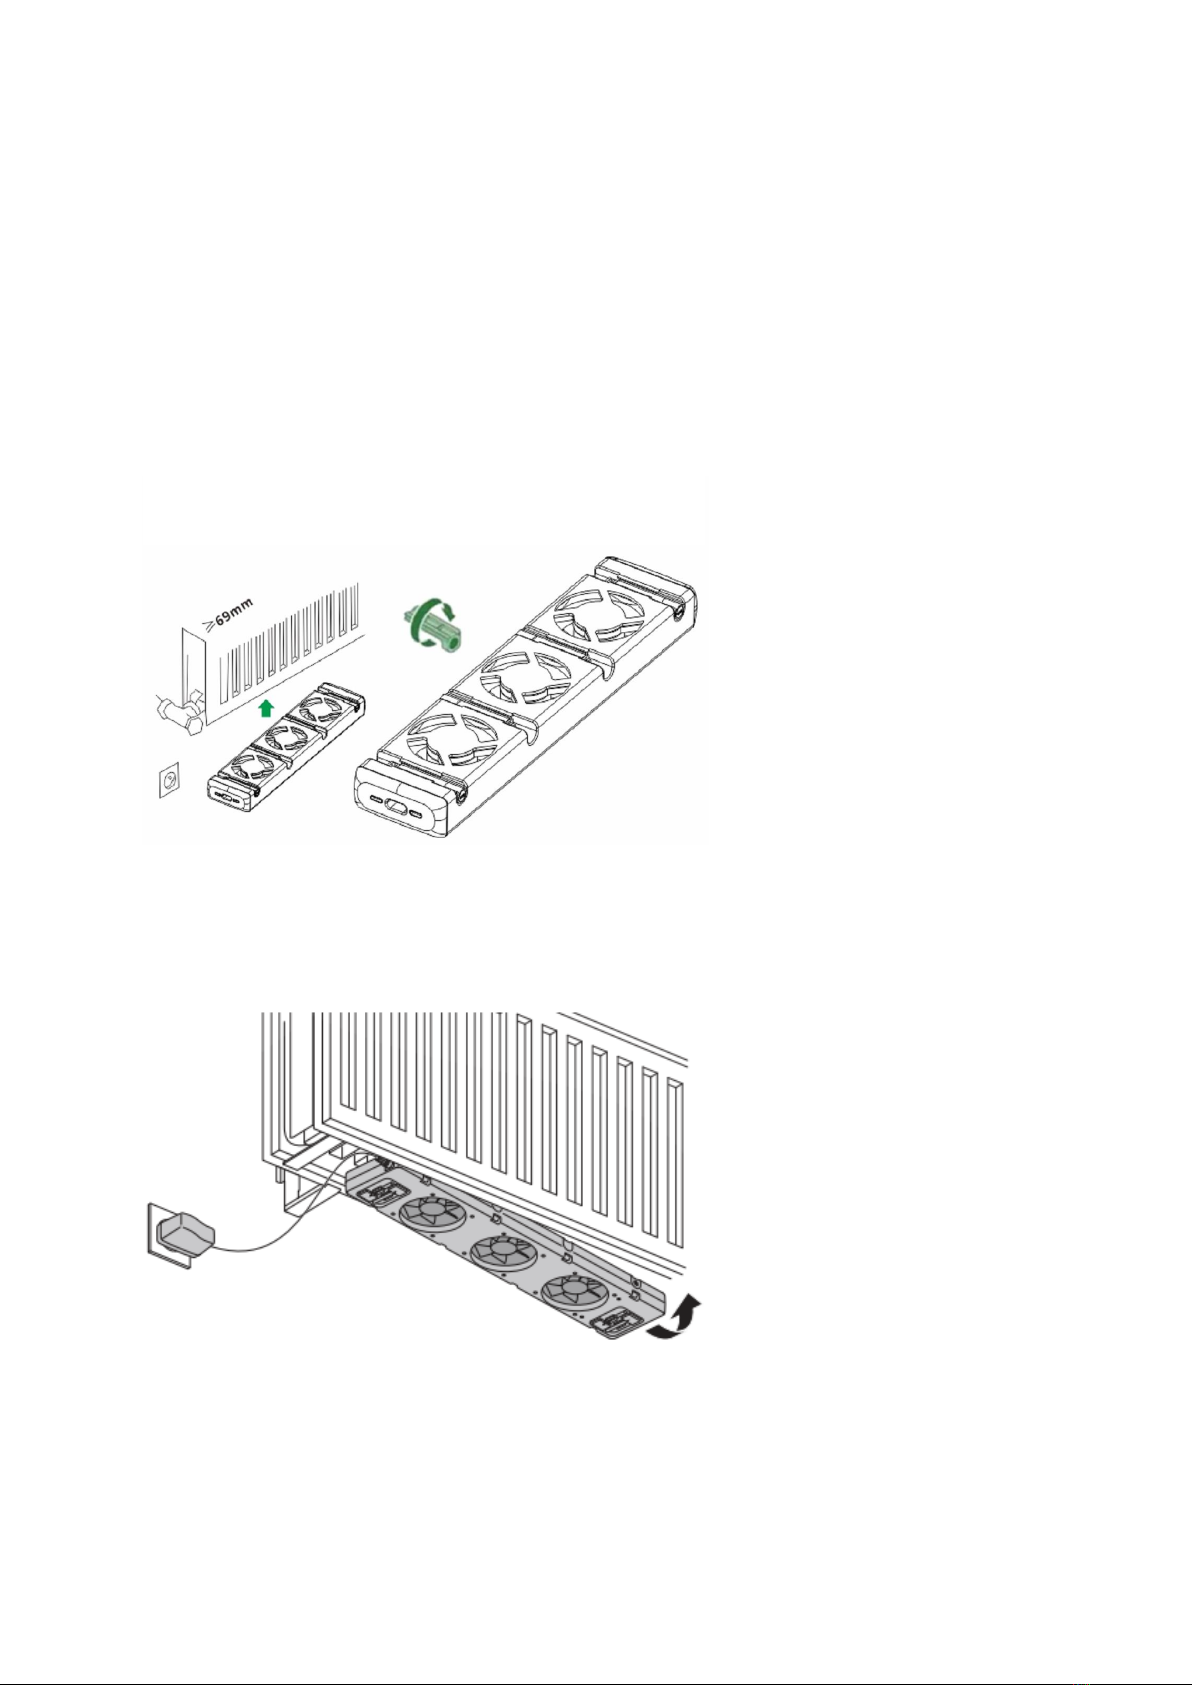
1. Wide radiator ≥69mm
2. Narrow radiator < 69mm
3. Single sided radiator
4. Convector
5. Other radiators
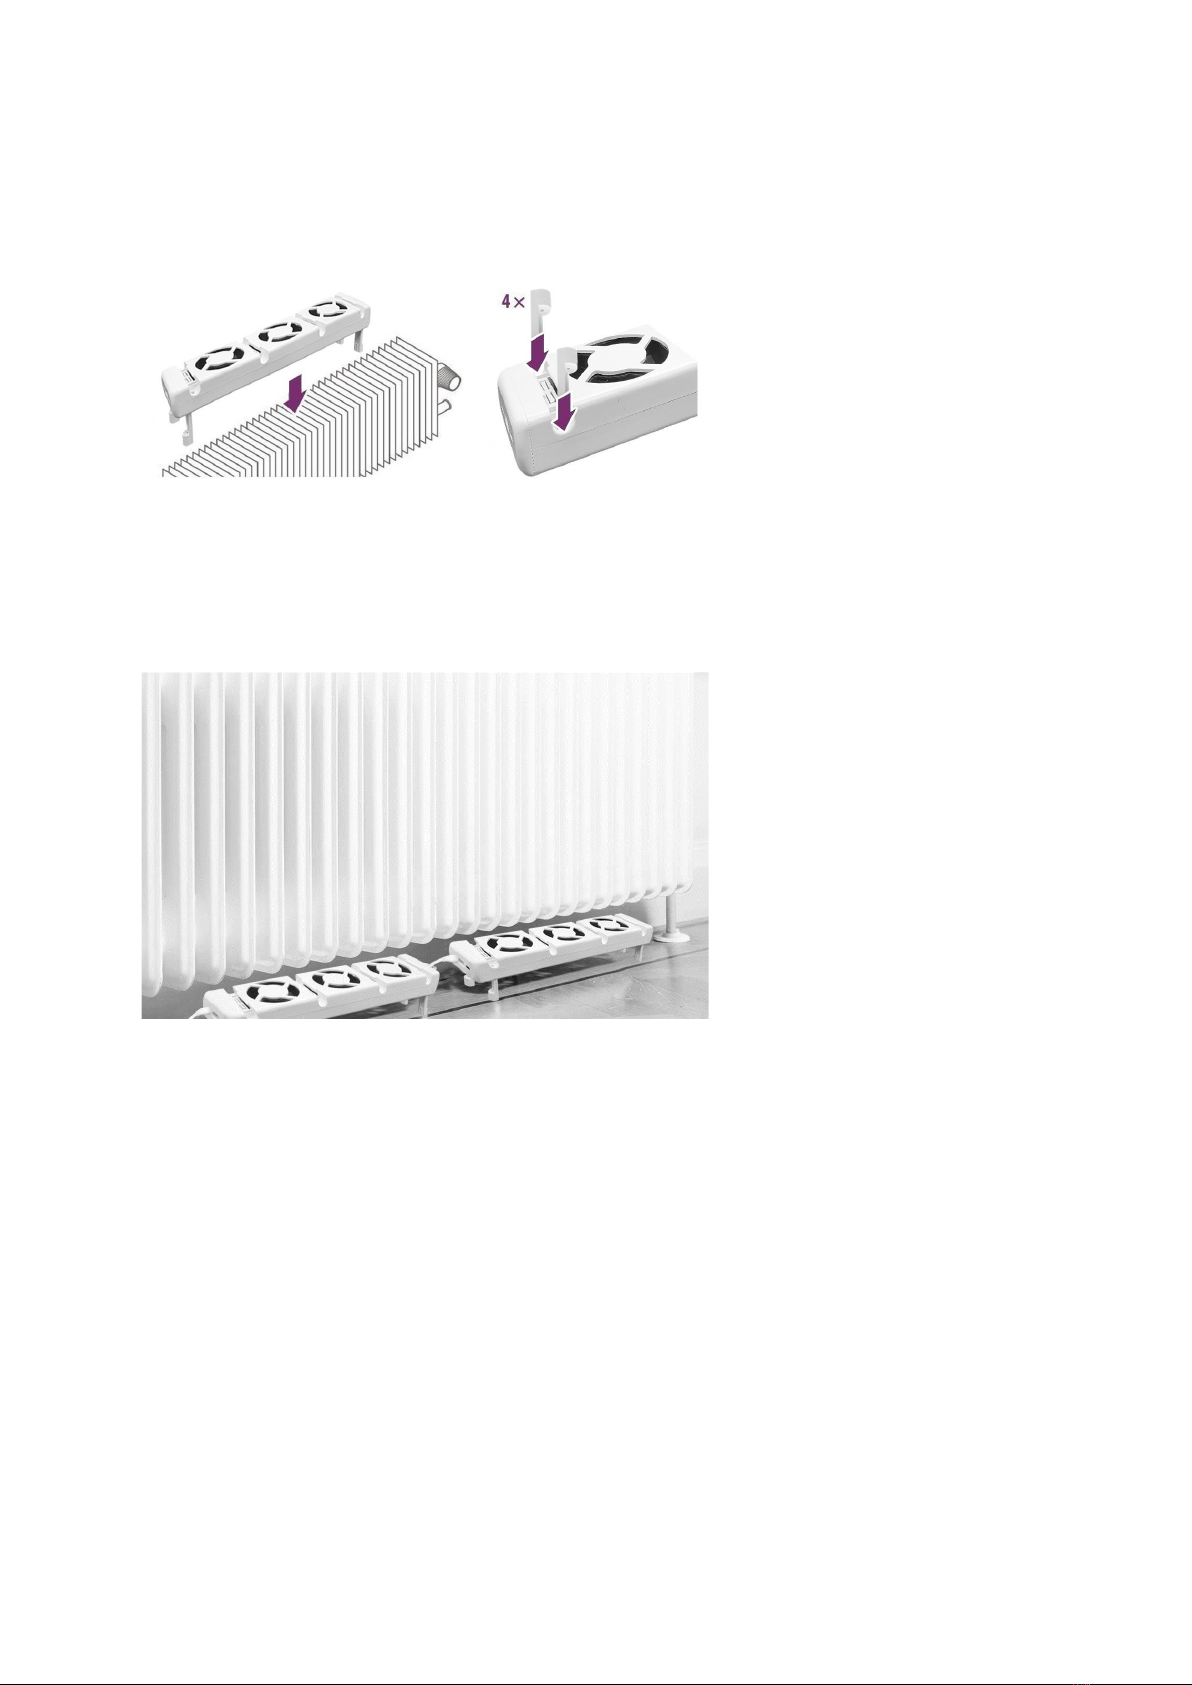
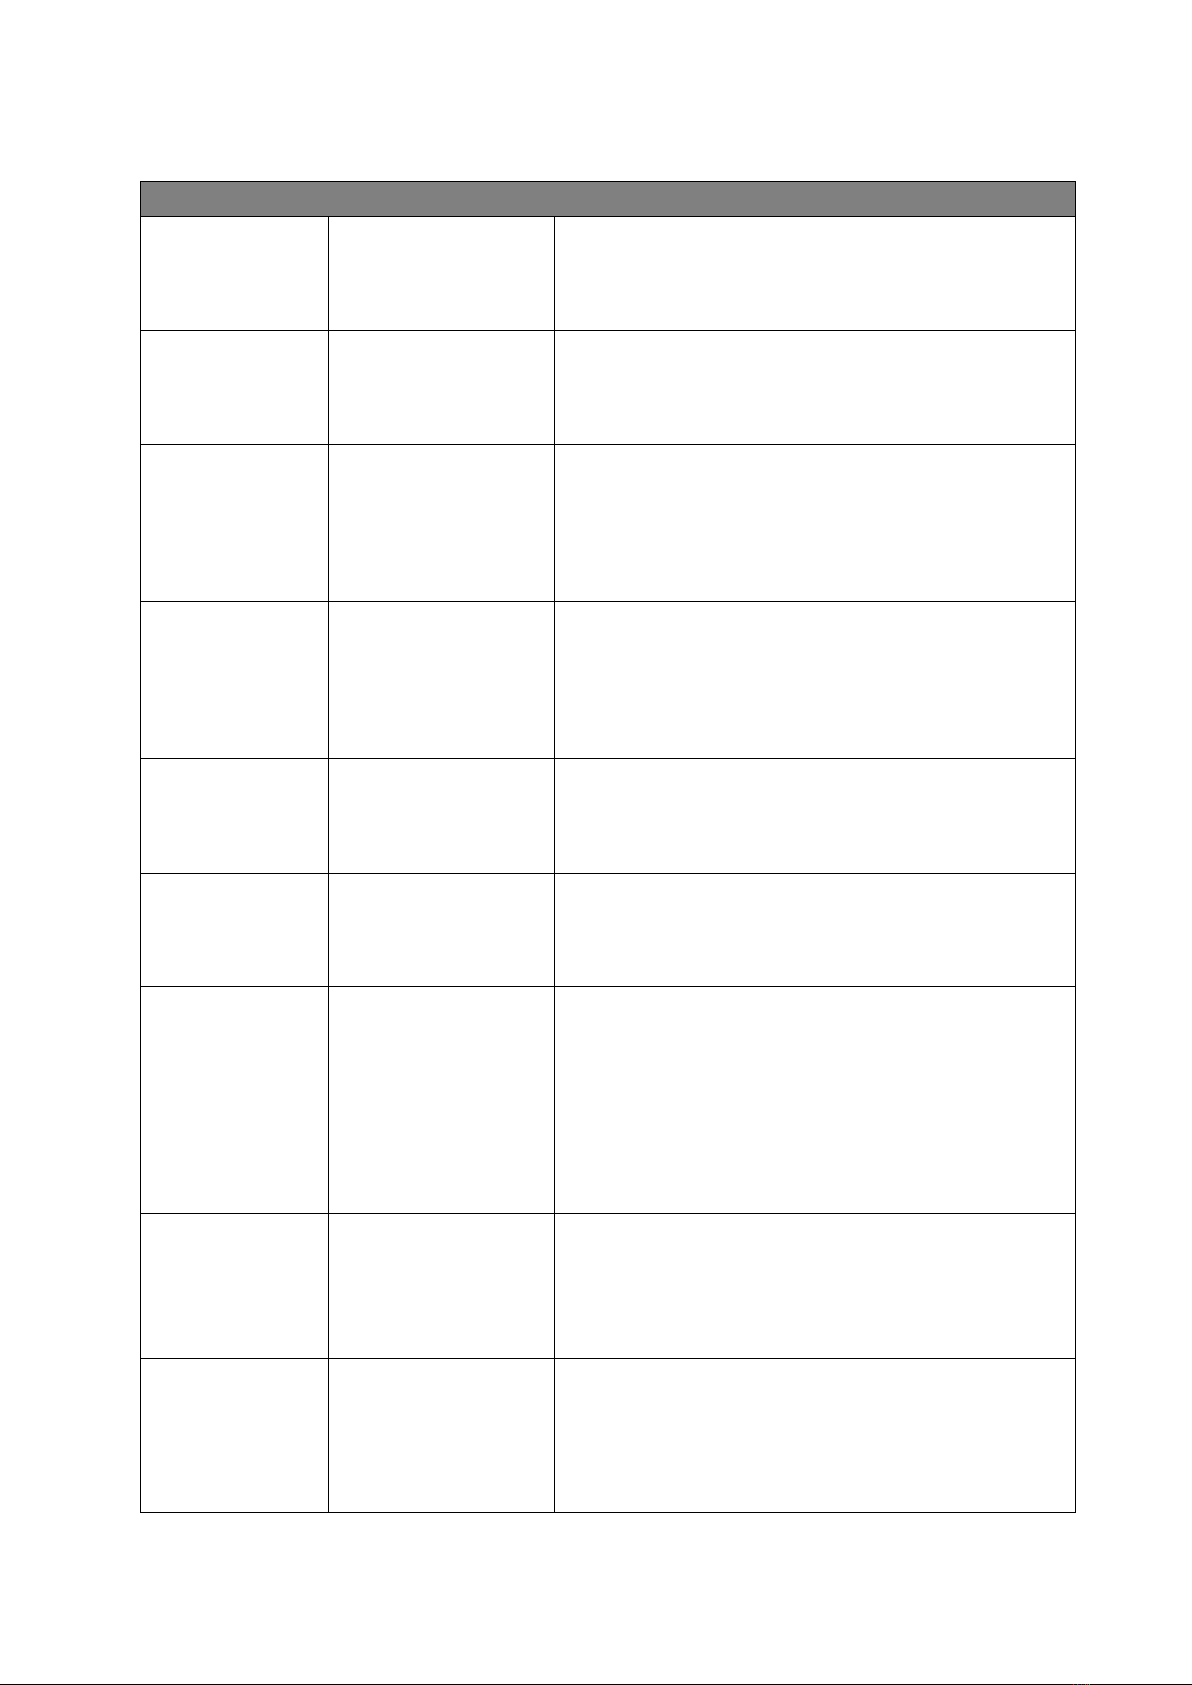
5.1 Connect the ventilator to a wide radiator (plates ≥ 69 mm apart)
1. Make sure that the ventilator (A) faces upwards, put it between the radiator plates and the magnets
will automatically stick to the radiator.
2. Identify a space where the radiator wall brackets and connecting clips are not in the way. Attach
the ventilator (A) at the bottom between the radiator plates with the adjustable magnets. The
ventilator (A) can also be attached on top of the radiator and under a cover. NOTICE Make sure the
fans still face upwards!
3. Connect the thermostat cable (C) and temperature sensor (E) to one of the ventilator (A) type C
connectors . Make sure the thermostat cable (C) and temperature sensor cable (E) are connected
to the Type C ports on the ventilator at the same side.
4. Attach the temperature sensor (C) with its adjustable magnets on the back of the radiator, close to
the heated water supply pipe, or on the pipe itself.

5. Connect the power adapter (D) with thermostat cable (C) to the wall socket.
6. On long radiators, connect additional ventilator (A) with the 50 cm connecting cables (B). Multiple
ventilator (A) (up to 10) can be connected to one power adapter (D). Additional temperature
sensors (E) or thermostat cable (C) are not required.
7. Turn on your central heating system. Wait for the Radiator Ventilator (A) to automatically turn on.
This happens when the radiator temperature reaches 32 °C. It automatically turns off when the
radiator cools down below 23 °C. The thermostat displays the radiator temperature it detects, you
can also manually set up the auto start and auto stop temperature by the buttons on the
thermostat.
IMPORTANT: please connect the ventilator (A) to the power supply after the thermostat controller and
temperature sensor cables are properly connected, to make sure ventilator (A) can be thermostat
controlled.
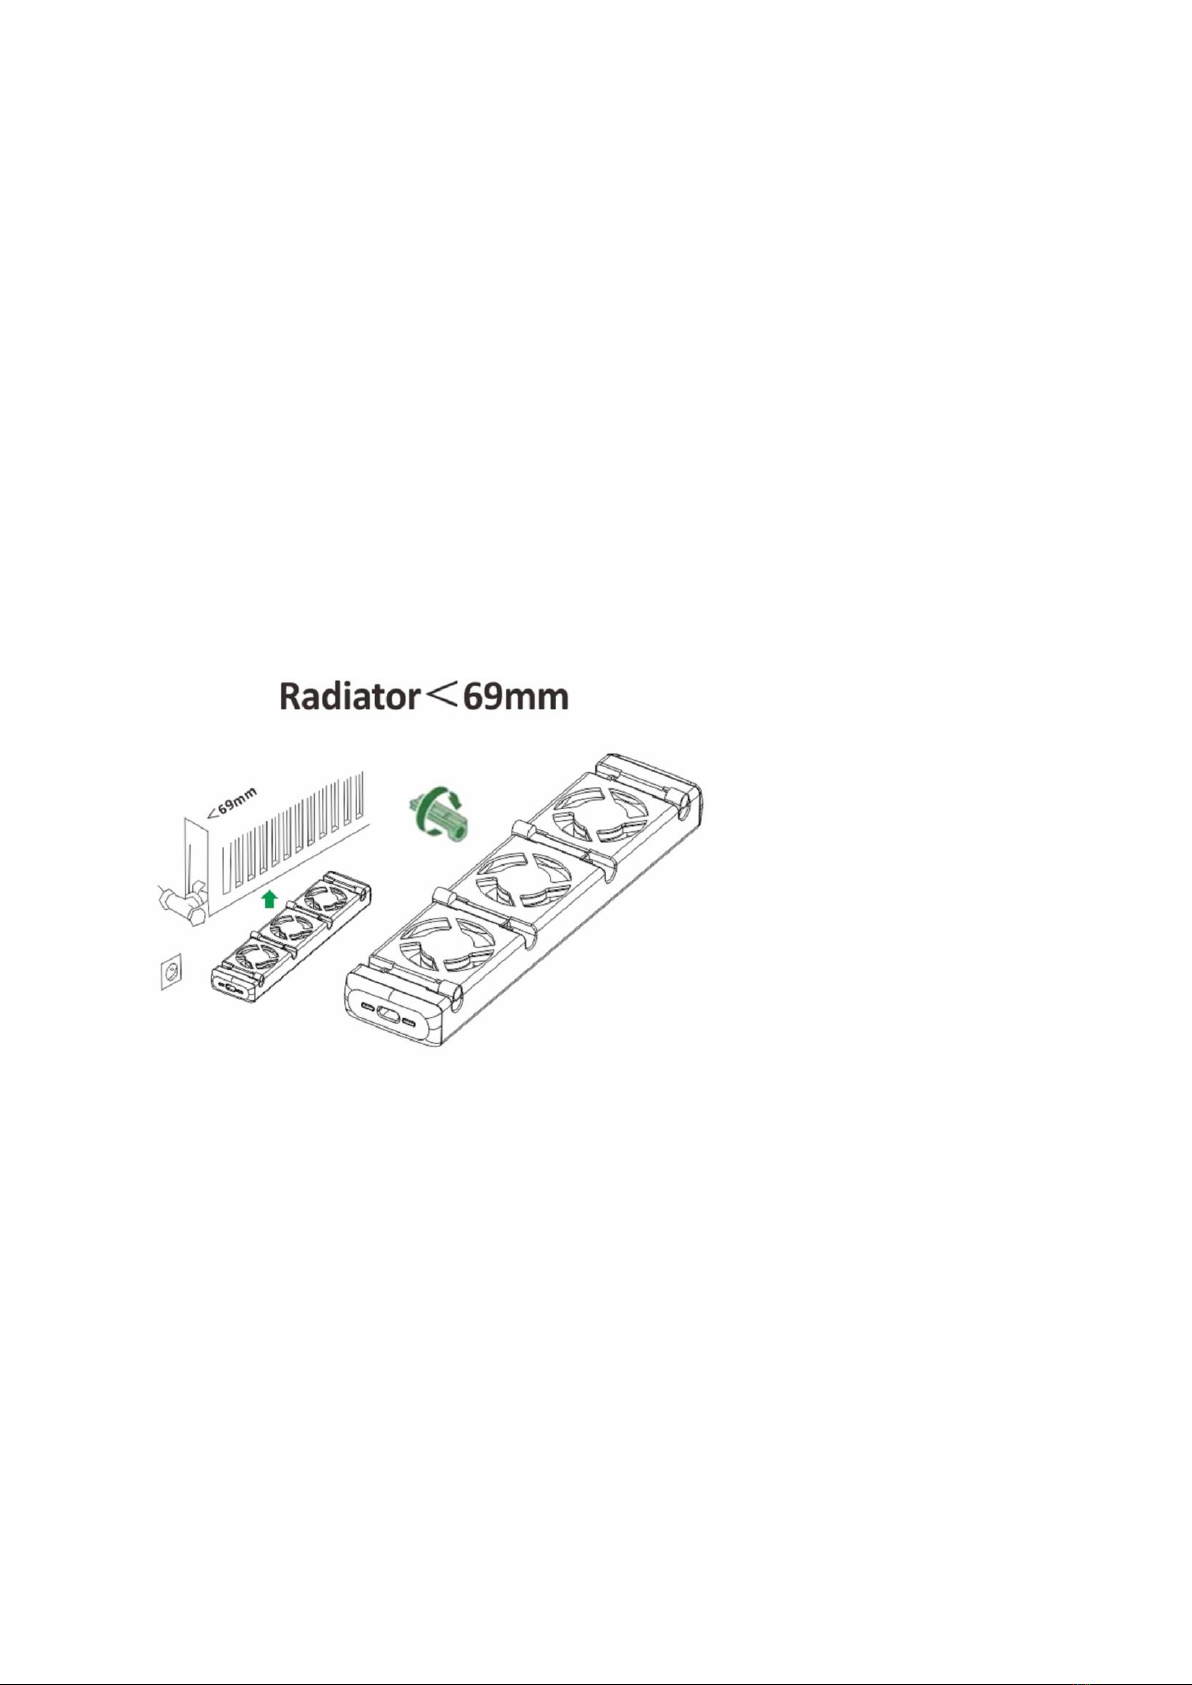
5.2. Connect the Radiator Ventilator to a narrow radiator (plates < 69 mm apart)
1. Turn the adjustable magnets until the magnet is on top, 2 magnets on one side, and two on the
other side.
2. Adjust the adjustable magnets to the correct width.
3. Repeat step 1 – 7 as for the wide radiator. Use the adjustable magnets to hang the Radiator
Ventilator (A) between the plates.

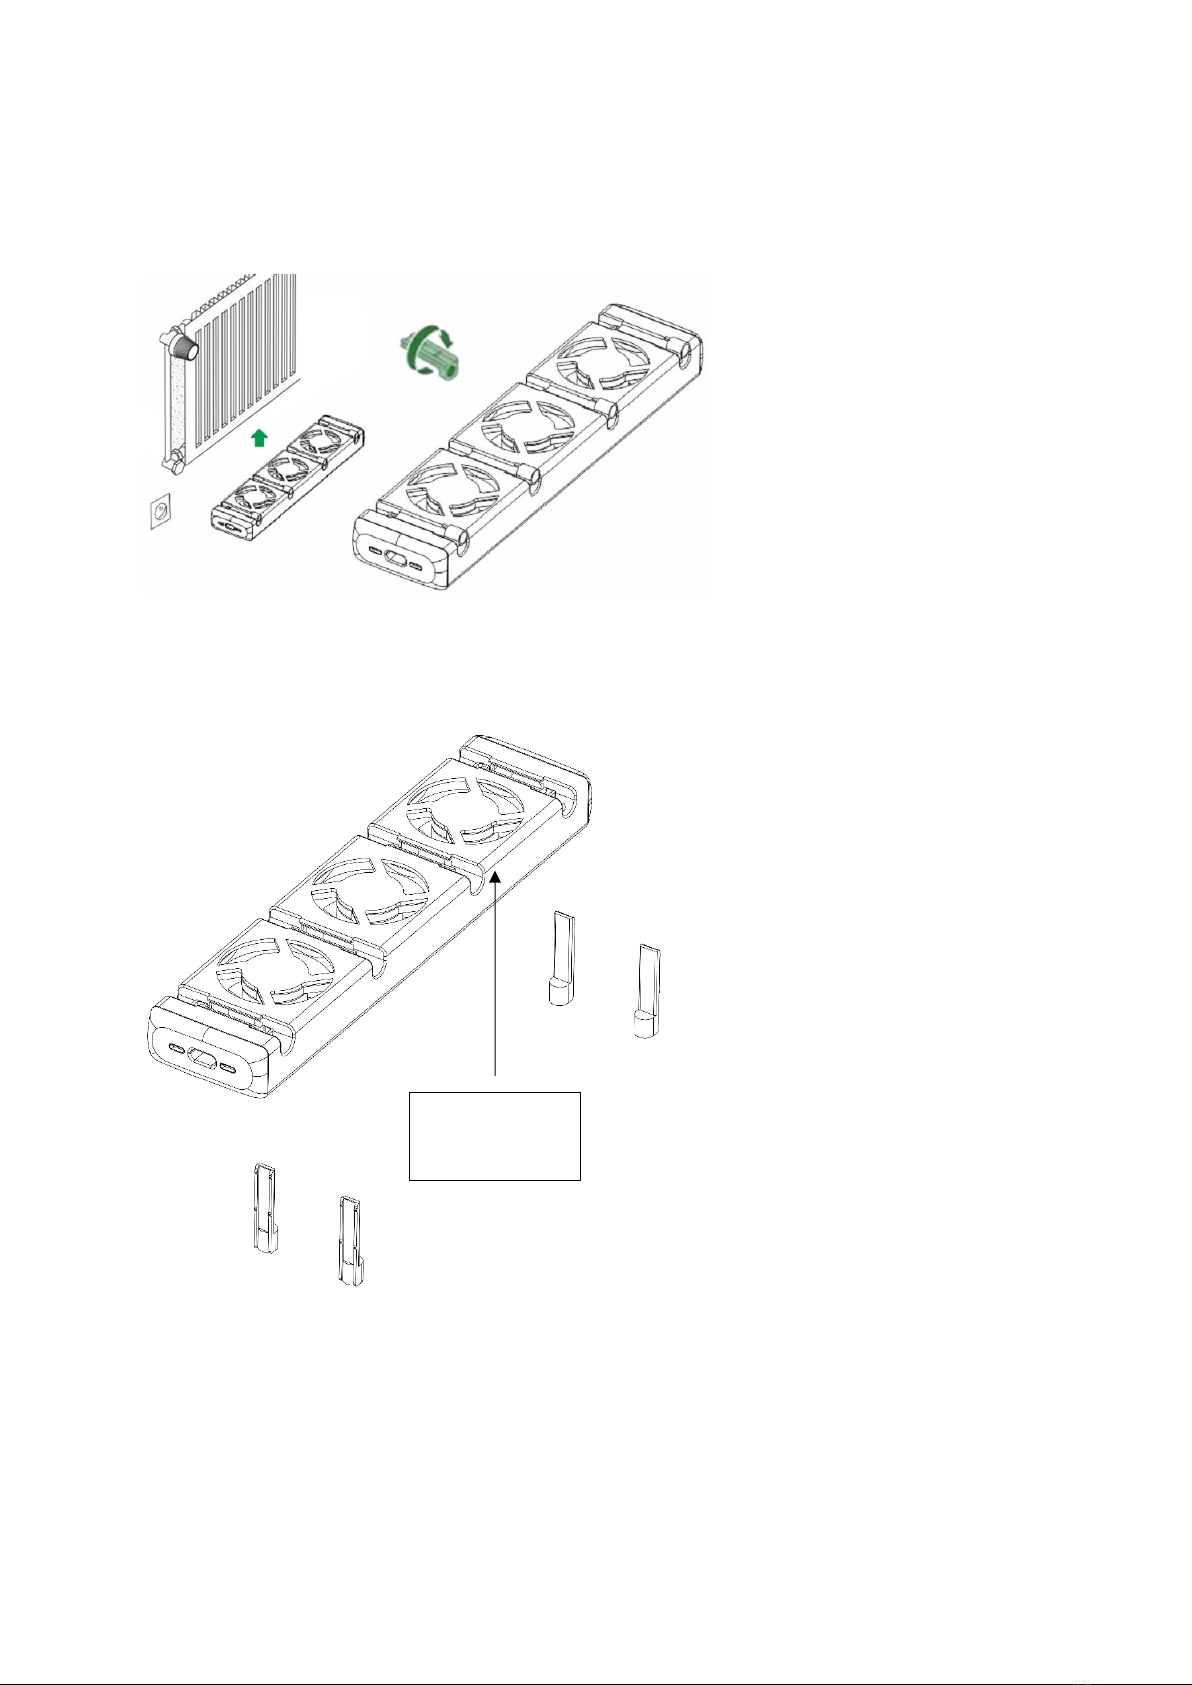
5.3 Connector the radiator ventilator to a single sided radiator
1. Adjust all the adjustable magnets to the same side of the Radiator Ventilator (A), and make sure
the magnets are at the edge.
2. Repeat step 1 – 7 as for the wide radiator.
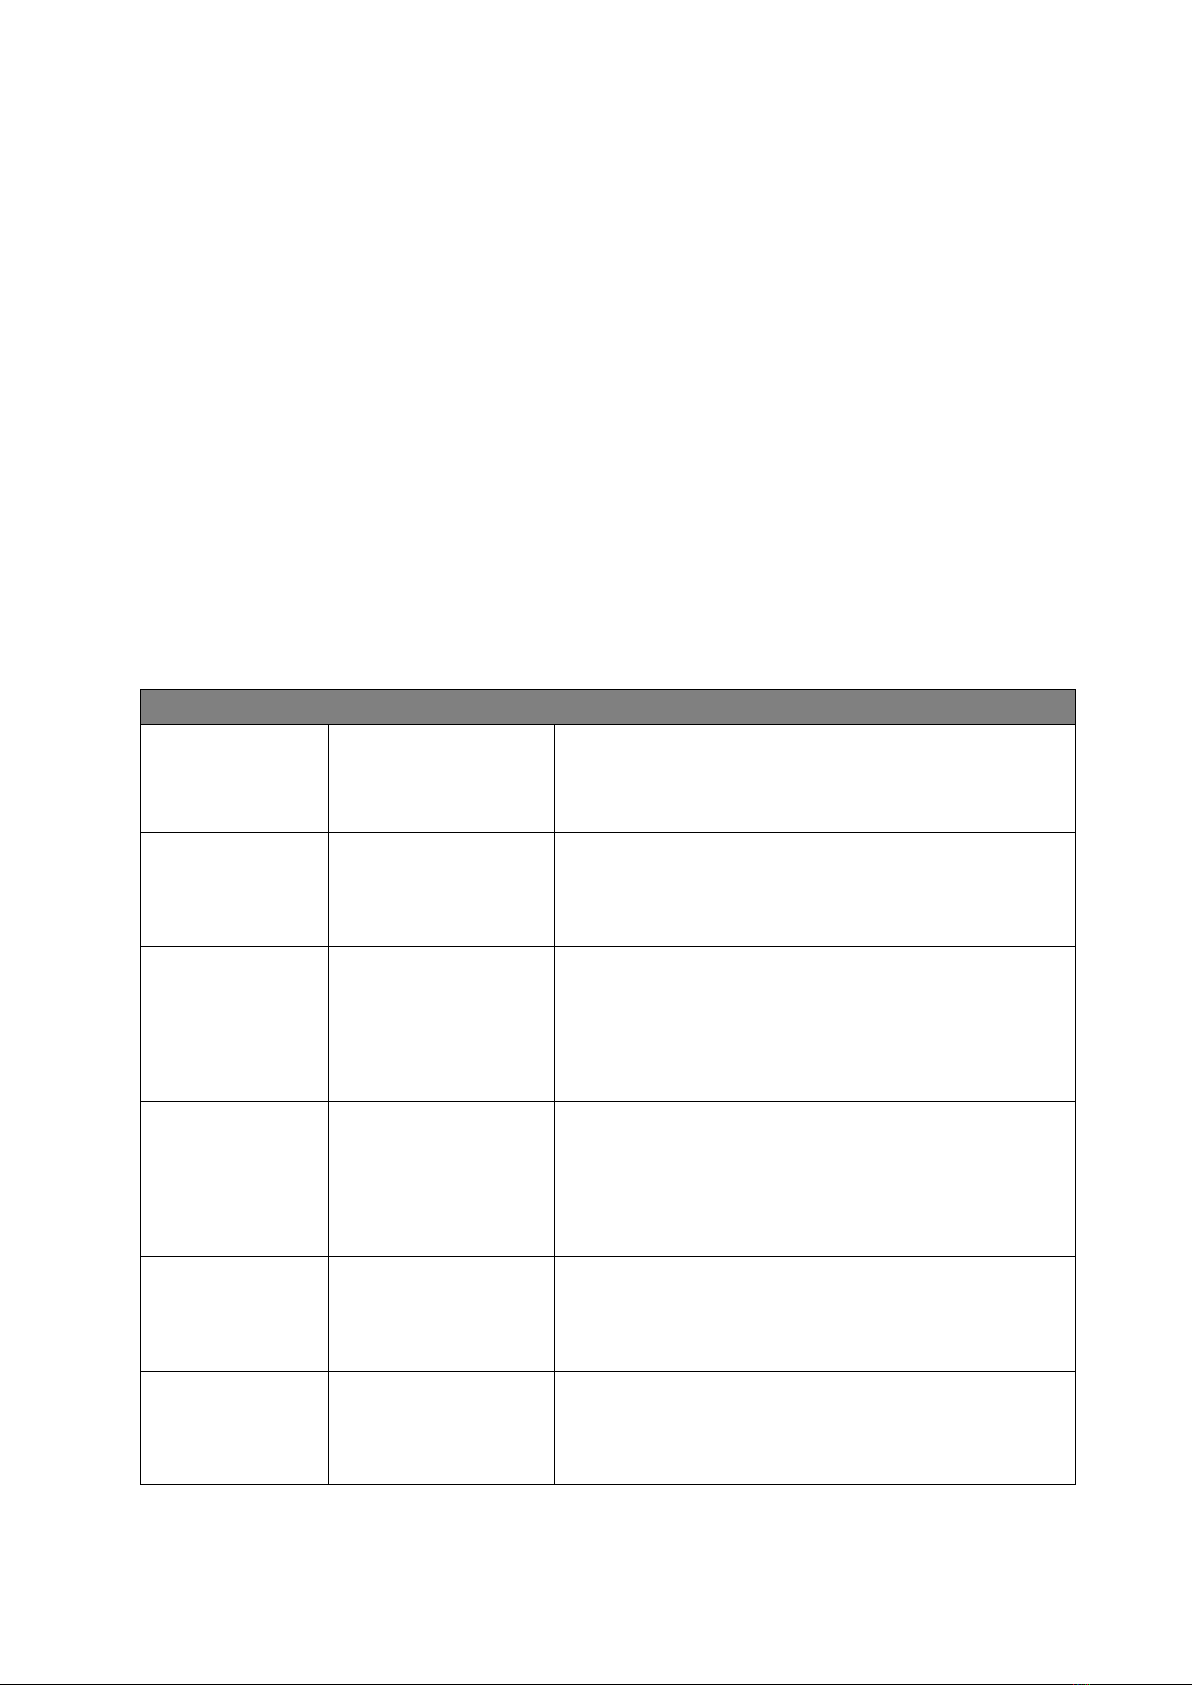
5.4 Connect the radiator ventilator to a convector
1. Attach the feet by pushing them into the slots of the Radiator Ventilator (A).
2. Make sure that the Radiator Ventilator (A) faces upwards.
3. Place the Radiator Ventilator (A) on top of the convector and allow space between the convector
sides and the Radiator Ventilator (A) to reduce noise. The Radiator Ventilator can also be placed on
the ground below the convector if space allows.
AIRFLOW
DIRECTION
4. If the convector block is made of magnetic material, the temperature sensor (C) can be easily
positioned on it with its magnets. The temperature sensor can also be clamped between two plates
of the convector block to ensure good heat transfer. The sensor can be attached to a copper pipe
or any other non-magnetic location using the provided Velcro.
5.5 For other radiators
1. Make the feet is vertical to the radiator fan. Put the radiator fan directly under the radiator. Make
sure the fans face upwards.
2. Follow the steps of 5.2.1 steps 3-7 to make the ventilator working.

SECTION 6: HOW TO SET THE THERMOSTAT
Normally, the display shows the temperature detected by the temperature sensor. If the temperature
sensor is not plugged in or damaged, the display shows 00.
1. Press and hold the left key (WORK/+) for 3 seconds to enter WORK temperature setting. The
temperature on display screen flashes. Now the left key (WORK/+) is the for increasing the
temperature and the right key (STOP/-) is the for decreasing the temperature, you may change the
temperature by pushing these 2 buttons, after setting, stop for 3 seconds and do not operate any
button. The temperature will be saved and exit the setting interface to return to the actual
temperature interface of the temperature sensor. (Note: the initial WORK temperature is 32 ℃.
When the temperature sensed by the temperature sensor is ≥32 ℃, the thermostat will enter
the WORK mode and the fan will start running.)
2. Press and hold the right key (STOP/-) for 3 seconds to enter STOP temperature setting, and the
temperature on display screen flashes. Now the left key (WORK/+) is the for increasing the
temperature and the right key (STOP/-) is the for decreasing the temperature, you may change the
temperature by pushing these 2 buttons. After setting, stop for 3 seconds without any operation
on the buttons, the temperature will be saved and exit the setting interface, and display the current
temperature detected by sensor. (Note: the initial STOP temperature is 23 ℃. When the
temperature detected by the temperature sensor is below 23 ℃, the thermostat will enter the
STOP state and the fan will stop working.)
3. The working temperature of the thermostat is between 0-60 ℃. (Notice: if there is no temperature
sensor or it is not working, the thermostat defaults to WORK status, that is, the fan works. If the
temperature is between 23-32 ℃ for the first use, the thermostat defaults to STOP status, that is,
the fan does not rotate.)
4. The WORK temperature set has to be higher than the STOP temperature. (i.e. when the WORK
temperature is set to 30°C, the STOP temperature can be set to 29°C maximum.)
5. Reset: hold both buttons of WORK and STOP for 3 seconds, the screen displays 88°C+WORK+STOP
and flashes for 3 times, and then exit to display the current temperature or display 00 if no
temperature is detected. The product is reset to default setting.
SECTION 7: HOW TO MAINTAIN THE RADIATOR VENTILATOR
7.1 Cleaning the product
The Radiator Ventilator and matching components can be cleaned if necessary. To clean the product:
1. Clean the product with a vacuum cleaner, when dirty. CAUTION! Make sure to use the lowest power
setting on the vacuum cleaner.
2. Clean the product with a damp cloth only if required. CAUTION! Make sure no water enters the
Radiator Ventilator through the fans.
7.2. Replacing components
If any components break, they must be replaced. CAUTION! Do not attempt to open, modify or repair
the product. To replace components:
1. Exchange broken components, still under warranty, at the supplier. The Radiator Ventilator has a
ten year guarantee and the power adapter has a 2 year warranty. NOTICE For safety- and control
reasons (CE), alterations or modifications of this product are not permitted.
2. Dispose of broken components that are not under warranty and buy new components.
SECTION 8: TROUBLE SHOOTING
Problem Cause Solution
Radiator Ventilator
(A) does not fit
between the radiator
plates.
It is a narrow radiator.
Follow the installation steps for the radiator ventilator on a narrow
radiator.
Radiator Ventilator
(A) does not fit at the
bottom of the
radiator.
There is too little space.
Place the Radiator Ventilator (A) on top of the radiator. This will not
influence performance. The bottom is only preferred as it is less
visible. Make sure the Radiator Ventilator (A) still faces upwards.
The Radiator
Ventilator
(A) need to be
attached at the top of
the radiator, but the
radiator has a cover.
NA
Place the Radiator Ventilator (A) underneath the cover. Keep in mind
that this exposes the Radiator Ventilator (A) to higher temperatures,
which may slightly limit its lifespan.
Cannot connect the
Radiator Ventilator (A)
to the wall socket.
The Radiator Ventilator (A)
was placed with the two
female connections on the
wrong side or the power
adapter cable is not long
enough.
Turn the Radiator Ventilator (A) around so that the two female
connections face in the other direction or connect the power adapter
cable to a power strip.
The temperature
sensor (E) cannot
reach the warm water
supply pipe.
The temperature sensor
cable is too short.
Buy an additional long cable and connect to the temperature sensor
cable. Else, the temperature sensor (E) may also be attached
anywhere of the radiator.
Cannot fit the
Radiator Ventilator (A)
between the wall and
single plate radiator.
The space is usually too
small (less than 70 mm).
Follow the single plate radiator installation steps. If there is not
enough space between the back of the radiator and the wall, please
attach the feet to the Radiator Ventilator (A) and position the product
on the floor below the radiator.
Radiator Ventilator (A)
did not turn on after it
was connected to the
wall socket.
The temperature sensor
(E) is not reaching 32 °C or
more or the Radiator
Ventilator (A) is not
receiving power.
- Make sure the radiator is at least 32 degrees.
- Make sure that temperature sensor (E) is attached to the warm
water supply pipe or close by to this pipe on the radiator where it gets
warm.
- Make sure that the temperature sensor (E) makes proper contact.
- If the radiator does not heat up properly, vent the central heating
system and consider doing hydronic balancing.
- Make sure that the wall socket works and that the power adapter
(D) is properly inserted.
The Radiator
Ventilator
(A) does not seem to
increase the radiator
heat output.
The Radiator Ventilator (A)
may be facing downwards.
This causes the air to flow
in the wrong direction;
against rather than with the
flow.
Turn the Radiator Ventilator (A) over so that the Radiator Ventilator
(A) is facing upwards. The top is the side where the fans are covered
with three white protective strips.
Do not save 30% on
the energy bill.
The central heating system
is not optimised enough or
the central heating system
has been functioning
optimally before
installation of the Radiator
Ventilators (A).
Optimise the central heating system by distributing the Radiator
Ventilators (A), adjusting the temperature set point and ensuring
hydronic balancing. If the central heating system has been
functioning optimally before the installation of the Radiator
Ventilators (A), it may not be possible to save 30%. User behaviour
can also have an impact on the maximum savings that can be
achieved.
Old cast iron radiator
or Single plate
radiator with plat
< 55 mm from wall.
Not one of the 5 types of
radiators mentioned.
Attach the feet to the Radiator Ventilator (A) and place on the floor
under the radiator.
The Radiator
Ventilator
(A) makes too much
noise when placed on
the convector.
This may be contact noise.
Make sure the Radiator Ventilator (A) does not touch any metal
pieces. For this reason the feet should also be attached.
The Radiator
Ventilator
(A) does not turn off
when the radiator is
off/cold.
The thermostat
(C) is not switching it off.
Make sure the Radiator Ventilator (A) is properly connected to a
thermostat (C) and temperature sensor (E).
SECTION 9: DISPOSAL
9.1. Disposal of the Product
The symbol on the product indicates that this product must not be treated as unsorted
municipal waste, but must be collected separately! Dispose of the product via a collection
point for the recycling of waste electrical and electronic equipment if you live within the
EU and in other European countries that operate separate collection systems for waste
electrical and electronic equipment. By disposing of the product in the proper manner, you
help to avoid possible hazards for the environment and public health that could otherwise
be caused by improper treatment of waste equipment. The recycling of materials contributes to the
conservation of natural resources. Therefore do not dispose of your old electrical and electronic
equipment with the unsorted municipal waste.
9.2. Disposal of Packaging Waste
Dispose of the packaging through your local recycling facilities. By disposing of the
packaging and packaging waste in the proper manner, you help to avoid possible hazards for
the environment and public health.

NL HANDLEIDING
Lees de instructies en de gebruikershandleiding zorgvuldig door voordat u het apparaat installeert of
gebruikt, en bewaar ze voor toekomstig gebruik. Deze handleiding maakt deel uit van het apparaat
en moet bij het apparaat worden bewaard. Bij doorverkoop van het apparaat, dient deze
gebruikershandleiding bij het product te worden meegeleverd. Bij onjuist gebruik of het niet
opvolgen van de veiligheidsinstructies is de fabrikant niet aansprakelijk voor de gevolgen hiervan en
vervalt het recht op garantie. Mocht u problemen ondervinden, neem dan contact op met een
gekwalificeerde servicemonteur voor hulp. Neem voor hulp of aanvullende informatie contact op
met een gekwalificeerde servicemonteur, de helpdesk of uw verkoper.
HOOFDSTUK 1: BESCHRIJVING VAN DE HANDLEIDING
Deze handleiding is bedoeld voor de eindgebruiker, de algemene huiseigenaar, die één of meer
ventilatoren op de radiators in zijn/haar huis wil installeren. De gebruiker heeft geen speciale
vaardigheden, opleiding of certificaat nodig om de ventilator te installeren.
HOOFDSTUK 2: VEILIGHEIDSWAARSCHUWINGEN
Lees en begrijp deze handleiding en de veiligheidsinstructies voordat je dit product gebruikt.
Volg alle instructies. Dit voorkomt brand, explosies, elektrische schokken of andere gevaren die kunnen
leiden tot schade aan eigendommen en/of letsel.
Het product dient alleen te worden gebruikt door personen die de inhoud van deze handleiding
volledig hebben gelezen en begrepen.
Zorg ervoor dat iedereen die het product gebruikt deze waarschuwingen en instructies heeft gelezen
en opvolgt.
Bewaar alle veiligheidsinformatie en instructies voor toekomstig gebruik en geef ze door aan de
volgende gebruikers van het product.
De fabrikant is niet aansprakelijk voor materiële schade of persoonlijk letsel veroorzaakt door onjuiste
omgang of niet-naleving van de veiligheidsinstructies. In dergelijke gevallen is de garantie ongeldig.

HOOFDSTUK 3: VEILIGHEIDSINSTRUCTIES
Lees en begrijp deze handleiding en de veiligheidsinstructies voordat je de ventilator en de
bijbehorende componenten gebruikt.
Veilig gebruik van het product
Veiligheidsinformatie voor kwetsbare personen
•Laat kinderen nooit alleen met het verpakkingsmateriaal. Er is risico op verstikking.
•Kinderen mogen nooit met het product spelen. Dit product is geen speelgoed.
•Installeer het product niet bij verminderde lichamelijke, zintuiglijke of mentale vermogens.
•Laat het product niet installeren door personen (inclusief kinderen) met verminderde lichamelijke,
zintuiglijke of mentale vermogens.
Veiligheidsinformatie met betrekking tot het beoogd gebruik
•Gebruik het product alleen als radiatorventilator door het te bevestigen aan een radiator. Volg
hiervoor de instructies in deze handleiding.
Productbeperkingen en restricties
•Gebruik geen scherpe voorwerpen in de buurt van de ventilatoren.
•Houd het product uit de buurt van open vuur, soldeerbouten of ander heet gereedschap omdat
dit het product kan beschadigen.
Veiligheidsinformatie voor installatie
•Til, behandel en vervoer het product uiterst voorzichtig.
•Let op en wees voorzichtig tijdens het installeren van een elektrisch product. Installeer het product
niet als je je niet goed kunt concentreren of als je kan flauwvallen of als je onder invloed bent van
medicijnen, alcohol of drugs.
•Voordat je de voedingsadapter aansluit op het stopcontact, moet je ervoor zorgen dat de lokale
spanning overeenkomt met de waarde op het product. De maximale toegestane spanning is 240
V.
•Sluit het product aan op een juist geïnstalleerd en makkelijk toegankelijk stopcontact. Zorg ervoor
dat het product op elk moment kan worden losgekoppeld van de voeding.
Veiligheidsinformatie met betrekking tot het gebruik
•Gebruik het product nooit buiten. Het product is alleen bedoeld voor gebruik binnen.
•Controleer alle componenten (inclusief snoeren) op schade voordat je het product installeert. Haal
direct de voedingsadapter uit het stopcontact bij zichtbare schade, een sterke geur of
oververhitting van de componenten.
Veiligheidsinformatie voor onderhoud
•Raak het product of de voedingsadapter nooit met natte handen aan.
•Houd het product uit de buurt van vocht. Wees voorzichtig bij het schoonmaken van het product
of de radiator waaraan het is bevestigd. Zorg ervoor dat er geen water in het product komt via de
ventilatoren.
Veiligheidsinformatie voor service en reparatie
•Open, modificeer of repareer het product niet. Wijzigingen of modificaties van het product zijn
niet toegestaan. Hierdoor vervalt de garantie.

HOOFDSTUK 4: BELANGRIJKSTE COMPONENTEN
D D
F AA
A
B
C
D
E
A. Radiatorventilator
B. 50 cm verlengsnoer met dubbele type C-aansluitingen
C. Thermostaat met aansluitsnoer, elk uiteinde 80 cm met type C-aansluiting, totaal 170 cm
D. Voedingsadapter
E. Temperatuursensor
SPECIFICATIE
Radiatorventilatorset
A+C+D+E)
(A+B+C+D+E)
(A+B+C+D+E)
Model: 5901600 (MXRV-01) - 8712757481743
Model: 5901620 (MXRV-02) - 8712757481767
Model: 5901630 (MXRV-03) - 8712757481774
Ingangsspanning: 100-240 V 50/60 HZ AC 350 MA
Enkele radiatorventilator voor
uitbreiding (A+B)
Model: 5901610 (MXRV-EXTENSION) - 8712757481750
Ingangsspanning: DC 5 V 0,2 A
Opmerking: De voedingsadapter in het pakket kan maximaal 10 ventilatoren van stroom
voorzien.
Vervaardigd in: China
HOOFDSTUK 5: AANWIJZINGEN VOOR GEBRUIK
Voor deze ventilator kunnen verschillende soorten radiators worden gebruikt
1. Brede radiator ≥ 69 cm
2. Smalle radiator < 69 cm
3. Radiator met één zijde
4. Convector
5. Andere radiators
5.1 Sluit de ventilator aan op een brede radiator (platen ≥ 69 mm van elkaar)
1. Zorg ervoor dat de ventilator (A) omhoog is gericht, plaats deze tussen de radiatorplaten en de
magneten hechten zich automatisch aan de radiator.
2. Identificeer een ruimte waar de muurbeugels van de radiator en aansluitklemmen niet in de weg
zitten. Maak de ventilator (A) met de verstelbare magneten vast aan de onderkant tussen de
radiatorplaten. De ventilator (A ) kan ook worden bevestigd aan de bovenkant van de radiator en
onder een afdekking. OPMERKING Zorg ervoor dat de ventilatoren nog steeds omhoog gericht zijn!
3. Sluit het thermostaatsnoer (C) en de temperatuursensor (E) aan op één van de type C-
aansluitingen van de ventilator (A). Controleer dat het thermostaatsnoer (C) en het snoer van de
temperatuursensor (E) zijn aangesloten op dezelfde zijde van de type C-poorten op de ventilator.
4. Bevestig de temperatuursensor (C) met de verstelbaremagneten op de achterkant van de radiator,
dicht bij de toevoerleiding voor verwarmd water of op de leiding zelf.
5. Sluit de voedingsadapter (D) met het thermostaatsnoer (C) aan op het stopcontact.
Radiatorbreedte ≥ 69 mm
6. Op lange radiators moet je een extra ventilator (A) verbinden met de 50 cm lange verlengsnoeren
(B). Er kunnen meerdere ventilatoren (A) (maximaal 10) worden aangesloten op één
voedingsadapter (D). Extra temperatuursensoren (E) of thermostaatsnoeren (C) zijn niet nodig.
7. Zet de centrale verwarming aan. Wacht totdat de radiatorventilator A automatisch aangaat. Dit
gebeurt wanneer de radiatortemperatuur 32°C bereikt. Deze gaat automatisch uit wanneer de
radiator afkoelt tot onder 23°C. De thermostaat geeft de radiatortemperatuur weer die hij
detecteert. Je kunt ook de temperatuur voor automatisch starten en automatisch stoppen
handmatig instellen door de knoppen op de thermostaat.
BELANGRIJK: sluit de ventilator (A) aan op de voeding nadat de thermostaatcontroller en de kabels
van de temperatuursensor er correct op zijn aangesloten, om er zeker van te zijn dat ventilator (A)
thermostaat gestuurd kan worden.
5.2 Sluit de radiatorventilator aan op een smalle radiator (platen < 69 mm van elkaar)
1. Draai de verstelbare magneten totdat de magneet bovenaan is, twee magneten aan één zijde en
twee aan de andere zijde.
2. Stel de verstelbare magneten af voor de juiste breedte.
3. Herhaal de stappen 1 –7 zoals bij de brede radiator. Gebruik de verstelbare magneten om de
radiatorventilator (A) tussen de platen te hangen.
5.3. Sluit de radiatorventilator aan op een radiator met één zijde
1. Stel alle verstelbare magneten af op dezelfde zijde van de radiatorventilator (A) en controleer dat
de magneten zich aan de rand bevinden.
2. Herhaal de stappen 1 –7 zoals bij de brede radiator.
5.4 Sluit de radiatorventilator aan op een convector.
1. Bevestig de pootjes door ze in de sleuven van de radiatorventilator (A) te duwen.
2. Controleer dat de radiatorventilator (A) omhoog wijst.
3. Plaats de radiatorventilator (A) aan de bovenkant van de convector en zorg voor ruimte tussen de
convectorzijden en de radiatorventilator (A) om lawaai de verminderen. De radiatorventilator kan
ook op de vloer worden geplaatst onder de convector als de ruimte dit toelaat.
RICHTING
LUCHTSTROOM

4. Als het convectorblok is gemaakt van magnetisch materiaal kan de temperatuursensor (C) er
gemakkelijk op worden geplaatst met de magneten. De temperatuursensor kan ook worden
vastgeklemd tussen twee platen van het convectorblok om een goede warmteoverdracht te
garanderen. De sensor kan worden bevestigd aan een koperen leiding of een nadere niet-
magnetische locatie met behulp van het meegeleverde klittenband.
5.5 Voor andere radiators
1. Zorg ervoor dat de pootjes verticaal staan ten opzichte van de radiatorventilator. Plaats de
radiatorventilator direct onder de radiator. Zorg ervoor dat de ventilatoren omhoog gericht zijn.
2. Volg de stappen 3-7 uit 5.2.1. zodat de ventilator werkt.

HOOFDSTUK 6: DE THERMOSTAAT INSTELLEN
Normaal gesproken toont het display de temperatuur die wordt gedetecteerd door de
temperatuursensor. Als de temperatuursensor niet aangesloten of kapot is, toont het display 00.
1. Houd de linkertoets (WORK/+) drie seconden ingedrukt om de temperatuurinstelling voor WORK
in te voeren. De temperatuur op het display knippert. Nu kan de linkertoets (WORK/+) worden
gebruikt voor het verhogen van de temperatuur en de rechtertoets (STOP/-) voor het verlagen van
de temperatuur. Je kan de temperatuur wijzigen door deze 2 knoppen in te drukken na het
instellen, stop drie seconden en raak geen enkele knop aan. De temperatuur wordt opgeslagen en
de instellingsinterface wordt verlaten om terug te keren naar de huidige temperatuurinterface van
de temperatuursensor. (Opmerking: de initiële WORK-temperatuur is 32°C. Wanneer de
temperatuur gedetecteerd door de temperatuursensor is ≥32°C gaat de temperatuur naar de
WORK-modus en begint de ventilator te werken.)
2. Houd de rechtertoets (STOP/-) drie seconden ingedrukt om de temperatuurinstelling voor STOP in
te voeren; de temperatuur op het display begint te knipperen. Nu kan de linkertoets (WORK/+)
worden gebruikt voor het verhogen van de temperatuur en de rechtertoets (STOP/-) voor het
verlagen van de temperatuur. Je kan de temperatuur wijzigen door deze twee knoppen in te
drukken. Als je na het instellen drie seconden de knoppen niet bedient, wordt de temperatuur
opgeslagen en wordt de instellingsinterface verlaten. Ook wordt de huidige temperatuur die
gedetecteerd wordt door de sensor weergegeven. (Opmerking: de initiële STOP-temperatuur is
23°C. Wanneer de temperatuur gedetecteerd door de temperatuursensor lager dan 23°C is, gaat
de temperatuur naar de status STOP en de ventilator stopt met werken.)
3. De bedrijfstemperatuur van de thermostaat is tussen 0-60°C. (Opmerking: als er geen
temperatuursensor is of deze niet werkt, gaat de thermostaat standaard naar de status WORK; dat
betekent dat de ventilator werkt. Als de temperatuur voor het eerste gebruik tussen 23-32°C ligt,
gaat de thermostaat standaard naar de status STOP; dat betekent dat de ventilator niet draait.)
4. De ingestelde WORK-temperatuur moet hoger zijn dan de STOP-temperatuur. (d.w.z. wanneer de
WORK-temperatuur is ingesteld op 30°C, kan de STOP-temperatuur worden ingesteld op maximaal
29°C.)
5. Reset: houd beide knoppen WORK en STOP 3 seconden ingedrukt, het scherm geeft
88°C+WORK+STOP weer en knippert 3 keer, en sluit vervolgens af om de huidige temperatuur weer
te geven of 00 weer te geven als er geen temperatuur wordt gedetecteerd. Het product wordt
teruggezet naar de standaardinstelling.
HOOFDSTUK 7: ONDERHOUDEN VAN DE RADIATORVENTILATOR
7.1 Het product schoonmaken
De radiatorventilator en bijbehorende componenten kunnen indien nodig worden schoongemaakt.
Het product schoonmaken:
1. Maak het vuile product schoon met een stofzuiger. VOORZICHTIG! Controleer dat je de laagste
vermogensinstelling van de stofzuiger gebruikt.
2. Maak het product alleen schoon met een vochtige doek als dit vereist is. VOORZICHTIG! Zorg
ervoor dat er geen water in de radiatorventilator komt via de ventilatoren.
7.2. Vervanging van componenten
Als er componenten breken, moeten deze worden vervangen. VOORZICHTIG! Open, modificeer of
repareer het product niet. Vervanging van componenten:
1. Verwissel gebroken componenten, die onder de garantie vallen, bij de leverancier. De
radiatorventilator heeft een garantie van tien jaar en de voedingsadapter heeft een garantie van
twee jaar. OPMERKING Om veiligheids- en controleredenen (CE) zijn wijzigingen of modificaties
van het product niet toegestaan.
2. Voer gebroken componenten af die niet onder de garantie vallen en koop nieuwe componenten.
HOOFDSTUK 8: PROBLEMEN OPLOSSEN
Probleem Reden Oplossing
Radiatorventilator (A)
past niet tussen de
radiatorplaten.
Het is een smalle radiator.
Volg de installatiestappen voor de radiatorventilator op een smalle
radiator.
Radiatorventilator
(A) past niet aan de
onderkant van de
radiator.
Er is te weinig ruimte.
Plaats de radiatorventilator (A) aan de bovenkant van de radiator. Dit
heeft geen invloed op de werking. De onderkant heeft alleen de
voorkeur omdat deze minder zichtbaar is. Controleer dat de
radiatorventilator (A) omhoog is gericht.
De radiatorventilator
(A) moet aan de
bovenkant van de
radiator worden
bevestigd, maar de
radiator heeft een
afdekking.
N.v.t.
Plaats de radiatorventilator (A) onder de afdekking. Houd er rekening
mee dat dit de radiatorventilator (A) blootstelt aan hogere
temperaturen, wat de levensduur van de radiatorventilator licht kan
verminderen.
De radiatorventilator
(A) kan niet worden
verbonden met het
stopcontact.
De radiatorventilator (A) is
geplaatst met de twee
vrouwelijke aansluitingen
aan de verkeerde zijde of
het snoer van de
voedingsadapter is niet
lang genoeg.
Draai de radiatorventilator (A) om zodat de twee vrouwelijke
aansluitingen de andere kant op gericht zijn of verbind het snoer van
de voedingsadapter met een contactdoos.
De temperatuursensor
(E) kan de
toevoerleiding voor
warm water niet
bereiken.
Het snoer van de
temperatuursensor is te
kort.
Koop een extra lang snoer en sluit dit aan op het snoer van de
temperatuursensor. Ook kan de temperatuursensor (E) ergens
anders op de radiator worden bevestigd.
De radiatorventilator
(A) kan niet tussen de
muur en de radiator
met enkele plaat
worden geplaatst.
De ruimte is meestal te
klein (minder dan 70 mm).
Volg de installatiestappen voor de radiator met enkele plaat. Als er
niet voldoende ruimte is tussen de achterkant van de radiator en de
muur, bevestig dan de pootjes van de radiatorventilator (A) en plaats
het product op de vloer onder de radiator.
This manual suits for next models
2
Table of contents
Languages:
Other livn Heater manuals


Popular Heater manuals by other brands


Toyotomi
Toyotomi RC-41F Type A user guide

DAY Useful Everyday
DAY Useful Everyday 69651 instruction manual

Feel-Maestro
Feel-Maestro MR 927 owner's manual

Modine Manufacturing
Modine Manufacturing IPT Series Installation and service manual

HELLER
HELLER PTC602BNS instruction manual

SKF
SKF EAZ Instructions for use


