LoadLok Frigowall 2D User guide

Frigowall 2D & 3D Mounting Instruction v1.0
Type:
Date: 01-06-2017
Version: 1.0
LoadLok® International B.V.
Oudewei 4
4004 LS TIEL
Nederland
T +31 (0)344-670 960
F +31 (0)344-722 960

page 2 of 42
Date : Jun-2017
Version : 1.0
Document history
Version
Status
Date
Author
Version
0.1
Concept
13 Jan 2017
0.1
0.5
Review
08 Mar 2017
0.5
0.6
Review
May 2017
0.6
1.0
Final
01 June 2017
Eelco Noort
1.0
Copyright © 2017 by Loadlok International
All rights reserved. No part of this publication may be reproduced, distributed, or
transmitted in any form or by any means, including photocopying, recording, or
other electronic or mechanical methods, without the prior written permission or the
publisher, except in the case of brief quotations embodied in critical reviews and
certain other non-commercial uses permitted by copyright law.

Date : Jun-2017
Version : 1.0
page 3 of 42
Contents
1Introduction ....................................................................................................................... 4
1.1 Preface ....................................................................................................................... 4
1.2 Common information ............................................................................................... 4
1.3 Notes to the operator............................................................................................... 4
1.4 Reading instructions.................................................................................................. 5
1.5 List with abbreviations............................................................................................... 5
2Safety ................................................................................................................................. 6
2.1 Signs on the product................................................................................................. 6
2.2 Signs in the manual ................................................................................................... 6
3Mounting the Frigowall track .......................................................................................... 7
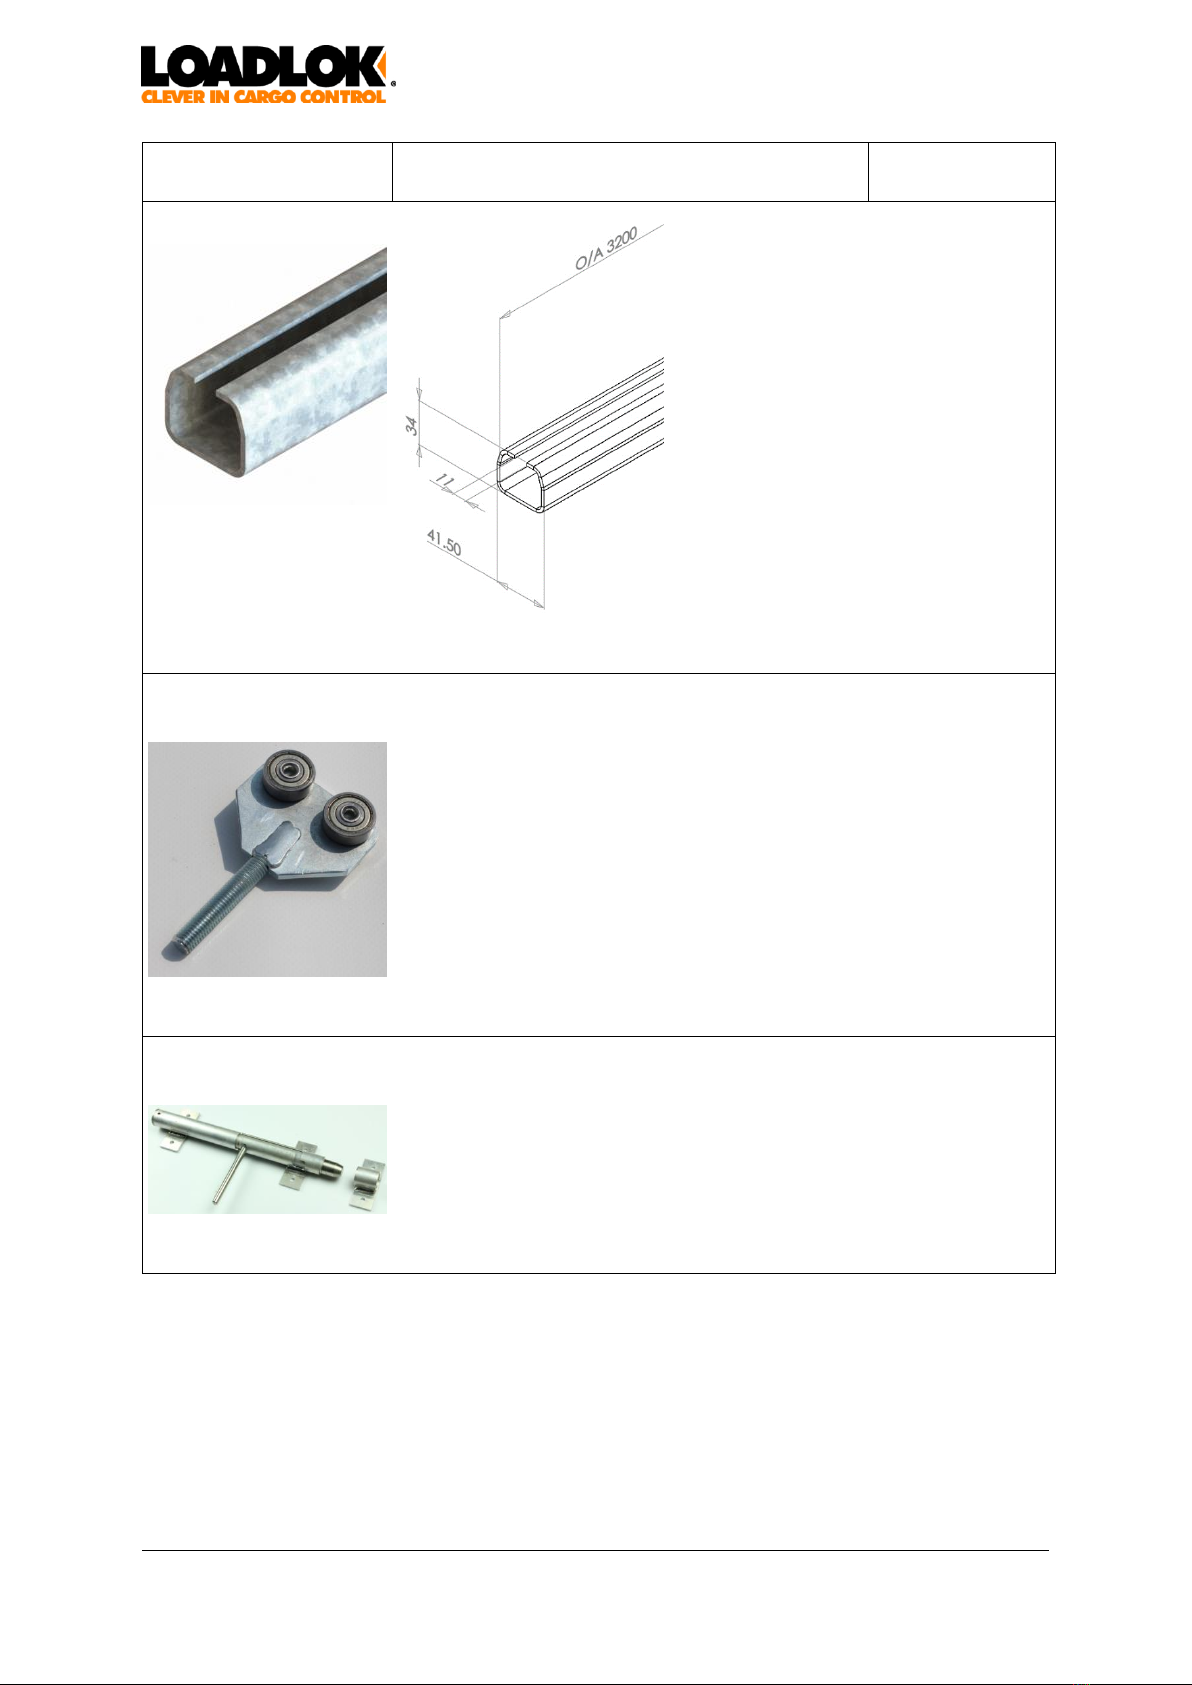
3.1 Parts needed ............................................................................................................. 7
3.1.1 Mandatory parts ................................................................................................ 7
3.1.2 Optional parts..................................................................................................... 9
3.1.3 Consumables.................................................................................................... 14
3.1.4 Parts to be supplied by yourself..................................................................... 15
3.2 Tools needed ........................................................................................................... 16
4Mounting the track......................................................................................................... 18
4.1 Mounting the U-profile (2D / 3D)........................................................................... 23
5Installation of the Frigowall in the vehicle ................................................................... 24
6Check the functionality of Frigowall............................................................................ 29
6.1 Floorstopper recessed ............................................................................................ 29
6.2 Adjust spring tension ............................................................................................... 30
6.3Check the break functionality .............................................................................. 32
6.4 Parking assistant (optional) .................................................................................... 34
6.5 Connecting the built-in fan ................................................................................... 36
6.5.1 Without the power supply kit.......................................................................... 36
6.5.2 With the power supply kit................................................................................ 37
6.6 Double Decking systems and Frigowall ............................................................... 39
7Maintenance .................................................................................................................. 41
8Document information .................................................................................................. 42

page 4 of 42
Date : Jun-2017
Version : 1.0
1INTRODUCTION
1.1 PREFACE
This operating manual is an essential aid for the correct and safe use of the insulation
partition walls.
This manual contains important information for reliable, proper and efficient use of
the insulating partitions. Adherence to the manual helps to avoid dangers, reduce
repair costs and downtime and increase the reliability and the lifetime of insulating
walls.
The instructions must be available to the operating personnel at all times. Any person
who is authorized to use the insulating walls reads the operating instructions before
use and then applies them accordingly.
1.2 COMMON INFORMATION
Do not expose the Frigowall to outside weather conditions, extreme temperatures
and direct sunlight.
Any change to the product makes the CE marking invalid. Please contact the
manufacturer, if a modification of the product is necessary.
Loadlok reserves the right, if not being met to the requirements, to withdraw the
guarantee of their product partially or entirely.
At the end of the lifecycle:
The end user can deliver the multi temp product to Loadlok. Loadlok provides
environmentally sound disposal of their product and recycles parts if these are fit for
reuse.
1.3 NOTES TO THE OPERATOR
This manual is an essential part of the insulating walls. The customer shall ensure that
the operator adheres these instructions.
Note that in addition to the instructions, the laws of the country of the place of use
are applicable and approved rules for accident prevention alongside with
approved technical regulations for safe and professional work shall apply.
Any change to the product makes the CE marking invalid. Please contact the
manufacturer, if a modification of the product is necessary.
The Frigowall is not a load securing device!

Date : Jun-2017
Version : 1.0
page 5 of 42
1.4 READING INSTRUCTIONS
WARNING:
This is a warning of a potentially hazardous situation, resulting in
moderate or minor injury and / or property damage if the
appropriate instruction is not followed exactly.
ATTENTION:
This is a reference to useful information for the safe and effective
use.
1.5 LIST WITH ABBREVIATIONS
Frigowall track
J-formed rail with locking holes to guide the Frigowall into the
trailer. (Type 3062)

page 6 of 42
Date : Jun-2017
Version : 1.0
2SAFETY
2.1 SIGNS ON THE PRODUCT
Type designation sign
Common information of the
Frigowall
Warning sign
Do not use the Frigowall as a
load securing device!
Warning sign
The balancer is a spring
activated device.
2.2 SIGNS IN THE MANUAL
WARNING:
This is a warning of a risk of danger, with the possible consequence
serious injury or death if the designated instruction is not exactly is
followed.
WARNING:
This is a warning of a potentially hazardous situation, resulting in
moderate or minor injury and / or property damage if the
appropriate instruction is not followed exactly.
ATTENTION:
This is a reference to useful information for the safe and effective
use.

Date : Jun-2017
Version : 1.0
page 7 of 42
3MOUNTING THE FRIGOWALL TRACK
3.1 PARTS NEEDED
3.1.1 Mandatory parts
Material
Measurements
Article number /
Description
Frigowall-track
14001332
3062 SS304 3200
Frigowall Track
Alternative article numbers with descriptions:
14001345
3062 PRE GALV 4400 Frigowall Track
14001340
3062 SS304 4400 Frigowall Track
14003604
3062 SS430 4400 Frigowall Track
10009470
3062 SS304 3200 CS Frigowall Track
14001344
3062 SS430 3200 Frigowall Track
14001329
3061 PG 3200 Frigowall Track
Notes:
Rubber end stop
11060164
Rubber endstop
extra hole
Notes: To be fitted on all ends. Is not accompanied with fasterners.

page 8 of 42
Date : Jun-2017
Version : 1.0
Material
Measurements
Article number /
Description
U-profile
12009613
Track U profile
L=3000mm pre-
galv
Notes: When applying 2D or 3D Frigowalls this article is mandatory
Double roller with
thread
12009514
Double roller
with thread
Notes: The roller guide which moves through the U-profile
Locking for Frigowall
2D and 3D
12009516
Locking for
Frigowall 2D
and 3D
Notes:

Date : Jun-2017
Version : 1.0
page 9 of 42
3.1.2 Optional parts
Material
Measurements
Article number /
Description
Steel stopper right
side
14003348
Steel stopper
rightside for
Bulkheads
Notes: Is delivered without fasteners
Steel stopper left side
14003346
Steel stopper
leftside for
Bulkheads
Notes: Is delivered without fasteners
Roller wheels on a
short axle
12009541
Roller wheels
axle 48mm
Notes:
Roller wheels on a
long axle
12009540
Roller wheels
axle 119mm
MK1

page 10 of 42
Date : Jun-2017
Version : 1.0
Material
Measurements
Article number /
Description
Notes:
Floorstopper recessed
11060149
Stainless steel
floorstopper
Notes:
Parking assistant
12009651
Parking assistant
MK4
Notes: It is advisable to mount 2 parking assistants in the Frigowall for stability of the
construction

Date : Jun-2017
Version : 1.0
page 11 of 42
Material
Measurements
Article number /
Description
Build on Floorstopper
12009425
Build on
Floorstopper
Notes:
Temperature
controlled fan
11060179
Frigowall 12V
Fan Digital with
switch.
(24V optional)
Notes: If the temperature controlled fan is built-in by Loadlok the connecting rod
between the balancers will be electrically insulated.

page 12 of 42
Date : Jun-2017
Version : 1.0
Material
Measurements
Article number /
Description
Air vent
11060155
Blind plate
square
Notes:
Slider for power
supply temperature
controlled fan
12009428
Stainless steel
sliding contact
Notes: If the temperature controlled fan is built-in by Loadlok the connecting rod
between the balancers will be electrically insulated.
Slider for power
supply temperature
controlled fan
12010053
Power Supply Kit
Multitemp 25+1
(25 isolators + 1
sliding
connector)
Notes: If the temperature controlled fan is built in by Loadlok the connecting rod
between the balancers will be electrically insulated.

Date : Jun-2017
Version : 1.0
page 13 of 42
Material
Measurements
Article number /
Description
Electrical guide track
14001370
Aluminium
Captive Track
2997mm
10009933
5002 AL 3000 CS
5.5 FH
POWERTRACK
Notes: These tracks are used in combination with the power pack.

page 14 of 42
Date : Jun-2017
Version : 1.0
3.1.3 Consumables
Material
Measurements
Article number /
Description
Rubber seal
12009404
Doorseal profile
L=2,7m PVC
spec
Notes:
Foot floorstopper
11060150
Stainless steel
foot with rubber
Notes:
Stainless steel bolt
12009264
Stainless steel
bolt M10x100
DIN 912
Notes: This bolt is used to mount and to adjust the foot floorstopper.

Date : Jun-2017
Version : 1.0
page 15 of 42
3.1.4 Parts to be supplied by yourself
Material
Measurements
Article number /
Description
Rivets
Max 5 mm diameter
N.A.
Notes: The length of the rivet is subject to the composition of the insulation wall of
the trailer.
This article is not in the delivery program of LoadLok.
Screw bolt
Max 5 mm diameter
N.A.
Notes: The length of the screw is subject to the composition of the insulation wall of
the trailer.
Flathead optional: holes counter sunk for flush mounting. If this is a preference for
mounting the Frigowall track, the mounting holes can be made counter sunk.
This article is not in the delivery program of LoadLok.

page 16 of 42
Date : Jun-2017
Version : 1.0
3.2 TOOLS NEEDED
Blind rivet pliers
Wrench
Spirit level tool
Allen key
Measuring
tape
Extended
wrench
24mm hex
1/2 inch
SAP 20000812

Date : Jun-2017
Version : 1.0
page 17 of 42
Pipe wrench
Socket wrench

page 18 of 42
Date : Jun-2017
Version : 1.0
4MOUNTING THE TRACK
ATTENTION:
The procedure as described here must be performed twice, once
on the left hand side and once on the right hand side of the
trailer.
1.
Measure the effective length of track to be used.
2.
For smooth running of the
balancer trolley wheels over
several tracks LoadLok advises
to weld the tracks in the joining
point in such way the balancer
or trolley wheels never can
interfere with the weld.
Make sure that the end edges of
the rails are straight, so that the
wheels of the vehicle can run
continuous smoothly.
3.
If the Frigowall-track is to be shortened, please leave enough material length in
order to fasten the rubber end-stop with its steel cover plate.
ATTENTION:
Loadlok advises to use adhesive between the Frigowall track
and side walls which is fit for this purpose.

Date : Jun-2017
Version : 1.0
page 19 of 42
4.
Insert the guide rails in the outer
left or right side of your vehicle.
Install the rails vertical (both to
the wall and also to the ceiling).
5.
Measure the distance from the
floor to the Frigowall track on
both ends of the track.
The difference must be less than
0.5 mm as is shown in illustration.
6.
Measure the distance between
the tracks in the vehicle, like is
shown in illustration.
The difference must be less than
0.5 mm.
7.
The locking holes must be
parallel.
The difference must be less than
0.5 mm.

page 20 of 42
Date : Jun-2017
Version : 1.0
ATTENTION:
Maintain the Frigowall-track on level!
The tolerance for smooth running is < 0.5 mm!
8.
Use all mounting holes with a rivet or a screw bolt.
ATTENTION:
When using rivets:
Please fasten the Frigowall track to a minimum length of 750
mm with bolts for maintenance purposes of the Frigowall door.
These sections must be opposite to each other!
ATTENTION:
Wait until the adhesive is fully hardened. Only then proceed
with rolling the Frigowall assembly into the track.
9.
In the case the trailer is reinforced in the edges with corner profiles:
The corner profile is shown in
blue colour.
This manual suits for next models
1
Table of contents