LOTRONIC Ibiza Light LEDSPOT10W User manual

FR - MANUEL D'UTILISATION - P. 3
DE - BEDIENUNGSANLEITUNG - S. 5
NL - HANDLEIDING - P. 6
ES - MANUAL DE USO - P. 7
SI - NAVODILA ZA UPORABO - S. 8
RO - MANUAL DE UTILIZARE - P. 10
FUNCTION DESCRIPTION & CHANNEL CHART - P. 11
Ref.
LEDSPOT10W (15-1097)
LED SPOT LIGHT
MANUAL
Imported from China by LOTRONIC S.A.
Avenue Zénobe Gramme 9
B-1480 Saintes
View the item on our website

Manual - LEDSPOT10W
2
©Copyright LOTRONIC 2019
INSTRUCTION MANUAL
EXPLANATION OF SYMBOLS
The unit complies with CE standards
For indoor use only
Don’t stare into the light beam
SAFETY INSTRUCTIONS
• Please read these instructions carefully, they include important information about the installation, usage and
maintenance of this product.
• Always make sure that you are connecting to the proper voltage, and that the line voltage you are connecting
to is not higher than that stated on the decal or rear panel of the xture.
• This product is intended for indoor use only!
• To prevent risk of re or shock, do not expose xture to rain or moisture. Make sure there are no ammable
materials close to the unit while operating.
• The unit must be installed in a location with adequate ventilation, at least 50cm from adjacent surfaces. Be
sure that no ventilation slots are blocked.
• Maximum ambient temperature (Ta) is 40°C. Do not operate the xture at temperatures higher than this.
• In the event of a serious operating problem, stop using the unit immediately. Never try to repair the unit by
yourself. Repairs carried out by unskilled people can lead to damage or malfunction. Please contact the near-
est authorized technical assistance center. Always use the same type of spare parts.
• Avoid direct eye exposure to the light source while it is on.
• The product is for decorative purposes only and not suitable as a household room illumination.
• The light source of this device is not replaceable. If it is defective, the entire unit must be discarded.
FEATURES:
• Display of running time
• Temperature control
• Manual Focus
HOW TO CONTROL THE UNIT
Access control panel functions using the four panel buttons located directly underneath the LCD Display.
Button Function
MENU Used to access the menu or to return to a previous menu option
UP Scrolls through menu options in ascending order
DOWN Scrolls through menu options in descending order
ENTER Used to select and store the current menu or option within a menu
MOUNTING
1. The spot light can be put everywhere, but you must leave a distance of at least 0.5m between the spot light
and an object. Keep the light stable
2. Connection to a DMX controller: The DMX512 signal must be connected to the INPUT and OUTPUT sockets
of the unit. Keep the cable run as short as possible in order to avoid signal losses and interference from other
units. The cable length should not be longer than 100m.
3. Use an standard 3-pin XLR lead to connect the unit to a DMX controller. The XLR connector is wired as
follows:
XLR WIRING
Pin 1 = Ground
Pin 2 = Data Compliment (negative)
Pin 3 = Data True (positive)
4. The focus can be set manually.
5. Display of running time (Press Down and Enter button)
UP DOWN
MENU ENTER
8.8.8.8.

Manual - LEDSPOT10W
3
www.ibiza-light.com
FR
SPECIFICATIONS
Input voltage......................................................................................................................................12V 3A
Light source .......................................................................................................................1x 10W RGBW LED
Power ........................................................................................................................................................13W
Rated life time of LED .................................................................................................50,000 operating hours
DMX channels ................................................................................................................................................6
Functions......................................................................................DMX, Auto-run Sound control, Master/slave
Net weight ..............................................................................................................................................0.6kg
Packing size .......................................................................................................................142 x 90 x 138mm
FIXTURE CLEANING
The cleaning of internal and external optical lenses and/or mirrors must be carried out periodically to optimize
light output. Cleaning frequency depends on the environment in which the xture operates: damp, smoky or
particularly dirty surrounding can cause greater accumulation of dirt on the unit’s optics.
• Clean with soft cloth using normal glass cleaning uid.
• Always dry the parts carefully.
• Clean the external optics at least every 20 days. Clean the internal optics at least every 30/60 days.
IMPORTANT NOTE: Electric products must not be put into household waste. Please bring them to a recycling centre. Ask your local au-
thorities or your dealer about the way to proceed.
MANUEL D’UTILISATION
EXPLICATION DES SYMBOLES
En conformité avec les exigences de la norme CE
Utilisation uniquement à l’intérieur
Ne pas regarder directement dans le rayon lumineux
CONSIGNES DE SÉCURITÉ
• Lisez attentivement ce manuel qui contient des informations importantes sur l’installation, l’utilisation et l’en-
tretien de cet appareil.
• Assurez-vous que la tension secteur convient à cet appareil et qu’elle ne dépasse pas la tension d’alimenta-
tion indiqué sur la plaque signalétique de l’appareil.
• Uniquement pour utilisation à l’intérieur!
• An d’éviter tout risque d’incendie ou de choc électrique, ne pas exposer cet appareil à la pluie ou à l’humidi-
té. Assurez-vous qu’aucun objet inammable ne se trouve à proximité de l’appareil pendant son fonctionne-
ment.
• Installez l’appareil à un endroit bien ventilé à une distance minimum de 50cm de toute surface. Assurez-vous
que les fentes de ventilation ne sont pas bloquées.
• La température ambiante ne doit pas dépasser 40°C. Ne pas faire fonctionner l’appareil à des températures
supérieures.
• En cas de dysfonctionnement, arrêtez immédiatement l’appareil. N’essayez jamais de réparer l’appareil par
vous-même. Une réparation mal faite peut entraîner des dommages et des dysfonctionnements. Contactez un
service technique agréé. Utilisez uniquement des pièces détachées identiques aux pièces d’origine.
• Ne pas exposer vos yeux à la source lumineuse.
• La source lumineuse de cet appareil n’est pas remplaçable. Si elle est défectueuse, l’appareil entier doit être
mis au rebut.
CARACTÉRISTIQUES :
Cet appareil petit et facile à installer peut être amené partout.
• Achage du temps d’utilisation
• Contrôle de température
• Mise au point manuelle

Manual - LEDSPOT10W
4
©Copyright LOTRONIC 2019
PANNEAU DE COMMANDE
Le panneau de commande comporte 4 boutons et un acheur à LED de 4 digits.
UP DOWN
MENU ENTER
8.8.8.8.
Touche Fonction
MENU Accès au menu ou retour vers une option précédente du menu
UP Délement des options du menu dans un ordre croissant
DOWN Délement des options du menu dans un ordre décroissant
ENTER Sélection et enregistrement du menu ou de l’option dans un menu
1. Vous pouvez installer le projecteur à l’emplacement de votre convenance mais il faut respecter une distance
minimum de 50cm entre le projecteur et l’objet. Le projecteur doit être installé d’une manière stable.
2. Branchement sur une commande DMX: Le signal DMX512 doit être branché au moyen d’un cordon XLR
standard à 3 contacts sur la fiche INPUT et OUTPUT de l’appareil. Ne pas dépasser des longueurs de câbles de
plus de 100m afin d’éviter des pertes de signal et des interférences d’autres appareils.
3. Câblage XLR
Conguration de la che XLR
Broche 1 = Masse
Broche 2 = Signal (-)
Broche 3 = Signal (+)
4. La mise au point est manuelle.
5. Affichage du temps passé (Appuyez sur les touches Down et Enter)
CARACTÉRISTIQUES TECHNIQUES
Alimentation ......................................................................................................................................12V 3A
Source de lumière............................................................................................................ 1 LED RVBB de 10W
Consommation..........................................................................................................................................13W
Durée de vie de la LED .............................................................................. 50.000 heures de fonctionnement
Canaux DMX ..................................................................................................................................................6
Fonctions.........................................................................................DMX, Automatique, audio, Maître/Esclave
Poids brut................................................................................................................................................0,6kg
Dimensions ........................................................................................................................142 x 90 x 138mm
NETTOYAGE DE L’APPAREIL
Nettoyez régulièrement les lentilles internes et externes e/ou miroirs an d’optimiser la puissance lumineuse.
• Utilisez un chion doux et du nettoyant à vitres classique.
• Séchez toutes les pièces soigneusement.
• Nettoyez les optiques externes au moins une fois toutes les 3 semaines et les optiques internes tous les 1-2
mois.
Ce symbole signie que cet appareil ne doit être mis aux déchets ménagers dans aucun pays de la Communauté européenne an d’éviter de
nuire à l’environnement et à la santé humaine. Il convient d’en disposer d’une manière responsable an de promouvoir la réutilisation
des matériaux. Pour retourner votre appareil usagé, merci d’utiliser les systèmes de retours et de ramassage mis en place ou de contac-
ter votre revendeur chez qui vous avez acheté l’appareil. Ils peuvent reprendre cet appareil pour un recyclage écologique.
BEDIENUNGSANLEITUNG
ZEICHENERKLÄRUNG
Entspricht den Richtlinien der CE
Nur für Innengebrauch
Niemals direkt in den Lichtstrahl blicken
SICHERHEITSHINWEISE
• Diese Anleitung sorgfältig vor der ersten Inbetriebnahme lesen. Sie enthält wichtige Informationen über Instal-
lation, Gebrauch und Instandhaltung des Geräts.
• Stets die Netzspannung vor Anschluss des Geräts überprüfen Sie muss mit der auf der Rückseite des Geräts

Manual - LEDSPOT10W
5
www.ibiza-light.com
DE
angegebenen Spannung übereinstimmen und darf auf keinen Fall höher sein.
• Dieses Gerät ist nur für Innengebrauch!
• Das Gerät vor Regen und Feuchtigkeit schützen. Keine brennbaren Materialien während des Betriebs in der
Nähe des Geräts lassen.
• Das Gerät muss an einem gut belüfteten Ort und in mindestens 50cm Entfernung zur nächsten Fläche ange-
bracht werden. Darauf achten, dass die Belüftungsschlitze nicht blockiert oder verstopft sind.
• Die Raumtemperatur darf 40°C nicht überschreiten. Das Gerät niemals bei höheren Temperaturen betreiben.
• Bei Betriebsstörungen das Gerät sofort ausschalten. Das Gerät niemals selbst reparieren. Reparaturen dürfen
nur von einem Fachmann vorgenommen werden. Alle verwendeten Ersatzteile müssen mit den Originalteilen
identisch sein.
• Die Lichtquelle dieses Gerätes ist nicht austauschbar. Bei einem Defekt muss das gesamte Gerät entsorgt
werden.
• Niemals direkt in die Lichtquelle blicken.
Features:
• Anzeige der Betriebsdauer
• Temperaturregler
• Manuelle Scharfeinstellung
BEDIENFELD
Das Bedienfeld besitzt 4 Tasten und ein 4-stelliges LED Display.
Die Funktionen sind über die vier Tasten unterhalb des Displays zugänglich.
UP DOWN
MENU ENTER
8.8.8.8.
Taste Funktion
MENU Gibt Zugang zum Menü oder schaltet zurück zum vorigen Menü
UP Durchlauf durch die Optionen in aufsteigender Reihenfolge
DOWN Durchlauf durch die Optionen in rückläuger Reihenfolge
ENTER Zur Auswahl und Speicherung des laufenden Menüs oder der Op-
tion im Menü
MONTAGE
1. Der Strahler kann überall angebracht werden. Es muss jedoch ein Sicherheitsabstand von mindestens 0,5m
zwischen dem Strahler und dem Gegenstand eingehalten werden. Den Strahler so anbringen, dass er keinen
Bewegungen oder Erschütterungen ausgesetzt wird.
2. Anschluss an einen DMX Controller: Das DMX512 Signal muss an die INPUT (Eingang) Buchse bzw. OUTPUT
(Ausgang) Buchse (falls mehrere Geräte kettenweise angeschlossen werden) des Geräts angeschlossen
werden. Die Kabellängen müssen so kurz wie möglich gehalten werden, um Signalverlust und Störungen von
anderen Geräten zu vermeiden. Die Kabel dürfen auf keinen Fall länger als 100m sein.
3. Das Gerät über ein 3-poliges Standard XLR Kabel an den DMX Controller wie folgt anschließen:
XLR Belegung
Pin 1 = Masse
Pin 2 = Negativ
Pin 3 = Positiv
4. Die Scharfeinstellung erfolgt manuell.
5. Anzeige der Betriebszeit (Auf Down und Enter drücken)
TECHNISCHE DATEN
Versorgungsspannung .......................................................................................................................12V 3A
Leuchtmittel.......................................................................................................................1x 10W RGBW LED
Verbrauch .................................................................................................................................................13W
Lebensdauer der LEDs ...............................................................................................50.000 Betriebsstunden
DMX Kanäle....................................................................................................................................................6
Funktionen ...................................................................................DMX, Automatik, Audioregler, Master/Slave
Gewicht...................................................................................................................................................0,6kg
Abmessungen ....................................................................................................................142 x 90 x 138mm

Manual - LEDSPOT10W
6
©Copyright LOTRONIC 2019
NL
REINIGUNG DES GERÄTS
Regelmäßig die Linsen des Geräts reinigen, um eine optimale Leuchtkraft zu erhalten. Die Häugkeit hängt von
den Betriebsumständen ab. In einer feuchten, rauchigen oder staubigen Umgebung sammelt sich mehr Schmutz
an.
• Die Linsen mit einem weichen Tuch und normalem Glasreiniger abwischen.
• Alle Teile sorgfältig trocknen.
• Die Linsen mindestens einmal alle 3 Wochen reinigen. Die Innenseite der Linsen alle 1-2 Monate.
Dieses Zeichen bedeutet, dass das Gerät innerhalb der europäischen Gemeinschaft nicht in den normalen Hausmüll geworfen werden
darf. Um Umwelt- und Gesundheitsschäden durch unkontrollierte Müllabfuhr zu vermeiden, muss das Gerät verantwortungsbewusst
entsorgt und für dauerhafte Wiederverwertung der Rohstoe recycelt werden. Bitte bringen Sie das alte Gerät zu einer Sammelstelle
für elektrische und elektronische Geräte bzw. zu Ihrem Fachhändler, wo Sie das Gerät gekauft haben, damit eine umweltfreundliche Entsor-
gung gewährleistet ist.
HANDLEIDING
VERKLARING VAN DE TEKENS
Voldoet aan de Europese CE richtlijnen
Alleen voor gebruik binnenshuis
Staar niet in de straal
VEILIGHEIDSINSTRUCTIES
Lees de handleiding aandachtig door. Ze bevat belangrijke informaties voor de installatie, gebruik en onderhoud
van dit toestel.
• Wees zeker dat u het toestel op de juiste spanning aansluit en dat de lichtnetspanning niet hoger dan de op
de zijde van het toestel aangegeven spanning is.
• Alleen voor gebruik binnenshuis!
• Om vuur en elektrische schokken te verhinderen bescherm het toestel tegen regen en vochtigheid. Wees
zeker dat geen ontvlambare materialen in de buurt van het toestel zijn tijdens de werking.
• Plaats het toestel in een ruimte met voldoende ventilatie en in tenminste 50cm afstand van oppervlakken.
Wees zeker dat de ventilatie openingen niet geblokkeerd zijn.
• Gebruik het toestel niet in ruimtes met een temperatuur van meer dan 40°C.
• In geval van een ernstig probleem stop het toestel direct. Verzoek nooit het toestel zelfs te repareren. Alle
reparaties moeten van een ervarene technicus doorgevoerd worden. Gebruik alleen onderdelen met dezelfde
specicaties.
• Nooit in de lichtbron kijken.
• De lichtbron van dit apparaat is niet vervangbaar. Als deze defect is, moet het gehele apparaat worden weg-
gegooid.
BEDIENING
Gebruik de vier knoppen direct beneden het LCD display.
UP DOWN
MENU ENTER
8.8.8.8.
Toets Functie
MENU In een menu gaan of naar een vorige menu optie terug gaan
UP Opwaarts doorlopen van de menu opties
DOWN Afwaarts doorlopen van de menu opties
ENTER Kies en bevestig de selectie in het menu
INSTALLATIE
1. Het spotje kan overal geplaatst worden, maar je moet een afstand van minstens 0,5 m tussen het spotje en
een object laten. Houd het licht stabiel
2. Aansluiting op een DMX-controller: Het DMX512-signaal moet worden aangesloten op de INPUT en OUTPUT
aansluitingen van het apparaat. Houd de kabel zo kort mogelijk om signaalverlies en storing door andere
apparaten te voorkomen. De kabellengte mag niet langer zijn dan 100m.
3. Gebruik een standaard 3-polige XLR-kabel om het apparaat aan te sluiten op een DMX-regelaar. De

Manual - LEDSPOT10W
7
www.ibiza-light.com
ES
XLR-connector is als volgt bedraad:
XLR-pennenconguratie
Pin 1 = massa
Pin 2 = negatief
Pin 3 = positief
De focus kan handmatig worden ingesteld.
Weergave van de looptijd (Druk op de knop Omlaag en Enter)
REINIGING
Het is belangrijk dat het toestel altijd schoon is om een optimale lichtkracht te garanderen en de leeftijd te ver-
lengen. De reinigingsfrequentie is afhankelijk van de omgevingsomstandigheden: vochtige, berookte of bijzon-
ders vuile omgeving veroorzaakt meer vuil op de optische delen.
• Reinig de lamp met een hoogwaardig glasreinigingsmiddel en een zachte doek.
• Droog de delen altijd zorgvuldig.
• Reinig de externe optische delen tenminste alle 20 dagen. Reinig de interne optische delen tenminste alle
30/60 dagen.
SPECIFICATIES
Lichtbron ..........................................................................................................................1 x 10W RGBW LED
Opgenomen vermogen ............................................................................................................................13W
Levensduur van de LED’s ..................................................................................................... 50.000 werkuren
Aansluitspanning ..............................................................................................................................12V 3A
Afmetingen .......................................................................................................................142 x 90 x 138mm
Gewicht ...................................................................................................................................................600g
Deze markering geeft aan dat dit product niet met ander huishoudelijk afval in de hele EU mag worden weggegooid. Om mogelijke scha-
de aan het milieu of de menselijke gezondheid door ongecontroleerde afvalverwijdering te voorkomen, moet u deze op verantwoorde
wijze recyclen om duurzaam hergebruik van materiaalbronnen te bevorderen. Als u uw gebruikt apparaat wilt retourneren, gebruikt u de
retour- en verzamelsystemen of neemt u contact op met de winkel waar het product is gekocht. Ze zullen voor milieuveilige recycling zorgen.
MANUAL DE USO
EXPLICACIÓN DE LOS SÍMBOLOS
Conforme con los requisitos de la norma CE
Este producto, es adecuado solo para uso en interiores
No exponga sus ojos a la fuente luminosa
INSTRUCCIONES DE SEGURIDAD
Lea atentamente este manual que contiene informaciones importantes de uso y mantenimiento del equipo.
• Asegurese de que la corriente del enchufe corresponde con los requisitos técnicos del equipo indicados en el
mismo.
• Unicamente para su uso en interiores!
• Con el n de evitar cualquier riesgo de incendio o descarga eléctrica, no exponga el equipo a la lluvia o hume-
dad. Asegurese que ningún objeto inamable se encuentra en las proximidades del equipo durante su funcio-
namiento.
• Instale el equipo en un lugar bien ventilado a una distancia mínima de 50cm de cualquier supercie. Asegure-
se de qu las rejillas de ventilación, no quedan bloqueadas.
• La temperatura ambiente no puede pasar de los 40°C. No haga funcionar el equipo a temperaturas superio-
res.
• En caso de mal funcionamiento, desenchufe inmediatamente el equipo y llevelo a un servicio técnico cuali-
cado. No intente reparar el equipo por usted mismo, puede producir daños al equipo. Exiga siempre que le
reparan el equipo con piezas originales.
• No exponga sus ojos a la fuente luminosa.
• La fuente de luz de este dispositivo no es reemplazable. Si está defectuosa, debe desecharse toda la unidad.

Manual - LEDSPOT10W
8
©Copyright LOTRONIC 2019
PANEL DE CONTROL
Acceda a las funciones del panel de control mediante los cuatro botones que se encuentran debajo de la pantalla
LCD..
Tecla Función
MENU Acceso al menú o vuelta a una opción anterior de menú
UP Paso de las opciones del menú en orden ascendentes
DOWN Paso de las opciones del menú en orden descendiente
ENTER Selección y grabación de menú o de las opciones dentro de un menú
INSTALACIÓN
1. El foco puede colocarse en todas partes, pero debe dejar una distancia de al menos 0,5 m entre el foco y un
objeto.
2. Conexión a un controlador DMX: la señal DMX512 debe conectarse a los enchufes INPUT y OUTPUT de la uni-
dad. Mantenga el cable lo más corto posible para evitar pérdidas de señal e interferencias de otras unidades. La
longitud del cable no debe ser superior a 100 m.
3. Use un cable XLR estándar de 3 pines para conectar la unidad a un controlador DMX. El conector XLR está
cableado de la siguiente manera:
Conguración de pin XLR
Pin 1 = Tierra
Pin 2 = Cumplimiento de datos (negativo)
Pin 3 = Datos verdaderos (positivo)
4. El foco se puede congurar manualmente.
5. Visualización del tiempo de ejecución (presione el botón Abajo e Intro)
LIMPIEZA DEL EQUIPO
Limpie regularmente las lentes externas a n de optimizar la potencia de la luz. La frecuencia de limpieza de-
pende de las condiciones de uso. Un medio húmedo, polvoriento o marino, favorece la acumulación de suciedad
en las ópticas.
• Desenchufe SIEMPRE el equipo antes de manipularlo o limpiarlo.
• Utilice un paño y limpiador de vidrios clásico.
• Seque todas las piezas cuidadosamente.
• Limpie las ópticas externas, al menos cada tres semanas.
CARACTERÍSTICAS TÉCNICAS
Fuente luminosa ..............................................................................................................1 LED RGBB de 10W
Consumo ..................................................................................................................................................13W
Duración de la vida de los LED ..................................................................................................50.000 horas
Alimentación .....................................................................................................................................12V 3A
Dimensiones .....................................................................................................................142 x 90 x 138mm
Peso ........................................................................................................................................................600g
Los productos eléctricos no deben ser tirados a la basura normal, han de ser reciclados en un lugar destinado a ello. Pregunte a las
autoridades locales, por el punto más cercano a su domicilio.
NAVODILA ZA UPORABO
POJASNILO SIMBOLOV
V skladu z zahtevami CE standarda
Izdelek je namenjen samo za uporabo v zaprtih prostorih
Ne glejte neposredno v vir svetlobe
UP DOWN
MENU ENTER
8.8.8.8.

Manual - LEDSPOT10W
9
www.ibiza-light.com
SI
VARNOSTNA NAVODILA
• Skrbno preberite ta navodila, ker vsebujejo pomembne informacije o namestitvi, uporabi in vzdrževanju tega
izdelka.
• Prosimo, shranite ta priročnik za uporabo v prihodnje. Če prodajate enoto drugem uporabniku, se prepričajte,
da tudi on dobi ta navodila.
• Da bi preprečili nevarnost požara ali električnega udara, ne izpostavljajte izdelka dežju ali vlagi. Prepričajte se,
da ni nobenih vnetljivih snovi v bližini enote, med delovanjem.
• Naprava mora biti postavljena v prostor z ustreznim prezračevanjem, vsaj 50cm od sosednjih površin.
• Maksimalna temperatura (Ta) je 40°C. Ne uporabljajte izdelka pri temperaturah, višjih od teh.
• V primeru resnega problema delovanja, prenehajte z uporabo naprave takoj. Nikoli ne poskušajte popravljati
sami. Popravila, ki jih izvajajo nekvaliciranih ljudi, lahko povzroči poškodbe ali okvare. Prosimo, da se obrnite
na najbližji pooblaščeni tehnični center za pomoč. Vedno uporabite isto vrsto rezervnih delov.
• Izogibajte se neposrednemu izpostavljanju oči svetlobnega vira, medtem ko je vklopljen.
• Svetlobni vir te naprave ni nadomestljiv. Če je okvarjen, je treba celotno enoto zavreči.
KAKO UPORABLJATI ENOTO
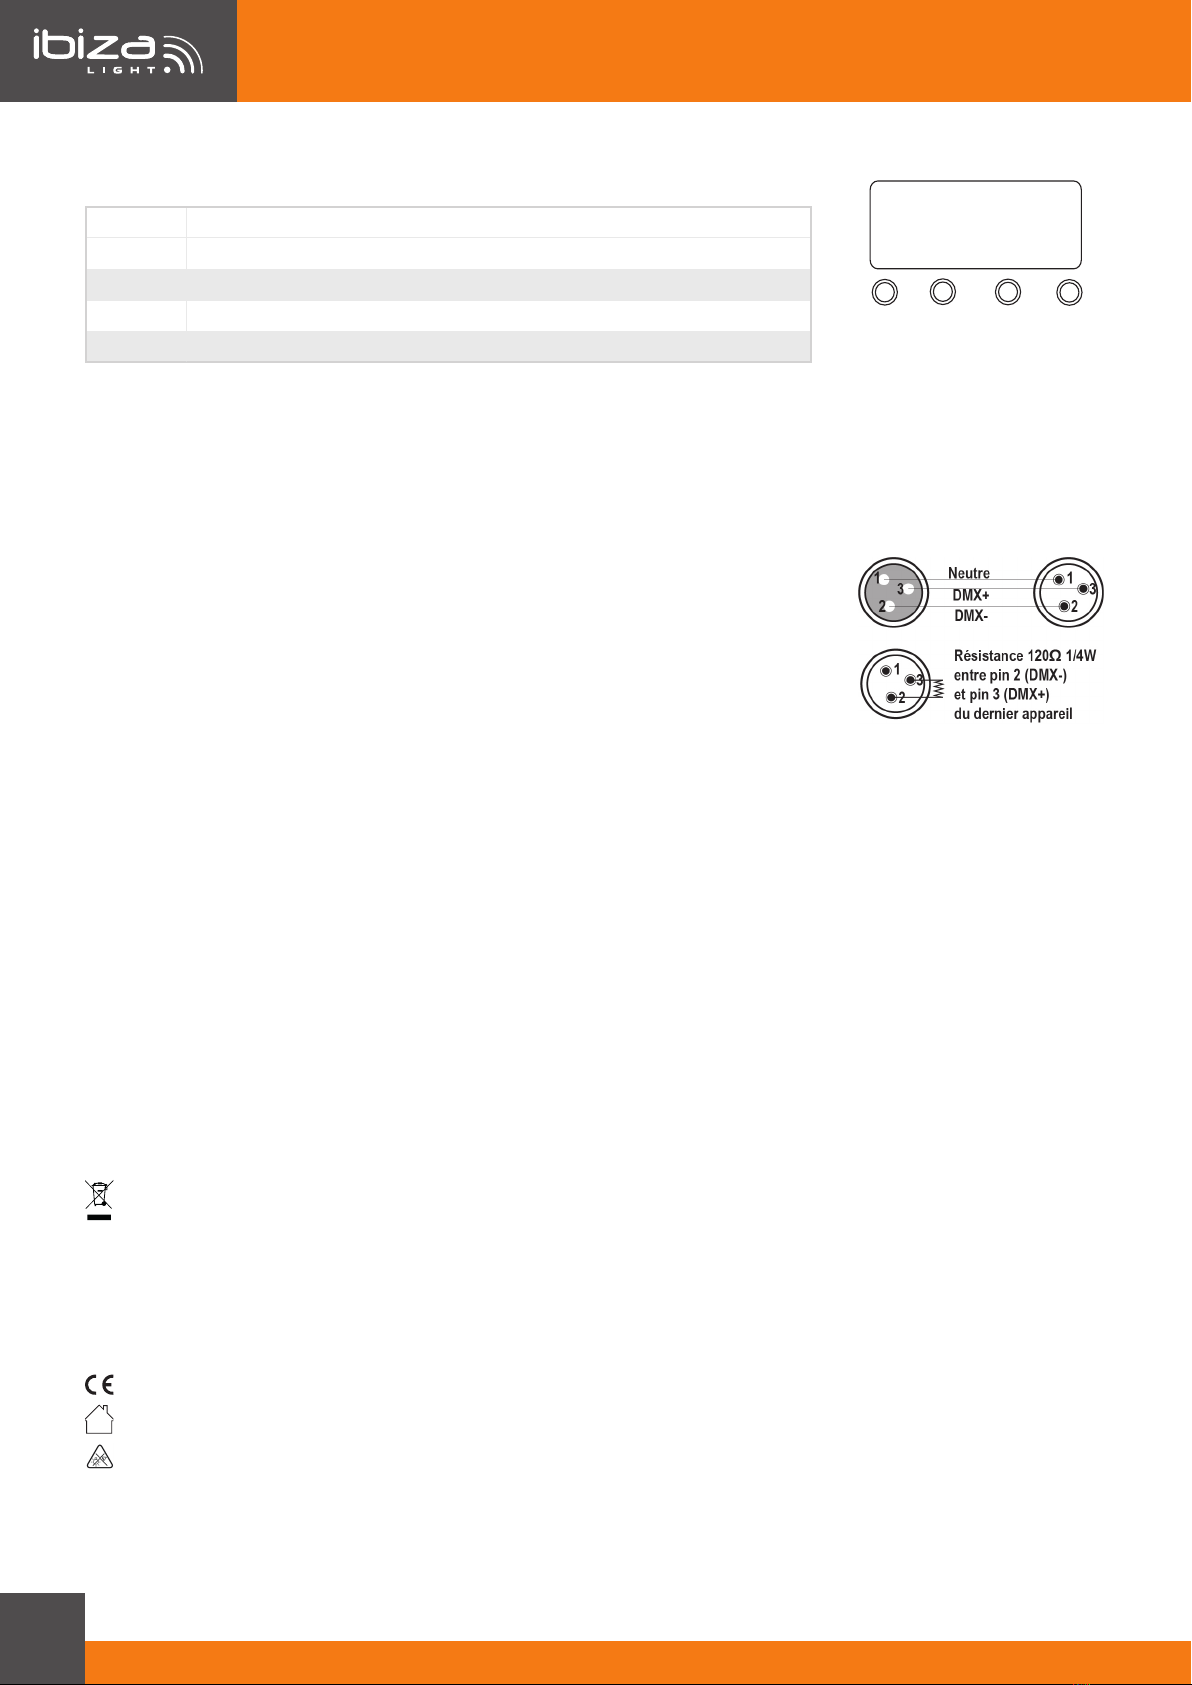
Do funkcij nadzorne plošče dostopate s štirimi gumbi ki se nahajajo neposredno pod LCD zaslonom.
Gumb Funkcija
MENU Uporablja se za dostop do menija ali za vrnitev na prejšnjo možnost
menija
UP Pomikanje po možnostih menija po naraščajočem vrstnem redu
DOWN Pomikanje po možnostih menija po padajočem vrstnem redu
ENTER Uporablja se za izbiro in shranjevanje trenutnega menija ali možnosti v
meniju
MONTAŽA
1. Luč v žarišču lahko postavite povsod, vendar morate med točkovno svetlobo in predmetom pustiti vsaj 0,5 m
razdalje. Svetloba naj bo stabilna
2. Povezava z krmilnikom DMX: Signal DMX512 mora biti priključen na vhodne in izhodne vtičnice enote. Kabel
naj bo čim krajši, da preprečite izgube signala in motnje drugih enot. Dolžina kabla ne sme biti daljša od 100m.
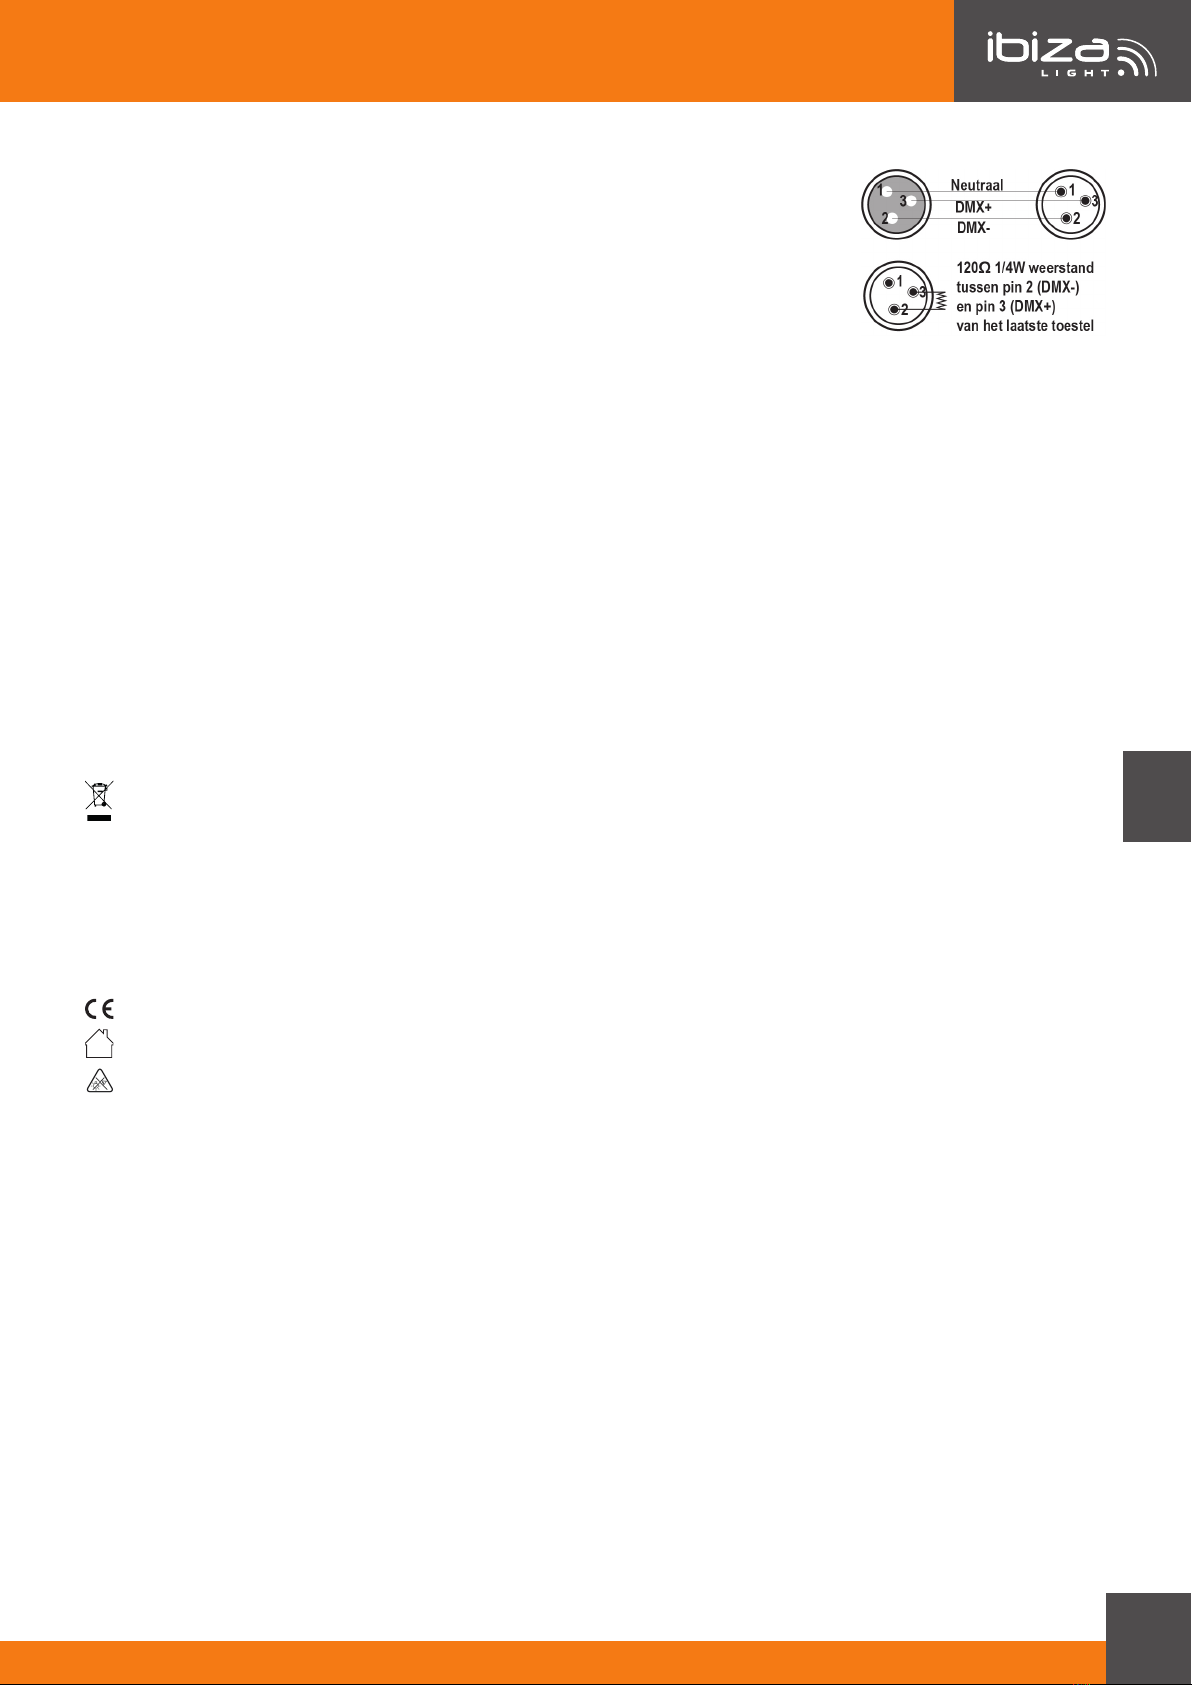
3. Za priključitev enote na krmilnik DMX uporabite standardni 3-polni XLR kabel. Priključek XLR je priključen na
naslednji način:
KONFIGURACIJA PIN XLR
Zatič 1 = tla
Pin 2 = kompliment za podatke (negativno)
Pin 3 = Podatki resnični (pozitivno)
4. Fokus lahko nastavite ročno.
5. Prikaz delovnega časa (pritisnite gumb za vnos in vnos)
ČIŠČENJE ENOTE
Čiščenje notranjih in zunanjih optičnih leč ali ogledal se mora izvajati redno za optimalno oddajanje svetlobe.
Pogostost čiščenja je odvisna od okolja, v katerem deluje naprava: vlaga, dim ali zelo umazano okolje lahko
povzroči večje nabiranje umazanije na optiki enote.
• Čistite z mehko krpo z normalno tekočino za čiščenje stekla.
• Vedno previdno posušite občutljive dele.
• Čiščenje zunanjih optičnih leč vsaj vsakih 20 dni. Čiščenje notranjih leč vsaj vsakih 30/60 dni.
TEHNIČNI PODATKI
Napajanje...........................................................................................................................................12V 3A
Poraba.......................................................................................................................................................13W
LED žarnica: ............................................................................................................................ 1 x 10W RGBW
Velikost paketa...................................................................................................................142 x 90 x 138mm
Teža..........................................................................................................................................................600g
POMEMBNO OPOZORILO: Električni izdelki se ne smejo odlagati v gospodinjske odpadke. Prosimo, da jih pripeljete do reciklažnega cen-
tra. Vprašajte vaše lokalne oblasti ali svojega prodajalca o načinu za začetek izvajanja.
UP DOWN
MENU ENTER
8.8.8.8.

Manual - LEDSPOT10W
10
©Copyright LOTRONIC 2019
RO
MANUAL DE UTILIZARE
CARACTERISTICI:
• Asarea duratei de functionare
• Control temperatura
• Focalizare manuala
RECOMANDARI DE SIGURANTA
În conformitate cu cerințele standardului CE.
Produsul este destinat doar utilizării în interior
Nu te uita direct în grindă
• Nu incercati sa efectuati nici o reparatie! In caz contrar, acest lucru va anula garantia produsului. In cazul
putin probabil in care aparatul va necesita intretinere, va rugam contactati un service autorizat.
• Pentru a preveni sau a reduce riscul unui soc electric sau al unui incendiu, feriti aparatul de ploaie sau orice
urma de umezeala.
• Va rugam cititi manualul cu atentie pentru a va familiariza cu functiile de baza ale aparatului.
• Inainte de conectarea aparatului la alimentare asigurati-va ca priza are tensiunea necesara pentru functio-
narea aparatului
• Nu scoateti capacul, in cazul in care nu sunteti calicat sa faceti acest lucru.
• Nu conectati niciodata la alimentare atunci cand capacul este scos.
• Nu folositi niciodata aparatul in cazul in care este deteriorat.
• Nu conectati acest aparat la nici un fel de regulator intensitate (dimmer).
• In cazul in care aparatul nu va folosit pentru o perioada lunga de timp, deconectati-l de la sursa de alimentare.
• Montati intotdeauna aparatul pe o suprafata sigura si stabila si asigurati-va ca zona va ventilata corespunzator.
• Aveti grija sa nu montati aparatul in zonele apropiate de surse de caldura, cum ar corpuri de iluminat, ampli-
catoare, sobe si radiatoare.
INSTALARE
1. Dispozitivul poate fi instalat oriunde, dar trebuie sa lasati o distanta de cel putin 0.5m intre sursa de lumina
si obiecte. Mentineti sursa de lumina stabila.
2. Conexiunea cu un dispozitiv de control DMX: Semnalul DMX512 trebuie conectat la mufele de INTRARE si
IESIRE ale aparatului. Pastrati cablurile cat de scurte puteti pentru a evita pierderile de semnal si interferentele
cu alte dispozitive. Lungimea cablului nu trebuie sa fie mai mare de 100m.
3. Folositi un conector XLR standard de 3 pini pentru a conecta aparatul la un dispozitiv de control DMX. Conec-
torul XLR este legat dupa cum urmeaza:
Conguratie XLR Pin
Pin 1 = Pamantare
Pin 2 = Semnal date (negativ)
Pin 3 = Semnal date (pozitiv)
4. Focalizarea poate fi setata manual.
5. Afisarea duratei de functionare (Apasati butonul Down si butonul Enter)
SPECIFICATII
Tensiune intrare .................................................................................................................................12V 3A
Sursa de lumina .................................................................................................................1x 10W RGBW LED
Consum.....................................................................................................................................................13W
Durata estimativa de functionare a LED-ului ..........................................................50,000 ore de functionare
Canale DMX ...................................................................................................................................................6
Functii ............................................................DMX, Functionare automata, Activare prin sunet, Master/slave
Greutate bruta ........................................................................................................................................0.6kg
Dimensiuni.........................................................................................................................142 x 90 x 138mm
Produsele electrice nu trebuie aruncate la deșeurile menajere. Vă rugăm să le duceți la un centru de reciclare. Pentru mai multe detalii
adresați-vă autorităților locale sau distribuitorului dumneavoastră.

Manual - LEDSPOT10W
11
www.ibiza-light.com
FUNCTION MENU
Menu Value Description
A 001~512 DMX (6CH) / Master-Slave
Run_
0 Close the light
1R, G,B, W monochrome jump Change
2R ON, G, B, W jump Change
3G ON,R, B, W jump Change
4 B ON,R, G, W jump Change
5W ON,R, G, B jump Change
6R, G, B, W gradual change, Low speed
7R, G, B, W gradual change, High speed
8 R, G gradual change, B, W OFF
9 R, B gradual change, G, W OFF
AB, G gradual change, R, W OFF
bR, G, B, W cross fade
CR, G, B, W Mixed color jump change
Sou_
1 Sound 1
2 Sound 2
3 Sound 3
colr
r000~255 Red Linear control (From dark to bright)
g000~255 Green Linear control (From dark to bright)
b000~255 Blue Linear control (From dark to bright)
y000~255 White Linear control (From dark to bright)
LEon Digital plate ON (Always)
LOFF Digital Plate will OFF Automatically within 3S
MENU: Menu choose; UP: up page; DOWN : down page; ENTER: enter choose

Manual - LEDSPOT10W
12
©Copyright LOTRONIC 2019
DMX CONTROL (A001~512)
CHs Value Function Description
CH1
0~8 Close the light totally
9~134 R, G, B, W from dark to bright, Linear Control
135~239 Strobe, Speed from Slow to Fast
240~255 Combine CH2\CH3\CH4 & CH5, Adjust color’s brightness (red, green,
blue, white)
CH2 0RED LIGHT OFF
1~255 Red Linear control, from dark to bright
CH3 0Green LIGHT OFF
1~255 Green Linear control ,from dark to bright
CH4 0Blue LIGHT OFF
1~255 Blue Linear control ,from dark to bright
CH5 0White LIGHT OFF
1~255 White Linear control ,from dark to bright
CH6
0~2 1~5CH workable
3~31 R, G, B, W monochrome jump Change
32~63 R ON , G, B, W jump Change
64~79 G ON, R, B, W jump Change
80~95 B ON, R, G, W jump Change
96~111 W ON, R, G, B jump Change
112~143 R, G, B, W gradual change, Low speed
144~159 R, G gradual change, B, W OFF
160~175 R, B gradual change , G, W OFF
176~191 B, G gradual change, R, W OFF
192~207 R, G, B, W cross fade
208~223 R, G, B, W Mixed color jump change
224~239 Sound 1
240~249 Sound 2
250~255 Sound 3
Other manuals for Ibiza Light LEDSPOT10W
1
This manual suits for next models
1
Table of contents
Languages:
Other LOTRONIC Spotlight manuals