LOTRONIC Ibiza Light LEDSPOT10W User manual

©Copyright LOTRONIC 2013 LEDSPOT10W 1
L
LE
ED
D
S
SP
PO
OT
T
L
LI
IG
GH
HT
T
P
PR
RO
OJ
JE
EC
CT
TE
EU
UR
R
A
A
L
LE
ED
D
L
LE
ED
D
S
ST
TR
RA
AH
HL
LE
ER
R
L
LE
ED
D
C
CA
AN
N
Ref.: LEDSPOT10W
INSTRUCTION MANUAL
MANUEL D’UTILISATION
BEDIENUNGSANLEITUNG
MANUAL DE INSTRUÇÕES
MANUAL DE UTILIZARE
Voor Nederlands zie onze website: www.lotronic.com
Function Menu
Menu
Value
Description
A
001~512
DMX (6CH) / Master-Slave
Run_
0
Close the light
1
R, G,B, W monochrome jump Change
2
R ON, G, B, W jump Change
3
G ON
,R, B, W jump Change
4
B ON
,
R, G, W jump Change
5
W ON
,
R, G, B jump Change
6
R, G, B, W gradual change, Low speed
7
R, G, B, W gradual change, High speed
8
R, G gradual change, B, W OFF
9
R, B gradual change, G, W OFF
A
B, G gradual change, R, W OFF
b
R, G, B, W cross fade
C
R, G, B, W Mixed color jump change
Sou_
1
Sound 1
2
Sound 2
3
Sound 3
colr
r000~255
Red Linear control (From dark to bright)
g000~255
Green Linear control (From dark to bright)
b000~255
Blue Linear control (From dark to bright)
y000~255
White Linear control (From dark to bright)
LEon
Digital plate ON (Always)
LOFF
Digital Plate will OFF Automatically within 3S
MENU: Menu choose; UP: up page; DOWN : down page; ENTER: enter choose

©Lotronic – 2013 ©Lotronic - 2013
DMX Control (A001~512)
CHs
Value
Function Describe
CH1
0~8
Close the light totally
9~134
R, G, B, W from dark to bright, Linear Control
CH1
135~239
Strobe, Speed from Slow to Fast
240~255
Combine CH2\CH3\CH4 & CH5, Adjust color’s
brightness (red, green, blue, white)
CH2
0
RED LIGHT OFF
1~255
Red Linear control, from dark to bright
CH3
0
Green LIGHT OFF
1~255
Green Linear control ,from dark to bright
CH4
0
Blue LIGHT OFF
1~255
Blue Linear control ,from dark to bright
CH5
0
White LIGHT OFF
1~255
White Linear control ,from dark to bright
CH6
0~2
1~5CH workable
3~31
R, G, B, W monochrome jump Change
32~63
R ON
,
G, B, W jump Change
64~79
G ON,R, B, W jump Change
80~95 B ON,R, G, W jump Change
96~111
W ON
,
R, G, B jump Change
112~143
R, G, B, W gradual change
,
Low speed
144~159
R, G gradual change, B, W OFF
160~175
R, B gradual change , G, W OFF
176~191
B, G gradual change, R, W OFF
192~207
R, G, B, W cross fade
208~223
R, G, B, W Mixed color jump change
224~239
Sound 1
240~249
Sound 2
250~255
Sound 3
G
GB
B-
-
L
LE
ED
D
S
SP
PO
OT
T
L
LI
IG
GH
HT
T
LEDSPOT10W
INSTRUCTION MANUAL
Thank you for purchasing the LEDSPOT10W Spot light. It is a small and easy
to carry unit that is simple to install.
Features:
•Display of running time
•Temperature control
•Manual Focus
Safety Recommendations
•Do not attempt any repairs yourself! Doing so will void your manufactures
warranty. In the unlikely event your unit may require service please contact
your local dealer.
•To prevent or reduce the risk of electrical shock or fire, do not expose this
unit to rain or any moisture.
•Please read this user manual carefully to familiarize you with the basic
operations of this unit.
•Before you plug the unit into a mails outlet, make sure the local power
voltage matches with the required voltage of the unit
•Do not remove the cover under any circumstances in case you are
qualified to do so.
•Never connect to power when cover is removed.
•Never use this unit if it is damaged.
•Never connect this unit to any kind of dimmer- and/or power-pack.
•If the unit will not be used for a long time, disconnect it from power supply.
•Always mount this unit safe and stable, and make sure the area will have
proper ventilation.

©Lotronic – 2013 ©Lotronic - 2013
•Take care this unit will not mounted in areas close to heat
sources such as lighting fixtures, amplifiers, heat registers, stoves and
radiators.
MOUNTING
1. The spot light can be put everywhere, but you must leave a distance of at
least 0.5m between the sport light and an object. Keep the light stable
2. Connection to a DMX controller: The DMX512 signal must be connected to
the INPUT and OUTPUT sockets of the unit. Keep the cable run as short
as possible in order to avoid signal losses and interference from other
units. The cable length should not be longer than 100m.
3. Use an standard 3-pin XLR lead to connect the unit to a DMX controller.
The XLR connector is wired as follows:
XLR Wiring
XLR Pin Configuration
Pin 1 = Ground
Pin 2 = Data Compliment (negative)
Pin 3 = Data True (positive)
4. The focus can be set manually.
5. Display of running time (Press Down and Enter button)
Specifications
Input voltage ................................................................... 220-240Vac 50/60Hz
Output voltage ............................................12Vdc 3A max., positive center tip
Light source......................................................................1x 10W RGBW LED
Power.........................................................................................................13W
Rated life time of LED..................................................50,000 operating hours
DMX channels ................................................................................................ 6
Functions .................................... DMX, Auto-run Sound control, Master/slave
Net weight................................................................................................ 0.4kg
Packing size......................................................................... 150x112x122mm
IMPORTANT NOTE: Electric products must not be put into household
waste. Please bring them to a recycling centre. Ask your local authorities
or your dealer about the way to proceed.
F
F
-
-
P
PR
RO
OJ
JE
EC
CT
TE
EU
UR
R
A
A
L
LE
ED
D
1
10
0W
W
R
RV
VB
BB
B
LEDSPOT10W
MANUEL D’UTILISATION
Lire attentivement ce mode d’emploi avant la première mise en service. Il
contient des consignes de sécurité et de maintenance importantes.
Caractéristiques :
Cet appareil petit et facile à installer peut être amené partout.
•Affichage du temps d’utilisation
•Contrôle de température
•Mise au point manuelle
Consignes de sécurité
- Conserver le manuel pour référence ultérieure.
- Uniquement pour utilisation à l’intérieur.
- Tenir à l’abri de l’humidité et de la poussière.
- Si la prise et/ou le fil et/ou l'entrée du câble de l'équipement est
endommagé, il doit être réparé par un professionnel.
- Toujours débrancher la prise murale en cas d'orage ainsi que lorsque
l'équipement n'est pas utilisé pendant une période prolongée.
- Ne jamais retirez la prise en tirant sur le fil.
- Installer l'équipement de façon à permettre un refroidissement
suffisant.
- Ne jamais utiliser l'appareil à proximité de sources de chaleur et/ou en
plein soleil.
- Assurez-vous qu'aucun objet ou liquide ne puisse pénétrer dans
l'appareil.
- Nettoyer l'appareil avec un chiffon légèrement humide. Ne pas utiliser
de produits d'entretien.
- A l'exception de ceux mentionnés dans le manuel, l'appareil ne
contient aucune pièce remplaçable par l’utilisateur.
- Si l'appareil est défectueux, il doit être réparé par un technicien
qualifié.
- Tenir hors de la portée des enfants.

©Lotronic – 2013 ©Lotronic - 2013
MONTAGE
1. Vous pouvez installer le projecteur à l’emplacement de votre convenance
mais il faut respecter une distance minimum de 50cm entre le projecteur et
l’objet. Le projecteur doit être installé d’une manière stable.
2. Branchement sur une commande DMX: Le signal DMX512 doit être
branché au moyen d’un cordon XLR standard à 3 contacts sur la fiche
INPUT et OUTPUT de l’appareil. Ne pas dépasser des longueurs de
câbles de plus de 100m afin d’éviter des pertes de signal et des
interférences d’autres appareils.
3. Câblage XLR
Configuration de la fiche XLR
Broche 1 = Masse
Broche 2 = Signal (-)
Broche 3 = Signal (+)
4. La mise au point est manuelle.
5. Affichage du temps passé
(Appuyez sur les touches Down et Enter)
Caractéristiques techniques
Alimentation.................................................................... 220-240Vac 50/60Hz
Tension de sortie de l’adaptateur .....................12Vdc 3A max. (centre positif)
Source de lumière...........................................................1 LED RVBB de 10W
Consommation...........................................................................................13W
Durée de vie de la LED .............................. 50.000 heures de fonctionnement
Canaux DMX .................................................................................................. 6
Fonctions .......................................DMX, Automatique, audio, Maître/Esclave
Poids brut................................................................................................. 0,4kg
Dimensions............................................................................150x112x122mm
NOTE IMPORTANTE : Les produits électriques ne doivent pas être mis au rebut avec les
ordures ménagères. Veuillez les faire recycler là où il existe des centres pour cela.
Consultez les autorités locales ou votre revendeur sur la façon de les recycler.
D - L
LE
ED
D
S
ST
TR
RA
AH
HL
LE
ER
R
LEDSPOT10W
BEDIENUNGSANLEITUNG
Vor der ersten Inbetriebnahme sorgfältig die Anleitung durchlesen. Sie enthält
wichtige Sicherheits- und Wartungshinweise.
Features:
•Anzeige der Betriebsdauer
•Temperaturregler
•Manuelle Scharfeinstellung
Sicherheitshinweise
- Bewahren Sie die Anleitung für spätere Einsichtnahme auf.
- Bewahren Sie die Originalverpackung auf, um das Gerät jederzeit
sicher transportieren zu können.
- Verwenden Sie das Gerät nicht im Freien und nicht in feuchten
Räumen.
- Wenn der Stecker und/oder das Kabel und/oder der Kabeleinlass des
Geräts beschädigt ist, muss es von einem Fachmann repariert
werden.
- Ziehen Sie bei Gewitter, oder wenn das Gerät eine Zeit lang nicht
benutzt wird, stets den Stecker aus der Steckdose.
- Immer am Stecker anfassen, niemals am Kabel ziehen
- Vor Hitze und/oder direktem Sonnenlicht schützen.
- Es dürfen keine kleinen Gegenstände oder Flüssigkeiten in das Gerät
dringen.
- Reinigen Sie das Gerät nur mit einem leicht feuchten Tuch.
Verwenden Sie keine Haushaltsreiniger.
- Außer den in der Anleitung genannten Teilen enthält das Gerät keine
Komponenten, die vom Benutzer repariert oder ersetzt werden
können.
- Falls das Gerät defekt ist, muss es von einer anerkannten
Reparaturwerkstatt repariert werden.
- Bewahren Sie das Gerät außerhalb der Reichweite von Kindern auf.
Installation
Prüfen Sie, ob Ihre Netzspannung der Versorgungsspannung des Strahlers
entspricht.

©Lotronic – 2013 ©Lotronic - 2013
MONTAGE
1. Der Strahler kann überall angebracht werden. Es muss jedoch ein
Sicherheitsabstand von mindestens 0,5m zwischen dem Strahler und dem
Gegenstand eingehalten werden. Den Strahler so anbringen, dass er
keinen Bewegungen oder Erschütterungen ausgesetzt wird.
2. Anschluss an einen DMX Controller: Das DMX512 Signal muss an die
INPUT (Eingang) Buchse bzw. OUTPUT (Ausgang) Buchse (falls mehrere
Geräte kettenweise angeschlossen werden) des Geräts angeschlossen
werden. Die Kabellängen müssen so kurz wie möglich gehalten werden,
um Signalverlust und Störungen von anderen Geräten zu vermeiden. Die
Kabel dürfen auf keinen Fall länger als 100m sein.
3. Das Gerät über ein 3-poliges Standard XLR Kabel an den DMX Controller
wie folgt anschließen:
XLR Belegung
XLR Stiftbelegung
Pin 1 = Masse
Pin 2 = Negativ
Pin 3 = Positiv
4. Die Scharfeinstellung erfolgt manuell.
5. Anzeige der Betriebszeit (Auf Down und Enter drücken)
Technische Daten
Versorgungsspannung ................................................... 220-240Vac 50/60Hz
Ausgangsspannung des Netzteils........................ 12Vdc 3A max., Mittelstift +
Leuchtmittel ......................................................................1x 10W RGBW LED
Verbrauch..................................................................................................13W
Lebensdauer der LEDs...............................................50.000 Betriebsstunden
DMX Kanäle.................................................................................................... 6
Funktionen.................................. DMX, Automatik, Audioregler, Master/Slave
Bruttogewicht........................................................................................... 0,4kg
Abmessungen........................................................................150x112x122mm
WICHTIGER HINWEIS: Elektrogeräte gehören nicht in den Hausmüll. Sie müssen in
speziellen Betrieben recycelt werden. Bringen Sie sie zu einer speziellen
Entsorgungsstelle für Elektrokleingeräte (Wertstoffhof)!
PT - L
LE
ED
D
P
PR
RO
OJ
JE
EC
CT
TO
OR
R
LEDSPOT10W
MANUAL DE INSTRUÇÕES
Obrigado por adquirir o LEDSPOT10W foi testado e enviado em perfeito
estado de funcionamento.
Características:
•Display de tempo decorrido
•Controlo de Temperatura
•Foco Manual
Recomendações de Segurança
• Não tente fazer reparações! Se o fizer, irá anular a garantia. No caso de a
sua unidade precisar de reparações entre em contacto connosco.
• Para prevenir ou reduzir o risco de choque eléctrico ou fogo, não exponha
este aparelho à chuva ou humidade.
• Leia atentamente este manual para se familiarizar com as operações básicas
da unidade.
• Antes de ligar certifique-se de que a tomada de energia eléctrica local
coincide com a voltagem necessária da unidade
• Não retire a tampa sob quaisquer circunstâncias caso não seja qualificado
para o fazer.
• Nunca ligue a alimentação quando a tampa é removida.
• Nunca use o aparelho se estiver danificado.
• Nunca ligue o aparelho a qualquer tipo de dimmer e/ou power-pack.
• Se o aparelho não for usado por um longo período de tempo, desligue-o da
fonte de alimentação.
• Instale sempre a unidade num local seguro e estável e verifique se a área
terá uma ventilação adequada.
• Tome cuidado para que esta unidade não seja montada em áreas próximas
a fontes de calor, tais como amplificadores, aquecedores, fogões e
aquecedores.
Montagem
1. Poderá instalar o projector no local que mais desejar, mas terá de
respeitar uma distância mínima de 50cm entre o projector e o objecto. O
projector deve ser instalado de forma estável.

©Lotronic – 2013 ©Lotronic - 2013
2. Ligue um controlador DMX: O sinal DMX512 deve ser ligado
usando um cabo padrão XLR com uma ficha de 3 pinos na entrada e
saída do
dispositivo. Não exceder o comprimento de 100m dos cabos de modo a
evitar a perda de sinal e interferência de outros dispositivos:
3. Ligações XLR
Configuração de Pinos XLR
Pin 1 = Terra
Pin 2 = Sinal (negativo)
Pin 3 = Sinal (positivo)
4. O foco pode ser configurado manualmente.
5. Display de tempo decorrido (Pressione Down e Enter)
Especificações
Entrada de Voltagem...................................................... 220-240Vac 50/60Hz
Fonte de Luz.....................................................................1x 10W RGBW LED
Potência.....................................................................................................13W
Tempo de Vida Médio dos LEDs............................50,000 horas de operação
Canais DMX.................................................................................................... 6
Funções..................................DMX, Controlo de Som Auto-run, Master/slave
Peso Bruto............................................................................................... 0.4kg
Tamanho de Embalagem ......................................................150x112x122mm
NOTA IMPORTANTE: Produtos eléctricos não deverão ser postos em contentores de lixo
caseiros. Por favor, deposite-os em contentores para reciclagem. Questione as
autoridades locais ou onde adquiriu o produto sobre como deverá proceder.
R
RO
O
-
-
L
LE
ED
D
S
SP
PO
OT
T
L
LI
IG
GH
HT
T
LEDSPOT10W
MANUAL DE UTILIZARE
Multumim pentru achizitionarea produsului LEDSPOT10W Spot light. Este un
dispozitiv de dimensiuni mici, usor de transportat si usor de instalat.
Caracteristici:
•Afisarea duratei de functionare
•Control temperatura
•Focalizare manuala
Recomandari de siguranta
•Nu incercati sa efectuati nici o reparatie! In caz contrar, acest lucru va
anula garantia produsului. In cazul putin probabil in care aparatul va
necesita intretinere, va rugam contactati un service autorizat.
•Pentru a preveni sau a reduce riscul unui soc electric sau al unui incendiu,
feriti aparatul de ploaie sau orice urma de umezeala.
•Va rugam cititi manualul cu atentie pentru a va familiariza cu functiile de
baza ale aparatului.
•Inainte de conectarea aparatului la alimentare asigurati-va ca priza are
tensiunea necesara pentru functionarea aparatului
•Nu scoateti capacul, in cazul in care nu sunteti calificat sa faceti acest
lucru.
•Nu conectati niciodata la alimentare atunci cand capacul este scos.
•Nu folositi niciodata aparatul in cazul in care este deteriorat.
•Nu conectati acest aparat la nici un fel de regulator intensitate (dimmer).
•In cazul in care aparatul nu va fi folosit pentru o perioada lunga de timp,
deconectati-l de la sursa de alimentare.
•Montati intotdeauna aparatul pe o suprafata sigura si stabila si asigurati-va
ca zona va fi ventilata corespunzator.
•Aveti grija sa nu montati aparatul in zonele apropiate de surse de caldura,
cum ar fi corpuri de iluminat, amplificatoare, sobe si radiatoare.

©Lotronic – 2013 ©Lotronic - 2013
INSTALARE
1. Dispozitivul poate fi instalat oriunde, dar trebuie sa lasati o distanta de cel
putin 0.5m intre sursa de lumina si obiecte. Mentineti sursa de lumina stabila.
2. Conexiunea cu un dispozitiv de control DMX: Semnalul DMX512 trebuie
conectat la mufele de INTRARE si IESIRE ale aparatului. Pastrati cablurile cat
de scurte puteti pentru a evita pierderile de semnal si interferentele cu alte
dispozitive. Lungimea cablului nu trebuie sa fie mai mare de 100m.
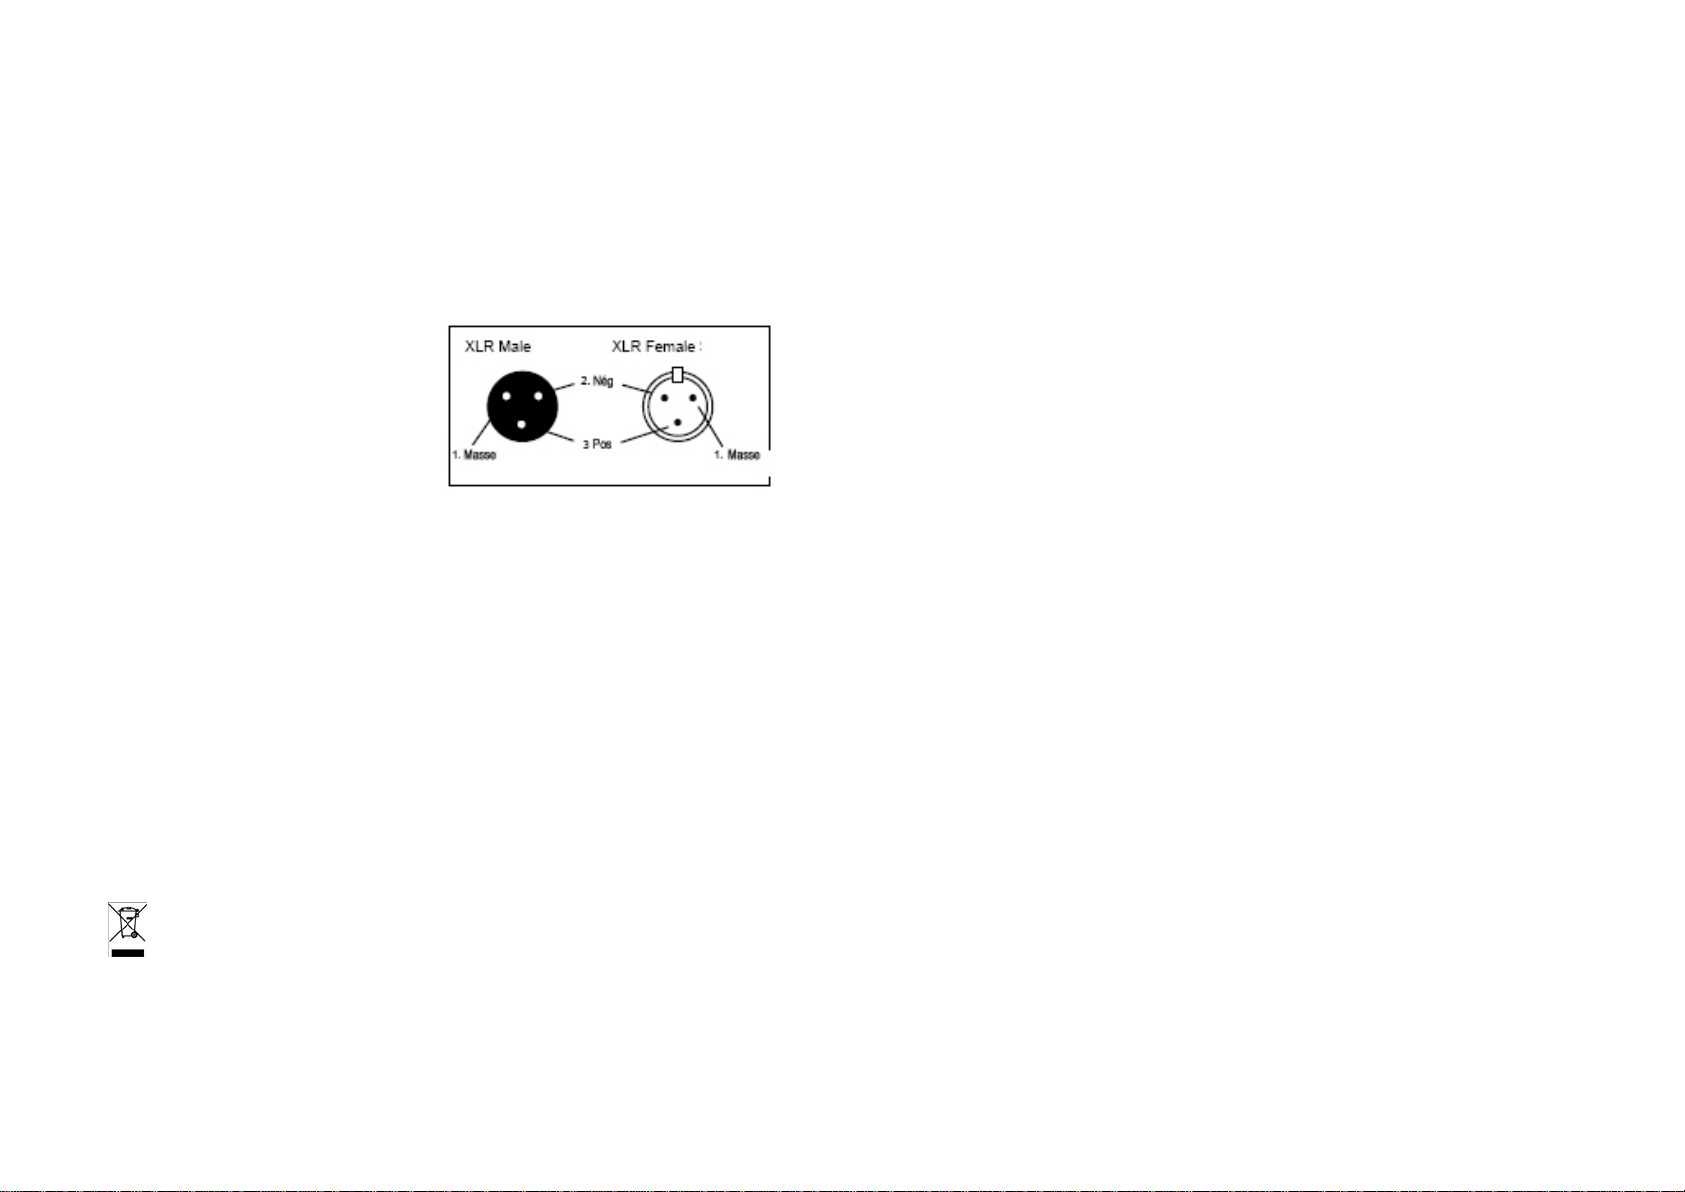
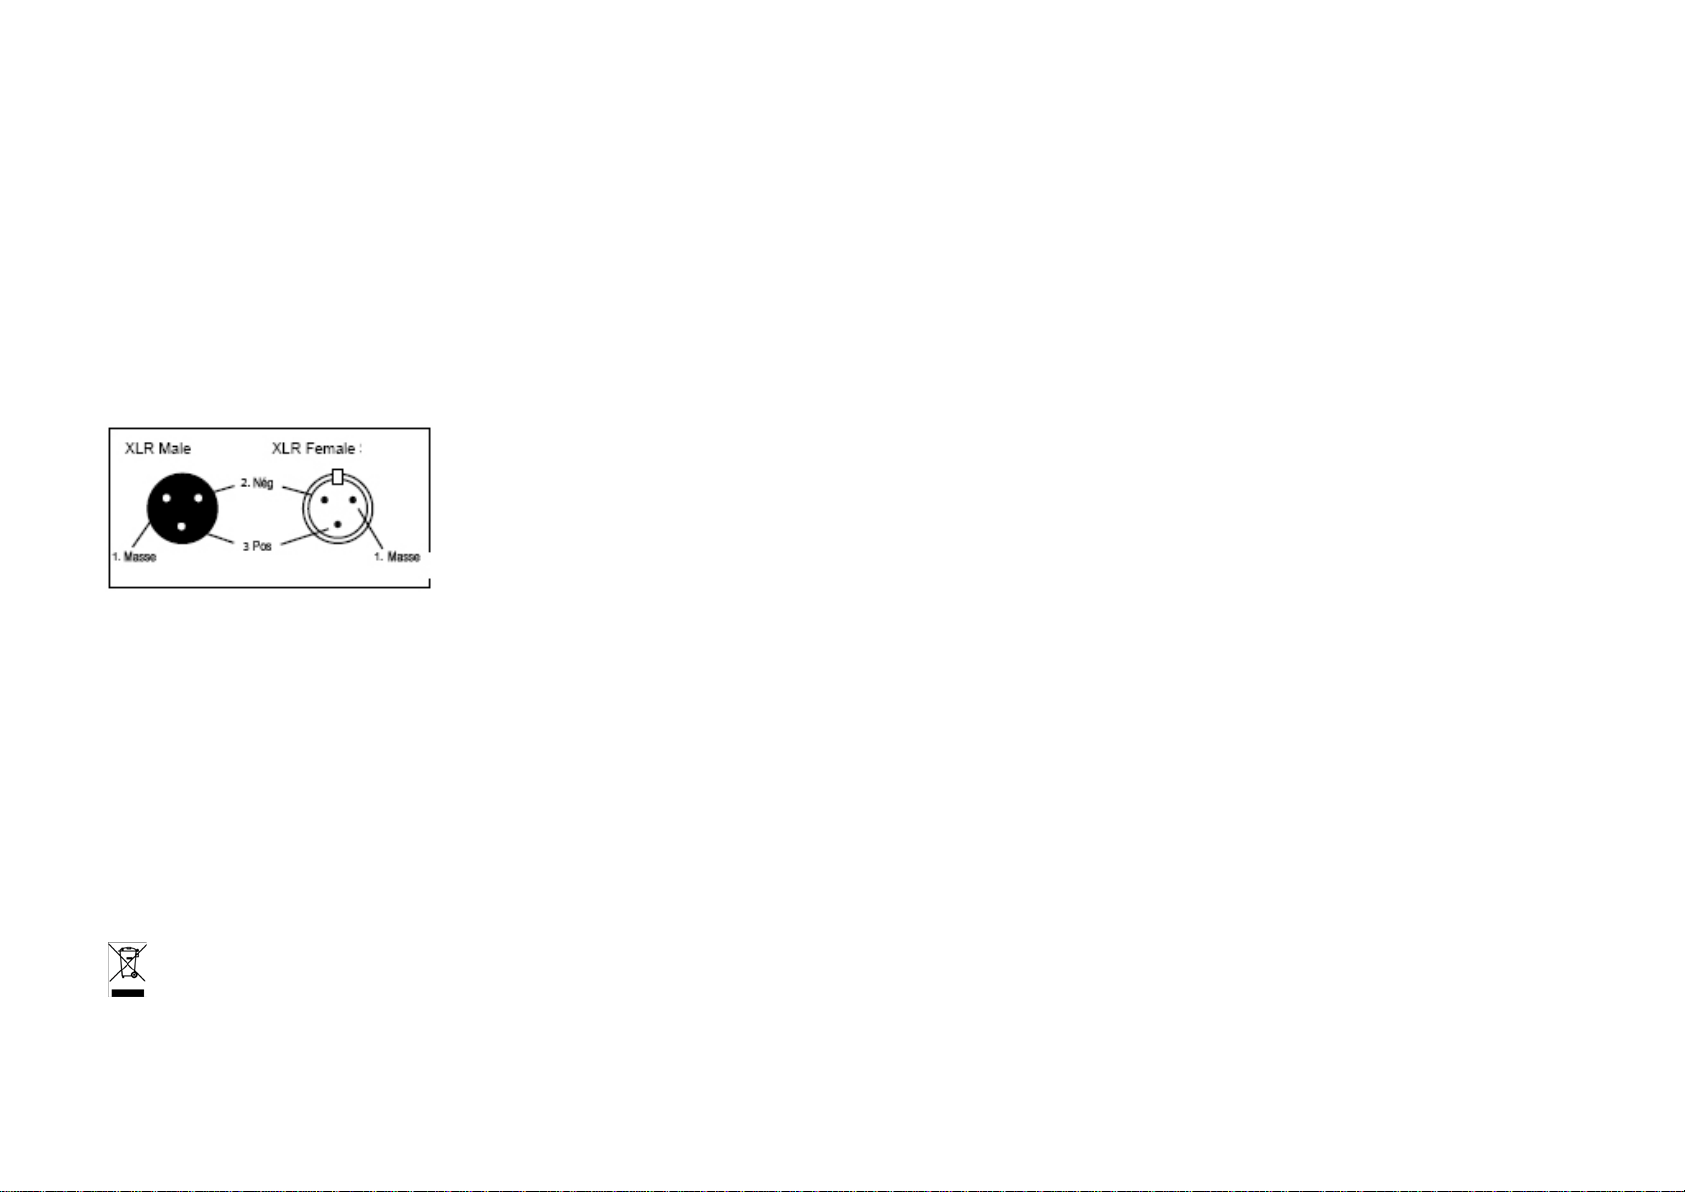
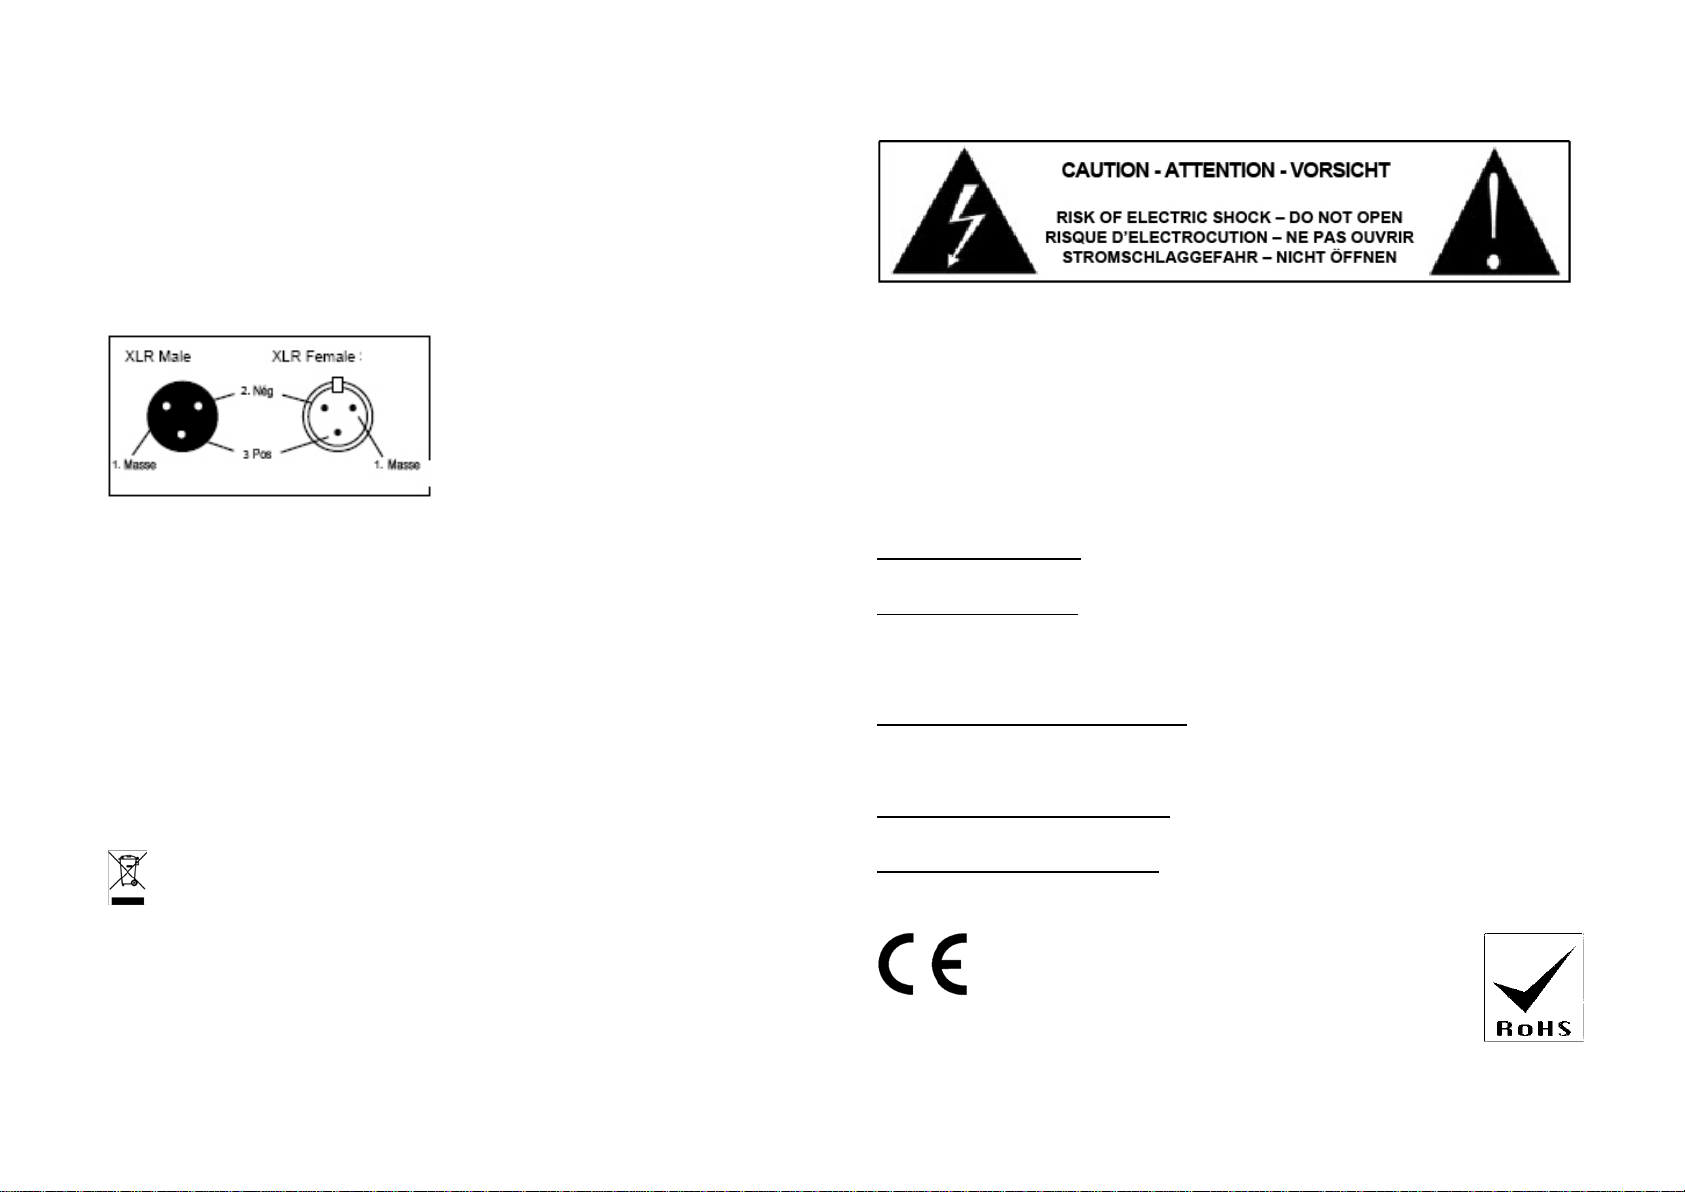
3. Folositi un conector XLR standard de 3 pini pentru a conecta aparatul la un
dispozitiv de control DMX. Conectorul XLR este legat dupa cum urmeaza:
Conexiune XLR
Configuratie XLR Pin
Pin 1 = Pamantare
Pin 2 = Semnal date (negativ)
Pin 3 = Semnal date (pozitiv)
4. Focalizarea poate fi setata manual.
5. Afisarea duratei de functionare (Apasati butonul Down si butonul
Enter)
Specificatii
Tensiune intrare.............................................................. 220-240Vac 50/60Hz
Sursa de lumina................................................................1x 10W RGBW LED
Consum .....................................................................................................13W
Durata estimativa de functionare a LED-ului...........50,000 ore de functionare
Canale DMX ................................................................................................... 6
Functii ........... DMX, Functionare automata, Activare prin sunet, Master/slave
Greutate bruta.......................................................................................... 0.4kg
Dimensiuni.............................................................................150x112x122mm
NOTA IMPORTANTA: Produsele electrice nu trebuie reciclate
impreuna cu gunoiul menajer. Va rugam sa le transportati la un centru
de reciclare. Adresati-va autoritatilor locale cu privire la procedura de
dezafectare a deseurilor electrice si electronice.
GB- The triangle containing a lightning symbol is used to indicate whenever your health
is at risk (due to electrocution, for example).
An exclamation mark in a triangle indicates particular risks in handing or operating the appliance
F- L’éclair dans le triangle attire l’attention sur un danger physique (due à une électrocution p.ex.).
Le point d’exclamation dans le triangle indique un risque dans la manipulation ou l’utilisation de
l’appareil.
D- Der Blitz im Dreieck weist auf ein Gesundheitsrisiko hin (z.B. Stromschlag).
Das Ausrufezeichen im Dreieck weist auf besondere Gefahren beim Umgang oder Betrieb des
Geräts hin
PT- O triângulo com um símbolo de um raio é usado para indicar quando sua saúde poderá estar
em perigo (devido a electrocussão, por exemplo). Um ponto de exclamação num triângulo indica
riscos específicos em manusear ou operar o aparelho
RO-Triunghiul continand simbolul fulgerului va indica cazurile in care sanatatea dumneavoastra
este in pericol (datorita electrocutarii, de exemplu).Semnul exclamarii in interiorul unui triunghi
indica riscuri deosebite in utilizarea sau punerea in functiune a aparatului.
GB- DISCONNECT DEVICE
Where the MAINS plug or an appliance coupler is used as the disconnect device, the disconnect
device shall remain readily operable.
F- ARRET DE L’APPAREIL
Lorsque le cordon d'alimentation ou un coupleur d'appareil est utilisé comme dispositif de
déconnexion, ce dispositif doit rester facilement accessible.
Si un interrupteur omnipolaire est utilisé comme dispositif de déconnexion, l'emplacement sur
l'appareil et la fonction de l'interrupteur doit être décrite, et le commutateur doit rester facilement
accessible.
D - NETZTRENNUNGSVORRICHTUNGEN
a) Wenn das Gerät über den Netzstecker ausgeschaltet wird, muss die Steckdose jederzeit leicht
zugänglich bleiben
b) Wenn das Gerät über einen Schalter ausgeschaltet wird, muss dieser klar gekennzeichnet und
leicht zugänglich sein.
PT- DESLIGAMENTO DE DISPOSITIVO
Assim que a ficha de alimentação ou um acoplador de equipamentos é ligada quando o
dispositivo está desligado, o dispositivo estará prontamente operacional
RO - DECONECTAREA APARATULUI
In cazul in care aparatul se deconecteaza de la priza, aceasta trebuie sa fie usor accesibila.
Imported from China by
LOTRONIC SA
Avenue Zénobe Gramme 11
1480 SAINTES
Belgium
Other manuals for Ibiza Light LEDSPOT10W
1
Table of contents
Other LOTRONIC Spotlight manuals
Popular Spotlight manuals by other brands

VanGaa Lighting
VanGaa Lighting VG-LM150S user manual

Sealey
Sealey AK435.V3 instructions

Vision & Control
Vision & Control SLE-150-B450-P-24V Instructions for use

brennenstuhl
brennenstuhl SOL 1x4 Instructions for installation and use

Chauvet
Chauvet Lrgrnd 300E Beam Specifications

VELAMP
VELAMP IR666-10W DOOMSTER TREKK EVO manual