Louis M. Gerson Elite User manual

Instructions for Loading and Dispensing
LOADING OF
ELITE
TM
STRAINERS
1. Open the top lid.
2. Open hinged door and the
clear revolving door.
3. Take Pod of Elite Strainers for
loading into open dispenser.
There should be loose material
below the tip of the strainer.
4. Pod must be loaded with dispensing
tabs facing front. The pod is marked
indicating front position.
5. Make sure end tabs are generally
aligned and gently place pod into
dispenser.
6. Once the pod is resting on the
dispenser ring, reach into the bottom
of the dispenser to guide the tip of
the pod into the centering V groove.
7. Close the hinged door.
Leave the lid open.
8. The pod is completely perforated
to allow removal.
9. With one hand, hold the pod of
strainers above the perforation line
and grasp the loose material at the
bottom with your other hand.
10. Firmly but slowly pull down on
the bottom part of the pod.
The bottom section will separate
and may be removed.
11. Remove the top portion and
remainder of the pod through the top
of the dispenser. CAUTION: Removing
strainers from protective pod before
loading into dispenser may cause
contamination of the filter mesh
from body oils or particulates!
12. Close the top lid.
13. Dispense strainers one at a time
using the Dispensing Tab.
14. Be sure to close clear revolving
door when dispenser is not in use.
This keeps strainer mesh free of
ambient dust and particulates.
Elite
™
Strainer & Dispenser System
12 3 & 4
56 7
89 10
11 13 14
LOADTHIS SIDE FRONT,
THENCLOSE FRONT DOOR
Pulldown firmly to open bag on perforations.
Removeconical portion of bag from bottom
andupper portion from top.
LOADTHIS SIDE FRONT,
THEN CLOSEFRONT DOOR
Pulldown firmly to open bag on perforations.
Removeconical portion of bag from bottom
andupper portion from top.
LOAD THIS SIDE FRONT,
THEN CLOSE FRONT DOOR
Pull down firmly to open bag on perforations.
Remove conical portion of bag from bottom
and upper portion from top.
LOADTHIS SIDE FRONT,
THEN CLOSE FRONT DOOR
Pull downfirmly to open bag on per forations.
Removeconical por tion of bag from bottom
and upper portion from top.
LOAD THIS SIDE FRONT,
THEN CLOSE FRONT DOOR
Pulldown firmly to open bag on per forations.
Removeconical portion of bag from bottom
and upper portion from top.
PAINTSTRAINER SYSTEM
CompleteContaminationControl
PAINTSTRAINER SYSTEM
CompleteContaminationControl
PAINTSTRAINER SYSTEM
CompleteContaminationControl
PAINTSTRAINER SYSTEM
CompleteContamination Control
SIDE FRONT,
RONT DOOR
SIDE FRONT,
RONT DOOR
Pulldown firmly to open bag on perforations.
Removeconical portion of bag from bottom
andupper portion from top.

Instrucciones para Llenar y Expender
COMO LLENAR EL
EXPENDEDOR CON
LOS FILTROS ELITE™
1. Abra la tapa superior.
2. Abra la puerta abisagrada y la puerta
giratoria transparente.
3. Agarre una bolsita de los filtros Elite
para colocarlos en el expendedor
abierto. Debería haber material suelto
debajo de la punta del filtro.
4. La bolsita debe ser colocada con las
lenguetas dispensadoras hacia delante.
En la bolsita se indica la posición frontal.
5. Asegúrese que las lenguetas de los
extremos estén básicamente alineadas
y con cuidado coloque la bolsita dentro
del expendedor.
6. Una vez que la bolsita esté colocada en
el aro dispensador, extienda su mano
hacia la parte de abajo del expendedor
para guiar la punta de la bolsita a la
ranura central en forma V.
7. Cierre la puerta abisagrada. Deje
la tapa abierta.
8. La bolsita está completamente
perforada para permitir que se
puede sacar.
9. Con una mano, sujete la bolsita de
filtros encima de la línea de perforación
y agarre el material que está al fondo
con su otra mano.
10. Jale hacia abajo lentamente con
firmeza, la parte de abajo de la bolsita.
La sección de abajo se separará y se
podrá sacar.
11. Saque la parte de arriba y lo que sobra
de la bolsita a través de la parte superior
del expendedor. PRECAUCION: Si saca
los filtros de la bolsita protectora antes
de colocarlos en el expendedor puede
contaminar la malla del filtro con aceites
corporales o partículas!
12. Cierre la tapa superior.
13. Usando la lengueta dispensadora saque
los filtros. Uno a la vez.
14. Asegúrese de cerrar la puerta giratoria
transparente cuando el expendedor no
esté en uso. De esta forma mantendrá la
malla del filtro libre de polvo ambiental
y partículas.
Sistema Elite
™
de Expendedor de Filtros
12 3 & 4
56 7
89 10
11 13 14
LOADTHIS SIDE FRONT,
THENCLOSE FRONT DOOR
Pulldown firmly to open bag on perforations.
Removeconical portion of bag from bottom
andupper portion from top.
LOADTHIS SIDE FRONT,
THEN CLOSEFRONT DOOR
Pulldown firmly to open bag on perforations.
Removeconical portion of bag from bottom
andupper portion from top.
LOAD THIS SIDE FRONT,
THEN CLOSE FRONT DOOR
Pull down firmly to open bag on perforations.
Remove conical portion of bag from bottom
and upper portion from top.
LOADTHIS SIDE FRONT,
THEN CLOSE FRONT DOOR
Pull downfirmly to open bag on per forations.
Removeconical por tion of bag from bottom
and upper portion from top.
LOAD THIS SIDE FRONT,
THEN CLOSE FRONT DOOR
Pulldown firmly to open bag on per forations.
Removeconical portion of bag from bottom
and upper portion from top.
PAINTSTRAINER SYSTEM
CompleteContaminationControl
PAINTSTRAINER SYSTEM
CompleteContaminationControl
PAINTSTRAINER SYSTEM
CompleteContaminationControl
PAINTSTRAINER SYSTEM
CompleteContamination Control
SIDE FRONT,
RONT DOOR
SIDE FRONT,
RONT DOOR
Pulldown firmly to open bag on perforations.
Removeconical portion of bag from bottom
andupper portion from top.

Mode d’emploi pour Recharge et Distribution des Filtres Cônes Elite™
RECHARGE DES
FILTRES CÔNES ELITE™
1. Ouvrir le couvercle du dessus.
2. Ouvrir le volet frontal supérieur du
distributeur ainsi que le système rotatif
transparent de la partie inférieure.
3. Prendre un sachet de filtres cônes
Elite® pour le charger dans le
distributeur en laissant dépasser un
peu d’emballage en dessous de la
pointe des filtres cônes.
4. Le paquet doit être chargé en
positionnant les languettes face
à l’ouverture selon le marquage sur
le sachet.
5. S’assurer que les languettes soient
alignées et placer doucement le paquet
dans le distributeur.
6. Une fois que le paquet de filtres cônes
repose sur l’anneau central du
distributeur, guider la pointe du sachet
au centre de la partie inférieure.
7. Fermer le volet frontal et laisser le
couvercle ouvert.
8. Le bas du sachet est entièrement
perforé pour faciliter son détachement.
9. Tenir le paquet de filtres cônes avec
une main au-dessus de la ligne
pointillée et saisir le bout du sachet
avec l’autre main.
10. Tirer fermement mais en douceur le bas
du sachet et retirez-le.
11. Enlever la partie plastique restante en
tirant par le haut du distributeur.
ATTENTION : Ne pas enlever le sachet
protecteur avant que les filtres ne
soient chargés dans le distributeur pour
éviter la contamination des mailles par
des substances et particules.
12. Fermer le couvercle.
13. Prélever les filtres cônes un par un en le
tirant par sa languette.
14. S’assurer que le système rotatif
transparent soit fermé lorsque vous
n’utilisez pas le distributeur, afin que les
filtres cônes ne soient pas contaminés
par des poussières et autres particules.
Filtres Cônes et Distributeur Elite
™
12 3 & 4
56 7
89 10
11 13 14
LOADTHIS SIDE FRONT,
THENCLOSE FRONT DOOR
Pulldown firmly to open bag on perforations.
Removeconical portion of bag from bottom
andupper portion from top.
LOADTHIS SIDE FRONT,
THEN CLOSEFRONT DOOR
Pulldown firmly to open bag on perforations.
Removeconical portion of bag from bottom
andupper portion from top.
LOAD THIS SIDE FRONT,
THEN CLOSE FRONT DOOR
Pull down firmly to open bag on perforations.
Remove conical portion of bag from bottom
and upper portion from top.
LOADTHIS SIDE FRONT,
THEN CLOSE FRONT DOOR
Pull downfirmly to open bag on per forations.
Removeconical por tion of bag from bottom
and upper portion from top.
LOAD THIS SIDE FRONT,
THEN CLOSE FRONT DOOR
Pulldown firmly to open bag on per forations.
Removeconical portion of bag from bottom
and upper portion from top.
PAINTSTRAINER SYSTEM
CompleteContaminationControl
PAINTSTRAINER SYSTEM
CompleteContaminationControl
PAINTSTRAINER SYSTEM
CompleteContaminationControl
PAINTSTRAINER SYSTEM
CompleteContamination Control
SIDE FRONT,
RONT DOOR
SIDE FRONT,
RONT DOOR
Pulldown firmly to open bag on perforations.
Removeconical portion of bag from bottom
andupper portion from top.

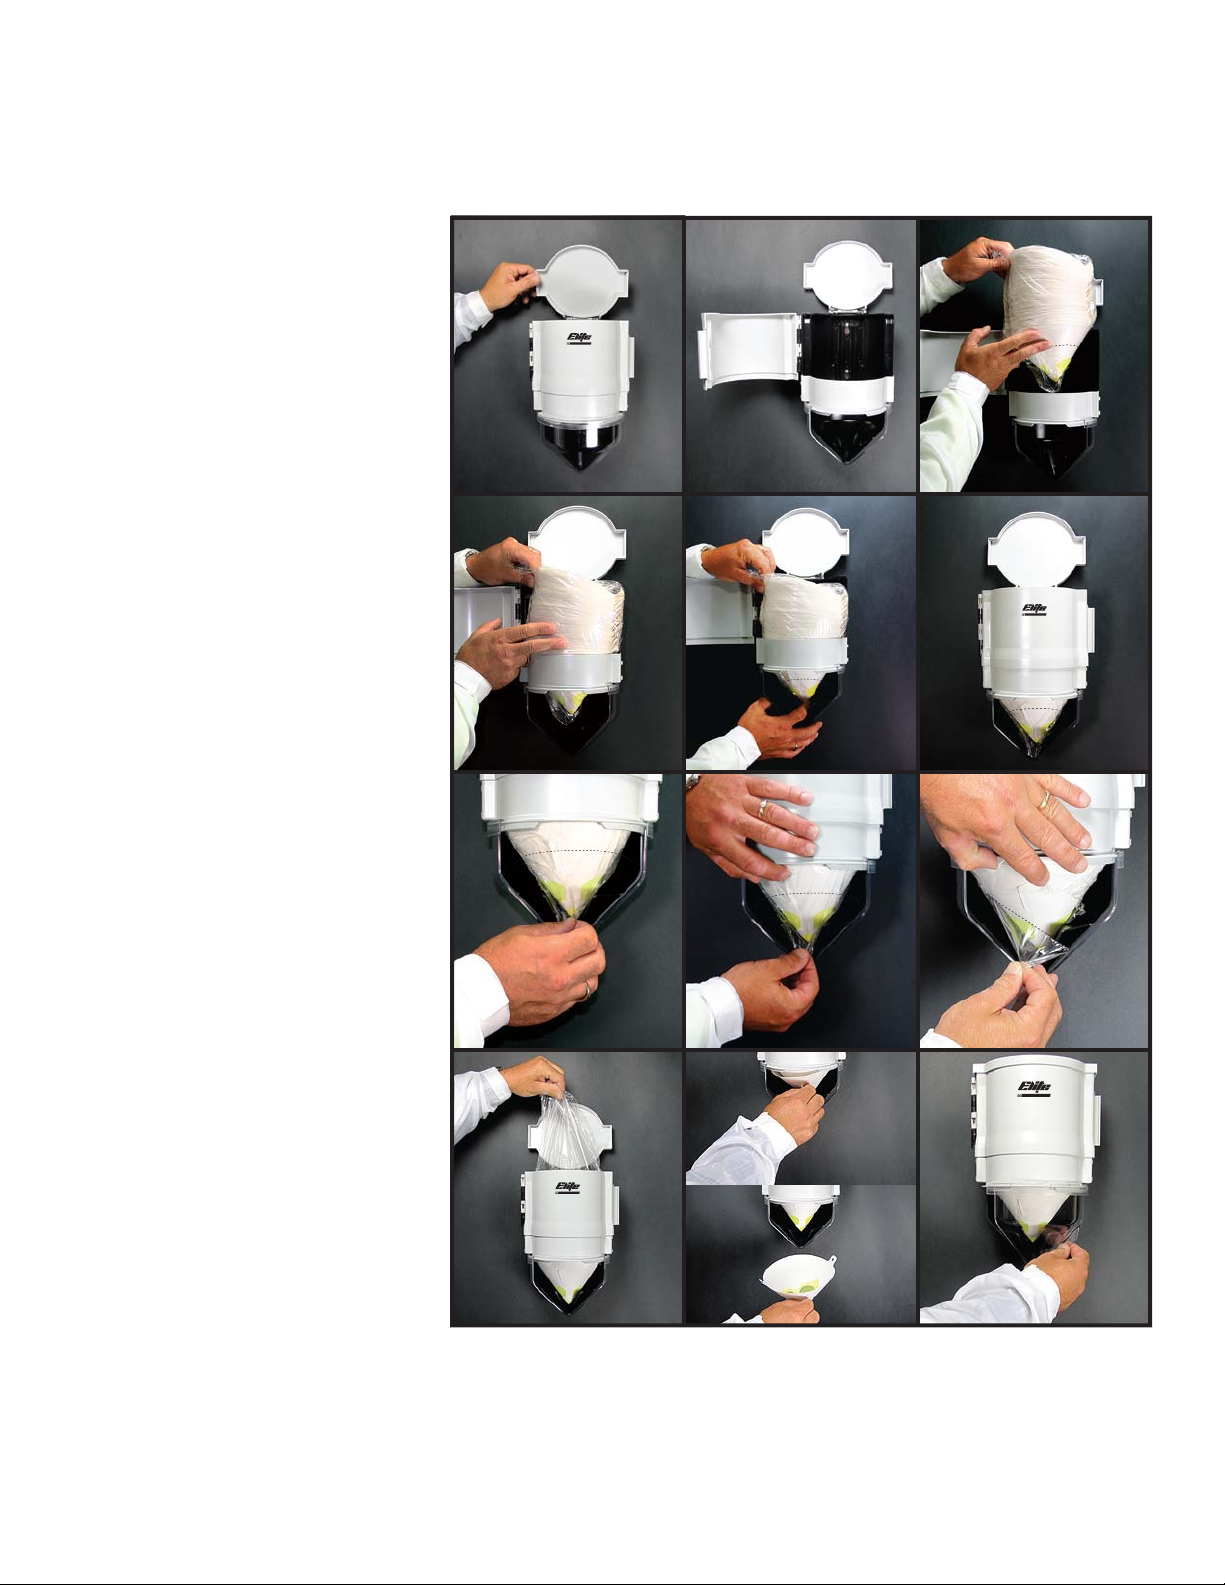
Anleitung zum Einlegen und zur Ausgabe
BEFÜLLEN DES SPENDERS
1. Öffnen Sie den Klappdeckel.
2. Öffnen Sie die Klapptür und die
durchsichtige Drehtür.
3. Nachfüllpackung zum Einlegen in
den offenen Spender bereithalten.
Unterhalb der Siebspitze sollte der
Polybeutel lose sein.
4. Die Nachfüllpackung ist so einzulegen,
dass die Entnahmelaschen der Siebe
nach vorne zeigen. Die Vorderseite
ist durch Beschriftung auf dem
Polybeutel ausgewiesen.
5. Achten Sie darauf, dass die Seiten-
laschen der Siebe alle in einer Linie
sind und legen Sie die Nachfüllpackung
vorsichtig in den Spender.
6. Greifen Sie, sobald die Siebe auf dem
Spenderring sitzen, von unten in den
Spender, um die Spitze der Siebe in
die dafür vorgesehene V-Kerbe in
der Mitte zu führen.
7. Schließen Sie die Klapptür.
Lassen Sie den Deckel geöffnet.
8. Der Polybeutel ist am unteren Ende
perforiert, um ein leichtes Entfernen
zu ermöglichen.
9. Halten Sie mit einer Hand den Polybeu-
tel über der Perforationslinie gut fest
und ergreifen Sie mit der anderen
Hand den losen Teil des Plastiks an
der Unterseite.
10. Ziehen Sie diesen unteren Teil des
Polybeutels fest aber behutsam nach
unten. Der untere Teil löst sich und
kann nun entfernt werden.
11. Entfernen Sie den oberen Teil des
Polybeutels über die Oberseite des
Spenders. ACHTUNG: Die Entnahme
von Sieben aus dem versiegelten
Polybeutel vor dem Einlegen in den
Spender kann zu Verunreinigungen
des Filtergewebes durch Körperfette,
Feinstaub oder andere Verschmutzun-
gen führen!
12. Schließen Sie den Klappdeckel.
13. Entnehmen Sie immer jeweils nur
ein Sieb, indem Sie dieses mit Hilfe
der Entnahmelasche nach unten
heraus ziehen.
14. Achten Sie darauf, dass Sie die durchsi-
chtige Drehtür schließen, wenn der
Spender nicht in Gebrauch ist. Dadurch
wird das Siebgewebe vor Schmutz und
Feinstaub geschützt.
Sieb- und Spendersystem
© 2020, Louis M. Gerson Co., Inc. All Rights Reserved.
300507revF
12 3 & 4
56 7
89 10
11 13 14
LOADTHIS SIDE FRONT,
THENCLOSE FRONT DOOR
Pulldown firmly to open bag on perforations.
Removeconical portion of bag from bottom
andupper portion from top.
LOADTHIS SIDE FRONT,
THEN CLOSEFRONT DOOR
Pulldown firmly to open bag on perforations.
Removeconical portion of bag from bottom
andupper portion from top.
LOAD THIS SIDE FRONT,
THEN CLOSE FRONT DOOR
Pull down firmly to open bag on perforations.
Remove conical portion of bag from bottom
and upper portion from top.
LOADTHIS SIDE FRONT,
THEN CLOSE FRONT DOOR
Pull downfirmly to open bag on per forations.
Removeconical por tion of bag from bottom
and upper portion from top.
LOAD THIS SIDE FRONT,
THEN CLOSE FRONT DOOR
Pulldown firmly to open bag on per forations.
Removeconical portion of bag from bottom
and upper portion from top.
PAINTSTRAINER SYSTEM
CompleteContaminationControl
PAINTSTRAINER SYSTEM
CompleteContaminationControl
PAINTSTRAINER SYSTEM
CompleteContaminationControl
PAINTSTRAINER SYSTEM
CompleteContamination Control
SIDE FRONT,
RONT DOOR
SIDE FRONT,
RONT DOOR
Pulldown firmly to open bag on perforations.
Removeconical portion of bag from bottom
andupper portion from top.
Table of contents
Popular Dispenser manuals by other brands

HORN TECALEMIT
HORN TECALEMIT HDM 60 eco operating manual

Coway
Coway H-100 manual

Bobrick
Bobrick 82216 Instruction for installation and maintenance

InSinkErator
InSinkErator C1300 Specifications & dimensions

AMTC
AMTC LIQUIDFLO ASD-400EL Installation & operation manual

Franke
Franke RODX618E Installation and operating instructions