LS LS30 User manual

©2016 Lucid Sound, Inc. 2150 Palomar Airport Rd., Suite 201, Carlsbad, CA 92011 U.S.A. Lucid Sound, Lucid Gaming, the Lucid Sound logo, and the Lucid Gaming logo are trademarks of Lucid Sound, Inc., its subsidiaries, and aliates.
The shape and design of this product are a trade dress of Lucid Sound, Inc., its subsidiaries and aliates. All rights reserved. All other product names and images are trademarks or registered trademarks of their respective owners. Made
in China. Product features, appearance and specications may be subject to change without notice. Please retain this information for future reference.
EN
DE
FR
IT
ES
USER GUIDE |BEDIENUNGSANLEITUNG |GUIDE D’UTILISATION |GUÍA DE USO |MANUALE D’USO

EN EN
UNIVERSAL GAMING HEADSET CHARGING MICROPHONE
CONNECTING TO CONSOLE
For: PS4, PS3, Xbox One, and Xbox 360
STEP 1.
Connect the wide end of the optical cable to
the optical port on the rear of the Console. Early
Xbox 360 Consoles may require an HDMI Audio
Adapter (not included).
Connect the thin end of the optical cable to the
optical port on the side of the Base Station.
Plug the Base Station into a USB port on the Console.
STEP 2. STEP 3.
CABLES/PARTS BASE STATION
Game Mute
Rising tone = unmuted
Falling tone = muted
Microphone Mute
Rising tone = unmuted
Falling tone = muted
LED on boom mic
illuminates when muted.
EQ Preset Select
1 beep for Normal
2 beeps for Bass Boost
3 beeps for Treble Boost
Status LED
Solid = ON/Connected
Slow Blink = Searching
Optical Input
Power LED
Solid = ON/Connected
Slow Blink = Searching
Fast Blink = Battery Low
USB Charging Port
Microphone Port
Game Volume
Chat Volume
Power Button
Mobile/Xbox Input
IN
5V
(L) (R)
EQ
Xbox Chat Cable/
Mobile 3.5mm Cable
Xbox 360
Chat Adapter
Boom Mic Mic Port Cover
Optical
Cable
USB Charging
Cable
!
The LS30 includes an optional boom microphone.
When this microphone is removed, an internal
microphone is activated.
To connect the boom microphone, simply insert it
into the port on the bottom of the headset.
When battery has less than 15%
power remaining, unit beeps twice
every 10 minutes.
Connect the small end (micro-USB) of the charging cable to the
headset. Connect the other end to a USB port. The LED on the
headset will pulse while charging and turn solid when charging
is complete.
PLAYSTATION 4 SETUP
Go into Settings > Sound and Screen > Audio Output Settings > Primary
Output Port and select ‘Digital Out (Optical)’.
Make sure that only ‘Linear PCM 44.1kHz and ‘Linear PCM 48kHz’ are checked.
Go into Settings > Audio Output Settings > Audio Format (Priority) and select
‘Linear PCM.’
Go into Settings > Devices > Audio Devices and set both the ‘Input Device’ and
‘Output Device’ to ‘USB Headset(Lucid Sound LS30).
Set the Output to Headphone to ‘Chat Audio’.
Set the ‘Volume Control (Headphones)’ to maximum.
1.
2.
3.
4.
5.
6.
PLAYSTATION 3 SETUP
Go into Settings > Sound Settings > Audio Output Settings > Optical Digital.
Make sure that only ‘Linear PCM 2 CH. 44.1kHz’ and ‘Linear PCM 2 CH. 48kHz’
are checked.
Go into Settings > Accessory Settings > Audio Device Settings and set the
‘Input Device’ and ‘Output Device’ to ‘Lucid Sound LS30’.
1.
2.
3.

EN XBOX ONE SETUP
XBOX 360 SETUP
PC / MAC SETUP
MOBILE
Lucid Sound, Inc. warrants this product to be free from defects in materials and workmanship for the warranty
period. This non-transferable, 2-year limited warranty is only to you, the rst end-user purchaser. If a defect covered
by this warranty occurs AND you provide proof of purchase, Lucid Sound, Inc., at its option, will repair or replace
the product at no charge (excluding shipping to Lucid Sound).
The Lucid Sound, Inc., 2-year limited warranty is available to North American and European customers. Your sole
and exclusive remedy is repair or replacement of your Lucid Sound product. In no event shall Lucid Sound’s liability
exceed the original purchase price of the product. This warranty does not apply to: (a) normal wear and tear or
abusive use; (b) industrial, professional or commercial use; (c) if the product has been tampered with or modied.
To receive warranty service, please contact us at:
lucidsound.com
Controller with 3.5mm port
Always turn on the headset before turning on the controller.
Connect one end of the Xbox One chat cable to the 3.5mm
port on the headset and the other end to the 3.5mm port on
the Controller.
On the Xbox One, go into All settings > Kinect & devices >
Devices & accessories and choose the Xbox One Wireless
Controller in use.
Select ‘Volume’ and set ‘Headset volume’ to maximum and
‘Mic monitoring’ to minimum.
Make sure that ‘Headset mic’ is turned to ‘On.’
If it appears, set ‘Headset chat mixer’ all the way to the right
for 100% chat.
On the Xbox One, go into All settings > Display & sound.
Under ‘Audio Output’ select ‘Optical audio’ and choose
‘Stereo uncompressed.’
Using Stereo Headset Adapter
If the Xbox One Controller does not have a 3.5mm port, an
Xbox One Stereo Headset adapter is required (not included).
Connect one end of the Xbox One chat cable to the 3.5mm
port on the headset and the other end to the 3.5mm port on
the Stereo Headset Adapter.
Adjust the game/chat balance on the Stereo Headset Adapter
to 100% chat and increase the volume on the adapter to
maximum.
On the Xbox One, go into All settings > Display & sound.
Under ‘Audio output’ select ‘Optical audio’ and choose ‘Stereo
uncompressed.’
Connect one end of the Xbox chat cable to the 3.5mm port on
the headset and the other end to the Xbox 360 adapter. Then
connect the adapter to the 2.5mm port on the Controller.
Go into Settings > System > Console Settings > Audio
and select ‘Digital Stereo.’
1.
2.
3.
4.
5.
6.
Connect the dongle to a USB port on the computer and power on the headset.
In the computer’s sound settings, set the default sound output to “Lucid Sound PC
Gaming Audio Interface” for game audio.
In the chat program being used, choose “Lucid Sound PC Chat Audio Interface” for
both the Input and Output.
1.
2.
3.
Connect one end of the mobile cable to the 3.5mm input on the headset and the
other end to the 3.5mm output on the mobile device.
The headset will only work in passive (OFF) mode. (note that the volume, EQ, and
mute features will not function).
1.
2.
1.
2.
3.
4.
1.
2.
DE
UNIVERSAL GAMING HEADSET
CABLES/PARTS BASE STATION
Gamesound aus/stumm
Steigende Töne = stumm
Fallende Töne = aktiv
Mikrofon aus/stumm
Steigende Töne = stumm
Fallende Töne = aktiv. LED
am Mikrofonarm leuchtet,
wenn das Mikrofon stumm
geschaltet ist
Equalizer Voreinstellungen
1 Piepton = Normal
2 Pieptöne = Bass Boost
3 Pieptöne = Höhen Boost
Status LED
(Durchgehendes Leuchten = EIN/verbunden;
Langsames Blinken = Verbindungssuche)
Optischer
Eingang
Power LED
Durchgehendes Leuchten = EIN/verbunden
Langsames Blinken = Verbindungssuche
Schnelles Blinken = Akku schwach
Micro-USB Ladeanschluss
Mikrofonanschluss
Lautstärke
Gamesound
Lautstärke Chat
Power-Koppeln Taste
Mobile/Xbox Input
IN
5V
(L) (R)
EQ
Xbox / Mobile
3.5mm Kabel
Xbox 360
Chat-Adapter
Mikrofonarm Mic Port Cover
Optisches
Kabel
USB Ladekabel
Model No: LS30RX IC: 21203-06302
Model No: LS30TX IC: 21203-06301
This device complies with Industry Canada licence-exempt RSS-247 standard. Operation is subject to the following
two conditions: (1) this device may not cause interference, and (2) this device must accept any interference, includ-
ing interference that may cause undesired operation of the device.
IC Radiation Exposure Statement:
This equipment complies with IC RSS-102 radiation exposure limits set forth for an uncontrolled environment. This
equipment should be installed and operated with minimum distance 0.5 cm between the radiator and your body.
Lucid Sound, Inc.
Made in China

XBOX ONE SETUP
XBOX 360 SETUP
PC / MAC SETUP
Lucid Sound, Inc. garantiert, dass dieses Produkt frei von Mängeln in Material und Verarbeitung für den Garantiezeitraum
ist. Diese nicht übertragbare, 2 Jahre Garantie ist nur für Sie, den ersten Käufer und Endbenutzer. Soweit ein Mangel, der
von dieser Garantie gedeckt wird, auftritt und Sie über einen Nachweis über den Kauf des Produkt verfügen, wird Lucid
Sound, Inc. nach eigenem Ermessen entweder reparieren oder das Produkt kostenlos (ohne Versandkosten zu Lucid
Sound) ersetzen.
Die Lucid Sound, Inc. 2 Jahre Garantie ist für Kunden in Europe verfügbar. Die einzige und ausschließliche Abhilfe ist
Reparatur oder der Ersatz Ihres Lucid Sound Produkts. In keinem Fall überschreitet die Haftung von Lucid Sound, Inc.
den ursprünglichen Kaufpreis des Produkts. Diese Garantie gilt nicht für: (a) normalen Verschleiß oder Missbrauch; (b)
Industrie, beruiche oder kommerzielle Zwecke; (c) wenn das Produkt manipuliert oder verändert wurde.
Um Garantieservice zu erhalten kontaktieren Sie uns bitte wie folgt:
lucidsound.com
Using Stereo Headset Adapter
Wenn der Xbox One Controller nicht über einen 3,5mm
Anschluss verfügt, wird der Xbox One Stereo Headset Adapter
benötigt. (nicht beinhaltet)
Stecke das eine Ende des Xbox One Chatkabels in den 3,5mm
Anschluss am Headset und das andere Ende in den 3,5mm
Anschluss des Stereo Headset Adapters.
Stelle die Game/Chat-Balance am Stereo Headset Adapter auf
100% Chat und die Lautstärke am Adapter auf Maximum.
An der Xbox One gehst Du in Einstellungen > Anzeige &
Audio. Bei ‘Audio Ausgang’ wähle ‘Optisches Audio’ und als
Option ‘Stereo unkomprimiert’.
Schließen Sie ein Ende des Xbox -Chat -Kabel mit dem
3,5-mm- Anschluss am Headset und das andere Ende an der
Xbox 360 -Adapter. Dann schließen Sie den Adapter an den
2,5-mm- Anschluss auf dem Controller.
Gehe zu Einstellungen > System > Konsoleneinstellungen
> Audio und wähle, ‘Digital Stereo‘
Controller mit 3.5mm Anschluss
Vor dem Einschalten des Kontrollers immer zuerst das Headset
einschalten.
Stecke das eine Ende des Xbox One Chatkabels in den 3,5mm
Anschluss am Headset und das andere Ende in den 3,5mm
Anschluss des Controllers.
An der Xbox One gehst Du in Einstellungen – Kinect &
Geräte – Geräte & Zubehör und wählst den Xbox One
Wireless Controller in Benutzung aus.
Wähle ‘Lautstärke’ und setze ‘Headset Lautstärke’ auf maxi-
mum und ‘Mic monitoring’ auf minimum. Versichern Sie sich,
dass das Headset Mikrofon eingeschaltet ist.
Wenn das auftritt, drehen Sie den Headset Chat Regler kom-
plett nach rechts für 100% Chat.
An der Xbox One gehst Du in Einstellungen – Anzeige & Klang
Bei ‘Audio Ausgang’ wähle ‘Optisches Audio’ und als Option
‘Stereo unkomprimiert’
1.
2.
3.
4.
5.
6.
Schließen Sie den Dongle an einen USB -Anschluss am Computer an und
schalten Sie das Headset ein.
In den Sound -Einstellungen des Computers , stellen Sie den Standard-Sound
-Ausgang auf “ LucidSound PC Gaming Audio Interface” für Game-Audio .
Im Chat-Programm verwendet wird , wählen Sie “ LucidSound- PC Chat Audio
Interface” sowohl für den Input und Output.
1.
2.
3.
MOBILE GERÄTE
Verbinde das eine Ende des Mobilgerätekabels mit dem 3,5mm Anschluss am Headset
und das andere Ende des Kabels mit dem 3,5mm Ausgang am Mobilgerät.
Das Headset wird nur im passiven (ausgeschaltetem) Zustand arbeiten. Bitte beachte,
das Lautstärkeregler, Equalizer und Stummschalter in diesem Modus ohne. Funktion
sind.
1.
2.
1.
2.
3.
4.
1.
2.
DEDE LADEVORGANG MIKROFON
VERBINDUNG ZUR KONSOLE
Für: PS4, PS3, Xbox One und Xbox 360
SCHRITT 1.
Stecke das breitere Ende des optischen Kabels
in den optischen Anschluss an der Rückseite der
Konsole. Ältere Modelle der Xbox 360 benötigen
ggf. einen HDMI Audio Adapter (nicht beinhaltet).
Stecke das schmalere Ende des optischen
Kabels in den optischen Anschluss an der Seite
der Basisstation.
Verbinde die Basisstation mit einem USB-Steckplatz
der Konsole.
SCHRITT 2. SCHRITT 3.
!
Das LS30 wird mit einem optionalen Mikrofonarm
geliefert. Wenn dieses Mikrofon entfernt wird, dann
wird automatisch ein internes Mikrofon aktiviert.
Um den Mikrofonarm mit dem Headset zu
verbinden, muss es einfach in den entsprechenden
Anschluss an der Unterseite des Headsets gesteckt
werden.
Wenn der Akku nur noch über weniger
als 15% Kapazität verfügt, hörst Du 3
Pieptöne alle 10 Minuten.
Verbinde mittels des mittgelieferten USB-Ladekabels den
USB-Ladeanschluss des Headsets mit einem USB-Anschluss.
Die LED des Headsets pulsiert während des Ladevorganges und
leuchtet konstant, wenn der Ladevorgang abgeschlossen ist.
PLAYSTATION 4 SETUP
Gehe in Einstellungen > Sound und Bildschirm > Audioausgabe-
Einstellungen > Primärer Ausgabeport und wähle ‘Digital Out (Optical)’
Stelle sicher, das nur ‘Linear PCM 44.1kHz‘ und ‘Linear PCM 48kHz’ ausgewählt sind.
Gehe in Einstellungen > Sound und Bildschirm > Audioausgabe-
Einstellungen > Audioformat (Priorität) und wähle ‘Lineare PCM.’
Gehe in Einstellungen > Geräte > Audiogeräte und setze ‘Eingabegerät’ und ‘Aus-
gabegerät’ auf ‘USB Headset (Lucid Sound LS30).
Bei ‘Ausgabe über Kopfhörer’ wähle ‘Chat-Audio’ aus.
Setze ‘Lautstärkeregelung (Kopfhörer) auf Maximum.
1.
2.
3.
4.
5.
6.
PLAYSTATION 3 SETUP
Gehe zu Einstellungen > Sound Einstellungen > Audio Ausgangseinstellungen
> Optisch Digital.
Stelle sicher, das nur ‘Linear PCM 2 CH. 44.1kHz’ und ‘Linear PCM 2 CH. 48kHz’
ausgewählt sind.
Gehe in Einstellungen > Peripheriegeräte-Einstellungen > Audio-Geräte-Ein-
stellungen und wähle bei ‘Eingabe-Gerät’ und ‘Ausgabe-Gerät’ jeweils ‘Lucid Sound
LS30’ aus.
1.
2.
3.

FR CASQUE GAMING UNIVERSEL
CÂBLES/PARTS STATION D’ACCUEIL
Coupure du son du jeu
tons hausse = ouvert
relevant tons= coupe
Coupure du son du
micro
tons hausse = ouvert
relevant tons= coupe
La DEL du micro
s’allume en mode muet
Selection du Mode EQ
1 bip= neutre
2 bips= basses ampliées
3 bips= aigus ampliés
État de la DEL
allumé = connecté
clignoté = en récherche
Entrée optique
Diode Alimentation
allumé=connecté
clignotement lent = en récherche
clignotement rapide = batterie
faible
Port de charge USB
Prise Micro
Volume du jeu
Volume du chat
Bouton Alimentatio
Prise Chat/
Mobile 3,5mm
IN
5V
(L) (R)
EQ
Câble Xbox /
Mobile 3,5mm
Adaptateur
Chat Xbox 360
Micro externe Couverture du prise micro externe
Câble
Optique
Câble de
recharge USB
EN
CHARGEMENT MICROPHONE
CONNEXION A AL CONSOLE
Pour : PS4, PS3, Xbox One, et Xbox 360
ÉTAPE 1.
Connecter le câble optique (embout large) sur
le port optique a l’arriere de la console. Les
premiers modeles de Xbox 360 recquierent un
adaptateur HDMI (non inclus)
Connecter l’autre extremité du cable optique
(ne) au port optique de la station d’accueil
Connecter la station d’accueil sur un port USB
de la console
ÉTAPE 2. ÉTAPE 3.
!
Le LS30 inclus un micro externe optionnel. Lorsque ce
micro n’est pas branché, un micro interne est active.
Pour connecter le micro externe, inserer le simplement
dans le port prevu a cet eet sur la partie inferieure du
casque.
Lorsque la batterie descends sous
les 15% de charge, le casque
bippe 3 fois toutes les 10 minutes.
Connecter l’embout (micro-USB) du cable de récharge sur le
casque. Connecter l’autre extremité sur un port USB. La diode
du casque clignote pendant le chargement et reste allumée
lorsque la charge est complete.
INSTALLATION PLAYSTATION 4
Aller dans Reglages>Son et écran>Reglages Audio>Sortie audio principale et
choisir “Sortie Numerique (optique)”.
S’assurer que seulement “linear PCM 44.1kHz” et “linear PCM 48kHz” sont coches.
Aller dans Reglages>Reglages sortie audio>Format Audio (prioritaire) et choisir
“lineaire PCM”.
Aller dans Reglages>Appareils>Appareils audio et mettre “input device” et “output
device” sur “Casque USB (Lucid Sound LS30).
Mettre la sortie vers le casque sur “chat Audio”.
Mettre le “controle du volume (casque)” au maximum.
1.
2.
3.
4.
5.
6.
INSTALLATION PLAYSTATION 3
Aller dans Reglages>Reglages son>Reglages sortie Audio>numerique optique.
S’assurer que seulement “linear PCM 44.1kHz” et “linear PCM 48kHz” sont coches.
Aller dans Reglages>Appareils>Appareils audio et mettre “input device” et “output
device” sur “Casque USB (Lucid Sound LS30).
1.
2.
3.

FR INSTALLATION XBOX ONE
INSTALLATION XBOX 360
Lucid Sound Inc garantit ce produit contre tout défaut de matériau ou de fabrication durant la période de garantie. Cette
garantie limitée non transférable de 2 ans n’est valable que pour le premier acheteur du produit. Si un défaut couvert par cette
garantie survient ET si vous avez la preuve d’achat du produit, Lucid Sound Inc, procèdera, a sa discrétion, au remplacement
ou à la réparation du produit à sa charge (excepte les frais d’envoi à Lucid Sound).
La garantie limitee de 2 ans oerte par Lucid Sound Inc, est valable pour les clients Européens. Le seul et unique remède est la
réparation ou le remplacement de votre produit Lucid Sound. En aucun cas la responsabilité de Lucid Sound ne pourra excéder
le montant initial d’achat du produit. Cette garantie ne s’applique pas à : (a) Usure normale due a l’utilisation ou utilisation
abusive ; (b) usage industriel, professionnel ou commercial ; (c) Si le produit a été modié ou démonté.
Pour recevoir le service de garantie s’il vous plaît nous contacter à :
lucidsound.com
Manette avec port 3,5mm
Toujours allumer le casque avant d’allumer la manette.
Connecter le câble chat sur le port 3,5mm du casque et l’autre
extremité sur le port 3,5mm de la manette.
Sur la Xbox One, aller dans le menu Reglages > Kinect et
peripheriques > Peripheriques et accessoires et choisir
Manette sans l Xbox One en utilisation.
Choisir “volume” et mettre le “volume casque” au maximum et
“retour Micro” au minimum.
Si il apparait, regler le “mixage chat casque” tout a droite
sur 100%.
Sur la Xbox One, aller dans les Reglages > Image et son.
Dans « Sortie Audio », choisir « audio optique » et choisir «
Stereo non compressé ».
Manette sans le port 3,5mm
Si la manette ne dispose pas de port 3.5mm, un adaptateur
Xbox One pour casque Stereo est requis (non inclus).
Connecter le cable chat sur le port 3,5mm du casque et l’autre
extremite sur le port 3,5mm de la manette.
Ajuster la balance jeu/chat sur l’adaptateur casque stéréo a
100% chat et monter le volume sur l’adaptateur au maximum.
Sur la Xbox One, aller dans les Reglages>Image et son.
Dans « Sortie Audio », choisir « audio optique » et choisir «
Stéréo non compressé. »
Branchez une extrémité du câble Xbox chat au port 3,5 mm sur
le casque et l’autre extrémité à l’adaptateur Xbox 360.
Branchez ensuite l’ adaptateur sur le port 2.5mm sur le
contrôleur.
Aller dans Reglages>Système>Reglages console>Audio et
choisir “stéréo numerique”.
1.
2.
3.
4.
5.
6.
1.
2.
3.
4.
1.
2.
IT
CUFFIA DA GIOCO UNIVERSALE
CAVI STAZIONE DI BASE
Silenziamento Gioco
Silenziamento Microfono
Disattiva entrambi audio del
microfono in uscita e tono
laterale
1 bip = silenziato
2 bip = riattivato
LED sul microfono si ac-
cende quando disattivato
Preselezione EQ
1 bip = Normale
2 bip = Incremento Bass
3 bip = Incremento Treble
LED di stato
solido = ON / connesso
Blink lento = Ricerca
Ingresso
Ottico
Power LED
LED di accensione
sso = ON / connesso
Blink Lento = Ricerca
Blink Veloce = batteria scarica
Porta di ricarica USB
Porta Microfono
Volume
Gioco
Volume Chat
Tasto di accensione
Porta Chat /
mobile 3,5 millimetri
IN
5V
(L) (R)
EQ
Cavo Xbox
mobile 3,5 millimetri
Adattatore Chat
Xbox 360
Boom Mic Mic Port Cover
Cavo
ottico
Cavo di
ricarica USB
Model No: LS30RX IC: 21203-06302
Model No: LS30TX IC: 21203-06301
Le manuel d’utilisation des appareils radio exempts de licence doit contenir l’énoncé qui suit, ou l’équivalent, à un
endroit bien en vue et/ou sur les appareils :
Le présent appareil est conforme aux CNR d’Industrie Canada applicables aux appareils radio exempts de licence. L’exploita-
tion est autorisée aux deux conditions suivantes : (1) l’appareil ne doit pas produire de brouillage, et (2) l’utilisateur de l’appareil
doit accepter tout brouillage radioélectrique subi, même si le brouillage est susceptible d’en compromettre le fonctionnement.
Déclaration d’exposition à la radiation:
Cet équipement respecte les limites d’exposition aux rayonnements IC RSS-102 dénies pour un environnement non contrôlé.
Cet équipement doit être installé et mis en marche à une distance minimale de 0.5 cm qui sépare l’élément rayonnant de votre
corps.
Lucid Sound, Inc.
Fabriqué en Chine
PC / MAC SETUP
MOBILE
Branchez le dongle à un port USB de l’ordinateur et de la puissance sur le casque.
Dans les paramètres sonores de l’ordinateur , réglez la sortie audio par défaut à
“LucidSound PC Interface Audio Gaming” pour le jeu audio.
Dans le programme de chat utilisé, choisissez “LucidSound PC chat Interface Audio”
tant pour l’ entrée et la sortie .
1.
2.
3.
Connecter le câble mobile sur le port 3,5mm du casque et l’autre extremité sur le
port 3,5mm de l’appareil mobile.
Le casque fonctionnera en mode passif (OFF). (Note: les boutons volume, EQ et
muet ne fonctionneront pas).
1.
2.

SETUP XBOX ONE
SETUP XBOX 360
SETUP PC / MAC
CELLULARE
INFORMAZIONE AGLI UTENTI DI APPARECCHIATURE DOMESTICHE
Ai sensi dell’art. 26 del Decreto Legislativo 14 marzo 2014, n. 49 “Attuazione della Direttiva 2012/19/UE sui
Riuti di Apparecchiature Elettriche ed Elettroniche (RAEE)” e del Decreto Legislativo 188 del 20 novembre
2008.
Il simbolo del cassonetto barrato riportato sull’apparecchiatura o sulla sua confezione indica che il prodotto alla ne
della propria vita utile deve essere raccolto separatamente dagli altri riuti per permetterne un adeguato trattamento
e riciclo.
Si ricorda che le pile/accumulatori eventualmente presenti, laddove possibile, debbono essere rimosse
dall’apparecchiatura prima che questa sia conferita come riuto.
L’utente potrà , pertanto, conferire gratuitamente l’apparecchiatura e l’eventuale batteria giunta a ne vita agli idonei
centri comunali di raccolta dierenziata dei riuti elettrici ed elettronici. In alternativa l’utente potrà riconsegnarle al
rivenditore secondo le seguenti modalità:
• sia pile portatili sia apparecchiature di piccole dimensioni, ovvero con almeno un lato esterno non superiore a 25
cm, è prevista la consegna gratuita senza obbligo di acquisto presso i negozi con una supercie di vendita delle
apparecchiature elettriche ed elettroniche superiore ai 400 mq. Per negozi con dimensioni inferiori, tale modalità è
facoltativa.
• per apparecchiature con dimensioni superiori a 25 cm, è prevista la consegna in tutti i punti di vendita in modalità
1 contro 1, ovvero la consegna al rivenditore potrà avvenire solo all’atto dell’acquisto di un nuovo prodotto
equivalente, in ragione di uno a uno.
L’adeguata raccolta dierenziata per l’avvio successivo dell’apparecchiatura e delle pile/accumulatori dismessi al
riciclaggio, al trattamento e allo smaltimento ambientalmente compatibile contribuisce ad evitare possibili eetti
negativi sull’ambiente e sulla salute e favorisce il reimpiego e/o riciclo dei materiali di cui essi sono composti.
Lo smaltimento abusivo di apparecchiature, pile ed accumulatori da parte dell’utente comporta l’applicazione delle
sanzioni di cui alla corrente normativa di legge.
Lucid Sound, Inc. garantiert, dass dieses Produkt frei von Mängeln in Material und Verarbeitung für den Garantie-
zeitraum ist. Lucid Sound, Inc. garantisce che questo prodotto è privo di difetti in materiali e manodopera per il peri-
odo di garanzia. Questa garanzia limitata, non trasferibili, di 2 anni è solo per voi, il primo utente nale acquirente.
Se un difetto coperto da questa garanzia si verica E potete fornire la ricevuta di acquisto, Lucid Sound, Inc., a sua
discrezione, riparerà o sostituirà il prodotto gratuitamente (escluso il trasporto a Lucid Sound).
Lucid Sound, Inc., garanzia limitata di 2 anni di è disponibile per i clienti europei. L’unico ed esclusivo rimedio è la
riparazione o la sostituzione del prodotto Lucid Sound. In nessun caso la responsabilità di Lucid Sound puó essere
superiore al prezzo di acquisto originale del prodotto. Questa garanzia non si applica a: (a) normale usura o uso
abusivo; (b), l’uso professionale, commerciale o industriale; (c) se il prodotto è stato manomesso o modicato.
Per ricevere assistenza in garanzia, vi preghiamo di contattarci all’indirizzo:
lucidsound.com
Controller con cavo 3,5 mm
Attivare sempre l’auricolare prima di accendere il controller
Collegare un’estremità del cavo chat Xbox One alla porta 3,5
millimetri dell’auricolare e l’altra estremità alla porta 3,5mm
sul controller.
Nella Xbox One, andare in Impostazioni> Kinect e
dispositivi> Dispositivi e accessori e scegliere Xbox One
wireless controller in uso.
Selezionare ‘Volume’ e impostare ‘il volume Auricolare’ a
massimo e ‘controllo Mic’ a minimo.
Se appare, impostare ‘auricolare Chat mixer’ completamente
a destra al 100% di chat.
Nella Xbox One, andare in Impostazioni> Display e suoni.
Sotto ‘Uscita Audio’ selezionare ‘audio ottico’ e scegliere
‘stereo non compresso.’
Collegare un’estremità del cavo cellulare all’ingresso 3,5mm Dell’auricolare e l’altra
estremità all’uscita 3,5mm del dispositivo mobile.
L’auricolare funziona solo in modalità passiva (OFF). (si noti che il volume, a EQ, e
pulsanti mute non funzionano).
Controller senza cavo 3,5 mm
Se il controller Xbox One non dispone di una porta da 3,5
mm, è necessario un adattatore Stereo Headset One Xbox
(non incluso).
Collegare un’estremità del cavo chat alla porta 3,5 mm dell’au-
ricolare e l’altra estremità alla porta 3,5mm dell’adattatore
Auricolare Stereo.
Regolare il bilanciamento del volume gioco / chat sull’ adatta-
tore auricolare stereo al 100% di chat e aumentare il volume
sull’ adattatore al massimo.
Nella Xbox One, andare in Impostazioni> Display e suoni.
Sotto ‘Uscita Audio’ selezionare ‘audio ottico’ e scegliere
‘stereo non compresso.’
Collegare un’estremità del cavo Xbox chat per la porta di 3,5
millimetri l’auricolare e l’altra estremità all’adattatore Xbox 360.
Quindi, collegare l’ adattatore alla porta 2,5 mm sul controller.
Andate in Impostazioni> Sistema> Impostazioni con-
sole> Audio e selezionare ‘Stereo Digitale.’
1.
2.
3.
4.
5.
6.
1.
2.
1.
2.
3.
4.
1.
2.
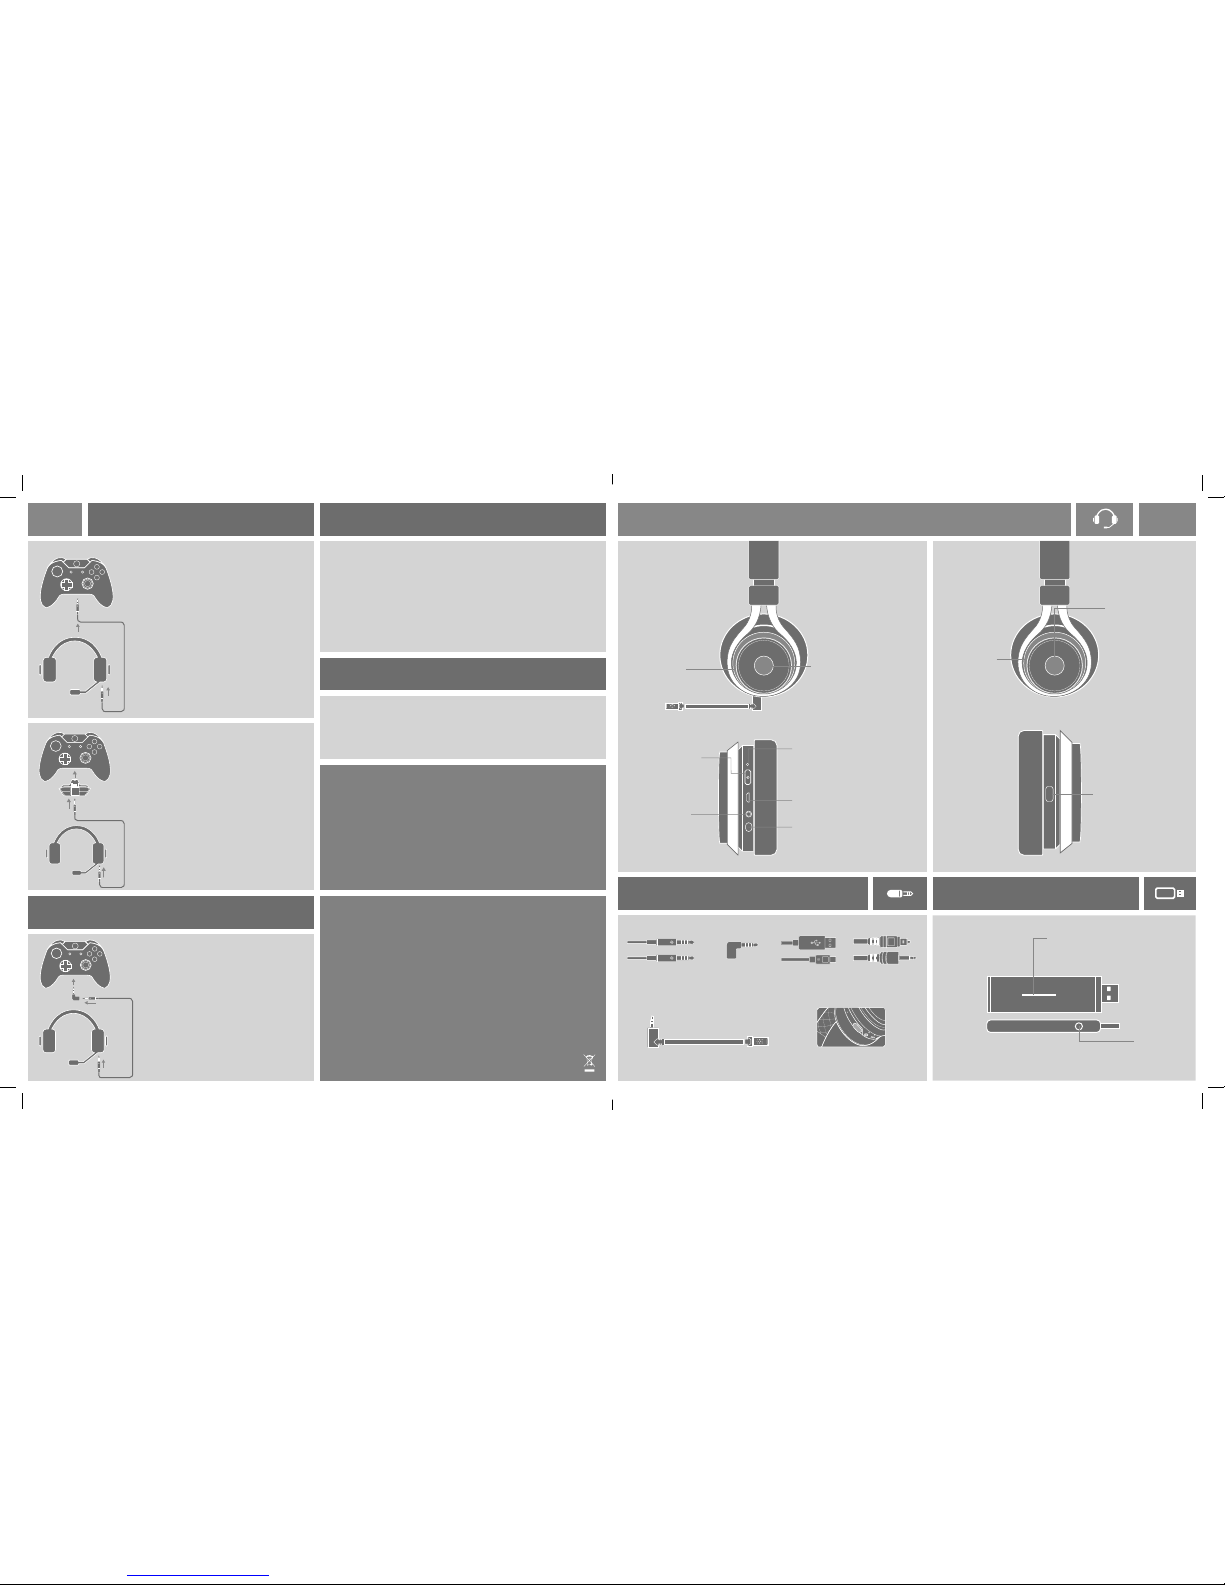
ITIT RICARICA MICROFONO
CONNESSIONE ALLA CONSOLE
Per: PS4, PS3, Xbox One und Xbox 360
FASE 1.
Collegare l’estremità larga del cavo ottico alla
porta ottica sul retro della console. Alcune ver-
sioni Xbox 360 possono richiedere un adattatore
HDMI audio (non incluso)
Collegare l’estremità sottile del cavo ottico alla
porta ottica sul lato della stazione base.
Collegare la stazione base ad una porta USB
sulla console
FASE 2. FASE 3.
!
L’LS30 include un microfono ad asta opzionale.
Quando questo microfono viene rimosso, un micro-
fono interno è attivato.
Per collegare il microfono ad asta, è suciente
inserirlo nella porta sulla parte inferiore della cua.
Quando il livello della batteria è inferi-
ore al 15%, la cua emette un suono
per 3 volte ogni 10 minuti.
Collegare l’estremità più piccola (micro-USB) del cavo di ricarica
alla cua. Collegare l’altra estremità ad una porta USB. Il LED
sulla cua pulserà durante la carica e diventa sso quando la
ricarica è completa.
SETUP PLAYSTATION 4
Andate in Impostazioni> Audio e schermo> Impostazioni di uscita audio> Port
uscita primaria e selezionare ‘Uscita digitale (ottica).’
Assicurarsi che solo ‘Linear PCM 44,1 kHz e’ Linear PCM 48kHz ‘ siano selezionati.
Andate in Impostazioni> Impostazioni di uscita audio> Formato Audio (Priority) e
selezionare ‘PCM lineare.’
Andate in Impostazioni> Dispositivi> Dispositivi audio e impostare sia il
‘Dispositivo in ingresso’ che il ‘Dispositivo di uscita’ a ‘USB Headset (LS30 Lucid Sound).”
Impostare l’uscita per cue per ‘Chat audio.’
Impostare il ‘Volume Control (cue)’ al massimo.
1.
2.
3.
4.
5.
6.
SETUP PLAYSTATION 3
Andate in Impostazioni> Impostazioni dell’audio> Impostazioni di uscita audio>
digitale ottico.
Assicurarsi che solo ‘Linear PCM 2 CH. 44.1kHz ‘e’ Linear PCM 2 CH. 48kHz ‘ siano
seleyionati.
Andate in Impostazioni> Impostazioni Accessori > Impostazioni dei dispositivi
audio e impostare il ‘Dispositivo d|ingresso ‘ e ‘Dispositivo di uscita’ a ‘LS30 Lucid
Suono’
1.
2.
3.
Collegare il dongle a una porta USB del computer e accendere l’auricolare.
Nelle impostazioni audio del computer , impostare l’uscita audio di default di “LucidSound del
PC Gaming Audio Interface” per l’audio del gioco.
Nel programma di chat in uso , scegliere “LucidSound del PC Chat Interfaccia Audio” sia per l’
ingresso e di uscita.
1.
2.
3.

ES AURICULAR UNIVERSAL GAMING
CÂBLES/PARTS ESTACIÓN BASE
Coupure du son du jeu
tons hausse = ouvert
relevant tons= coupe
Función Mute Micrófono
Cancela ambas salidas de
audio del micro con los tonos:
1 pitido= Cancela
2 pitidos= Fin de cancelación.
El LED del micrófono se ilu-
mina cuando está en función
mute
EQ Preset Select
Ajuste Ecualizador
1 pitido = Normal
2 pitidos = Realce de graves
3 pitidos = Realce de agudos
Indicador LED
Luz ja= ON/Conectado
LED parpadea= Buscando
Entrada cable
Óptico
Indicador LED
Luz ja= ON/Conectado;
LED parpadea = Buscando
LED parpadea-rápido = Baja
batería
Puerto de carga USB
Entrada Micrófono
Volumen Juego
Volumen
del Chat
Encendido
Entrada Jack
3.5 mm Chat| Móvil
IN
5V
(L) (R)
EQ
Cable jack 3.5 mm
Xbox / Móvil
Adaptador Chat
Xbox 360
Brazo Micrófono Mic Port Cover
Cable
Óptico
Cable carga
puerto USB
ES
CARGA MICRÓFONO
CONEXIÓN CONSOLAS
Para : PS4, PS3, Xbox One, et Xbox 360
PASO 1.
Conecta utilizando el cable óptico en el puerto
de la parte trasera de la consola. Todas las Xbox
360 necesitan un adaptador de audio HDMI (no
incluido).
Conecta la parte más delgada del cable óptico
en el puerto lateral de la Base de Carga.
Enchufa la Base de Carga en el puerto USB de la
consola.
PASO 2. PASO 3.
!
EL LS30 incluye un micrófono opcional. Cuando el
brazo del micro se desístala, un micrófono interno
se activa.
Para conectar el micrófono, es muy sencillo, inserta
el brazo del micro en el puerto del auricular.
Cuando la batería tenga menos
de un 15% de carga, sonaran 3
pitidos cada 10 minutos indicando la
necesidad de carga del dispositivo.
Conecte el cable en el puerto micro-USB del auricular, el otro
extremo del cable al puerto USB. El LED del auricular par-
padeara durante la carga. Una vez la luz deje de parpadear el
dispositivo se habrá cargado completamente.
CONFIGURACIÓN PLAYSTATION 4
Ves a la pantalla Settings > Sound and Screen > Audio Output Settings >
Primary Output Port y selecciona Digital Out (Optical).
Recuerda chequear sólo las frecuencias ‘Linear PCM 44.1kHz y ‘Linear PCM 48kHz.’
Ves a la pantalla Settings > Audio Output Settings > Audio Format (Priority)
y selecciona Linear PCM.
Ves a la pantalla Settings > Devices > Audio Devices y congura las opciones
Imput Device y Output Device a través del USB del auricular (Lucid Sound LS30).
Congura las salida del Auricular para el audio del Chat.
Congura el control del volumen del auricular.
1.
2.
3.
4.
5.
6.
CONFIGURACIÓN PLAYSTATION 3
Congura el auricular en la pantalla Sound Settings > Audio Output Settings >
Optical Digital.
Recuerda chequear sólo las frecuencias ‘Linear PCM 44.1kHz y ‘Linear PC 48kHz’
Recuerda chequear las frecuencias ‘Linear PCM 44.1kHz y ‘Linear PCM 48kHz’
1.
2.
3.

ES CONFIGURACIÓN XBOX ONE
CONFIGURACIÓN XBOX 360
CONFIGURACIÓN PC / MAC
CONFIGURACIÓN MÓVILES
Lucid Sound, Inc. garantiza los materiales y mano de obra durante el periodo de garantía del producto. Esto no es
transferible, la garantía tiene una limitación de 2 años. Importante! sólo podrá ser utilizada por el al usuario nal. Cualquier
defecto será cubierto bajo esta garantía. Es necesario presentar el comprobante de compra. Lucid Sound, Inc., reparará o
reemplazará el producto sin cargos (Como excepción la compañía no se hará cargo del
coste del envío en tu dirección del auricular Lucid Sound)
La garantía limitada de 2 años será para los clientes europeos. Su único, y exclusivo derecho es la reparación o sustitución
de su producto Lucid Sound. En ningún caso la responsabilidad de auricular Lucid Sound excederá del precio de compra
original del producto. Esta garantía no se aplica a : ( a) el desgaste normal o el uso abusivo ; ( b ) el uso industrial , comercial o
profesional ; ( c ) si el producto ha sido manipulado o modicado previamente.
Para recibir la garantía, por favorcontacte con nosotros en
lucidsound.com
Con conexión en el puerto 3.5 mm del Mand
Siempre activar el auricular antes de encender el mando.
En la Xbox One conecta el cable Jack 3.5 mm en el puerto del
auricular , el otro extremo en el puerto 3.5 mm del Mando.
Ves al menú de la consola Xbox One Conguraciones >
Kinect y dispositivos > Dispositivos y accesorios
selecciona la opción Xbox One Mando Wireless.
Selecciona Volumen y establece el Volumen Auricular al máx-
imo y el control del micrófono al mínimo.
Si aparece, set ‘Headset Chat mixer’ hasta la derecha al
100% de chat.
En la Xbox One, pantalla Conguraciones > Display y
sound. En el apartado Salida Audio selecciona Optical Audio
y escoge ‘Stereo Uncompressed.’
Cuando se utiliza un adaptador de
auriculares estéreo
En el caso de que tú mando de la Xbox One no incluya el
puerto para la conexión del auricular estéreo. Es necesario el
adaptador correspondiente (no incluido).
En tu Xbox One conecta el cable Jack 3.5 mm en el puerto
del auricular, el otro extremo en el puerto 3.5 mm del adapta-
dor para el auricular estéreo.
Ajusta el audio del juego y el Chat en el adaptador del auric-
ular. Puedes subir o bajar el volumen a través del adaptador.
En la Xbox One, pantalla Settings > Display & sound. En
el apartado Salida Audio selecciona Optical Audio y escoge
‘Stereo Uncompressed.’
Conecte un extremo del cable de chat de Xbox al puerto de
3.5mm en el auricular y el otro extremo al adaptador de Xbox
360. A continuación, conecte el adaptador al puerto de 2,5 mm
en el controlador.
Ves a la pantalla Settings > System > Console Settings >
Audio y selecciona Digital Stereo.
1.
2.
3.
4.
5.
6.
Conecta el jack 3.5 mm en la salida del auricular, y el otro extremo en la salida de
audio del dispositivo móvil.
El auricular solo podrá funcionar con modo pasivo en (OFF). Por favor ten en
cuenta que las funciones ecualizador y mute no son compatibles en este caso.
1.
2.
1.
2.
3.
4.
1.
2.
Conecte el dongle a un puerto USB del ordenador y encienda el auricular.
En la conguración de sonido del ordenador , ajuste la salida de sonido por defecto a
“LucidSound PC Gaming Audio Interface” para el audio del juego.
En el programa de chat que se utilice, elija “PC LucidSound de charla de audio Interface” ,
tanto para la entrada y la salida.
1.
2.
3.
Table of contents
Other LS Headset manuals