11 Lubemate | Digital Preset Oil Control Gun
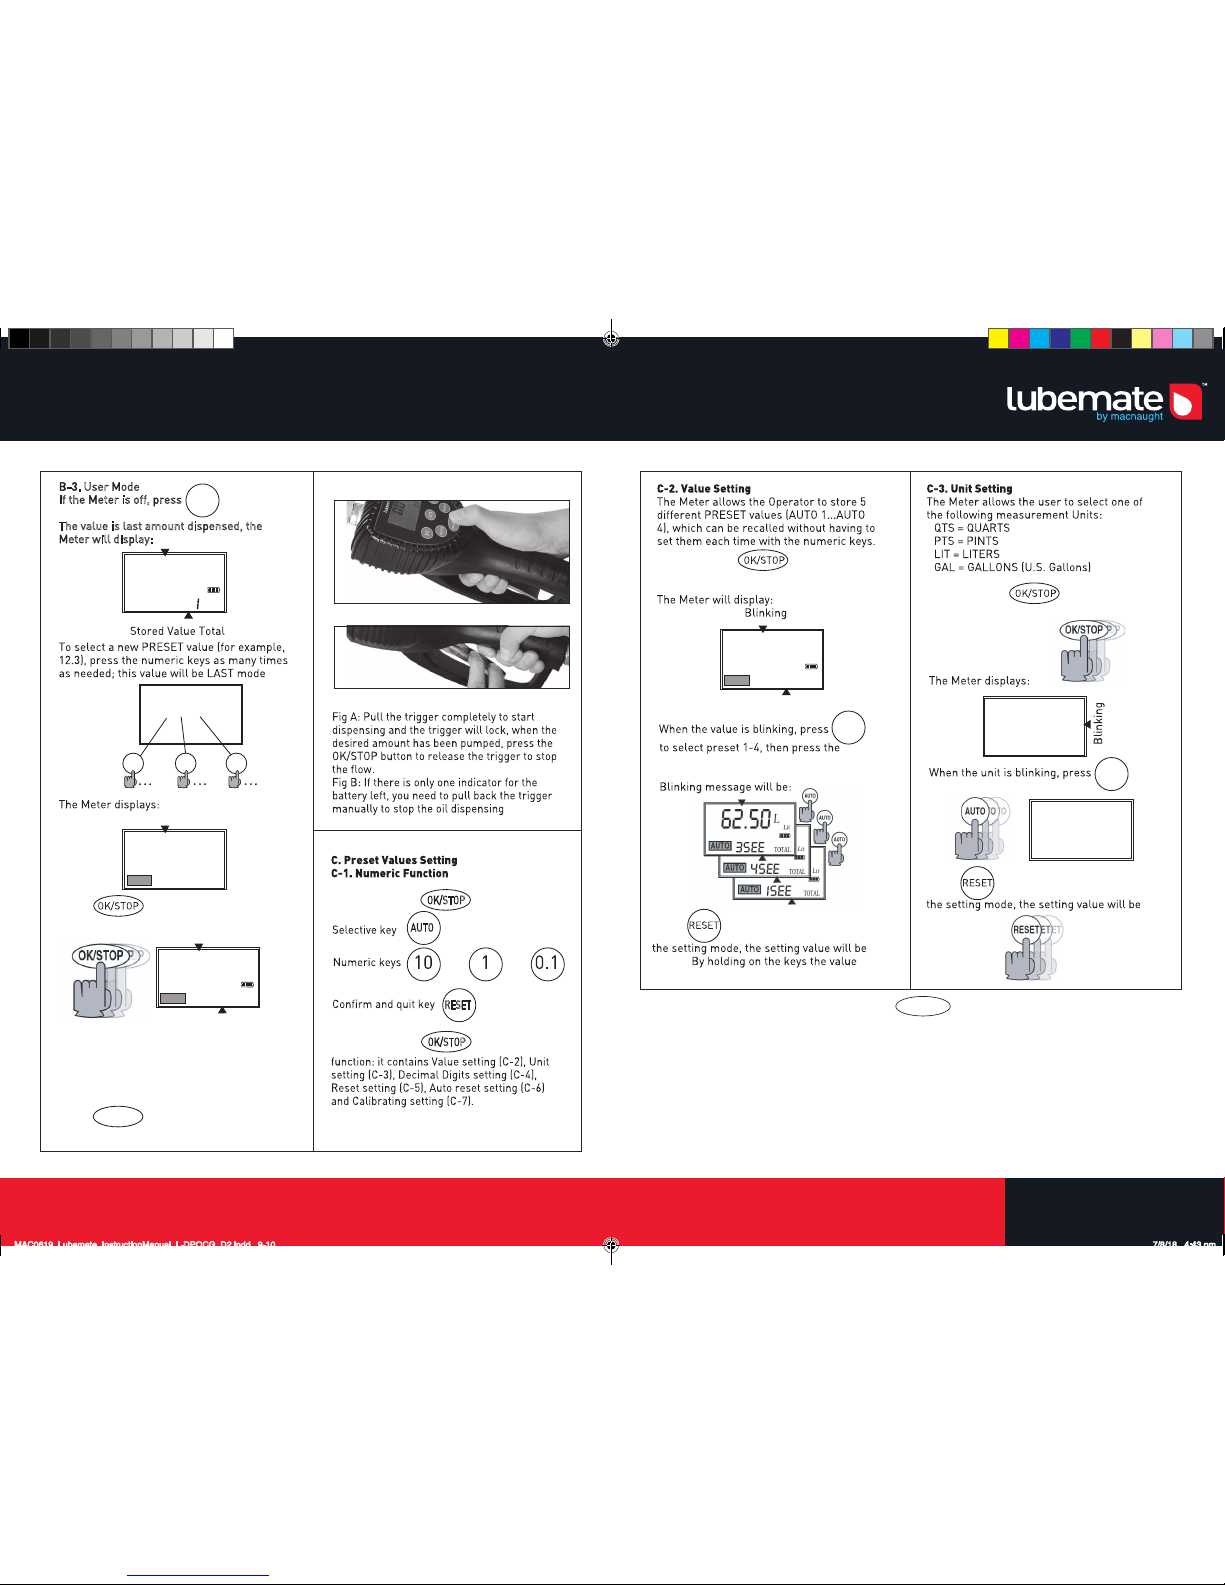
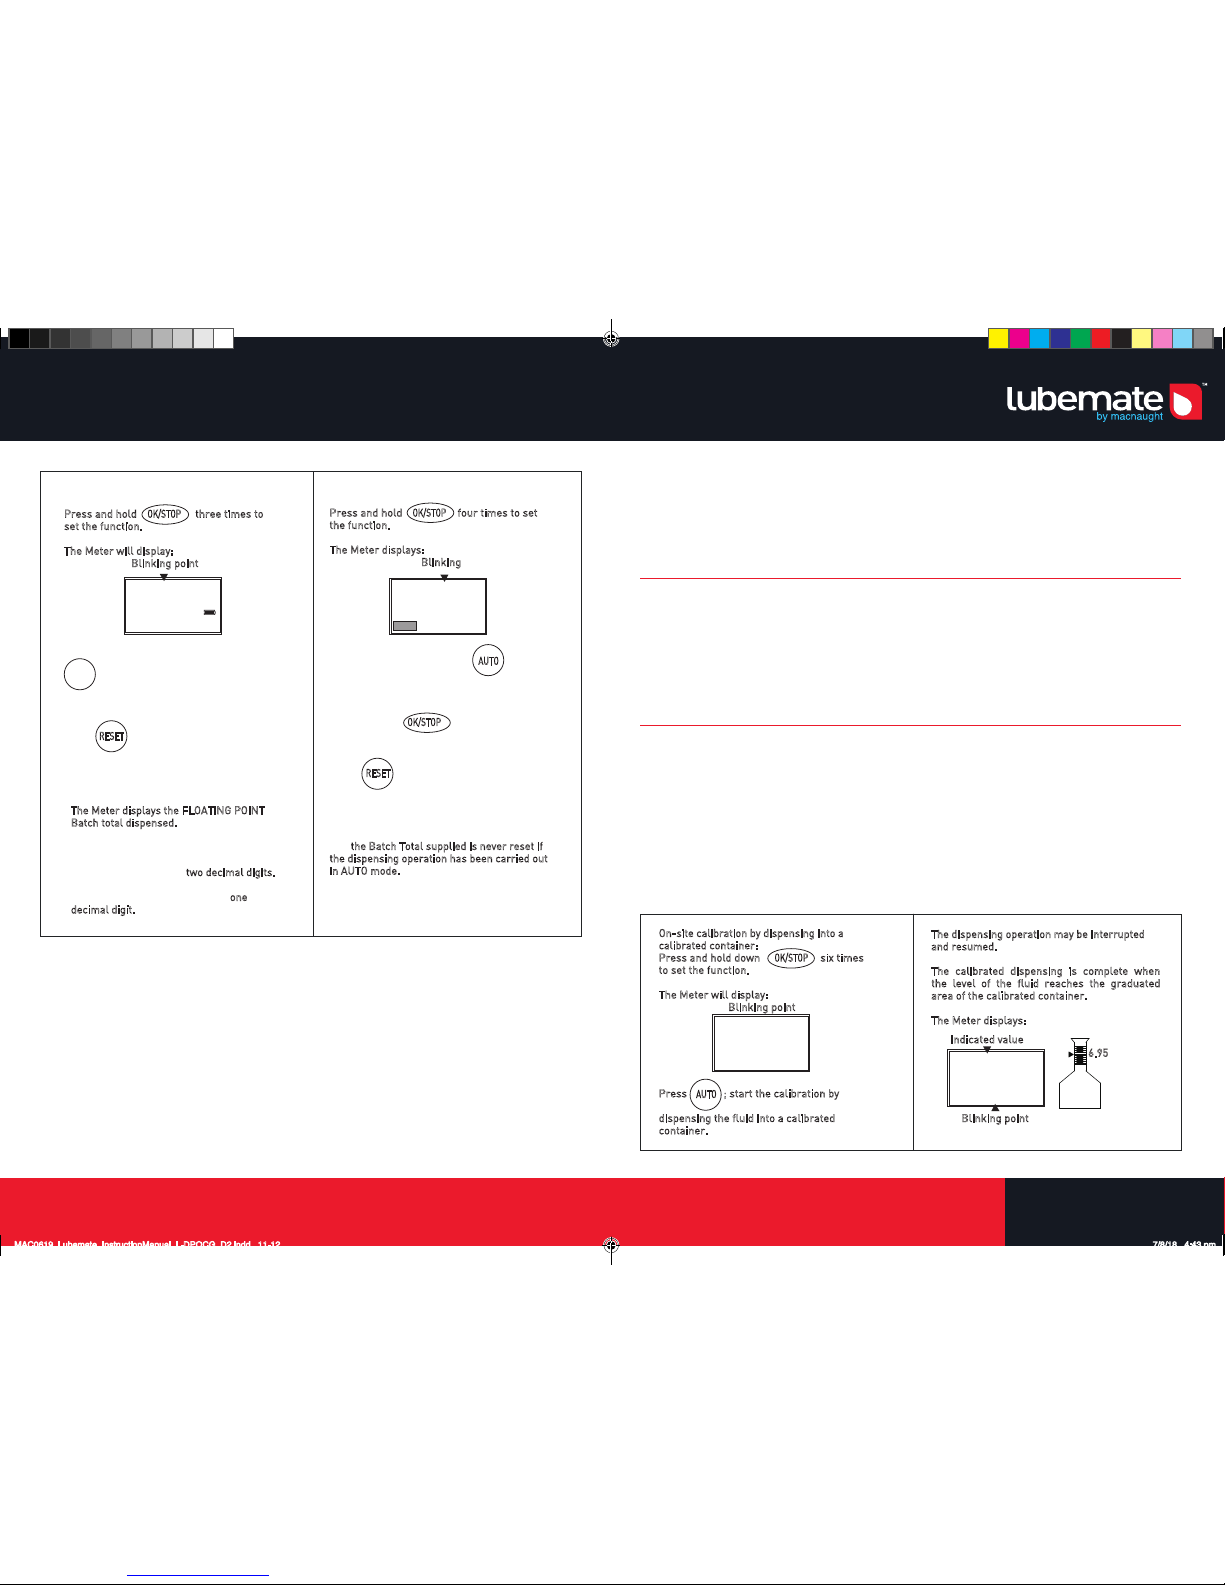
C-4. Decimal Digits Setting
three times to
OK/STOP
Press and hold
set the function.
The Meter will display:
Blinking point
When the number point is blinking, press
AUTO to select location of the point to
confirm the number of decimal digits setting.
to confirm the value and quit
RESET
Press
the setting mode. The setting value will be
stored.
NOTE:
•
The Meter displays the FLOATING POINT
Batch total dispensed.
•Independent of the selection carried out
(two or three decimal digits), as soon as
the amount dispensed exceeds 10 units,
the Meter displays only
two decimal digits.
•As soon as the amount dispensed exceeds
99 units, the Meter displays only
one
decimal digit.
Press
RESET
C-5. Reset Setting
four times to set
OK/STOP
Press and hold
the function.
The Meter displays:
Blinking
to
AUTO
When YES is blinking, press
select YES or No. If YES the batch total will
be set to
button for 10 zero after hold
OK/STOP
seconds, NO to cancel.
to confirm the value and quit
the setting mode. The setting value will be
stored.
NOTE:
Independent of the selection carried
out,
the Batch Total supplied is never reset if
the dispensing operation has been carried out
in AUTO mode.
yes
1see
AUTO
C-6. Auto Reset Setting
The function described in this paragraph concerns
only those who want to obtain the
maximum dispensing stop precision in AUTO mode.
If a slight excess of the pre-set value (a
few hundredths of a quart) does not cause any problem,
the following paragraphs can be
ignored.
The Meter in AUTO mode allows the user to obtain a highly precise stop, thus dispensing
exactly the pre-set amount without exceeding the PRESET value.
To guarantee this high stop precision, especially when the unit operates at the maximum
allowed flow rates, dispensing does not stop when the PRESET value is reached, but instead
when the PRESET value reaches a few Unit hundredths.
If the METER is used:
•
With fluids having a viscosity close to the limits of the allowed range
(such as
low-viscosity antifreeze fluids or high-viscosity oils for gear boxes).
•
In extreme flow rate conditions
(close to the min. and max. value of the allowed range), it
may be necessary to carry out an on-site calibration.
The Meter allows the user to carry out a rapid electronic calibration by modifying the
Calibration factor (K Factor).
At delivery all meters are given the same calibration factor:
K Factor = 1.000
This calibration factor guarantees the best accuracy in the following operating conditions:
Fluid: Motor oil type 10W 30 Temperature: 68°F Flow-rate: 2.6 GPM
The calibration can be done either as:
• An on-site calibration by dispensing into a calibrated container or
• A direct modification of the calibration factor.
To guarantee the stop precision,
this pre-stop value must not be fixed
, but is dependent on the
flow rate used. To allow the operator to obtain the highest stop precision, the unit is equipped
with a Stop Precision factor, called PS factor.
The operator can customize the Meter to
select a PS factor between ZERO and FOUR.
Why calibrate?
How to calibrate
On-site calibration by dispensing into a
calibrated container:
Press and hold down six times
OK/STOP
to set the function.
The Meter will display:
Blinking point
Press
AUTO
; start the calibration by
dispensing the fluid into a calibrated
container.
The dispensing operation may be interrupted
and resumed.
The calibrated dispensing is complete when
the level of the fluid reaches the graduated
area of the calibrated container.
The Meter displays:
6.95
Blinking point
Indicated value
6.90
Lit
CAL
CRL
Lit
1-000
INSTRUCTION MANUAL
INSTRUCTION MANUAL
C-4. Decimal Digits Setting
three times to
OK/STOP
Press and hold
set the function.
The Meter will display:
Blinking point
When the number point is blinking, press
AUTO to select location of the point to
confirm the number of decimal digits setting.
to confirm the value and quit
RESET
Press
the setting mode. The setting value will be
stored.
NOTE:
•
The Meter displays the FLOATING POINT
Batch total dispensed.
•Independent of the selection carried out
(two or three decimal digits), as soon as
the amount dispensed exceeds 10 units,
the Meter displays only
two decimal digits.
•As soon as the amount dispensed exceeds
99 units, the Meter displays only
one
decimal digit.
Press
RESET
C-5. Reset Setting
four times to set
OK/STOP
Press and hold
the function.
The Meter displays:
Blinking
to
AUTO
When YES is blinking, press
select YES or No. If YES the batch total will
be set to
button for 10 zero after hold
OK/STOP
seconds, NO to cancel.
to confirm the value and quit
the setting mode. The setting value will be
stored.
NOTE:
Independent of the selection carried
out,
the Batch Total supplied is never reset if
the dispensing operation has been carried ou
C-6. Auto Reset Setting
The function described in this paragraph concerns
only those who want to obtain the
maximum dispensing stop precision in AUTO mode.
If a slight excess of the pre-set value (a
few hundredths of a quart) does not cause any problem,
the following paragraphs can be
ignored.
The Meter in AUTO mode allows the user to obtain a highly precise stop, thus dispensing
exactly the pre-set amount without exceeding the PRESET value.
To guarantee this high stop precision, especially when the unit operates at the maximum
allowed flow rates, dispensing does not stop when the PRESET value is reached, but instead
when the PRESET value reaches a few Unit hundredths.
If the METER is used:
•
With fluids having a viscosity close to the limits of the allowed range
(such as
low-viscosity antifreeze fluids or high-viscosity oils for gear boxes).
•
In extreme flow rate conditions
(close to the min. and max. value of the allowed range), it
may be necessary to carry out an on-site calibration.
The Meter allows the user to carry out a rapid electronic calibration by modifying the
Calibration factor (K Factor).
At delivery all meters are given the same calibration factor:
K Factor = 1.000
This calibration factor guarantees the best accuracy in the following operating conditions:
Fluid: Motor oil type 10W 30 Temperature: 68°F Flow-rate: 2.6 GPM
The calibration can be done either as:
• An on-site calibration by dispensing into a calibrated container or
• A direct modification of the calibration factor.
To guarantee the stop precision,
this pre-stop value must not be fixed
, but is dependent on the
flow rate used. To allow the operator to obtain the highest stop precision, the unit is equipped
with a Stop Precision factor, called PS factor.
The operator can customize the Meter to
select a PS factor between ZERO and FOUR.
Why calibrate?
How to calibrate
On-site calibration by dispensing into a
calibrated container:
Press and hold down six times
OK/STOP
to set the function.
The Meter will display:
Blinking point
Press
AUTO
; start the calibration by
dispensing the fluid into a calibrated
container.
The dispensing operation may be interrupted
and resumed.
The calibrated dispensing is complete when
the level of the fluid reaches the graduated
area of the calibrated container.
The Meter displays:
6.95
Blinking point
Indicated value
6.90
Lit
CAL
CRL
Lit
1-000
INSTRUCTION MANUAL
INSTRUCTION MANUAL
C-4. Decimal Digits Setting
three times to
OK/STOP
Press and hold
set the function.
The Meter will display:
Blinking point
When the number point is blinking, press
AUTO to select location of the point to
confirm the number of decimal digits setting.
to confirm the value and quit
RESET
Press
the setting mode. The setting value will be
stored.
NOTE:
•
The Meter displays the FLOATING POINT
Batch total dispensed.
•Independent of the selection carried out
(two or three decimal digits), as soon as
the amount dispensed exceeds 10 units,
the Meter displays only
two decimal digits.
•As soon as the amount dispensed exceeds
99 units, the Meter displays only
one
decimal digit.
Press
RESET
C-5. Reset Setting
four times to set
OK/STOP
Press and hold
the function.
The Meter displays:
Blinking
to
AUTO
When YES is blinking, press
select YES or No. If YES the batch total will
be set to
button for 10 zero after hold
OK/STOP
seconds, NO to cancel.
to confirm the value and quit
the setting mode. The setting value will be
stored.
NOTE:
Independent of the selection carried
out,
the Batch Total supplied is never reset if
the dispensing operation has been carried out
in AUTO mode.
00.00
L
Lit
0
TOTAL
yes
1see
AUTO
C-6. Auto Reset Setting
The function described in this paragraph concerns
only those who want to obtain the
maximum dispensing stop precision in AUTO mode.
If a slight excess of the pre-set value (a
few hundredths of a quart) does not cause any problem,
the following paragraphs can be
ignored.
The Meter in AUTO mode allows the user to obtain a highly precise stop, thus dispensing
exactly the pre-set amount without exceeding the PRESET value.
To guarantee this high stop precision, especially when the unit operates at the maximum
allowed flow rates, dispensing does not stop when the PRESET value is reached, but instead
when the PRESET value reaches a few Unit hundredths.
If the METER is used:
•
With fluids having a viscosity close to the limits of the allowed range
(such as
low-viscosity antifreeze fluids or high-viscosity oils for gear boxes).
•
In extreme flow rate conditions
(close to the min. and max. value of the allowed range), it
may be necessary to carry out an on-site calibration.
The Meter allows the user to carry out a rapid electronic calibration by modifying the
Calibration factor (K Factor).
At delivery all meters are given the same calibration factor:
K Factor = 1.000
This calibration factor guarantees the best accuracy in the following operating conditions:
Fluid: Motor oil type 10W 30 Temperature: 68°F Flow-rate: 2.6 GPM
The calibration can be done either as:
• An on-site calibration by dispensing into a calibrated container or
• A direct modification of the calibration factor.
To guarantee the stop precision,
this pre-stop value must not be fixed
, but is dependent on the
flow rate used. To allow the operator to obtain the highest stop precision, the unit is equipped
with a Stop Precision factor, called PS factor.
The operator can customize the Meter to
select a PS factor between ZERO and FOUR.
Why calibrate?
How to calibrate
On-site calibration by dispensing into a
calibrated container:
Press and hold down six times
OK/STOP
to set the function.
The Meter will display:
Blinking point
Press
AUTO
; start the calibration by
dispensing the fluid into a calibrated
container.
The dispensing operation may be interrupted
and resumed.
The calibrated dispensing is complete when
the level of the fluid reaches the graduated
area of the calibrated container.
The Meter displays:
6.95
Blinking point
Indicated value
6.90
Lit
CAL
CRL
Lit
1-000
INSTRUCTION MANUAL
C-6. Auto reset setting
The function described in this paragraph concerns only those who want to obtain the maximum
dispensing stop precision in AUTO mode. If a slight excess of the pre-set value (a few hundredths of a
quart) does not cause any problem, the following paragraphs can be ignored.
The Meter in AUTO mode allows the user to obtain a highly precise stop, thus dispensing exactly the
pre-set amount without exceeding the PRESET value.
To guarantee this high stop precision, especially when the unit operates at the maximum allowed flow
rates, dispensing does not stop when the PRESET value is reached, but instead when the PRESET value
reaches a few Unit hundredths.
To guarantee the stop precision, this pre-stop value must not be fixed, but is dependent on the flow rate
used. To allow the operator to obtain the highest stop precision, the unit is equipped with a Stop Precision
factor, called PS factor.
The operator can customize the Meter to select a PS factor between ZERO and FOUR.
WHY CALIBRATE?
If the METER is used:
• With fluids having a viscosity close to the limits of the allowed range (such as low-viscosity
antifreeze fluids or high-viscosity oils for gear boxes).
• In extreme flow rate conditions (close to the min. and max. value of the allowed range),
it may be necessary to carry out an on-site calibration.
HOW TO CALIBRATE
The Meter allows the user to carry out a rapid electronic calibration by modifying the
Calibration factor (K Factor).
At delivery all meters are given the same calibration factor:
K Factor = 1.000
This calibration factor guarantees the best accuracy in the following operating conditions:
Fluid: Motor oil type 10W 30 Temperature: 68°F Flow-rate: 2.6 GPM
The calibration can be done either as:
• An on-site calibration by dispensing into a calibrated container or
• A direct modification of the calibration factor.
MAC0619_Lubemate_InstructionManual_L-DPOCG_D2.indd 11-12 7/8/18 4:43 pm