lubluelu SG60 User manual

Model:SG60
Robot Vacuum Cleaner

Safety Warnings
Introduction
Installation and APP Connection
Operation Instructions
Maintenance
Malfunctions and Troubleshooting
DE
FR
IT
ES
01
03
08
13
16
20
22
43
64
85
........................................................................................................................................................
..................................................................................................................................................................
....................................................................................................................
...........................................................................................................................................
................................................................................................................................................................
................................................................................................................
.....................................................................................................................................................................................
.....................................................................................................................................................................................
.....................................................................................................................................................................................
.....................................................................................................................................................................................
Table of Contents

Safety Warnings
•
•
•
•
•
•
•
•
•
•
•
•
•
•
•
•
•
•
•
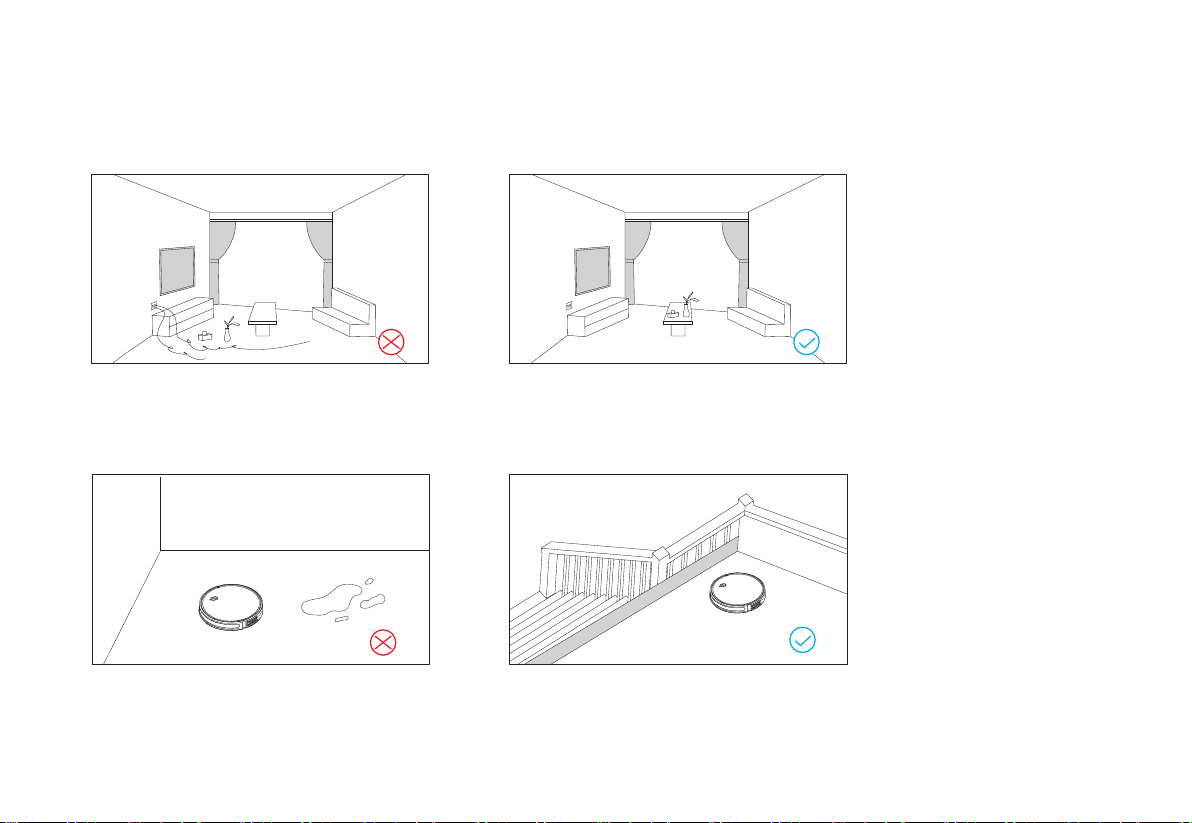
Application Restrictions
This machine is used for indoor cleaning only. Do not use the machine outdoors (such as open balcony), on non-floors (such as sofa) or in
commercial or industrial places.
Do not use the machine in the place of cliff without protective rails (such as duplex floors, open balcony, furniture top).
Do not use the machine in the place more than 40°C or less than 0°C or on the ground with any liquids and viscous substances.
Please hang up the wires on the ground indoors before use, to avoid the wires being entangled during cleaning.
Please remove the fragile items and debris (such as vases, plastic bags, etc.) on the ground to avoid valuables being damaged due to obstacles
or minor collisions.
Those with physical, mental or perceptual impairments, including children, are prohibited to use or operate the machine.
This machine should not be used as a toy by the children. Please keep children and pets away when the machine is working.
Place the cleaning brush beyond the reach of the children.
Do not place any objects (including children or pets) on the stationary or moving machine.
Do not keep any parts of human body or pets such as hair and finger close to the suction port during the cleaning.
Do not use the machine to clean the burning objects (such as unquenched cigarette butts)
Do not use the machine to clean the plush carpet (some dark carpets may not be cleaned properly)
Do not use the machine to clean the hard or sharp objects (such as decoration wastes, glass, iron nails, etc.)
Do not use the bumper as the handle.
Please cut off the power before cleaning or maintaining the machine or the charging base.
Do not wipe any parts of the machine with a damp cloth or any liquid.
Please strictly abide by the operation instructions. Any losses or injuries caused by improper operation shall be borne by the user.
Do not activate the mop function on carpets or on top of furniture.
Please remove the water tank during charging.
01

Safety Warnings
•
•
•
•
•
•
•
•
Battery and Charging
Do not use the battery, charging base or charger produced by any third parties.
Do not disassemble, repair or modify the battery or charging base without authorization.
Do not keep the charging base close to heat sources (such as radiator).
Do not wipe or clean the spring contacts of the charging base with a damp cloth or wet hands.
Do not discard the used battery arbitrarily. The used battery should be handed over to professional recycling agency for proper disposal.
Do not use the machine if the power cord is broken or wrecked, please buy new power cord through official channels.
Please power off the machine during transportation. It’s recommended to transport the machine with original package.
If the machine will not be used for a long time, please power it off after being fully charged, then store in a cool and dry place. Charge the
battery at least every three months to avoid the battery failure due to excessive discharging.
02

Introduction
Packing List
Machine Charging Base Dustbin
Side Brush HEPA Filter + Filter Sponge Adapter
Remote Control Magnetic Strip Cleaning Brush
03

Recharge
Short Press to Recharge
WIFI Indicator
Light OFF: Offline
Light Flash: Connecting
Light ON: Online
Power/Clean/Pause
Short press to start Clean/Pause
Press and hold for 3 seconds to
Power ON/OFF System Reset
Insert a pin to trigger the switch,
the machine will shut off to reset
the system.
Machine
Introduction
04

Sensor and Structure
Infrared Bumper Sensor
Charging Contacts
Omni Wheel
Side Brush
Battery Lid
Driving Wheel
Rolling Brush
Edge Sensor
Bumper
Button
Dustbin
Infrared receiving sensor
Introduction
05

Dustbin Accessories Charging Base
Power Indicator
Charging contact poles
Signal Transmission
AC IN
Introduction
HEPA Filter Lid
Filter Sponge
Primary Filter
Dustbin Button
HEPA Filter
06

Auto Clean Recharge
Start/Pause
Edge Clean
Suction Force
Direction Control
Designated Clean
Water Volume
(*Water tank is not included in
packing list. The button is invalid
if water tank is not equipped.)
Remote Control
Introduction
07

Notices
Installation and APP Connection
Please sort out the wires, debris and fragile,
unstable, valuable and potentially dangerous
objects on the ground before starting the device.
Do not clean the liquid.
Avoid personal injury or property damage caused
by entanglement, jamming, dragging, or bumping
of equipment.
Please set up guardrail in the places with cliff to
prevent physical injuries or property losses due to
accidental falling of the machine or other items.
08

1. Please place the charging base on a flat place against the wall.
2. Reserve a space of more than 0.5m on both sides and more than 1.5m in the front.
3. When the charging base is powered on, the charging indicator will be illuminated.
Notes:
3. Connect the adapter to the charging base and arrange the
power cable properly.
4. Place the charging base in proper position and power on for
charging.
1. Remove the protective strips.
2. Install the side brushes.
Press left brush (L) and the right brush (R) respectively
into corresponding holes until the "click" sound is heard.
Installation and APP Connection
09

5. Do not move the charging base arbitrarily and keep it asway
from direct sunlight
Installation and APP Connection
6. Power-On and Charging
Note:
If the battery is too low to start the machine, please place the machine to the
charging base and it will automatically power on.
Press and hold to power on. When the indicator is illuminated,
place the machine to the base for charging. The voice prompt of
"Start Charging" indicates successful charging.
10

Installation and APP Connection
4.When the power is on, press and hold “Power” and “Recharging”
for more than 3 seconds till the WIFI indicator starts to flash.
4
A
18:30
Google Play
App Store
1 2 3
1.Activate the WIFI and Bluetooth in the phone.
2.Search for "Smart Life” in App Store/Scan QR code to search
and download “Smart Life” (Note: "Smart Life” must be
authorized to enable the Nearby Devices)
3.Open “Smart Life”, then register and log in.
11

Installation and APP Connection
5 6
7 8 9
5.Enter “Smart Life”, click “Add Device”, then select +in the
upper right corner to add device.
6.Search for Sweeping Robot, then click “Add”.
7.Enter WIFI password for network configuration
8.Wait for automatic connection.
9.Click on “Finish” in upper right corner to enter the operation
interface.
12

Power ON/OFF
Clean/Pause
Notes:
Charging
Virtual Wall
You can set up magnetic strip to isolate the areas not to be cleaned
(such as bathroom, kitchen, etc.)
Magetic Strip
Note: Please properly fix the magnetic strip on the ground to ensure the normal function
of the virtual wall.
Operation Instructions
Press and hold for 3 seconds till the indicator is illuminated,
which means the machine has been powered on. Press and hold
for 3 seconds in standby mode, the indicator is OFF, which
means the machine has been powered off. Note: The machine
cannot be powered off during the charging.
After the machine is powered on, short press or use the remote
control or APP to start cleaning.
Auto Mode: The machine will automatically return to the charging
base for charging after cleaning.
Manual Mode: In the PAUSE state, short press to start the
recharging or use the remote control or APP to start the recharging.
Do not clean the liquid.
The machine cannot start cleaning if the battery is lower than 15%, please charge
the machine first.
If the battery is lower than 15% during the cleaning, the machine will automatically
return to the base for charging.
Please clear up the wires on the ground (including the power cord of charging base)
before cleaning to avoid power failure or property damages due to cable
entanglement during cleaning.
Note: If the machine cannot find the charging base, it will automatically return to
the starting position, please place the machine back to the charging base manually.
•
•
•
•
13

Operation Instructions
Auto Clean Designated Clean
Area cleaned
Area to be cleaned
In the default cleaning mode, the machine will set the scanning
path to clean all the ground in an orderly and efficient manner. The
machine will automatically return to the charging base for charging
after cleaning.
Press on the remote control, the machine will set the self-cen-
tered path to clean a circular area within a diameter of 1.2m. After
the cleaning is completed, the machine will automatically return to
the starting position and stop cleaning.
(In addition, you can also press the direction buttons on the APP to
manually guide the machine to the place needs to be cleaned.)
14

Operation Instructions
Edge Cleaning Appoitment Cleaning
Mute Mode
Suction Force
To clean the edges indoors, the machine will move along the
edge of fixed objects (such as walls) and return to the charging
base after cleaning.
Short press on the remote control or use APP to quickly start
the Edge Cleaning.
The voice will not prompt in the silent mode. Mute Mode can be
activated or disactivated through the APP.
The Power Mode, Normal Mode and Mute Mode can be switched
through the APP.
You can set appointment cleaning time on the APP and the
machine will automatically start cleaning at the specified time and
return to the charging base after cleaning (7X24h appointment)
15

Maintenance
Side brush (to be cleaned every week)
It’s recommended to clean the rolling brush every 1~2 weeks.
1. Turn the machine over and press the buckle to remove the brush lid.
2. Remove the rolling brush. 1. Turn the machine over and pull out the side brush vertically.
2. Remove the entangled hairs and dirt, then reinstall the side brush.
3. Press the left brush (L) and the right brush (R) into the correspond-
ing holes to complete the brush installation.
Note: It is recommended to replace the side brush every 3~6 months (especially
when the side brush is seriously deformed) for the sake of satisfactory cleaning
effect.
3. Clean the main brush and rolling brush with the tool provided and
remove the entangled debris on the rolling brush.
16

Maintenance
(to be cleaned every 3~5 days)
1. Press and hold the button to pull out the dustbin.
2. Press and hold the dustbin lock to open and dump the dirt inside.
Dustbin and Filter (to be cleaned every 1~2 weeks)
1. Clean the filter: Remove the filter sponge and HEPA filter. Gently
tap the HEPA filter to remove the dust.
2. Clean the dustbin: Open the dustbin and clean with a brush or rag.
3. If the dustbin is too dirty, it can be washed with water. Please use
only after being thoroughly dried.
Notes:
1. Please do not add detergent when washing the dustbin with water; make it
thoroughly dry after wash.
2. It is recommended to replace the HEPA filter every 3~6 months
Clean the dustbin
17

Maintenance
(to be cleaned every month)
Clean the infrared bumper sensor (to be cleaned every month)
Clean the charging contacts
(to be cleaned every month)
Clean the edge sensor
18
Table of contents
Other lubluelu Vacuum Cleaner manuals