Lynx greenMachine titan User manual

© 2019 LYNX Technik AG all rights reserved
greenMachine
®
Reference Manual
greenMachine titan
4K/UHD or 3G/HD/SD Quad (4) Channel SDI Video
and Audio Processing Platform
Revision 2.0 –January 2019
LYNXTechnik AG
Broadcast Television Equipment
Information in this document is subject to change without notice. No part of this document may be reproduced or
transmitted in any form or by any means, electronic or mechanical for any purpose, without express written permission of
LYNX Technik AG.
LYNX Technik AG may have patents, patent applications, trademarks, copyrights or other intellectual property rights
covering the subject matter in this document. Except as expressly written by LYNX Technik AG, the furnishing of this
document does not give you any license to patents, trademarks, copyrights or other intellectual property of
LYNX Technik AG or any of its affiliates.
THIS MANUAL SUPPORTS:
titan from Revision
833
greenGUI from Revision
2.4.0
®

greenMachine®titan Reference Manual - Rev 2.0
© 2019 LYNXTechnik AG Page 2 of 57
Contents
Warranty ...............................................................................................................4
Regulatory information ........................................................................................6
Europe: Declaration of Conformity.............................................................................................. 6
USA: FCC 47 Part 15.................................................................................................................. 6
Product Overview .................................................................................................7
Product Description..................................................................................................................... 7
Functional Diagram ..................................................................................................................... 8
Rear Connection Panel............................................................................................................... 9
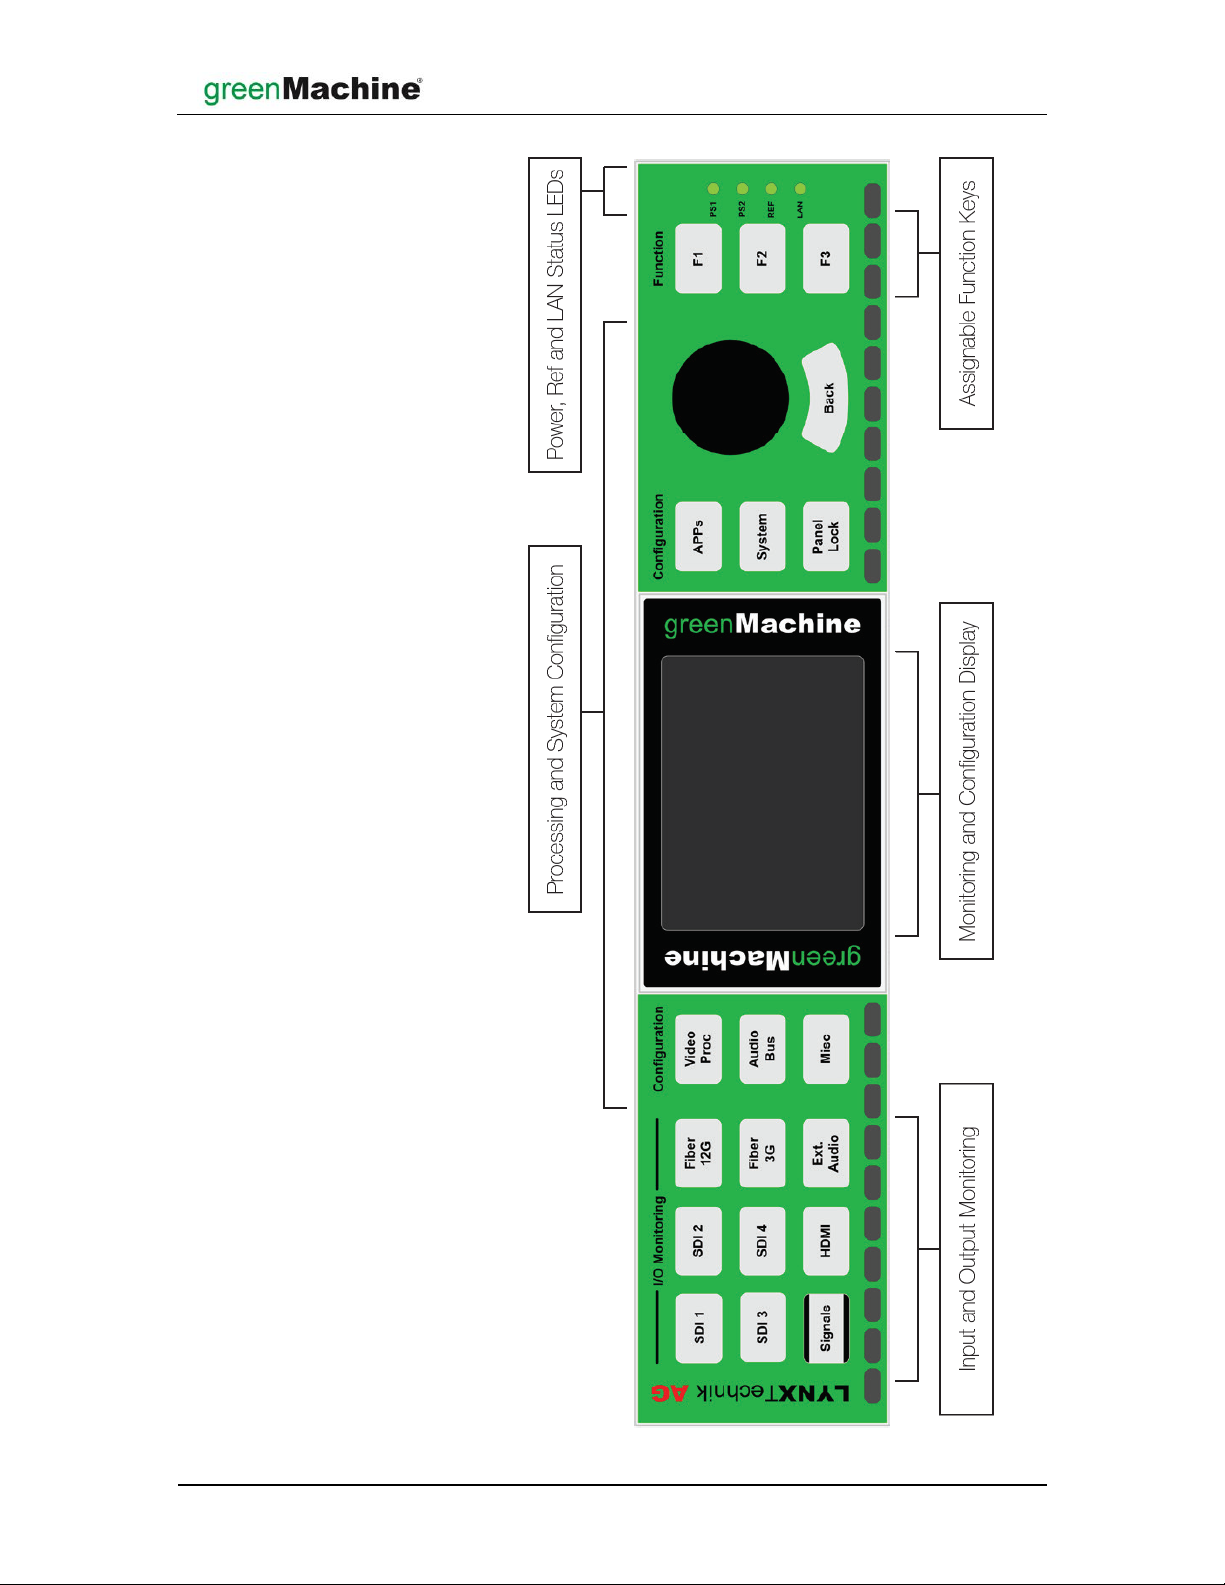
Control Panel............................................................................................................................. 10
Customizing your greenMachine........................................................................11
Constellation.............................................................................................................................. 11
Deployment ............................................................................................................................... 12
greenUniverse........................................................................................................................... 13
Control Panel Description ..................................................................................14
I/O Monitoring............................................................................................................................ 14
Signals Button....................................................................................................................... 14
Detailed Signal Information................................................................................................... 15
Processing Configuration.......................................................................................................... 17
Processing Configuration Menus.......................................................................................... 17
System Settings ........................................................................................................................ 20
Deploying Constellations with the local Control Panel ......................................................... 20
IP Settings............................................................................................................................. 21
Panel Configuration .............................................................................................................. 22
F-Key Assign......................................................................................................................... 23
Reset..................................................................................................................................... 23
Health Parameters................................................................................................................ 24
Panel Lock................................................................................................................................. 24
Power Supply Unit, LAN and Ref LEDs.................................................................................... 24
IP Remote Control ..............................................................................................25
greenGUI................................................................................................................................... 25
System Requirements........................................................................................................... 25
Passive Operation................................................................................................................. 25
Getting Started...................................................................................................................... 26
General Menu Bar................................................................................................................. 26
greenGUI Layout................................................................................................................... 27
Control Page......................................................................................................................... 28
Nova Subpage.................................................................................................................................32
Advanced Subpage .........................................................................................................................33
Preview Subpage.............................................................................................................................33
Universe Page ...................................................................................................................... 34
Configure Page..................................................................................................................... 36
Update Subpage..............................................................................................................................36
Settings Subpage ............................................................................................................................37
Info Page............................................................................................................................... 38
Device Log Subpage .......................................................................................................................38
GUI Log Subpage............................................................................................................................38
Audio Pinning Subpage...................................................................................................................39
Diagrams Subpage..........................................................................................................................39

greenMachine®titan Reference Manual - Rev 2.0
© 2019 LYNXTechnik AG Page 3 of 57
Constellation Page - Constellation Licensing ....................................................................... 40
Load Additional Purchased Licenses...............................................................................................40
Locking.................................................................................................................................. 42
License Lock....................................................................................................................................42
Machine Lock ..................................................................................................................................42
GUI Settings Page ................................................................................................................ 43
Network Subpage............................................................................................................................43
Registration Subpage......................................................................................................................43
Local DB Subpage...........................................................................................................................44
DB Connect and Connection Subpage............................................................................................44
Pref(erences Subpage)....................................................................................................................45
Hotkeys Subpage ............................................................................................................................45
SNMP........................................................................................................................................ 46
GET/SET............................................................................................................................... 46
SNMP Traps ......................................................................................................................... 46
LYNX Remote Control Interface................................................................................................ 48
Supported Formats.............................................................................................49
Supported SDI I/O Formats....................................................................................................... 49
Supported HDMI Input Formats................................................................................................ 50
Supported Reference Input Formats......................................................................................... 51
Connections .......................................................................................................52
Video SDI .................................................................................................................................. 52
Video HDMI............................................................................................................................... 52
LAN............................................................................................................................................ 52
Optical Fiber.............................................................................................................................. 52
Audio ......................................................................................................................................... 53
Pinning.................................................................................................................................. 53
Analog - Digital Configuration............................................................................................... 54
General Purpose Interface (GPI) .............................................................................................. 54
Power Supply Connectors DC1 and DC2 (PSU) ...................................................................... 54
Timing.................................................................................................................55
Specifications ....................................................................................................56
Technical Support ..............................................................................................57
Contact Information ...........................................................................................57

greenMachine®titan Reference Manual - Rev 2.0
© 2019 LYNXTechnik AG Page 4 of 57
Warranty
LYNX Technik AG warrants that the product will be free from defects in materials and
workmanship for a period of three (3) years from the date of shipment. If this product
proves defective during the warranty period, LYNX Technik AG at its option will either
repair the defective product without charge for parts and labor or will provide a
replacement in exchange for the defective product.
In order to obtain service under this warranty, customer must notify LYNX Technik of the
defect before expiration of the warranty period and make suitable arrangements for the
performance of service. Customer shall be responsible for packaging and shipping the
defective product to the service center designated by LYNX Technik, with shipping
charges prepaid. LYNX Technik shall pay for the return of the product to the customer if
the shipment is within the country which the LYNX Technik service center is located.
Customer shall be responsible for payment of all shipping charges, duties, taxes and any
other charges for products returned to any other locations.
This warranty shall not apply to any defect, failure, or damage caused by improper use or
improper or inadequate maintenance and care. LYNX Technik shall not be obligated to
furnish service under this warranty a) to repair damage resulting from attempts by
personnel other than LYNX Technik representatives to install, repair or service the
product; b) to repair damage resulting from improper use or connection to incompatible
equipment; c) to repair any damage or malfunction caused by the use of non-LYNX
Technik supplies; or d) to service a product which has been modified or integrated with
other products when the effect of such modification or integration increases the time or
difficulty servicing the product.
THIS WARRANTY IS GIVEN BY LYNX TECHNIK WITH RESPECT TO THIS PRODUCT
IN LIEU OF ANY OTHER WARRANTIES, EXPRESS OR IMPLIED. LYNX TECHNIK
AND ITS VENDORS DISCLAIM ANY IMPLIED WARRANTIES OF MERCHANTABILITY
OR FITNESS FOR A PARTICULAR PURPOSE. LYNX TECHNIK`S RESPONSIBILITY
TO REPAIR AND REPLACE DEFECTIVE PRODUCTS IS THE SOLE AND EXCLUSIVE
REMEDY PROVIDED TO THE CUSTOMER FOR BREACH OF THIS WARRANTY.
LYNX TECHNIK AND ITS VENDORS WILL NOT BE LIABLE FOR ANY INDIRECT,
SPECIAL, INCIDENTIAL, OR CONSEQUENTIAL DAMAGES IRRESPECTIVE OF
WHETHER LYNX TECHNIK OR THE VENDOR HAS ADVANCE NOTICE OF THE
POSSIBILITY OF SUCH DAMAGES.

greenMachine®titan Reference Manual - Rev 2.0
© 2019 LYNXTechnik AG Page 5 of 57
CAUTION:
The LYNX Technik Warranty policy does not cover damages caused by the use of non-LYNX
Technik parts and accessories.
Use only LYNX Technik products with LYNX Technik parts delivered with the product or marked
as compatible LYNX Technik product accessory.
Installation of parts and accessories not originally intended could result in less than optimal
performance and/or injury. For in-depth service information on LYNX Technik products, refer to
our website www.lynx-technik.com. Contact your local LYNX Technik partner or dealer for
ordering information.
Information contained in this publication is subject to change at any time without prior notice.
Your product‘s appearance may vary from the diagrams contained in this catalog.
The greenMachine titan hardware is designed to be used / installed in a horizontal position, either
standing on the device feet or mounted in a R FR 6000.

greenMachine®titan Reference Manual - Rev 2.0
© 2019 LYNXTechnik AG Page 6 of 57
Regulatory information
Europe: Declaration of Conformity
USA: FCC 47 Part 15
This device complies with part 15 of the FCC Rules. Operation is subject to the following
two conditions: (1) This device may not cause harmful interference, and (2) this device
must accept any interference received, including interference that may cause undesired
operation.
Note: This equipment has been tested and found to comply with the limits for a Class A
digital device, pursuant to the part 15 of the FCC Rules. These limits are designed to
provide reasonable protection against harmful interference when the equipment is
operated in a commercial environment. This equipment generates, uses, and can radiate
radio frequency energy and, if not installed and used in accordance with the instruction
manual, may cause harmful interference to radio communications. Operation of this
equipment in a residential area is likely to cause harmful interference in which case the
users will be required to correct the interference at their own expense.
We LYNX Technik AG
Brunnenweg 3
D-64331 Weiterstadt
Germany
Declare under our sole responsibility that the product
TYPE: greenMachine titan
To which this declaration relates is in conformity with the following
standards:
EN 55103-1:2009+A1:2012 Class A
EN 61000-3-2:2006
EN 61000-3-3:1995
EN 55103-2:2009 Env. E 5
Following the provisions of 2014/30/EU.
Weiterstadt, January 2018 Oliver Berisch / QA Manager
Place and date of issue Legal Signature

greenMachine®titan Reference Manual - Rev 2.0
© 2019 LYNXTechnik AG Page 7 of 57
Product Overview
Product Description
greenMachine adopts a three-prong approach to product definition and function. Rather
than being a fixed application specific box, greenMachine is a combination of general-
purpose hardware, constellation (pre-defined set of functionalities/features) for re-
programmable functionality and powerful control software.
The current greenMachine titan processes four 3G/HD/SD-SDI video streams or a single
4K/UHD video input. It offers up to 12G processing support (3840 x 2160 @60 Hz) and
provides the functionality to convert between single-link 4K video (12G) and quad-link 4K
video (2SI; 4x3G).
The greenMachine titan hardware is a powerful general-purpose audio and video
processing appliance that is custom configured using one of the pre-defined
constellations, which can be purchased through the LYNX sales network. You are not
limited to one constellation per greenMachine; you can switch between multiple licensed
constellations to configure the machine for many different applications in your workflow.
greenMachine hardware devices are standalone processing modules with an intuitive
control interface and LCD display for accessing and viewing the graphical menu. The LCD
display and menu also allows you to monitor the video inputs and outputs. An entire
greenMachine system is fully controlled by the powerful greenGUI®software available for
Windows and Mac.
greenMachine hardware devices are extremely powerful and use the very latest high
speed programmable Xilinx technology and dual ARM processors. greenMachine and its
software, APP based approach and architecture provides a future-proof solution for
numerous applications from broadcast all the way to industrial type AV uses.

greenMachine®titan Reference Manual - Rev 2.0
© 2019 LYNXTechnik AG Page 8 of 57
Functional Diagram
Four electrical 3G/HD/SD SDI inputs and outputs are available on the greenMachine titan.
In addition to this it has an HDMI input and output as well as two optional fiber inputs and
outputs. Without any APPs installed, the greenMachine titan comes with input and output
signal routers as shown in the functional diagram below. Basic conversion functionality
from and to HDMI, SDI and Fiber are available.
The greenMachine titan comes with four audio input and output connections that can be
configured for either analog or digital audio. Basic conversion functionality from and to
analog and digital audio are available without any APPs installed. Monitoring of all inputs
and outputs including image previews and audio level meters are also part of the basic
functionality as well as the Nova controller providing support for SNMP and custom
control.
All further video and audio processing functionalities can be defined by deploying the
available constealltions.
Functional Diagram
Alternatively, the greenMachine titan can be configured with one 12G capable
Processing Path.

greenMachine®titan Reference Manual - Rev 2.0
© 2019 LYNXTechnik AG Page 9 of 57
Rear Connection Panel

greenMachine®titan Reference Manual - Rev 2.0
© 2019 LYNXTechnik AG Page 10 of 57
Control Panel

greenMachine®titan Reference Manual - Rev 2.0
© 2019 LYNXTechnik AG Page 11 of 57
Customizing your greenMachine
The greenMachine titan comes standard with basic routing and audio analog to digital
conversion functionalities. All further video and audio processing functionalities are
defined by the deployed constellation.
Constellation
A constellation is an arrangement of different functionalities. Constellations define what
video and/or audio functionality is needed on what processing path. The greenMachine
titan has four 3G processing paths or one 12G processing path. When deploying a new
constellation, one can choose between constellation types for 3G or 12G 4K/UHD.
There are different processing categories that the functions belong to, which are color
coded to help you identify them:
- Audio I/O is yellow
- Sync is red
- Video Converter is turquoise
- Image Proc is blue
- Generate is green
- Switching is gray
- Monitoring is cadet blue
- Global is magenta
Constellations are pre-defined in the system and are always available, e.g.:
The Quad FS Constellation
- This turns your greenMachine titan into a quad channel frame with basic test
generator function and video processing, full audio processing including two Dolby
E decoders and MADI input and output as well as adjustable user delay.
The 4k UPXD Constellation
- This constellation provides a broadcast quality 4K/UHD up/down converter with
4x3G Quad Link (2SI) <> 12G Single Link conversion. It also includes powerful
scaling capabilities that allow a versatile Region of Interest selection with
adjustable user delay Additional functions include the possibility to convert
metadata information as well as video / audio processing and a 4K/UHD basic test
generator.
- More constellations are available, and we are constantly adding new
constellations, please check the LYNX homepage for more information:
www.lynx-technik.com

greenMachine®titan Reference Manual - Rev 2.0
© 2019 LYNXTechnik AG Page 12 of 57
Deployment
To give your greenMachine titan the functionality you defined in a constellation, you need
to deploy this constellation onto your device(s). You can deploy any pre-defined
constellation onto your greenMachine titan even if the constellation was not purchased.
You will be able to test this constellation with your own signals including all the parameters
available. As long as you haven’t been purchased the deployed constellation, you will get
watermarks on all the outputs of your greenMachine. The video watermark is shown
below.
Watermarked video output
The audio channels embedded in the output video as well as the external audio channels
will also be watermarked with a 1 kHz test tone every 20 seconds.

greenMachine®titan Reference Manual - Rev 2.0
© 2019 LYNXTechnik AG Page 13 of 57
greenUniverse
As soon as there are at least two greenMachines in the same network, they will form a
virtual cloud, which we refer to as “greenUniverse.” This cloud enables the greenMachines
to share and transfer information, such as your licensed Constellations or stored
images/patterns in the TESTOR constellation.
Image 1: the greenUniverse - greenMachine cloud with five greenMachines
When you purchase constellations, they are available for the entire greenUniverse.
Purchasing a constellation from LYNX means you have purchased one instance of the
constellation that can be used on any of your greenMachines at a given time. If you need
to use several instances of the constellation at the same time, you will need to purchase
additional constellations. If, on the other hand you want to use a constellation at several
different points in your greenUniverse and at different times, you will need only one
instance of a constellation.
A simple example of this is the TESTOR constellation. Although you may need to have a
generated test pattern at every output of all your greenMachines, it probably will not be
necessary at the same point in time. In this case, you can share one, or a few TESTOR
constellations throughout your Network, deploying it at will to the greenMachines needing
a generated output.
When you deploy a given Constellation to a greenMachine, the system will check if there
is an available instance in the greenUniverse. If so, this instance will be assigned to this
greenMachine. If not, you will get, as described above, watermarks on your outputs until
your purchase the required constellation.

greenMachine®titan Reference Manual - Rev 2.0
© 2019 LYNXTechnik AG Page 14 of 57
Control Panel Description
The front control panel allows the complete configuration of the module in addition to
detailed monitoring features of the input and output signals. The following chapters will
outline the control panel functions.
I/O Monitoring
The nine push buttons located on the left hand side of the control panel used with the local
display provide everything that is required for detailed input and/or output signal
monitoring.
Signals Button
Pressing the Signals button located on the bottom left of the control panel will show the
I/O Monitoring Signal Chooser to switch between Inputs and Outputs (see Detailed Signal
Information as well). The Signals button will be illuminated white to indicate that it is
selected.
The signal buttons (e.g. SDI 1, SDI 2, SDI 3, SDI 4, 12G Fiber, 3G Fiber HDMI, etc.) now
will be illuminated with colors according to the status of the selected signals (e.g. inputs).
Pressing the Signals button a second time will show the inputs and outputs overview page.
Signals - Monitoring of all Input and Output Signals
Signals - Chooser

greenMachine®titan Reference Manual - Rev 2.0
© 2019 LYNXTechnik AG Page 15 of 57
Pressing the Signals button a third time will show the left hand side of a signal flow
overview of the module including the status indication of the video and reference inputs
and outputs. Pressing the Signals button a fourth time will pan to the right hand side of
this flow diagram.
When either the left or right hand side of the diagram is shown in the display, the rotary
push encoder can be used to pan between the left and right side.
Pressing the Signals button when the display shows the right hand side of the diagram
page will switch back to the Signal Chooser.
Detailed Signal Information
To get detailed information for a specific input (or output) signal simply press the signal
button (e.g. SDI 1) when in Inputs (or Outputs) mode (selected with Signal Chooser). The
chosen signal button will be illuminated more brightly than the other ones to indicate that
it is selected.
Detailed Input Monitoring
Signals Display Navigation

greenMachine®titan Reference Manual - Rev 2.0
© 2019 LYNXTechnik AG Page 16 of 57
The detected input standard of the selected input will be shown at the top of the display.
The bottom of the display will list which internal video processor the signal is assigned to
(none, Video Proc 1 and/or 2 and/or 3 and/or 4).
Pressing the same signal button repeatedly will toggle between different pages with more
information. The following example will show the information pages for the SDI inputs.
1. Signal Status Overview
Depending on the type of input (i.e. electrical SDI or Fiber) this page will
show details about the input format, available audio, optical input budget or
similar.
2. Preview
The display will show a preview image of the selected input that is assigned
to one of the video processors. This feature is only available for the input
signal(s) assigned to one of the processors.
3. Audio Level Meters
The display will show audio level meters of the selected input that is assigned
to one of the video processors. This feature is only available for the input
signal(s) assigned to one of the processors.
4. Meta Data Information
The display will show the detected metadata information of the selected input
that is assigned to one of the video processors. This feature is only available
for the input signal(s) assigned to one of the processors.
Detailed Signal Information Pages

greenMachine®titan Reference Manual - Rev 2.0
© 2019 LYNXTechnik AG Page 17 of 57
Processing Configuration
The three buttons to the left of the display access the three processing configuration
menus in the panel.
Together with the rotary push encoder and the back button, these three configuration
menus are all that is required to configure the processing of the greenMachine titan.
Processing Configuration Menus
The processing configuration parameters are generally grouped to the Video Proc and the
Audio Bus menus according to their respective processing function. Settings that cannot
be logically associated to any of these categories can be found in the Misc menu.
Inside the three processing configuration menus, the parameters are ordered according
to the processing category they belong to. These processing categories are the same as
described in the Constellation chapter: Audio I/O, Sync, Video Convert, Image Proc,
Generate, Monitoring and Global, and are shown with the same color code. The picture
below shows the first level of the VideoProc1 menu with all processing categories. The
parameters controlling the Routers are grouped under the category I/O Config.
First Level of the VideoProc1 Menu - the Processing categories
Configuration Controls

greenMachine®titan Reference Manual - Rev 2.0
© 2019 LYNXTechnik AG Page 18 of 57
Inside the processing categories, the parameters are ordered according to their respective
APP. Therefore, you will find in the first two levels of the configuration a direct mapping of
the deployed constellation.Below picture shows the second menu (the functions)
contained in the Video Convert processing category of the Video Proc 1 Menu. Inthis case
three functions in that category were contained in the Constellation that was deployed on
that greenMachine: 3G Level A/B, MetaData and Scaler.
Second Level of the Video Convert Menu
The structure and usage of the configuration menus works as follows:
The areas on the left and right side of the display show the active menu items. Turning
the rotary push encoder will navigate between these different menu items. The inverted
menu item (i.e. dark gray with white text) is currently selected. It’s possible that there are
more than six menu items. In this case there will be more pages available. These are
indicated by the circles at the bottom of the center part of the menu. The pale gray circle
Active Menu Items

greenMachine®titan Reference Manual - Rev 2.0
© 2019 LYNXTechnik AG Page 19 of 57
indicates which page is currently selected. To change pages, simply continue turning the
rotary encoder beyond the last icon (next page) or the first icon (previous page).
There are two different shapes for the menu items. The square boxes are menus
containing at least one additional menu level. When selected,the middle partof the display
will show a preview of what settings and/or menus are available within this menu (see
below). Pressing the encoder will enter the selected menu. Pressing the Back button
below the encoder will return to the higher menu level.
The hexagon shaped items are parameters. When one of these menu items is selected,
the middle area of the display will show the type of parameter and the current setting (see
picture below).
To edit the parameter, press the encoder. When in edit mode, turn the encoder. To exit
the edit mode, press either the encoder or the Back button.
Image 2: Preview of Menu Content
Image 3: Parameter Preview

greenMachine®titan Reference Manual - Rev 2.0
© 2019 LYNXTechnik AG Page 20 of 57
System Settings
The System menu contains all setting and monitoring possibilities that are not directly
related to the processing.
Deploying Constellations with the local Control Panel
The front control panel allows the complete configuration of the module including the
deployment of new constellations.
Deployment of new constellations can be done in the System menu. To select the System
menu, just press the button next right to the display. Then select the General menu.
Note: The areas on the left and right side of the display show the active menu items. Turning the
rotary push encoder will navigate between these different menu items. The inverted menu item (i.e.
dark gray with white text) is currently selected.
There are two different shapes for the menu items. The square boxes are menus containing at least
one additional menu level. When selected, the middle part of the display will show a preview of
what settings and/or menus are available within this menu. Pressing the encoder will enter the
selected menu. Pressing the Back button below the encoder will return to the higher menu level.
Please select the constellation you would like to deploy form the parameter list in the
display and press the rotary button.
Note: The hexagon shaped items are parameters.
When one of these menu items is selected, the
middle area of the display will show the type of
parameter and the current setting.
To edit the parameter, press the encoder. When in
edit mode, turn the encoder. To exit the edit mode,
press either the encoder or the Back button.
Other manuals for greenMachine titan
1
Table of contents