Lynx LCS30 User manual

1
LCS30 COCKTAIL STATION CARE & USE/INSTALLATION
|
CARE & USE/INSTALLATION
MAKE THE MOST OF YOUR
LCS30 COCKTAIL STATION
LCS30 shown with pass shelf (LCSPS) which is available separately from Lynx Grills.


LCS30 COCKTAIL STATION CARE & USE/INSTALLATION
|3
Cutout Dimensions Exterior Dimensions
Cut-out Dimension
Specifications Width A Height B Depth C Width D Depth E Depth F
LCS30 29 10½ 22 31 251
/8221
/8
Counter top notch detail: a 1/2” width is required
with a depth equal to the counter top overhang.
EXTERIOR DIMENSIONS
INSTALLATION PREPARATION
The Lynx sinks are designed for outdoor use. It is recommended that the sink be installed by a qualied technician
in accordance with all local plumbing and building codes.
Prepare the counter top by cung the appropriate cutout dimensions from the table above. There must be a
minimum of a 1/2” overlap on the sides and rear of the sink on the counter top to support the sink. Adequate
clearances below the sink must be maintained for maintenance, water, and drain lines.
Exterior DimensionsCutout Dimensions
E
F
D
INSTALLER: Read these instructions carefully before starting installation. Please leave these instructions with
the homeowner.
HOMEOWNER: Please retain these instructions for future use

|LCS30 COCKTAIL STATION CARE & USE/INSTALLATION4
INSTALLING THE DRAIN ASSEMBLY
For ease of installaon we recommend that the drain assembly be installed before installing the sink into the counter
top.
1. Remove the drain assembly from the box and idenfy the following parts:
INSTALLING THE DRAIN ASSEMBLY
a. Drain Plug/Strainer Basket
b. Upper Drain Fing
c. Rubber Gasket
d. Paper Gasket
e. Locknut
f. Tailpiece
g. Threaded Coupling
Sink Boom
2. Remove the drain plug strainer basket (a) and separate the upper drain ng (b) from the remainder of the
drain assembly.
3. Place a bead of Plumbers Puy* around the underside lip of the upper drain ng. Drop the upper drain ng
(b) into the sink boom opening and press it rmly into place. From the boom of the sink posion the rubber
gasket (c) and then the paper gasket (d) on the upper drain ng (b). The paper gasket (d) is used to prevent
kinking of the rubber gasket (c) while ghtening the locknut (e).
4. Align the drain assembly so that it sits centered in the sink drain cut-out. Screw the locknut (e) on to the upper
drain ng (b) threaded connecon unl it is hand ght. Now use a tool to ghten the locknut (e) another
quarter turn.
5. Remove any excess Plumber Puy with a damp cloth.
* Plumbers Puy is available at most home improvement centers. Plumbers puy is an
easy-to-mold seng compound for use with stainless steel sealing applicaons. Do Not Omit This Step.
Sink Opening

LCS30 COCKTAIL STATION CARE & USE/INSTALLATION
|5
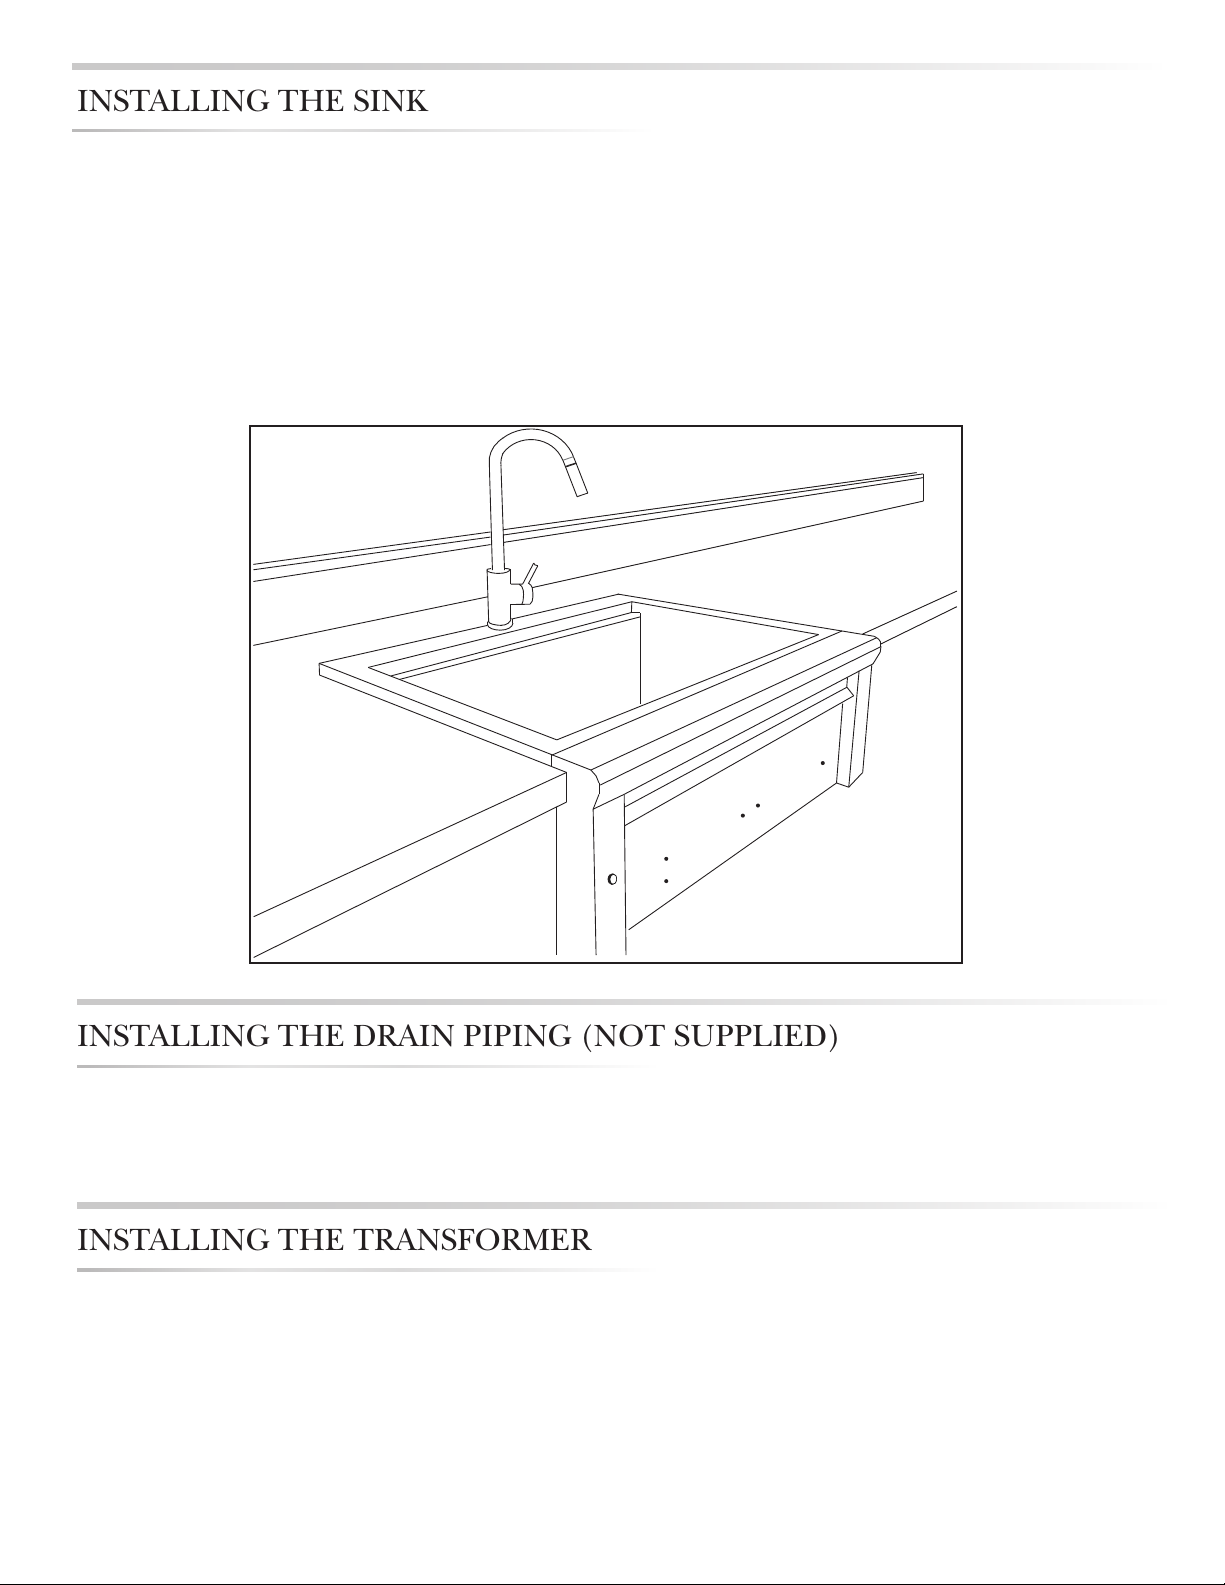
1. Install the faucet or the stainless steel plug (included) into the top faucet opening.
2. Carefully lower the sink into the cut out on the counter top. Push the sink back unl there are no gaps in the
back and the bullnose contacts the front face of the cabinet. The sink will be supported by its weight on the side
and back.
3. If desired a small bead of silicone sealant could be put around the edges of the sink to prevent water seepage
into the spaces below the sink.
Assemble all drain pipe connecons to the tailpiece and on through a pipe trap and proper drainage. The drain
must be installed in accordance with all local codes. In the absence of local codes, the requirements of the Uniform
Plumbing Code should be followed.
INSTALLING THE SINK
INSTALLING THE DRAIN PIPING (NOT SUPPLIED)
INSTALLING THE TRANSFORMER
The power supply transformer should be installed below the sink within the cabinet enclosure. Select a locaon
where the transformer is protected against water, heat and physical damage. It is recommended that fasteners are
used in at least two of the four mounng holes for secure aachment.
The power supply transformer must be plugged into a properly grounded GFI equipped outlet, installed by a
qualied technician. The outlet of the transformer is plugged into the white Molex connector at the rear of the sink.
Please see the electrical diagram provided in this manual.
Faucet installation
instructions available
in the faucet box.

|LCS30 COCKTAIL STATION CARE & USE/INSTALLATION6
INSTALLING THE LCS30 FRONT COMPONENTS
1. Located the supplied hardware bag with 3 stainless shoulder screws and 2 stainless philips head screws.
2. Install the two stainless steel shoulder screws into the right hand side inserts of the front panel.
3. Carefully lower the bole holder on the newly aached shoulder screws.
4. When installing the bole opener you will need to Install the third shoulder screw directly below the far le
insert. Aach the top of the bole holder when you install the towel bar, as they share the screw.
5. Connue to install the towel bar using the second stainless steel phillips head screw provided.
Stainless
Steel
Screws
Stainless Steel Shoulder Screws

LCS30 COCKTAIL STATION CARE & USE/INSTALLATION
|7
INSTALLING THE LCS30 COMPONENTS
1. Set the bole cup holder into the sink opening. The sink has a recessed opening in which the support rests.
2. Lower the bole wells into each opening of the well support.
3. Insert the ice sink into the sink opening, resng on the recessed opening.
4. In this order, drop in the slide support, the strainer basket and the slide cover into the sink opening. You will
need to hook the back fold of the slide cover onto the ared back end of the slide support.
Flared
back end
of slide
support
Ice Sink
Slide Cover
Strainer
Basket

|LCS30 COCKTAIL STATION CARE & USE/INSTALLATION8
ASSEMBLING THE LCS30 PASS SHELF (OPTIONAL)
1. Aach the support legs to the pass shelf top with the four shorter provided stainless steel screws.
2. Feed the light harness through the far le rear opening.
3. Carefully match up all four support legs with their corresponding openings in the pass shelf base.
4. Using the four longer provided stainless steel screws, secure the base to the pass shelf support legs. There are
metal inserts with threaded openings within the support legs to ax the screw to.
5. Hook the condiment tray onto the top le rail of the pass shelf top.

LCS30 COCKTAIL STATION CARE & USE/INSTALLATION
|9
INSTALLING THE LCS30 PASS SHELF (OPTIONAL)
DETAIL F
SCALE 1 : 5
F
FREESTANDING ASSEMBLY
1. Remove the rear panel of the cart, and the two brackets (shown in detail F) holding in the rear ller plate.
2. With the panel removed, pull o the stainless steel rear ller.
3. Unscrew the large nut holding the faucet in place, and remove the faucet.
4. Set the pass shelf on top of the sink, carefully matching the opening of the sink with the opening of the pass
shelf base.
5. Once all hoses have been fed through the holes assemble the faucet per the original instrucons (included).
6. Connect the molex connector from the light harness to the wiring harness from the sink.
7. Re-aach the rear panel.
Transformer
Connection Sink Wire Harness
LCS30 Pass Shelf
Light Connection

|LCS30 COCKTAIL STATION CARE & USE/INSTALLATION10
INSTALLING THE LCS30 PASS SHELF (OPTIONAL)
BUILT IN ASSEMBLY
1. Access the faucet underneath the sink, and unscrew the large nut holding the faucet in place, and remove the
faucet.
2. You will need to drill a 1” round hole in the back le corner to accommodate for the wiring harness to drop
down to aach to the wiring harness of the sink
3. Set the pass shelf on top of the sink, carefully matching the opening of the sink with the opening of the pass
shelf base.
4. Once all hoses have been feed through the holes assemble the faucet per the original instrucons.
5. Connect the molex connector from the light harness to the wiring harness from the sink.

LCS30 COCKTAIL STATION CARE & USE/INSTALLATION
|11
CONTACTING LYNX CUSTOMER CARE
Before calling Lynx Customer Care, please make sure you
have the following information:
• Model number
• Date of purchase
• Proof of purchase by the original owner
• Serial number
The serial number can be located on the rating plate which
is located on interior of the front panel.
For warranty service, contact the Lynx Customer Care
Department for an authorized service agent near you at:
(888) 289-5969
www.lynxgrills.com
Your satisfaction is of the utmost importance to us. If a
problem cannot be resolved to your satisfaction, please
write, fax or email us:
Lynx Professional Grills
7300 Flores Street
Downey, CA 90242
Service: (888) 289-5969
Tel: (562) 299-6900
Fax: (562) 299-6978
www.lynxgrills.com
Contact Lynx for replacement parts. Parts are shipped
F.O.B. Downey, CA.
THE LYNX STORY
Lynx began with a vision.
A small group of manufacturing engineers with over a
century of collective experience had a dream. They dared
to take their extensive commercial manufacturing know-how
and create a line of outdoor cooking products that offer
commercial elegance and performance to the consumer
market.
Lynx has taken the
quality, workmanship,
service and
innovation of the
commercial market and
incorporated it into the
Lynx Professional Grills
line of consumer and
commercial products.
The combination of
creative design, superior
materials and exceptional
craftsmanship elevates
Lynx products to a class
of their own.
Lynx original commercial products are used every day in
restaurants, hotels and theme parks across the USA:
LYNX SATISFIED CUSTOMERS
• TGI Fridays
• Applebee’s
• Houston’s
• Red Lobster
• Hard Rock Café
• Wolfgang Puck’s
• Cheesecake Factory
• Red Robin
• Planet Hollywood
• Hilton
• Hyatt
• Four Seasons Marriott
Le Meridian
• Sheraton
• Conrad International
• Bellagio
• New York New York
• MGM Grand
• Treasure Island
• Mirage
• Paris
• Venetian
• Excalibur
• Mandalay Bay
• Riviera
• Desert Inn
• Hard Rock Hotel
• Disney World

|LCS30 COCKTAIL STATION CARE & USE/INSTALLATION12
*For optional pass shelf*
Replacement bulbs are halogen, 12 volt, 10W max, T3 type
with a G4 bi-pin, and are readily available at most stores.
The glass cover is held in place by two spring tension tabs.
The bulbs are easily removable without
the use of tools. Simply grasp the glass
lens at the outer corners, near the front
tension clips and push the lens back.
Then, swing the lens down and pull it
loose. You may have to loosen the screw to remove the
lens.
Avoid touching the glass of a new bulb. Halogen bulbs are
very sensitive to the oils found in human skin. Touching the
bulbs may shorten their life.
Pull the bulb straight out from the socket without twisting.
Hold the bulb using a paper towel or other cloth and gently
press it straight into the socket. The glass cover should be
gently snapped back into place.
STAINLESS STEEL
Lynx products are known for their attractive appearance.
We achieve this by selecting only the finest grades of
stainless steel and applying exacting workmanship.
In order to maintain this attractive appearance over the life
of the grill it is important to take the following steps:
• Use a commercially available Stainless Steel cleaner* to
clean and polish the exterior surfaces.
Doing these things on a regular basis minimizes the amount
of effort required.
Part of the appeal of your Lynx Accesory is the fine grain
finish. When removing stubborn stains:
• Do not use metallic abrasives and always rub in the
direction of the grain.
• Some household cleaning products are not suitable for
stainless steel; be sure to read the label before using on
your Lynx Accesory.
• Always use the mildest cleaning solution first, scrubbing
in the direction of the grain. Specks of grease may gather
in the grain of the stainless steel and bake on to the
surface, giving the appearance of rust.
To remove these baked-on foods use a fine to medium
grit non-metallic abrasive pad (Scotch Brite is good) in
conjunction with a stainless steel cleaner.
• Solutions used for cleaning concrete and masonry
can be very corrosive and will ‘attack’ stainless steel.
Ensure your Lynx products are well protected before
you allow the use of such chemicals.
SPECIAL NOTE FOR LOCATIONS NEAR POOLS AND
COASTAL AREAS:
The 304 stainless steel material used in the construction of
a Lynx Grill is highly rust resistant, however, chlorine in the
air from swimming pools or the salt from sea air may cause
surface rust to appear and even create some pitting if left
on the product.
Here are a few tips to avoid this:
• Regularly wipe down the exterior surfaces with a damp
cloth. (Micro fiber cloths such as Ecloth perform very
well).
• Allow the surfaces to dry before installing the cover. Do
not cover a damp sink.
• In extreme environments apply a rust inhibitor which
leaves a microscopic protective layer on the stainless.
Products that provide a layer of vapor corrosion inhibitors
(VpCI™) protect the surface very well.
• For seasonal storage use the product referred to above,
ensure the sink is dry and then cover and secure the
cover to minimize the amount of damp air getting to the
surfaces.
THE LYNX LIMITED LIFE TIME WARRANTY PROVIDES
PROTECTION AGAINST RUST THROUGH OF PARTS THAT
RENDER THE PRODUCT INOPERATIVE. IT DOES NOT
COVER OCCASIONAL SURFACE RUST OR STAINING DUE
TO ENVIRONMENTAL CONDITIONS.
For light and heavy food stains there are many different
stainless steel cleaners available.
LCS30 CARE

LCS30 COCKTAIL STATION CARE & USE/INSTALLATION
|13
EXPLODED VIEW/PARTS
1
2
3
4
5
6
7
9
8
10
11
12
14
15
16
13
17
17
18
8
COVER IS PART OF
ITEM #1 AND ISTALLS
ON TOP OF THE ASSEMBLY
ITEM
PART NO.
DESCRIPTION
Defa
ult/Q
TY.
1 81103
SINK ASSEMBLY, 30
1
2 36080
CUP HOLDER
1
3 11004
BOTTLE WELL
3
4 36081
ICE SINK
1
5 35754
BOTTLE AND SPICE, LARGE
1
6 35751
TOWEL BAR, SHORT
1
7
L10003
BOTTLE OPENER
1
83 2222
SCREW, SHLDR, #10-32 X 1/4, SLTD, SS, 1/4 DIA X 1/8
3
9 70547
CAP CUP
1
10
LPFK
FAUCET, GOOSE NECK PULL-DOWN
1
11 32767
SCREW, #10-32 X 3/8, THP, SS
2
12 36084
SLIDE FRAME
1
13 36082
BASKET, STRAINER
1
14 36085
SLIDE BACK
1
15 36086
SLIDE FRONT
1
16 31379
HANDLE, 4" STAINLESS
1
17 36101
DART, NYLON
3
18 36072
SCREW, #10-24 X 1/2, THP, SS
2

|LCS30 COCKTAIL STATION CARE & USE/INSTALLATION14
EXPLODED VIEW/PARTS
ITEM
PARTNO.
DESCRIPTION QTY.
1 70552
PASS SHELF BASE
1
2 70553
PASS SHELF TOP WELDMENT
1
3 70550
SUPPORT LEG P. SHELF WELDMENT
2
4 36094
TRAY, CONDIMENT
1
5 11114
TRAY, CONDIMENT CS30
4
6 35139
RETAINER, 1/4-20 THREADED
3
7 14043
SCREW, 1/4-20 X 1, FHP, SS
3
8 80353
LIGHT ASSY CSPS 2008
1
9 14014
SCREW, #8-32 X 3/8, THP, SS
4
2
9
4X
3
2X
1
7
3X
3X
5
4X
4
6
8
Optional Pass Shelf

LCS30 COCKTAIL STATION CARE & USE/INSTALLATION
|15
SCHEMATICS
Light Switch
LCS30

|LCS30 COCKTAIL STATION CARE & USE/INSTALLATION16
PRODUCT DIMENSIONS/CUT OUT DIMENSIONS (IN BLUE)

LCS30 COCKTAIL STATION CARE & USE/INSTALLATION
|17
LYNX LIMITED WARRANTY
I. Limited Lifeme Warranty
The stainless steel housing is warranted to be free from defects in material and workmanship when subjected to normal domesc
use and service for the lifeme of the original purchaser. This warranty excludes surface corrosion, scratches, and discoloraon which
may occur during regular use. This warranty is limited to the replacement of the defecve parts, with the owner paying all other cost
including labor.
II. Limited ONE-Year Warranty
All other components are warranted to be free from defects in material and workmanship for a period of one year from the original
date of purchase. Lynx will replace or repair parts found to be defecve at no cost to the original purchaser.
III. Limitaons & Exclusions
1. This Warranty shall apply to products purchased and located in the United States and Canada. Products must be purchased in the
country where service is requested.
2. Warranty applies only to the original purchaser and may not be transferred.
3. Warranty is in lieu of all other warranes expressed or implied and all other obligaons or liabilies related to the sale or use of
its products.
4. Warranty shall not apply and Lynx is not responsible for damage resulng from misuse, abuse, alteraon of or tampering with the
appliance, accident, hosle environment, improper installaon, or installaon not in accordance with the instrucons contained
in this manual, or the local codes.
5. Lynx shall not be liable for incidental, consequenal, special or conngent damages resulng from its breach of this wrien
warranty or any implied warranty.
6. Some states do not allow limitaons on how long an implied warranty lasts, or the exclusions of or limitaons on consequenal
damages. This warranty gives you specic legal rights and you may have other rights which vary from state to state.
7. No one has the authority to add to or vary Lynx’s warranty, or to create for Lynx any other obligaon or liability in connecon with
the sale or use of its products.
8. Limited to the replacement of defecve parts with the owner paying all other costs including labor.
IV. What is not covered: Lynx shall not be responsible for and shall not pay for the following
1. Damages or problems caused by improper installaon or use;
2. Service by an unauthorized service provider;
3. Damage or repair due to service by an unauthorized service provider or use of unauthorized parts;
4. Warranty does not apply to products installed in any commercial or non-residenal applicaon. Examples of excluded applicaons
include, but are not limited to day care centers, schools, bed and breakfast centers, churches, private clubs, re staons, club
houses, common areas in mul-family dwellings, restaurants, hotels, nursing homes, food service locaons and instuonal food
service locaons.
5. To correct normal adjustments or sengs, due to improper installaon, commissioning or local supply properes;
6. Shipping and handling costs, export dues, installaon, removal, or re-installaon cost.
7. Display models are generally sold “as is.” If you have purchased a display model, please be advised that it is sold “as is” and that
it is subject to the following warranty exclusions: any exterior or cosmec damage is non warrantable; any missing components
will be re-placed at consumers expense; major handling damage will be serviced at consumer’s expense; all other warranty’s
(standard warranty) will remain in eect.
8. The cost of a service call to diagnose trouble.


The best outdoor kitchen products come from:
Lynx Grills, Inc. 7300 Flores Street Downey, CA 90242
Service: (888)-289-5969 Fax: (562) 299-6789
www.lynxgrills.com
P/N 36110 Rev.A 2/2017
Table of contents
Other Lynx Kitchen Appliance manuals