5. Run the Landscape Wire
5. Installation du câble de jardin
* llustration of xtures is for example only.
*
L’illustration des luminaires est à titre d’exemple seulement.
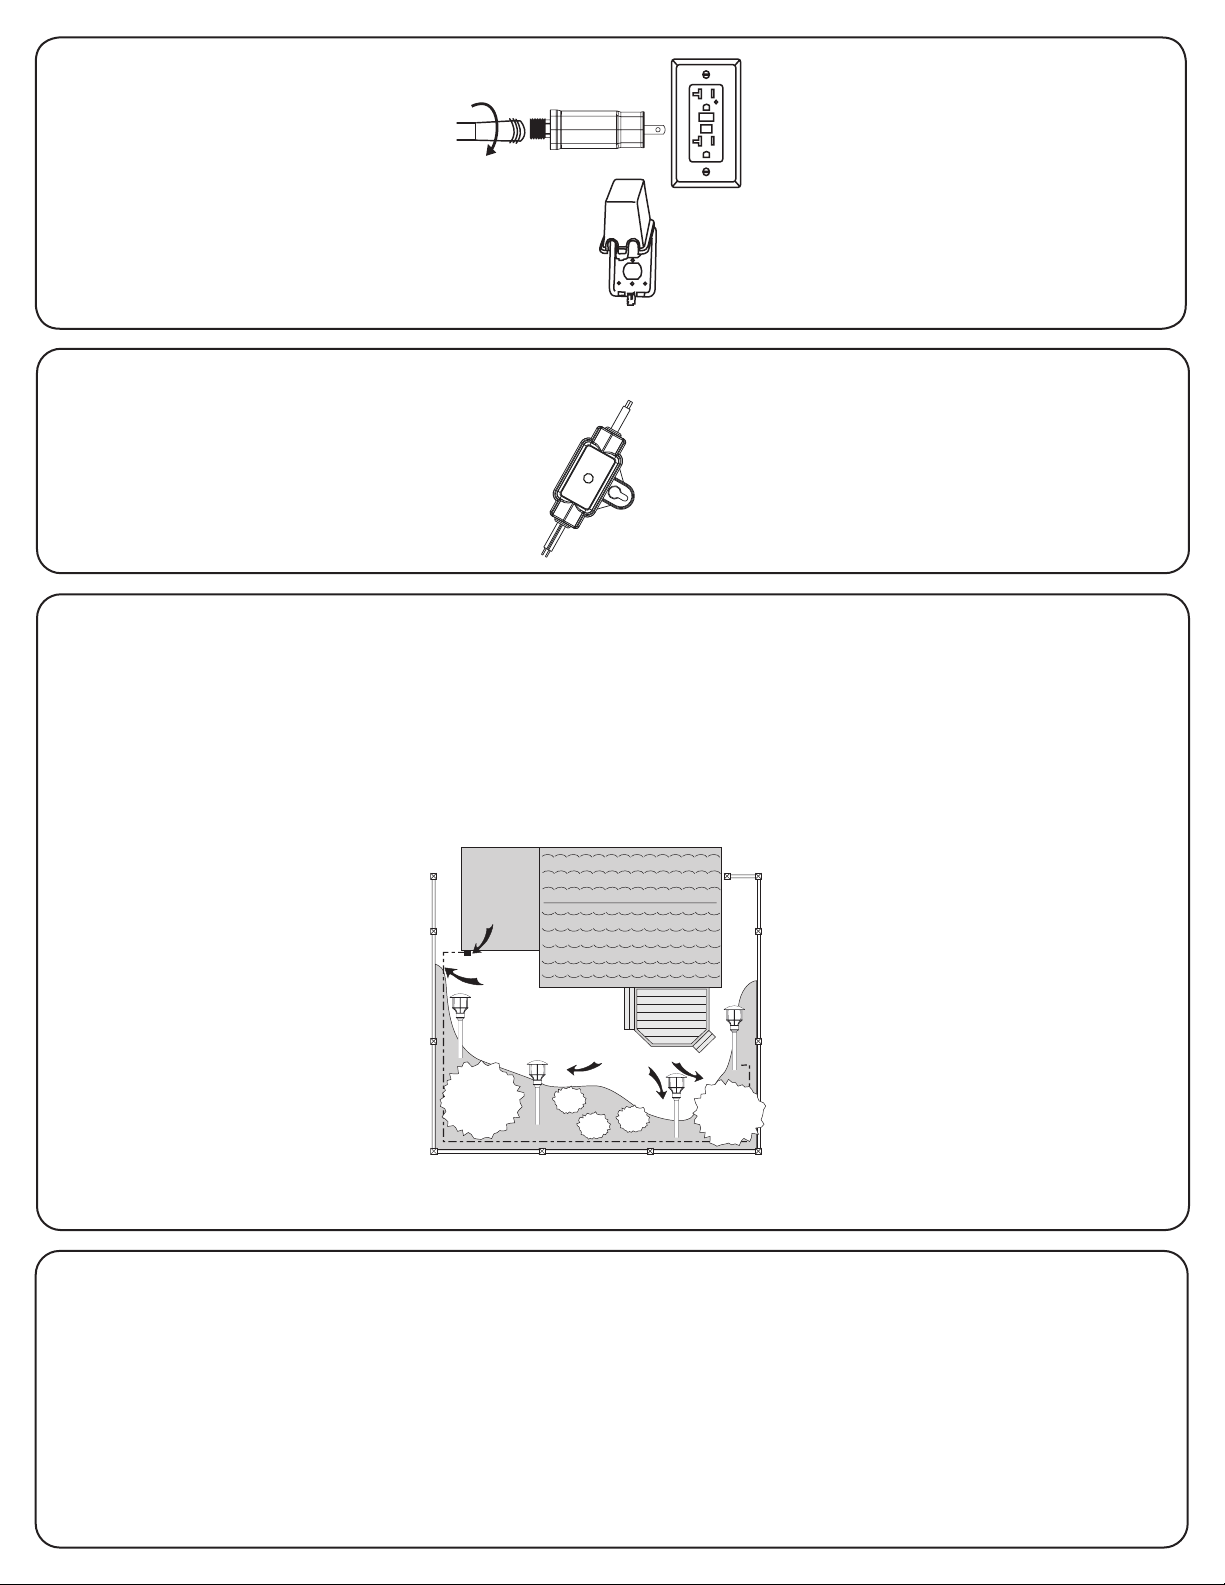
The landscape wire should run from the transformer
to each light without being cut. Do not run the
landscape wire within 10 feet (3.05m) of a pool, spa
or fountain. If the landscape wire is too long, cut it
with a cable cutter.
The landscape wire should be protected by routing it
close to proximity of the light fixture or next to a
building, deck or fence. Use cable suitable for low
voltage landscape lighting.
Le câble pour jardin doit aller du transformateur à chaque
luminaire sans être coupé. Ne pas faire passer
le câble à moins de 3.05 mètres (10pi) d’une piscine,
d’une cuve thermale ou d’une fontaine. Si le câble pour
jardin est trop long, coupez-le avec une pince coupe-câble.
Il faut protéger le câble pour jardin en le faisant passer
près du luminaire ou de l’édifice, de la terrasse ou de la
clôture.
Bloc d’alimentation
Transformer
Cable
Câble
Fixtures
Pathlights
4. Mount the photosensor
4
. I
nstallation du détecteur de lumière
Mount the photosensor with the included screw on a wall within
1foot (30.5cm) of the electrical outlet where the transformer will
be connected.
* Alternate photosensor installation: If there is no area within 1 foot
(30.5cm) of the transformer to install the photosensor, it is possible to
install the extension wire directly to the transformer and to install the
photosensor between the extension wire and the first light.
Fixer le détecteur de lumière au mur à l’aide de la vis incluse à une
distance maximale de 30.5cm (1 pied) d’où seront installés le
transformateur et la prise de courant.
* Installation alternative du détecteur de lumière : S’il n’y a aucun endroit à
moins de 30.5cm (1 pied) du transformateur pour installer le détecteur de
lumière, il est possible de brancher la rallonge directement au transformateur
et de brancher le détecteur à la fin de la rallonge, avant la première lumière.
3.
Connect the Transformer and the Wire
3.
Branchez le bloc d’alimentation et le câble
Note: Prior to installing and powering the transformer,
a safety approved GFCI receptacle (fig. 1) and GFCI
watertight protective cover (fig. 2)– not supplied must
be installed by a qualified electrician. GFCI receptacle
and cover must be mounted a minimum of 12 inches
(0.3 m) above ground level.
Transformer must me mounted at least 1
foot (0.3m) above ground level.
3.1 Connect the wire to the power pack.
3.2 Screw the watertight connector by turning clockwise.
3.3 Plug the power pack into the GFCI receptacle.
Remarque: Avant d’installer et d’alimenter le bloc
d’alimentation, un réceptacle approuvé GFCI (fig. 1) et un
couvercle de protection étanche GFCI (fig. 2) - (non fourni)
doivent être installés par un électricien qualifié. Le réceptacle
et le couvercle GFCI doivent être installés à un minimum
de 12 pouces (0,3 m) au-dessus du niveau du sol. Le bloc
d’alimentation doit être installé à 12 pouces (0,3 m) au-
dessus du niveau du sol.
3.1 Reliez le fil au bloc d’alimentation.
3.2 Vissez le connecteur étanche en tournant dans
le sens horaire.
3.3 Branchez le bloc d’alimentation dans la prise GFCI.
6. Choosing Lighting Fixture Location
6
.
Choisir l’emplacement du luminaire
For uniform brightness and longer fixture life,
attach first fixture at least 10 feet from transformer.
Once you have decided where you will install your fixtures,
verify the type of soil.
• If the soil is of a loose, sandy or organic type, grasp the fixture
post, close to the spike, with both hands and firmly push into
the ground.
• If the soil is heavy or stony, dig a small hole, insert the fixture
spike, replace the soil and tap down.
Never push the fixture into the ground by the fixture head.
Pour un éclairage uniforme et pour allonger la vie de la fixture,
installer le premier luminaire à au moins 3 mètres du transformateur.
Une fois l’emplacement des luminaires déterminé, examiner la nature
du sol.
• Si le sol est meuble, sablonneux ou organique, prendre le pied
du luminaire près du piquet à deux mains et l’enfoncer fermement
dans la terre.
• Si le sol est lourd ou pierreux, creuser un petit trou, insérer le
piquet du luminaire, remplir le trou avec la terre et bien tasser.
Ne jamais enfoncer le luminaire dans la terre en le tenant par la tête.